

山大王 @ 花果山
前言
hi 各位大兄弟好,最近前端圈最热门的事,就是5.22的vueconf了,看了下议题都很有意思,考虑到很多同学对vue3还不是那么熟悉,我给几个议题写一个预习资料吧,帮助大家在22号当天收获更大
我掏腰包大家报销三张vueconf的线上票
微信搜索并关注花果山前端, 回复vueconf即可参与 直接给你红包
我定了个大屏幕,22号当天一起围观,欢迎在线一起讨论学习

议题
- 09:30 Vue生态进展 @尤雨溪
- 10:30 Vite介绍 @underfin
- 11:20 Vue3 compiler优化 @HcySunYang
- 12:05 干饭吃火锅
- 13:30 构建工具优化代码 @蒋豪群
- 14:15 Vue3的jsx @Amour1688 jsx-next
- 15:00 Vue Composition @Anthony Fu vueuse
- 15:45 Vue flutter @染陌 北海Kraken
- 16:30 Vue3多端应用 @崔红保 uni-app
- 17:20 Vue Composiiton中封装库 @Jonathan chakra-ui-vue
- 18:10 结束干饭
依次介绍下以上议题的预备知识吧,先把vue3官网撸一遍
Vue3 生态进展和计划
这个没啥预习的,结合上一次小右直播介绍vue3和vueconf us的内容,盲猜同步vue生态系统的研发进度
个人感觉现在已经很成熟了,可以尝试线上搞起了
大家最近多体验体验把,这个没啥预习的,到时候好好听就可以,很期待听一下Vue3之后下一步的计划
* Vue3近况
* Vuex 4
* Vue-router 4
* Nuxt
* 组件库
* IDE 插件 Volar啥的
* Vite2
* Vue2迁移指南
* Vue2.7
* 展望美好的未来
Vite,下一代Web工具
分享内容主要是现有Web开发的痛点以及Vite的解决方案。
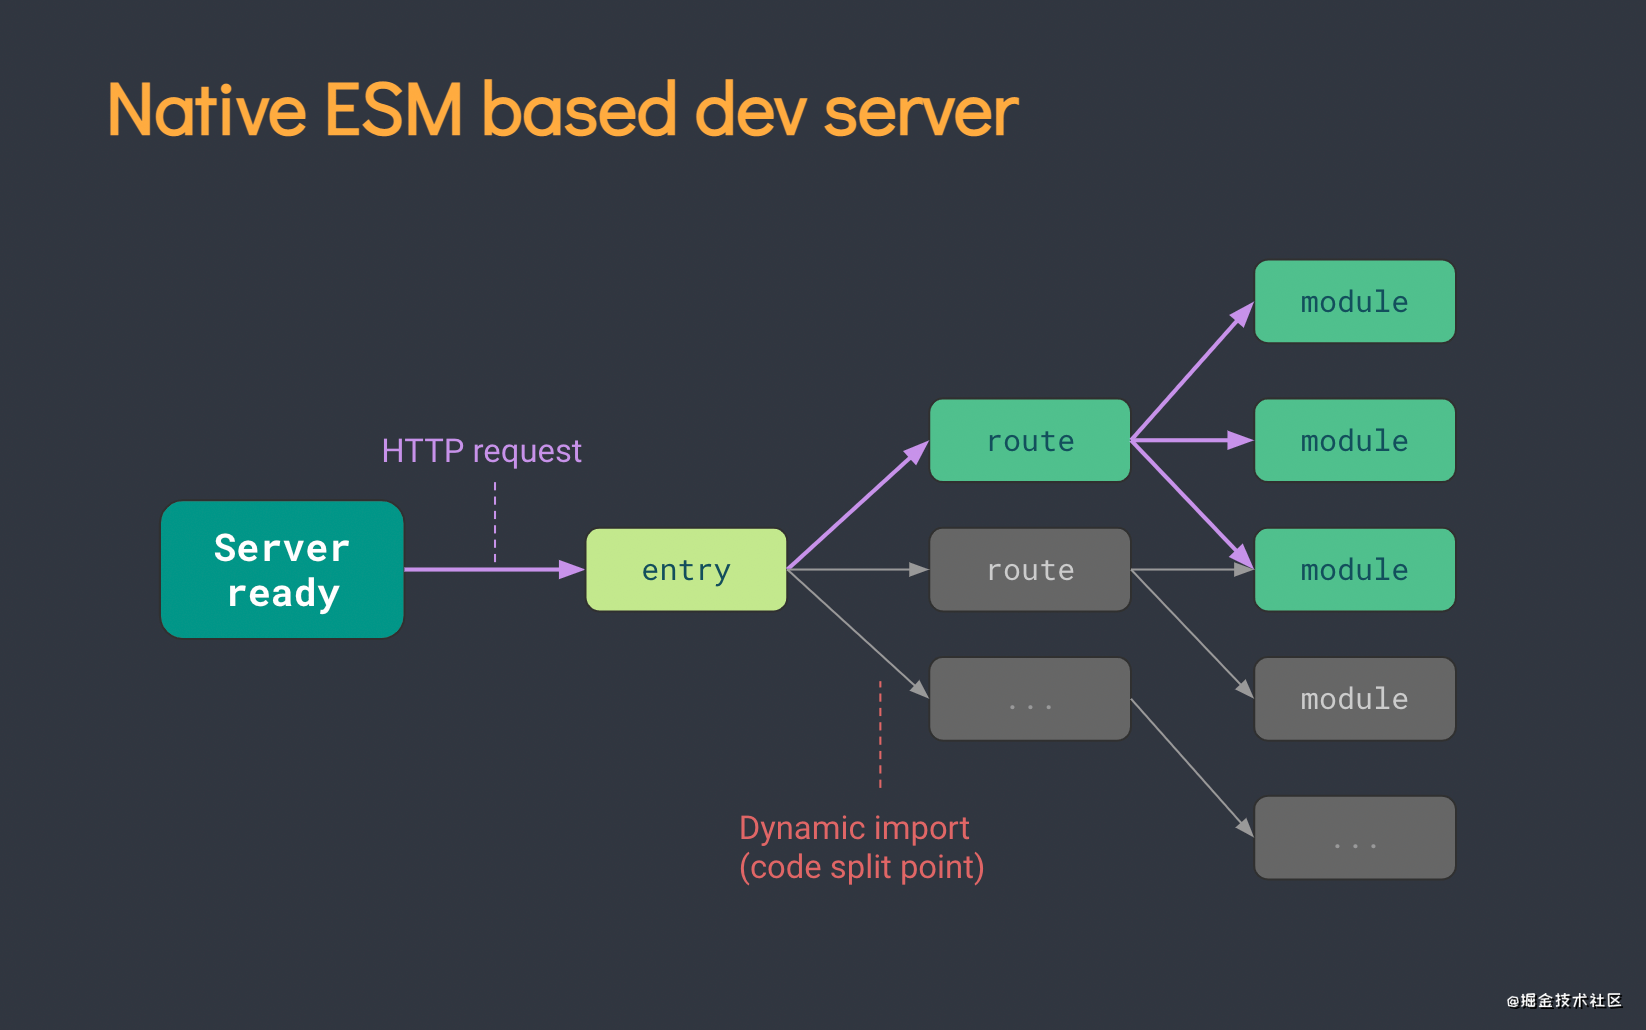
Vite最近的热度一直不减,确实解决了开发者的痛点,那就是webpack太慢了,大家可以看下这个图
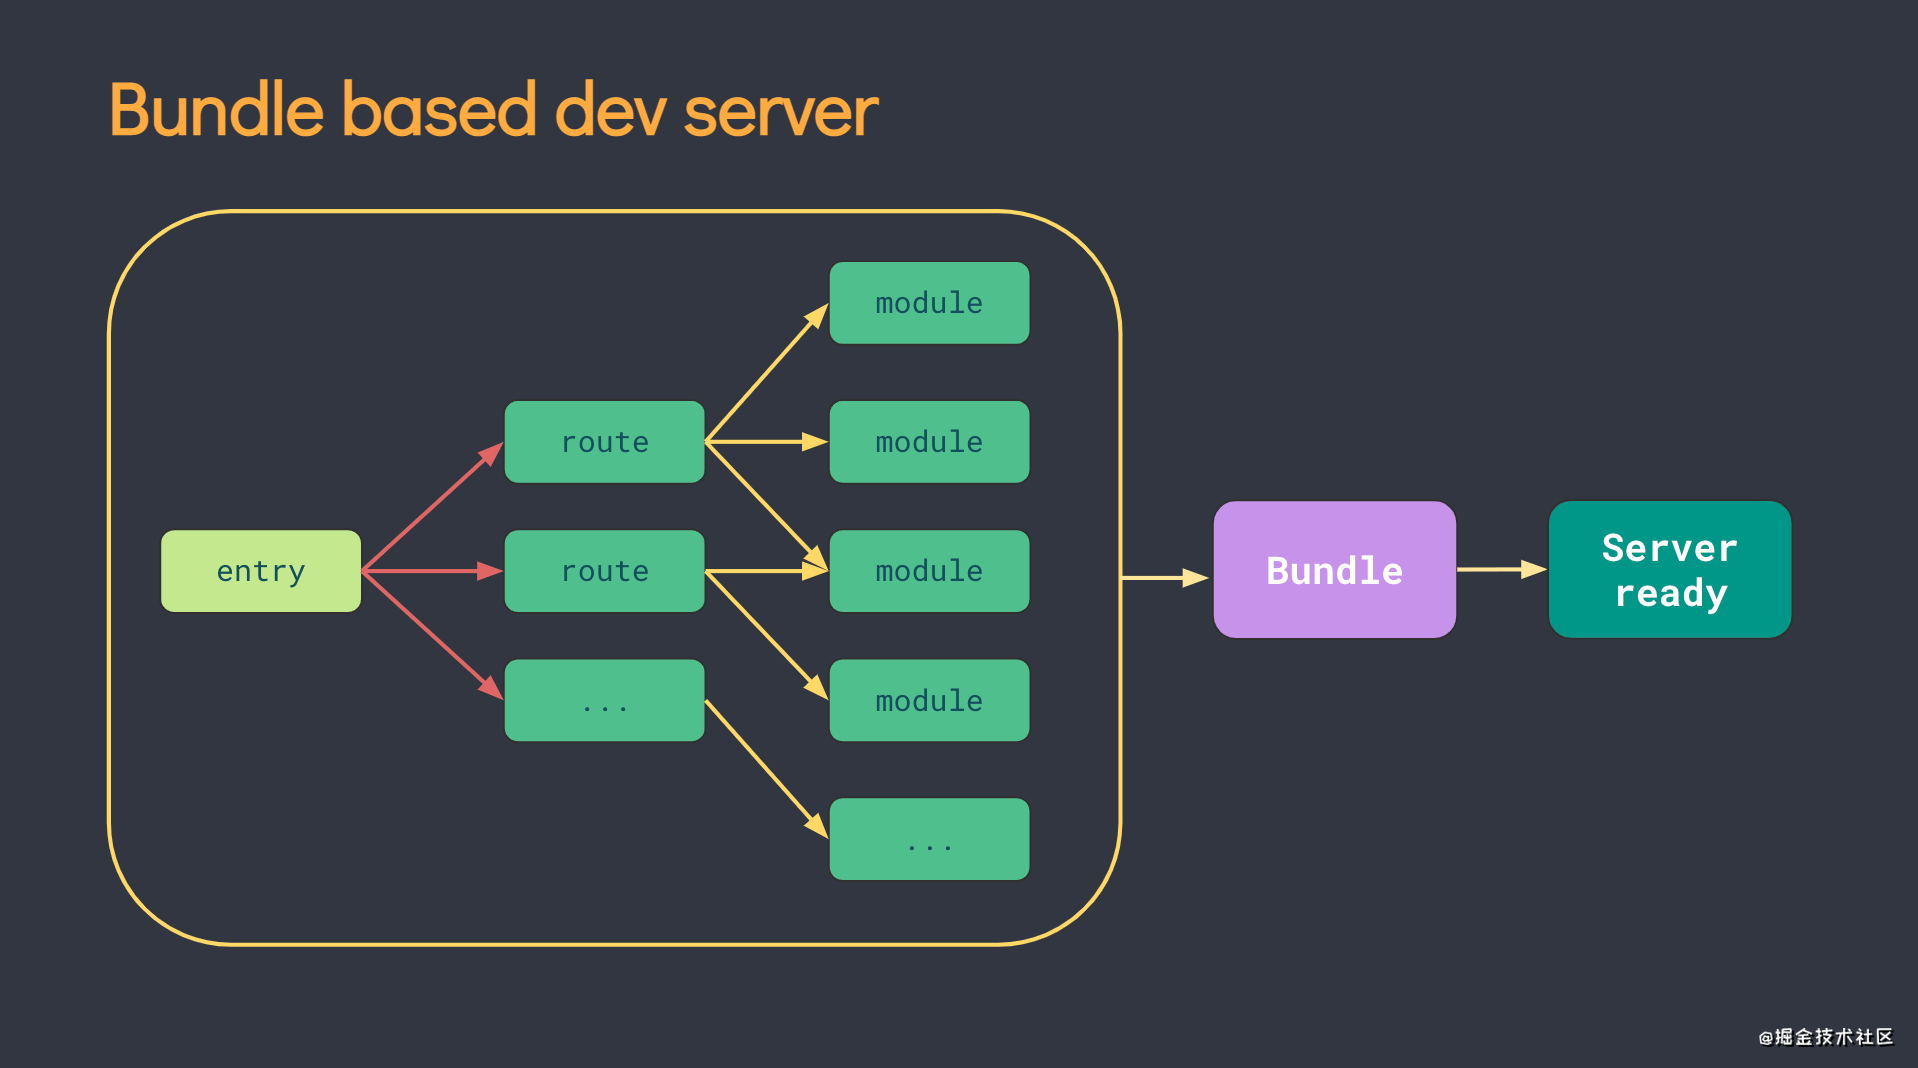
webpack每次启动项目,都需要预打包,打包一个bundle后,才能启动dev server,这也是每次npm run dev都需要三分钟的原因,vite利用浏览器自带的import功能,避开了这一步
大概就是浏览器里标记了script module后,写的import语法,会发送一个http请求获取资源,调试的时候就无须打包,让开发环境变得丝般润滑
这只是简单的原理,为了真正达到可用状态,vite还做了很多额外的努力
* node_modules路径解析
* 插件机制 支持vue & react & svelte等框架
* 热更新 hmr
* 引入esbuild转译js, 速度贼快
* 预打包优化 node_modules/.vite
* 支持ssr
* 。。。。
Vite已经和vue解耦,逐渐成为新型框架首选的工程化工具 ,关于原理大家可以看下我之前写的文章,vite2已经重构了,后续再更新热更新和预优化的内容,期待vite下一步的动作
大家最近能跟着官网好好熟悉一下vite,带着问题去听,收获会更大
前端新工具–vite从入门到实战(一)
Vue3 在编译优化方面做的努力
相信很多同学或多或少的都了解过 vue3 在编译方面配合运行时做了很多性能优化方面的努力,本次分享的主题将会详细探讨实现优化的思路、问题以及应对方法,和对模板能力的探索。
Vue3我最喜欢的两个点就是composition和compiler优化,composition解决了代码组织混乱的问题,compiler在我们无感知的情况加,真正做到了按需更新
compiler的概念建议大家先去看the-super-tiny-compiler,了解一下编译原理的基本概念,paser,ast,transformer,generate是啥意思
所以编译优化,就是代码在打包上线之前进行的优化,vue中把template转化成render函数,期间的源码大家去vue-next里搜baseCompile
export function baseCompile(
  template: string | RootNode,
  options: CompilerOptions = {}
): CodegenResult {
  const prefixIdentifiers =
    !__BROWSER__ && (options.prefixIdentifiers === true )

  const ast = isString(template) ? baseParse(template, options) : template
  transform(
    ast,
    extend({}, options, {
        ...
    })
  )
  return generate(
    ast,
    extend({}, options, {
      prefixIdentifiers
    })
  )
}
简化一下就是
const ast = baseParse(template) // 把template解析成ast 也就是一棵树
transform(ast,option)           // 优化,比如标记和转化vue的特定语法
return genrate(ast)             // 生成的render 函数
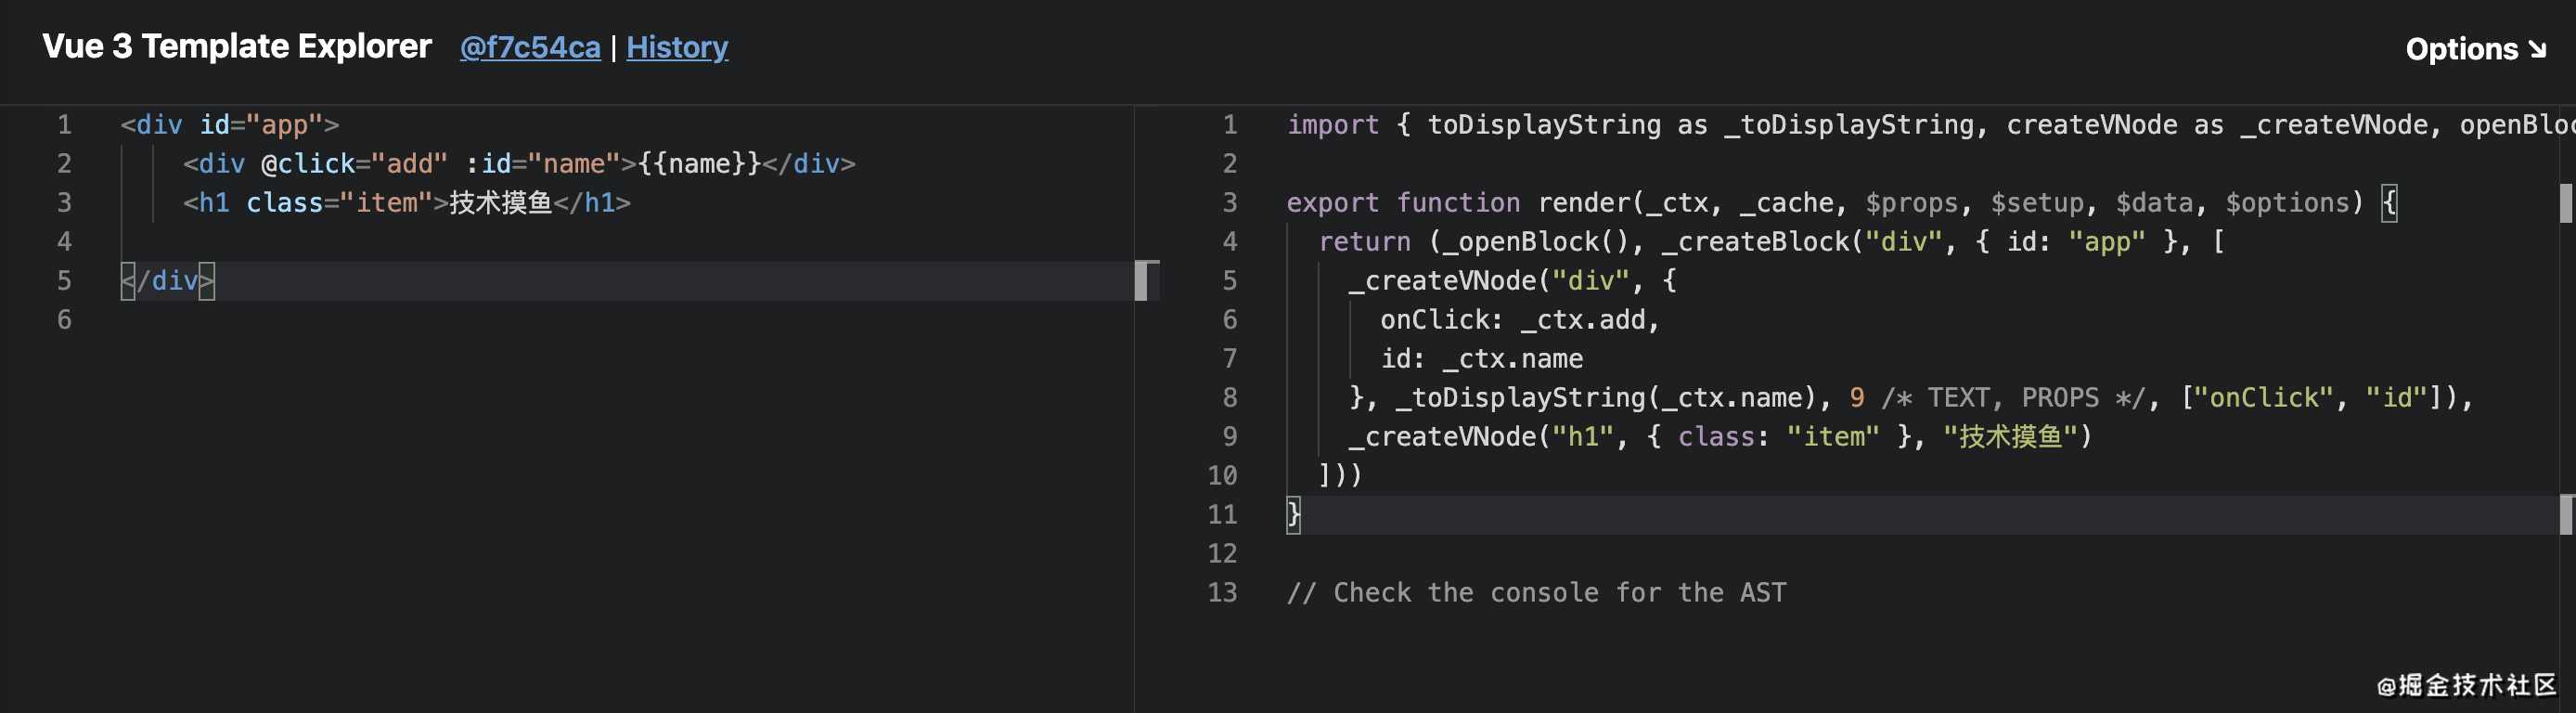
大家可以在线体验一下Vue compiler的实时结果
我们在上线前,把动态的内容都打好标记,在浏览器执行的时候,就可以略过很多操作
比如上面这个图里,h1是纯静态,不会发生任何变化,div的id和textContent是动态的,可能修改,传递进来的函数,也加了缓存 贼棒
我们尝试自己实现一个mini的大家体验一下 ,实际的实现代价可以去看vue-next,新手读起来略显难度,而且正则也需要理解
我的代码比较挫,字符串挨个遍历,算是一个非常der的实现,最搓就叫the-der-tiny-compiler吧,欢迎大家去star
我们尝试模拟一下,写一个非常der的实现,辅助大家理解
用上面这个输入
function compiler(template) {
  const ast = parse(template);
  transform(ast)
  const code = generate(ast)
  return new Function(code);
}

let tmpl = `<div id="app">
      <p @click="add" :id="name">{{name}}</p>
      <h1 class="item">技术摸鱼</h1>
  </div>`


let render = compiler(tmpl)
tokens
先写把字符串拆成tokens
function tokenizer(input) {
  let tokens = []
  let type = ''
  let val = ''
  // 粗暴循环
  for (let i = 0; i < input.length; i++) {
    let ch = input[i]
    if (ch === '<') {
      push()
      if (input[i + 1] === '/') {
        type = 'tagend'
      } else {
        type = 'tagstart'
      }
    } if (ch === '>') {
      push()
      type = "text"
      continue
    } else if (/[\s]/.test(ch)) { // 碰见空格夹断一下
      push()
      type = 'props'
      continue
    }
    val += ch
  }
  return tokens
我们把得到了这个
[
  { type: 'tagstart', val: 'div' },
  { type: 'props', val: 'id="app"' },
  { type: 'tagstart', val: 'p' },
  { type: 'props', val: '@click="add"' },
  { type: 'props', val: ':id="name"' },
  { type: 'text', val: '{{name}}' },
  { type: 'tagend', val: 'p' },
  { type: 'tagstart', val: 'h1' },
  { type: 'props', val: 'class="item"' },
  { type: 'text', val: '技术摸鱼' },
  { type: 'tagend', val: 'h1' },
  { type: 'tagend', val: 'div' }
]
parse
然后搞出来ast 就是遍历生成一棵树
function parse(template) {
  const tokens = tokenizer(template)
  let cur = 0
  let ast = {
    type: 'root',
    props:[],
    children: []
  }
  while (cur < tokens.length) {
    ast.children.push(walk())
  }
  return ast

  function walk() {
    let token = tokens[cur]
    if (token.type == 'tagstart') {
      let node = {
        type: 'element',
        tag: token.val,
        props: [],
        children: []
      }
      token = tokens[++cur]
      while (token.type !== 'tagend') {
        if (token.type == 'props') {
          node.props.push(walk())
        } else {
          node.children.push(walk())
        }
        token = tokens[cur]
      }
      cur++
      return node
    }
    if (token.type === 'tagend') {
      cur++
      // return token
    }
    if (token.type == "text") {
      cur++
      return token
    }
    if (token.type === "props") {
      cur++
      const [key, val] = token.val.split('=')
      return {
        key,
        val
      }
    }
  }
}
最终得到ast
{
  "type": "root",
  "props": [],
  "children": [
    {
      "type": "element",
      "tag": "div",
      "props": [
        {
          "key": "id",
          "val": "\"app\""
        }
      ],
      "children": [
        {
          "type": "element",
          "tag": "p",
          "props": [
            {
              "key": "@click",
              "val": "\"add\""
            },
            {
              "key": ":id",
              "val": "\"name\""
            }
          ],
          "children": [
            {
              "type": "text",
              "val": "{{name}}"
            }
          ]
        },
        {
          "type": "element",
          "tag": "h1",
          "props": [
            {
              "key": "class",
              "val": "\"item\""
            }
          ],
          "children": [
            {
              "type": "text",
              "val": "技术摸鱼"
            }
          ]
        }
      ]
    }
  ]
}
transform
然后优化一下,主要就是做个标记,标记属性,文本是不是静态的
function transform(ast) {
  // 优化一下ast
  let context = {
    // import { toDisplayString , createVNode , openBlock , createBlock } from "vue"
    helpers:new Set(['openBlock','createVnode']), // 用到的工具函数
  }
  traverse(ast, context)
  ast.helpers = context.helpers
}
function traverse(ast, context){
  switch(ast.type){
    case "root":
      context.helpers.add('createBlock')
      // log(ast)
    case "element":
      ast.children.forEach(node=>{
        traverse(node,context)
      })
      ast.flag = {props:false,class:false,event:false}
      ast.props = ast.props.map(prop=>{
        const {key,val} = prop
        if(key[0]=='@'){
          ast.flag.event = true
          return {
            key:'on'+key[1].toUpperCase()+key.slice(2),
            val
          }
        }
        if(key[0]==':'){
          ast.flag.props = true
          return{
            key:key.slice(1),
            val
          }
        }
        if(key.startsWith('v-')){
          // pass such as v-model
        }
        return {...prop,static:true}
      })
      break
    case "text":
      // trnsformText
      let re = /\{\{(.*)\}\}/g
      if(re.test(ast.val)){
        //有{{
          ast.static = false
          context.helpers.add('toDisplayString')
          ast.val = ast.val.replace(/\{\{(.*)\}\}/g,function(s0,s1){
            return s1
          })
      }else{
        ast.static = true
      }
  }
}
主要就是用 ast.flag = {props:false,class:false,event:false}来标记,false的话就全部是静态,可以直接越过虚拟dom diff
generate
然后就是生成代码啦,字符串拼一下
function generate(ast) {
  const {helpers} = ast

  let code = `
import {${[...helpers].map(v=>v+' as _'+v).join(',')}} from 'vue'\n
export function render(_ctx, _cache, $props){
  return(_openBlock(), ${ast.children.map(node=>walk(node))})}`

  function walk(node){
    switch(node.type){
      case 'element':
        let {flag} = node // 编译的标记
        let props = '{'+node.props.reduce((ret,p)=>{
          if(flag.props){
            //动态属性
            ret.push(p.key +':_ctx.'+p.val.replace(/['"]/g,'') )
          }else{
            ret.push(p.key +':'+p.val )
          }

          return ret
        },[]).join(',')+'}'
        return `_createVnode("${node.tag}",${props}),[
          ${node.children.map(n=>walk(n))}
        ],${JSON.stringify(flag)}`
        break
      case 'text':
        if(node.static){
          return '"'+node.val+'"'
        }else{
          return `_toDisplayString(_ctx.${node.val})`
        }
        break
    }
  }
  return code
}
你就得到了这段代码
import { openBlock as _openBlock, createVnode as _createVnode, createBlock as _createBlock, toDisplayString as _toDisplayString } from 'vue'

export function render(_ctx, _cache, $props) {
    return (_openBlock(), _createVnode("div", { id: "app" }), [
        _createVnode("p", { onClick: _ctx.add, id: _ctx.name }), [
            _toDisplayString(_ctx.name)
        ], { "props": true, "class": false, "event": true }, _createVnode("h1", { class: "item" }), [
            "技术摸鱼"
        ], { "props": false, "class": false, "event": false }
    ], { "props": false, "class": false, "event": false })
}
虽然和vue差得远,但是有内味了,后续可以吧props,event这些标记用位运算标记
虽然实现的非常的der(语音),高手轻喷, 但是对于辅助理解vue3的compiler已经够用了 以后有机会我写个文章,好好实现一下 (@todo)
看了分享者的知乎,以后还会做直接编译到dom的svelte风格的compiler,vue真的是要做全家桶了吗
面向新一代构建工具优化代码
要充分用上这些新工具的独特能力,如更快的模块热更新、跨模块代码复用、强构建缓存等,我们的项目代码也需要与时俱进。

本主题将会分享我在研究构建工具时总结的一些易于发挥工具潜力的编码技巧与开发流程实践。
怎么说呢,不太能预判出来要讲啥,盲猜是这些工具提供的新思路,以及辅助函数? 等看完vueconf后我再写个总结
应该是个可以提高开发效率的分享
探索 Vue 3 中的 JSX
对于 JSX 和 template,在大部分场景下是推荐使用 template 的,尤其是在业务场景下。虽然 Vue 3 的 template 提供了很多的性能优化,但是对于一些库的开发者来说,template 可能不够灵活,而使用 JSX 的方式就比较灵活。这次分享,将会给大家聊聊 JSX 和 template 的差异,并分享一些 Vue 3 JSX 插件的设计思路,和 Babel 插件的开发技巧。
jsx的compiler相比于vue3自带的会稍微简单一些,因为少了很多标记的优化,主要能学到怎么参与vue3生态的设计,以及babel的插件技巧
我们上面的der-compiler,改一下加一个loader 其实也可以用来解析jsx了
还有一点略困惑,就是template做了很多静态标记,但是我刚才跑了个demo,jsx的性能居然和template差不多,5000个组件相差10ms左右,期待明天能对template和jsx有更多的理解
Composable Vue
Vue Composition API 底层原理介绍,对于编写优质的组合式函数技巧与模式的分享。
composition的原理还好,vue-next的代码地址在这
  // 2. call setup()
  const { setup } = Component
  if (setup) {
    const setupContext = (instance.setupContext =
      setup.length > 1 ? createSetupContext(instance) : null)

    currentInstance = instance
    const setupResult = callWithErrorHandling(
      setup,
      instance,
      ErrorCodes.SETUP_FUNCTION,
      [__DEV__ ? shallowReadonly(instance.props) : instance.props, setupContext]
    )


 export function callWithErrorHandling(fn,instance,type,args) {
  let res
  try {
    res = args ? fn(...args) : fn()
  } catch (err) {
    handleError(err, instance, type)
  }
  return res
其他估计讲的更多的是他的vue.use这个库,也就是把日常的常用功能,都封装成useXX的风格,比如修改一下网页的小图标
import { useFavicon } from '@vueuse/core'
const icon = useFavicon()
icon.value = 'dark.png' // change current icon
内部其实就是查找link标签,修改href,但是api让你用着很丝滑
export function useFavicon(
  newIcon: MaybeRef<string | null | undefined> = null,
  options: FaviconOptions = {},
) {
  const {
    baseUrl = '',
    rel = 'icon',
    document = defaultDocument,
  } = options

  const favicon = isRef(newIcon)
    ? newIcon
    : ref<string | null>(newIcon)

  const applyIcon = (icon: string) => {
    document?.head
      .querySelectorAll<HTMLLinkElement>(`link[rel*="${rel}"]`)
      .forEach(el => el.href = `${baseUrl}${icon}`)
  }

  watch(
    favicon,
    (i, o) => {
      if (isString(i) && i !== o)
        applyIcon(i)
    },
    { immediate: true },
  )

  return favicon
}
对了其实favicon还可以设置成视频和摄像头,回头我去提个pr 囧

原理可以看我之前的文章
技术摸鱼工具开发(1)60行代码实现favcion摸鱼
用 Vue.js 构建一个高性能 Flutter 应用
在当下,跨端已经是前端绕不开的一个话题,随着 IoT 设备的普及越来越多的“端”涌现到我们的日常开发中。自 Hybrid 、React Native(Weex)后,Flutter 凭借其精简的渲染管线以及自绘渲染的特性,一跃成为这两年跨端的新宠。但其用 Dart + Widget 的开发模式以及与前端割裂的生态造成了研发成本过高。基于这个背景,我们探索一种基于 W3C 标准的 Flutter 应用方案,向上对接前端生态,向下通过自绘保证多端一致性。将给大家带来一个用 Vue.js 开发 Flutter 应用的方案,以及 Kraken 背后的实践与思考。
组内大兄弟说挺好用,但是我对flutter兴趣不大,本身也是个菜鸡,回头让大帅写点感想发出来
基于 Vue 3.0 开发多端应用
新版 uni-app 编译器升级为 Vite,运行时升级为 Vue 3.0,升级后的 uni-app编译速度有了指数级的提升,运行时也有很多性能优化。
本次我将分享 uni-app 在升级 Vue 3.0 过程中的系列探索和思考,主要内容包括:
1、基于 Vite 重新实现 uni 编译器
2、利用 Composition API 重写 uni-app 内置组件
3、更小、更快、可摇树的 uni runtime
4、根据平台差异,量身裁剪 Vue 3.0 runtime
5、使用 Vue 3.0开发多端应用的优势(运行性能/灵活性/编译速度等)
vue跨端也是一个市场很大的应用,runtime-core和runtime-dom拆开之后,我们可以基于runtime-core自己定制renderer。把vue3渲染到任意你想要的平台,之前学习的时候写过一个渲染canvas的玩具
import { createRenderer } from '@vue/runtime-core'
let ctx

function draw(ele, isChild) {
  if (!isChild) {
    ctx.clearRect(0, 0, 500, 500)
  }
  ctx.fillStyle = ele.fill || 'white'
  ctx.fillRect(...ele.pos)
  if (ele.text) {
    ctx.fillStyle = ele.color || 'white'
    ele.fontSize = ele.type == "h1" ? 20 : 12
    ctx.font = (ele.fontSize || 18) + 'px serif'
    ctx.fillText(ele.text, ele.pos[0] + 10, ele.pos[1] + ele.fontSize)
  }
  ele.child && ele.child.forEach(c => {
    draw(c, true)
  })

}

const { createApp: originCa } = createRenderer({
  insert: (child, parent, anchor) => {
    if (typeof child == 'string') {
      parent.text = child
    } else {
      child.parent = parent
      if (!parent.child) {
        parent.child = [child]
      } else {
        parent.child.push(child)
      }
    }
    if (parent.nodeName) {
      draw(child)
      if (child.onClick) {
        ctx.canvas.addEventListener('click', () => {
          child.onClick()
          setTimeout(() => {
            draw(child)
          })
        }, false)
      }
    }


  },
  createElement(type, isSVG, isCustom) {
    return {
      type
    }
  },
  setElementText(node, text) {
    node.text = text
  },
  patchProp(el, key, prev, next) {
    el[key] = next
  },
  parentNode: node => node,
  nextSibling: node => node,
  createText: text => text,
  remove:node=>node

});
function createApp(...args) {
  const app = originCa(...args)
  return {
    mount(selector) {
      const canvas = document.createElement('canvas')
      canvas.width = window.innerWidth
      canvas.height = window.innerHeight
      document.querySelector(selector).appendChild(canvas)
      ctx = canvas.getContext('2d')
      app.mount(canvas)
    }
  }
}
export { createApp }
然后就可以这么玩, 把canvas的大小和位置变成了响应式控制
<template>
<div @click="setName('vue3真棒')" :pos="[10,10,300,300]" fill="#eee">
    <h1 :pos="[20,20,200,100]" fill="red" color="#000">累加器{{count}}</h1>
    <span :pos="pos" fill="black" >哈喽{{name}}</span>
</div>

</template>

<script>

import {ref} from 'vue'
export default {
  setup(){
    const name = ref('kkb')
    const pos = ref([20,120,200,100])
    const count = ref(1)
    const setName = (n)=>{
      name.value = n
      pos.value[1]+=20
      count.value+=2
    }
    return {
      name,
      setName,
      pos,
      count
    }
  }
}
</script>
我们组内有配合pixijs写了个vue3打飞机大战,大家可以参考玩一下
Converting Browser Libraries into Vue hooks/composables.
唯一一个老外的分享
感觉和vueuse的内容可能会有冲突,也没有啥具体的介绍,猜不到讲啥,通过作者Jonathan的作品来看
还是啥也没看出来,期待实际分享吧
闪电分享
按照以往vueconf的习惯,除了这些议题,还会有大佬进行闪电分享,这次也不例外,先卖个关子, 等结束后我再写点感想
总结
希望这篇文章能够帮助你更好的旁听明天的vueconf,yeah 欢迎大家关注我的专栏,后续有最新文章会及时发出来
我掏腰包大家报销三张vueconf的线上票
微信搜索并关注花果山前端, 回复vueconf即可参与 直接给你红包
回复读书加群,明天一起群里直播讨论Vueconf 的心得体会,打王者也欢迎