
Mool3D
前言
时隔一年,偷懒了近一年的时间没学到什么新的技术。最近大环境太卷了,面试碰壁,整个人有点焦虑。花了一个月的私人时间,用ts重构了threejs引擎。借此机会打算重新开始写文章。
引擎介绍
基于threejs+typescript封装的引擎,目前初版完成,这篇文章介绍整个引擎的思想和实现,文章会有点长,耐心看完~~
文章中就不做引擎的展开了,感兴趣的可以查看我的在线文档Mool3D文档,带宽有点慢,需给模型一点加载的时间~
Viewer
提供一个 Viewer 类作为主类,承载着多种子类,建议以插件的形式将各子类初始化方法挂在在主类下。以继承主类的方式开发定制化的业务。
目前引擎的大致目录
 - threejs
   - plugins
    - camera.ts
    - render.ts
    ......
   - shader
   - libs
   - types
    - camera.ts
    ......
   - index.ts 主类的位置
Params类中存放主类的属性,ViewerType约束主类的类型,constructor中初始化一些内置的方法(如创建场景等)及主类下挂在的一些初始化类。
export class Params {
  clock: THREE.Clock; //时钟
  animate: ViewerAnimate; //帧动画执行类
  gAmGroup: THREE.Group[]; //环境场景
  ......
}
export class Viewer extends Params implements ViewerType {
    constructor(options: ViewerParams) {
    super(options);
    this.createScene();
    ......
  }
   private createScene() {
       ......
   }
    /*
   *@description: 天空盒子
   *@author: yangj
   *@date: 2023-03-04 17:23:13
   *@return:
   */
  initSky() {
    this.sky = new Sky({
      gScenes: this.gScenes,
      path: this.options.path,
      sceneidx: this.sceneidx,
    });
  }
}
相机类(基类)
初始化场景的需要,我将默认在主类中默认加载相机(透视相机)。主类中提供操作相机的一些方法和相机访问属性。


this.activeCamera //访问相机属性
this.flyTo(option: FlyToParams) //飞行过渡函数
渲染类(基类)
初始化场景的需要,我将默认在主类中默认加载渲染类。主类中提供访问render的属性用于修改threejs渲染参数。两种渲染方式帧动画渲染及鼠标事件渲染(针对是否有场景动画化,优化场景渲染频率)
this.renderer //访问渲染属性
//配合animate使用帧渲染
this.animate?.animateFuntion.push(() => { //类中具体介绍(解藕函数)
  this.renderer.render(scene, camera);
});
//如果场景没有动画可以不用帧渲染,使用鼠标事件渲染,优化场景卡顿问题
雾类
主类中提供初始化雾的方法,有两种官方提供的雾,initFog正常雾气设置最近最远有效范围,initFogExp线性雾气随距离不断增大。

this.initFog();
this.fog.initFog("#cccccc", 10, 500);
this.fog.initFogExp("#cccccc", 1);
灯光类
主类中提供各种类型灯光的初始化方法,挂载各类灯光的属性(如ambient、hemisphereLight等),初始化后通过属性修改灯光位置颜色等信息。详细的属性说明和属性方法见在线文档Mool3D文档~
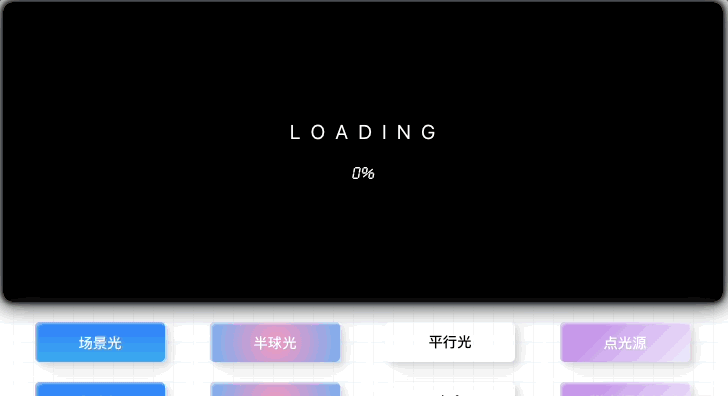
this.ambient.setLight(1.5, 1); //场景光
this.initSkyLight("#66dd7a", "#66dd7a", 2); //半球光
this.initDirectional("#db5847", 2); //平行光
this.pointIndex = this.initPointLight("#db5847", 3, 0); //点光源
this.initSpotLight("#db5847", 5, 600, new Vector3(0, 0, 0)); //聚光灯
this.initRectArea("#fff", 100, 100, 30); //区域光
this.initRectAreaBox("#fff", 150, 150, 5, [10, 0, 50]); //光盒

//初始化光的位置是0,0,0(修改位置等信息见下方)
setRect() {
  this.clearLight();
  this.initRectArea("#fff", 100, 100, 30);
  this.rectAreaLight.light.position.set(100, 100, 100);
  this.rectAreaLight.light.lookAt(0, 0, 0);
  this.rectAreaLight.initHelper(30);
}
模型类

主类中提供场景模型及单一模型的加载初始化模型类的方法,场景模型建议按配置文件进行加载,如需加载单一模型则可以调用模型类下的loadModel方法,模型类提供了执行场景动画相关函数,及切换场景相关方法~
配置文件
[
  {
    "name": "mool", //名称
    "target": false, //是否被鼠标拾取
    "layeridx": 1, //场景id
    "scale": 1, //场景缩放
    "positionX": 50, //场景初始位置
    "positionY": 120,
    "positionZ": 170,
    "layers": [ //场景模型配置对象
      {
        "name": "./glb/building1.glb"
      },
      {
        "name": "./glb/building2.glb"
      }
    ]
  }
  ......
]
使用
this.initModel()
this.setScene(index,callback)//场景配置文件加载
this.model.playAllClipes(sceneA.sceneidx)//执行场景动画
this.model.loadModel(url: string, sceneidx: number, callback: Fn<any>) //加载单一模型
控制类
主类默认初始化控制类,控制类中默认加载了OrbitControls轨道控制器,还提供了变换控制器等。变换控制器还需配置事件类来实现一些特殊的功能(如粒子打点等功能)
this.controls.initTransform(sceneidx); //初始化变换控制器
this.controls.transformControls //访问变换控制器对象
this.controls.orbitControls //访问轨道控制器对象
事件类
主类提供事件类初始化方法,通过传入需监听的事件类型,监听各类型事件的回调(注意这里只有拾取到模型才会执行鼠标事件回调)。通过解藕的方式使得业务逻辑分模块处理便于查看和维护。具体使用案例见下方~
this.initEvent(["click"]);
this.event.typesFn.click.push((e) => {
  //回调函数参数e解析
  let { event , list } = e
  event //鼠标事件参数
  list //拾取到的模型碎片组合
});
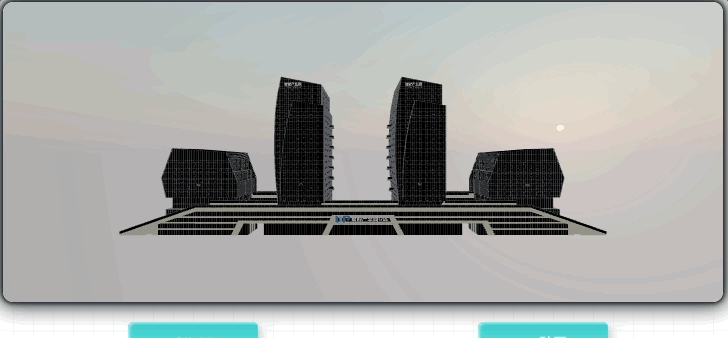
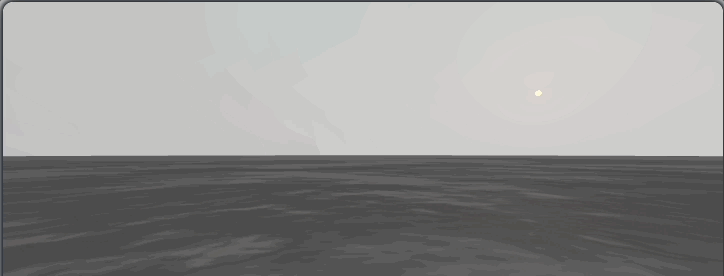
天空类

主类提供天空初始化方法,引擎提供两种类型的天空盒子。贴图天空盒子通过setSkyBox方法设置,着色器天空通过initShaderSky方法初始化。着色器天空可以通过修改太阳的位置来模拟场景亮度及颜色的变化(可用来模拟日升日落)
this.initSky() //初始化天空类
this.sky.setSkyBox("sky4"); //设置天空贴图盒子("sky4"是this.options.path下的sky4文件夹下的贴图文件)
this.sky.initShaderSky({
    scale: 100, //大小
    turbidity: 2, //浑浊度
    rayleigh: 4, //散射
    postion: [15, 2, -20], //位置
});
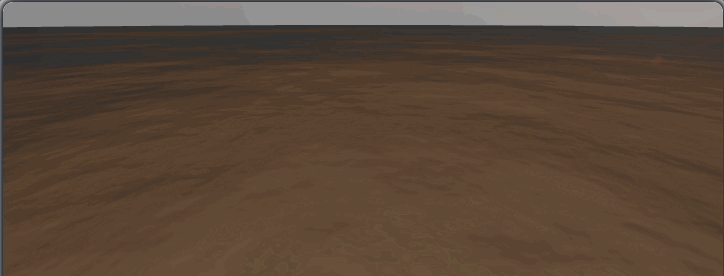
环境类
主类提供环境贴图类的初始化方法,引擎提供两种格式贴图的加载。hdr贴图于exr贴图,exr相对于hdr曝光度更高~
this.initEnvironment({ //exr
  path: "exr.exr", //加载this.options.path下的exr文件
  type: "exr",
});
this.initEnvironment({ //hdr
  path: "hdr.hdr",
  type: "hdr",
});
动画类
主类默认初始化了动画类,主要用于帧动画的执行,引擎提供了animateFuntion(帧动画执行组)数组,应用于需要帧动画执行的函数。
this.animate.animateFuntion.push((dt) => {
  ......//执行对应模块逻辑
});
资源类
主类提供资源类初始化方法,引擎目前只提供图片的加载类,通过loadTexture方法加载对应的图片资源。
 this.initSource()
 this.souce.loadTexture({
    path: "/docs/public/images/waternormals.jpg",
    onLoad: function (texture) {
      texture.wrapS = texture.wrapT = RepeatWrapping;
    },
  })
水
主类提供水的初始化方法,参数较多可以参考在线文档Mool3D文档,通过initWater加载水~
this.initWater({
  textureWidth: 200,
  textureHeight: 200,
  radius: 400,
  waterPosition: new Vector3(0, 0.2, 0),
  texture: this.souce.loadTexture({
    path: "/docs/public/images/waternormals.jpg",
    onLoad: function (texture) {
      texture.wrapS = texture.wrapT = RepeatWrapping;
    },
  }),
  sunPosition: new Vector3(0, 0, 0),
  sunColor: "#f2c144",
  waterColor: "#fff",
  distortionScale: 0.7,
  time: 1 / 100,
  scene: this.scene,
});
粒子

主类提供粒子类初始化方法,通过loadSprite方法加载粒子(方法返回粒子对象),注意需手动add添加到场景,这里只提供初始化加载粒子。主类通过spriteGroup访问粒子组合~
//图中粒子的添加函数
initSprite() {
    let sprite = this.loadSprite({
      texture: this.souce.loadTexture({
        path: "/docs/public/images/SXT.png",
      }),
      name: "sprite",
    });
    sprite.scale.set(0.1, 0.1, 0.1);
    sprite.position.set(0, 1.5, 0);
    let effect: THREE.Mesh = new Mesh(
      new CircleGeometry(2, 100),
      this.hovermaterial
    );
    effect.rotateX(Math.PI / 2);
    effect.visible = false;
    effect.position.set(0, 0.8, 0);
    (sprite as unknown as { effect: any }).effect = (tage) => {
      effect.visible = tage;
    };
    sprite.attach(effect);
    return sprite;
}
 this.gRayGroup[this.sceneidx].add(this.initSprite());
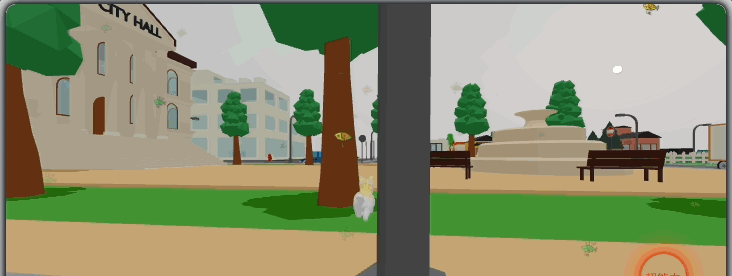
巡游

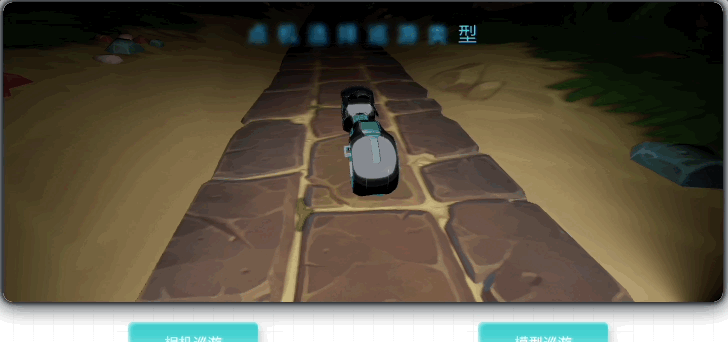
主类提供巡游类初始化方法,巡游类只是一个基座,详细说明见在线文档Mool3D文档,整个巡游分为规划路线和沿线运动。这里需要用到事件类、巡游类、资源类、灯光类与模型类组合实现上方的场景~
 //以下是部分关键代码
 /*
   *@description: 初始化巡游类
   *@author: yangj
   *@date: 2023-03-10 19:57:00
   *@return:
   */
  initparade() {
    let pipeTexture = this.souce.loadTexture({
      path: "/docs/public/images/line.png",
    });
    this.initParade({
      pipeParams: {
        tubularSegments: 80,
        radius: 0.15,
        radialSegments: 16,
        closed: false,
      },
      pipeTexture: pipeTexture,
      scene: this.gScenes[this.sceneidx],
      animate: this.animate.animateFuntion,
      speed: 1,
      object: this.object,
    });
    this.animate.animateFuntion.push((dt) => {
      pipeTexture.offset.x -= dt / 2;
    });
    this.parade.drawPipeLine(this.pipeLineArr); //通过位置点组合绘制路线
  }
  /*
   *@description: 开始巡游
   *@author: yangj
   *@date: 2023-03-10 19:56:17
   *@return:
   */
  startParade() {
    this.parade.pipeLine.visible = false;
    this.controls.orbitControls.enabled = true;
    this.controls.transformControls.detach();
    this.parade.autoParade((type, { point, pointLook }) => {
      if (type === "start") {
           ......//巡游过程中的回调,参数提供目前位置和未来位置
      } else {
        //巡游结束回调,重制巡游状态,相机回到巡游前的位置。
        this.controls.orbitControls.enabled = false;
        this.parade.stop = true;
        this.parade.progress = 0;
        this.parade.direction = "GO";
        this.parade.pipeLine.visible = true;
        this.ambient.setLight(1.5, 0.7);
        this.flyTo({
          position: [-49, 53, 3],
          controls: [0, 0, 0],
          duration: 2000,
        });
      }
    });
  }
粒子系统
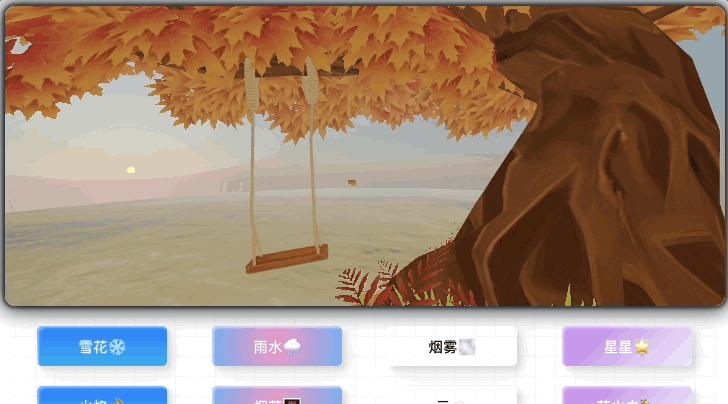
主类下提供粒子系统的初始化方法,上图为不同类型粒子间的切换,引擎粒子种类目前有8种。如需多种粒子同时存在需调用多次initParticleEngine初始化方法接收并使用,初始化一次相当于提供一个粒子的容器。具体使用见在线文档Mool3D文档~
//以下提供雪的粒子加载参考,各参数详细信息文档中都有说明~
this.particle = this.initParticleEngine(this.particle, true); //初始化粒子容器
this.setParticleMode(this.particle, "snow", { //设置粒子模式
  positionBase: new Vector3(0, 150, 0),
  positionSpread: new Vector3(400, 0, 400),
  velocityBase: new Vector3(20, -100, 0),
  velocitySpread: new Vector3(-10, -50, 0),
  particlesPerSecond: 50,
  particleDeathAge: 3,
  sizeTween: this.getParticleTween([0, 0.25], [10, 13]),
});
this.particle.destroy();//销毁粒子
漫游
Web(WASD+Z操控)
手机(摇杆操控)

漫游类由于适配性不好,不同的场景模型需要调整的参数较多,思来想去不打算挂载在主类下,还需进行完善。初版漫游类只暴露出了部分配置参数。需要体验可以查看在线文档Mool3D文档,但是照样可以以较少的代码实现场景漫游~
//以下为上方图中大部分关键代码
//漫游初始化
roam() {
this.Roam = new Roam({
scene: this.gScenes[this.sceneidx],
camera: this.activeCamera,
animate: this.animate.animateFuntion,
controls: this.controls.orbitControls,
renderer: this.renderer,
modelPath: "../public/scene/glb/run.glb",
});
this.Roam.init();
this.setLight();
}
//遥感角度及动画切换
setAngle(angle) { //通过touch事件计算出模型移动的转向
this.Roam.angle = -angle;
this.Roam.fwdPressed = true;
if (!this.Roam.isRun) {
this.Roam.mixer.stopAllAction();
this.Roam.mixer.clipAction(this.Roam.animations[0]).play();
this.Roam.isRun = true;
}
}
//停止移动及动画切换
end() {
this.Roam.fwdPressed = false;
if (this.Roam.isRun) {
this.Roam.mixer.stopAllAction();
this.Roam.mixer.clipAction(this.Roam.animations[1]).play();
this.Roam.isRun = false;
}
}
//跳跃
jump() {
if (this.Roam.playerIsOnGround) {
this.Roam.playerVelocity.y = this.Roam.params.playerVelocity;
}
}
//超能力
super() {
if (this.Roam.params.playerSpeed == 5) {
this.Roam.params.playerSpeed = 0.3;
this.Roam.params.playerVelocity = 5;
this.Roam.object.traverse((child) => {
if (child.material) {
child.material = this.oldMater;
}
});
} else {
this.Roam.object.traverse((child) => {
if (child.material) {
this.oldMater = child.material.clone();
child.material.map = this.souce.loadTexture({
path: "/docs/public/images/super.png",
onLoad: function (texture) {
texture.wrapS = texture.wrapT = RepeatWrapping;
texture.rotation = 1.5;
},
});
}
});
this.Roam.params.playerSpeed = 5;
this.Roam.params.playerVelocity = 20;
}
}
结语
这篇初版引擎介绍由于内容较多,每个子类没法展开详细介绍,如需展开详细介绍可以底下评论区留言对应的子类,我后续会以文章的形式具体介绍子类的封装与设计思想。本文及引擎都为本人独自完成,如需转载请标注出处。创作不易,后续会开源,感谢点赞和评论~
原文链接:https://juejin.cn/post/7215100383601246266 作者:Mool