
拖拽可缩放div—组件学习分享
分类:javascript
记录和分享也是学习路上重要的一环,掘金平台的文章质量很不错,我喜欢在这里浏览,接下来也会讲自己的所学所知,记录并分享与此,希望在这里,可以多结识喜欢分享与学习的朋友!
一段事件的基础知识学习过程,让我对HTML + css + js 有了更深刻的印象,特别是js,作为网页行为的实现者,为了能够面对各种开发场景,必须深入学习,在一段时间的理论学习后,并没有得到强烈的知识反馈,所以我决定在实践中继续探索,并进行记录与分享,以加深理解!
需求拆解分析
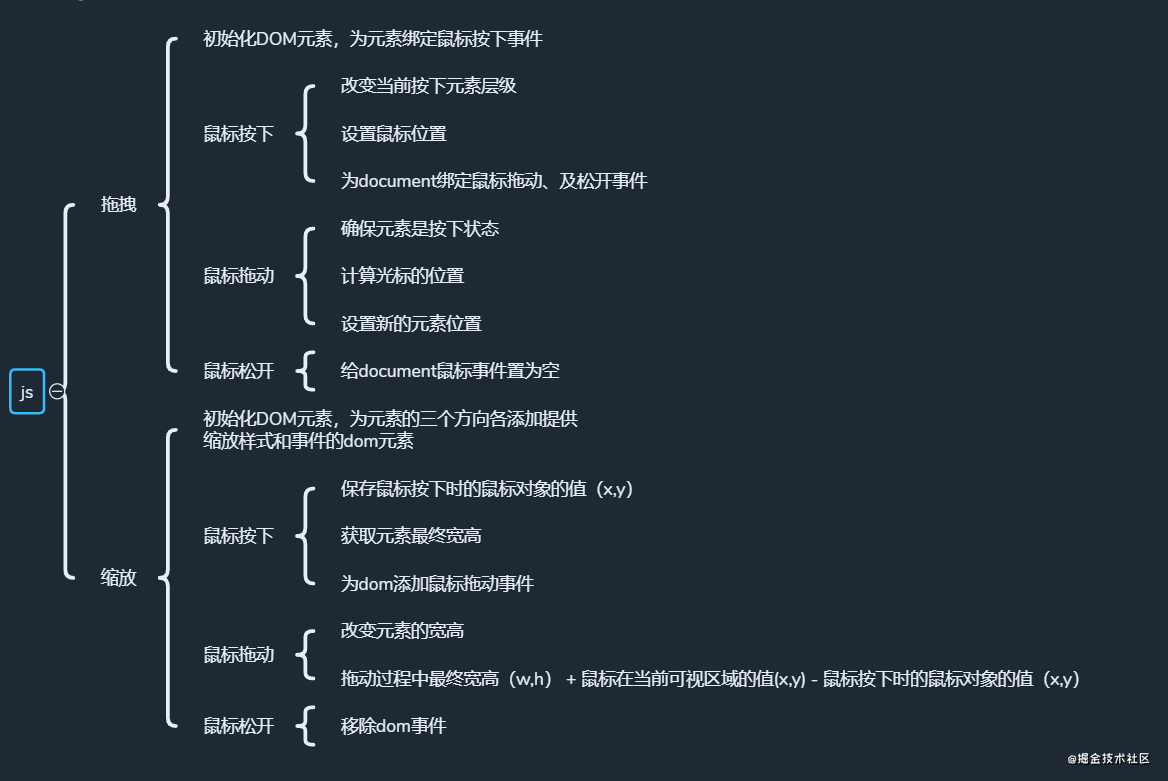

可以发现,如此罗列出来后,通过代码实现就变的容易了,这次需求的主要实现,依靠的就是鼠标事件,所以必须要理解鼠标事件的属性,接下来在代码中,我会将这些属性及事件进行使用并解释。
HTML
    <div class="popup">
        <div class="popup-header">点击移动</div>
        <p>Move</p>
        <p>this</p>
        <p>DIV</p>
    </div>
    <div class="popup">
        <div class="popup-header noselect">点击移动</div>
        <p>Move</p>
        <p>this</p>
        <p>DIV</p>
    </div>
CSS
<style>
    /* 盒子样式- 限制了缩放大小 */
    .popup {
        z-index: 9;
        background-color: #f1f1f1;
        border: 1px solid #d3d3d3;
        text-align: center;
        min-height: 150px;
        min-width: 300px;
        max-height: 300px;
        max-width: 600px;
    }
    /* 绝对定位  */
    .popup {
        position: absolute;
        /*resize: both; !*enable this to css resize*! */
        overflow: auto;
    }
    /* 拖动头元素 */
    .popup-header {
        padding: 10px;
        cursor: move;
        z-index: 10;
        background-color: #2196f3;
        color: #fff;
    }
    /*缩放元素样式*/

    .popup .resizer-right {
        width: 5px;
        height: 100%;
        background: transparent;
        position: absolute;
        right: 0;
        bottom: 0;
        cursor: e-resize;
    }

    .popup .resizer-bottom {
        width: 100%;
        height: 5px;
        background: transparent;
        position: absolute;
        right: 0;
        bottom: 0;
        cursor: n-resize;
    }

    .popup .resizer-both {
        width: 5px;
        height: 5px;
        background: transparent;
        z-index: 10;
        position: absolute;
        right: 0;
        bottom: 0;
        cursor: nw-resize;
    }
    /*取消鼠标选择*/

    .popup * {
        -webkit-touch-callout: none;
        /* iOS Safari */
        -webkit-user-select: none;
        /* Safari */
        -khtml-user-select: none;
        /* Konqueror HTML */
        -moz-user-select: none;
        /* Firefox */
        -ms-user-select: none;
        /* Internet Explorer/Edge */
        user-select: none;
    }
</style>
js
<script>
window.onload = function() {
//页面载入,初始化拖拽 、 缩放函数
initDragElement();
initResizeElement();
};
function initDragElement() {
var pos1 = 0,
pos2 = 0,
pos3 = 0,
pos4 = 0;
var popups = document.getElementsByClassName("popup");
var dist = document.getElementById("elementDist");
var elmnt = null;
var currentZIndex = 100; //盒子的默认层级
for (var i = 0; i < popups.length; i++) {
var popup = popups[i];
var header = getHeader(popup);
popup.onmousedown = function() {
/* 点击时,提升盒子层级 */
this.style.zIndex = "" + ++currentZIndex;
};
if (header) {
// 为header元素添加一个父元素dom
header.parentPopup = popup;
// 添加鼠标按下事件
header.onmousedown = dragMouseDown;
}
}
function dragMouseDown(e) {
// 鼠标按下,拿到父元素dom对象
elmnt = this.parentPopup;
elmnt.style.zIndex = "" + ++currentZIndex;
e = e || window.event;
// 记录鼠标首次按下,鼠标相对于浏览器有效区域的X、Y距离
pos3 = e.clientX;
pos4 = e.clientY;
document.onmouseup = closeDragElement;
document.onmousemove = elementDrag;
}
function elementDrag(e) {
if (!elmnt) {
return;
}
e = e || window.event;
// 计算新的鼠标位置
pos1 = pos3 - e.clientX;
pos2 = pos4 - e.clientY;
pos3 = e.clientX;
pos4 = e.clientY;
// 设置元素的新位置,元素的相对父元素的偏移位置 - 鼠标事件的点击位置 = 元素的顶部
elmnt.style.top = elmnt.offsetTop - pos2 + "px";
elmnt.style.left = elmnt.offsetLeft - pos1 + "px";
}
function closeDragElement() {
console.log('鼠标松开了');
// 鼠标松开,清空鼠标事件
document.onmouseup = null;
document.onmousemove = null;
}
function getHeader(element) {
var headerItems = element.getElementsByClassName("popup-header");
if (headerItems.length === 1) {
return headerItems[0];
}
return null;
}
}
function initResizeElement() {
// 获取popups元素
var popups = document.getElementsByClassName("popup");
// 初始化对象
var element = null;
// 元素起始位置
var startX, startY, startWidth, startHeight;
// 循环元素
for (var i = 0; i < popups.length; i++) {
var p = popups[i];
// 创建dom节点
var right = document.createElement("div");
// 添加元素样式
right.className = "resizer-right";
// 追加dom节点
p.appendChild(right);
// 元素监听鼠标按下事件
right.addEventListener("mousedown", initDrag, false);
// 添加父节点属性
right.parentPopup = p;
// 下缩放元素
var bottom = document.createElement("div");
bottom.className = "resizer-bottom";
p.appendChild(bottom);
bottom.addEventListener("mousedown", initDrag, false);
bottom.parentPopup = p;
// 斜角缩放元素
var both = document.createElement("div");
both.className = "resizer-both";
p.appendChild(both);
both.addEventListener("mousedown", initDrag, false);
both.parentPopup = p;
}
function initDrag(e) {
// 获取父元素属性
element = this.parentPopup;
// 鼠标元素在屏幕内位置
startX = e.clientX;
startY = e.clientY;
//  getComputedStyle()读取元素最终样式,只读---属性
// element.style获取元素的内联样式,支持读写
startWidth = parseInt(
document.defaultView.getComputedStyle(element).width,
10
);
startHeight = parseInt(
document.defaultView.getComputedStyle(element).height,
10
);
// 监听移动事件,改变尺寸
document.documentElement.addEventListener("mousemove", doDrag, false);
// 监听鼠标松开事件,移除鼠标事件
document.documentElement.addEventListener("mouseup", stopDrag, false);
}
function doDrag(e) {
//  改变盒子宽高   盒子当前的宽 + 鼠标事件位置 - 鼠标事件初始位置
element.style.width = startWidth + e.clientX - startX + "px";
element.style.height = startHeight + e.clientY - startY + "px";
}
function stopDrag() {
//  移除事件
document.documentElement.removeEventListener("mousemove", doDrag, false);
document.documentElement.removeEventListener("mouseup", stopDrag, false);
}
}
</script>
上面的代码,我做了很多的注释,阅读下来发现,只要理解了属性所代表的含义,利用其作用,很容易就可以实现想要的效果,接下来,我将我认为这次学习中,很值得解析的知识点,做一些解释及备忘,以巩固学习。
getComputedStyle 读取样式
该属性为只读属性,大多数场景下我们进行元素的样式操作时,使用的是element.style,而上面代码我们读取样式用的却是getComputedStyle,为什么要用这个属性呢?我们先来看一下它与element.style属性的区别
-
element.style 读取的只是元素的内联样式,即写在元素的 style 属性上的样式;而 getComputedStyle 读取的样式是最终样式,包括了内联样式、嵌入样式和外部样式。
-
element.style 既支持读也支持写,我们通过 element.style 即可改写元素的样式。而 getComputedStyle 仅支持读并不支持写入。我们可以通过使用 getComputedStyle 读取样式,通过 element.style 修改样式
需要注意的是,getComputedStyle存在兼容性问题,IE8不支持这个特性,IE 8 支持的是element.currentStyle 这个属性,这个属性返回的值和 getComputedStyle 的返回基本一致,只是在 float 的支持上,IE 8 支持的是 styleFloat,这点需要注意。
拖动原理
    // 计算新的鼠标位置
pos1 = pos3 - e.clientX;
pos2 = pos4 - e.clientY;
pos3 = e.clientX;
pos4 = e.clientY;
// 设置元素的新位置,元素的相对父元素的偏移位置 - 鼠标事件的点击位置 = 元素的顶部
elmnt.style.top = elmnt.offsetTop - pos2 + "px";
elmnt.style.left = elmnt.offsetLeft - pos1 + "px";
可以看到,拖动就是设置元素的位置,那么元素位置的值由谁来决定呢,从我的注释来看,首先是elmnt.offsetTop,关于这个属性的含义:
- offsetTop:元素到offsetParent顶部的距离
- offsetParent:距离元素最近的一个具有定位的祖宗元素(relative,absolute,fixed),若祖宗都不符合条件,offsetParent为body。
- 原文链接:blog.csdn.net/jinxi1112/a…
看完解释后,此次元素就是距body的距离,但是这个距离还不是移动后,元素的顶部距离,还需要减去鼠标的位置,使得元素的位置跟随鼠标效果实现。
总结
每一次的探究,都会有所收获,作为一名自强的程序爱好者,需要持之以恒的学习精神,和不怕问题迎难而上的坚韧品质,理论是实践的基础,希望再每一次的分享中得到成长,感谢阅读。以上的学习内容来自于网络,分享于此,仅作为学习交流使用!