
从表情包来学JS动画
从表情包来学JS动画
前言
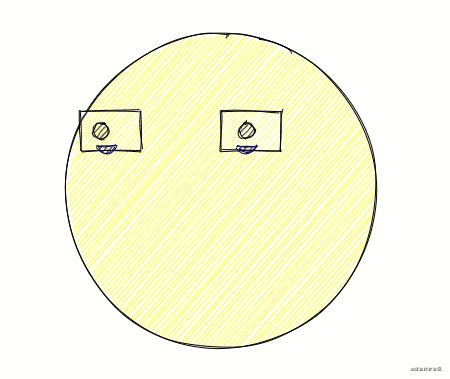
前两期介绍了,从表情包来学canvas、从英雄联盟来学pixi.js, 从canvas入门到canvas绘图库的使用。今天来补充一下之前没说到的动画部分,这次用一个手绘风的表情包来讲解一下JS的动画实现,如果对手写canvas表情包感兴趣的可以之前写的从表情包来学canvas。 以下是本期的实现效果手绘风表情包动画。阅读完你将收获js动画的常用手段,以及svg描边的实现原理。一学表情包,小试牛刀,再学表情包,打开任督二脉。

当我写完的时候回头来看,有点抽象了,不吹牛逼的说,可能有梵高、ONE老师一半的水平了。

走进动画世界
在web开发中,常见的动画手段分为两种形式,一种是由CSS控制的补间动画,一种是由JS控制的逐帧动画。
补间动画: 给定第一帧和最后一帧的动画位置,剩下的交给浏览器来处理。
// eg:
@keyframes mymove
{
0%   {top:0px;}
100% {top:200px;}
}
逐帧动画: 需要我们手动给出每一帧动画所在的位置
// eg:
let timer = setInterval(() => {
    if (top >= 200) {
    clearInterval(timer)
    } else {
       top += 1
    }
} 60)
JS和CSS动画各有千秋,主要是看使用场景,CSS运用的是GPU的运算,在JS由于复杂运算阻塞时,CSS动画依然能流畅运行。JS动画控制灵活,便于书写复杂的代码逻辑,能控制非dom元素,比如canvas里的小球,这点CSS就莫得办法了。接下来讲解一下JS动画的常用手段。
requestAnimationFrame
requestAnimationFrame,由三个单词组成request(请求)、Animation(动画)、 Frame(帧), 再加上window,window.requestAnimationFrame, 这不正是向浏览器请求动画刷新的意思吗?
前面写的setInterval 或者 setTimeout不是也能实现动画吗,为什么要用requestAnimationFrame呢
这要提到异步队列的概念了,settimeout、setInterval调用后被放入异步队列,只有当主线程任务执行完后才会执行队列中的任务,这就造成时间上的误差,假设setTimeout(() => { }, 60) 后有一个复杂的的运算js执行1s,由于js单线程执行的缘故,setTimeout不会再60毫秒后触发 至少会是 1 +0.06秒后才会被触发,因此实际执行时间总是比设定时间要晚,而requestAnimationFrame回调函数的调用时机则是浏览器决定的,而且与屏幕刷新时间相同。
let x = 0;
//回调函数
function animation() {
 x += 1; //修改图像的位置
 if (x < 100) {
 //在动画没有结束前,递归渲染
 window.requestAnimationFrame(animation);
 }
}
//第一帧渲染
animation()
tween
tween, 可以说是JS的补间动画,与CSS的动画相似,只需要指定开始和结束的位置,中间的每一帧由tween动画引擎帮忙算出来。
// 官方案例
const box = document.createElement('div')
box.style.setProperty('background-color', '#008800')
box.style.setProperty('width', '100px')
box.style.setProperty('height', '100px')
document.body.appendChild(box)

// Setup the animation loop.
function animate(time) {
	requestAnimationFrame(animate)
	TWEEN.update(time)
}
requestAnimationFrame(animate)

const coords = {x: 0, y: 0} // Start at (0, 0)
const tween = new TWEEN.Tween(coords) // Create a new tween that modifies 'coords'.
	.to({x: 300, y: 200}, 1000) // Move to (300, 200) in 1 second.
	.easing(TWEEN.Easing.Quadratic.Out) // Use an easing function to make the animation smooth.
	.onUpdate(() => {
		// Called after tween.js updates 'coords'.
		// Move 'box' to the position described by 'coords' with a CSS translation.
		box.style.setProperty('transform', `translate(${coords.x}px, ${coords.y}px)`)
	})
	.start() // Start the tween immediately.
表情包案例
前两天在掘金上看见了掘友写了一个rough.js库的介绍,第一次接触还蛮有意思的,尝试使用在本次案例中。
rough.js的基本使用
import rough from 'roughjs';
const rc = rough.svg(svg);
let node = rc.rectangle(10, 10, 200, 200); // x, y, width, height
svg.appendChild(node);

rc.circle(50, 50, 80, { fill: 'red' }); // fill with red hachure
rc.rectangle(120, 15, 80, 80, { fill: 'red' });
rc.circle(50, 150, 80, {
  fill: "rgb(10,150,10)",
  fillWeight: 3 // thicker lines for hachure
});
rc.rectangle(220, 15, 80, 80, {
  fill: 'red',
  hachureAngle: 60, // angle of hachure,
  hachureGap: 8
});
rc.rectangle(120, 105, 80, 80, {
  fill: 'rgba(255,0,200,0.2)',
  fillStyle: 'solid' // solid fill
});

上手还是蛮简单的,想了解更多的可以看一下这篇手把手教你实现手绘风格图形,这里就不做rough.js的扩展介绍了。接下来,按着第一期的套路画一个表情包。
画表情包
import rough  from 'roughjs'
const svg = document.getElementById('svg')
const rc = rough.svg(svg);
let mouth, timer
let tear = {height :60}
let dash = {offset: 0}

function getTear(x, y, width = 20, height = 60, radian = 15) {
  return `M${x} ${y} L${x + width} ${y} L${x + width} ${y + height} Q${x + width / 2} ${y + height + radian} ${x} ${y+height} L${x} ${y}`
}

function getMouth() {
  let m = rc.curve([[200, 360], [280, 380], [340, 360]])
  m.style['strokeDasharray'] = 200
  m.style['strokeDashoffset'] = dash.offset
  return m
}

function render() {
  // 画脸部
  svg.appendChild(rc.circle(300, 300, 300, {
    fill: 'yellow'
  }))
  // 左眼
  svg.appendChild(rc.rectangle(160, 220, 60, 40, {
    fill: 'white'
  }))
  // 右眼
  svg.appendChild(rc.rectangle(300, 220, 60, 40, {
    fill: 'white'
  }))
  // 左眼球
  svg.appendChild(rc.circle(180, 240, 15, {
    fill: 'black'
  }))
  // 右眼球
  svg.appendChild(rc.circle(326, 240, 15, {
    fill: 'black'
  }))
  // 左眼泪
  let tear1 = rc.path(getTear(176, 255, 20, tear.height), {
    stroke: 'blue',
    strokeWidth: '1',
    fill: 'blue'
  })
  // 右眼泪
  let tear2 = rc.path(getTear(316, 255, 20, tear.height), {
    stroke: 'blue',
    strokeWidth: '1',
    fill: 'blue'
  })
  // 嘴巴
  mouth = getMouth()
  svg.appendChild(tear1)
  svg.appendChild(tear2)
  svg.appendChild(mouth)
}
render()

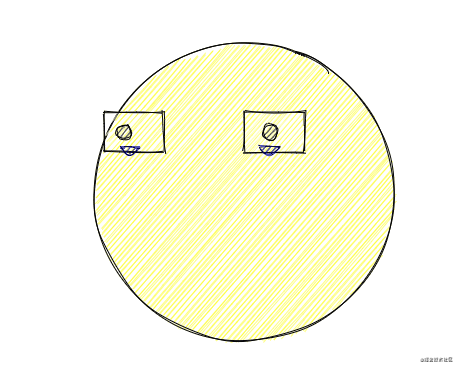
表情包动画实现
- 手绘风动画
利用rough.js 会随机生成偏移的轨迹图形,不断重新生成即可。
// 每个一段时间清除svg,然后重回
setInterval(() => {
  svg.innerHTML = ''
  render()
}, 400)
- 流泪动画
利用tween.js的补间效果,把tear的高度从0绘制到60
const tearTween = new Tween(tear).to({height: 60}, 2000).easing(Easing.Quadratic.In).onComplete(() => {
  remove(tearTween)
}).start()
function animate() {
	timer = requestAnimationFrame(animate)
	getAll().forEach((t) => {
    t.update()
  })
}
- 描绘嘴巴的动画
这里利用的是svg的虚线特性, 先来了解一下svg的strokeDasharray, 当strokeDasharray = 10的时候, 每个10像素绘制一段实现,每个10像素绘制一段空白,形成了一个每个10像素一段虚线效果的。
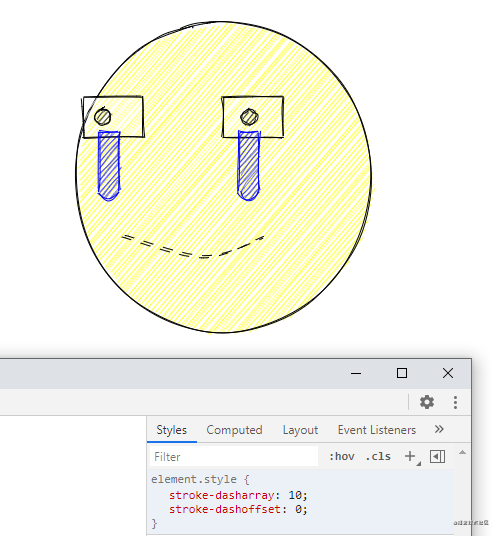
假设整个嘴巴的path长度为200,那么效果应该是先画200实线,再画200虚线,由于只有200长度,所以看到的效果应该是一个完整的嘴巴,没有虚线部分。事实上svg提供了获取path长度的方法pathLength()可以返回path的总长度。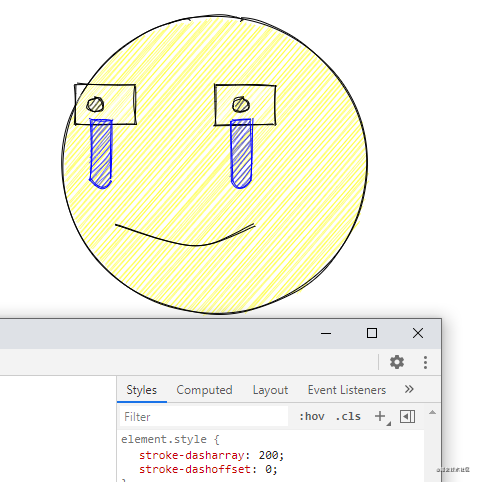
那么再介绍一下strokeDashoffset,顾名思义,也就虚线的偏移量。来看看strokeDashoffset的效果

通过谷歌浏览器的调试工具可以看出,当随着strokeDashoffset从0变到200 嘴巴的svg path逐渐消失,我们把效果反过来,offset从最大值变成0的画也就是实现了svg path的描绘。 这也就是常见的svg描边动画的实现原理。利用tween将strokeDashoffset从200逐帧变到0也就实现了绘制嘴巴线条的效果。
const mouthTween = new Tween(dash).to({offset: 0}, 2000).easing(Easing.Quadratic.In).onUpdate(() => {
  mouth.style['strokeDashoffset'] = dash.offset
}).onComplete(() => {
  remove(mouthTween)
}).start()
最后
本期结合tween、svg、rough.js做了一个手绘风的动画,讲解了JS动画的实现原理(源代码地址)。
渲染svg动画的方式不建议在生产环境使用,为了增加svg描边动画介绍,图形绘制采用了svg渲染, 动画上则用了canvas常用的清除屏幕重绘的方式,svg的每个图形都是dom元素,不断插入删除dom,比较消耗性能。在正常情况下,如果要实现SVG描边效果,推荐用css去实现。