tui.editor使用指南


伊始
2020年初,团队成立了wiki兴趣小组,我们非常荣幸地可以开发前端为公司出品的第一个全栈项目,wiki中必不可少的模块则是编辑器,而挑选一个优秀的开源编辑器是我们的首要任务。
Markdown编辑器
在多日挑选之后,最终决定使用该编辑器tui-editor,它又叫toastUiEditor,现在主要说的是 2.5.1 版本的内容。
该编辑器允许您使用文本或所见即所得来编辑Markdown文档,并具有语法突出显示,滚动同步,实时预览和图表功能,还支持自定义插件,提供了扩展能力。
官方团队非常给力,我们去年使用时还是2.0版本,现在已经到2.5.1版本了。
????
2021年官方还将推出 3.0版本,主要针对内部核心编辑器的优化,codemirror将被弃用。
该编辑器还推出了衍生版本
| 名称 | 描述 |
|---|---|
| @toast-ui/jquery-editor | jQuery包装器组件 |
| @toast-ui/react-editor | React包装器组件 |
| @toast-ui/vue-editor | Vue包装器组件 |
编辑器使用场景
有md文档编辑需求的时候可以使用,并且可拓展性较强,在wiki项目中我们后来又引入了诸如流程图之类的基于该库的衍生产物。
官方文档地址
官方github地址
官方npm地址
公司知识库项目(实例)

该文档仅是使用指南,更多api请阅读后续相关文档。
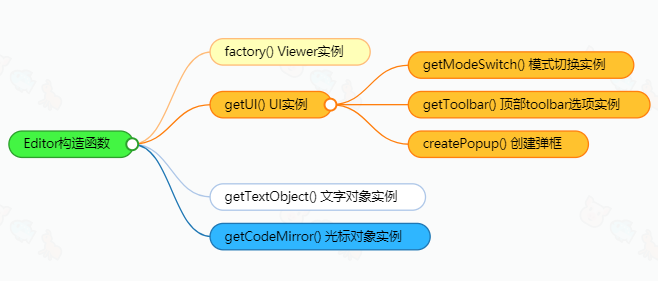
后续文档将基于以下结构对tui-editor展开介绍
|-- 第一部分 构造函数参数
|   |-- options详解
|   |-- hooks
|   |-- events
|   |-- 其他用法
|-- 第二部分 实例方法
|   |-- 构造函数属性与方法
|   |-- 实例钩子函数与事件监听相关
|   |-- 实例获取输入文本内容对象相关
|   |-- 实例获取并设置文本相关
|   |-- 实例操作自身相关
|   |-- 实例获取UI相关
|-- 第三部分 衍生实例方法
|   |-- CodeMirrorExt
|   |-- MdTextObject
|   |-- DefaultUI
|   |   |-- Toolbar
|   |   |-- ModeSwitch
|   |   |-- LayerPopup
|-- 第四部分 拓展插件
|   |-- 自定义拓展
|   |-- 库自带部分拓展
|   |-- 语法高亮突出
|-- 第五部分 1.x到2.0的过度
|-- 第六部分 鸣谢及其他
|   |-- 鸣谢与帮助
|   |-- 思考与推翻
安装
npm方式
$ npm install @toast-ui/editor 存在一定的被墙风险
$ npm install @toast-ui/editor @<版本> 存在一定的被墙风险
cdn引入:推荐该方式
<link rel="stylesheet" type="text/css" href="https://cdnjs.cloudflare.com/ajax/libs/codemirror/5.48.4/codemirror.css" />
<link rel="stylesheet" href="https://uicdn.toast.com/tui-editor/latest/tui-editor.css"></link>
<link rel="stylesheet" href="https://uicdn.toast.com/tui-editor/latest/tui-editor-contents.css"></link>

<!-- js  该js必须放置在body标签之后 -->
<script src="https://uicdn.toast.com/tui-editor/latest/tui-editor-Editor-full.min.js"></script>
由于官方cdn形式存在翻墙或网速缓慢问题,所以实际使用的时候,我们将
js css放置在我们的服务器上。
如何使用
首先在html中加入需要tui-editor绑定的元素节点
<div id="editorSection"></div>
编辑器模式
yarn/npm install方式引入
import '@toast-ui/editor/dist/toastui-editor.css';
import '@toast-ui/editor/dist/toastui-editor-viewer.css';
import Editor from '@toast-ui/editor';

const editor = new Editor({
  el: document.querySelector('#editorSection'),
  initialEditType: 'markdown', // 默认编辑模式,还支持富文本编辑模式
  previewStyle: 'vertical', / 编辑样式,还支持tab切换的形式
  height: '300px'
});
cdn方式引入
let editor = new toastui.Editor({
   el: document.querySelector('#editorSection'),
   initialEditType: 'markdown', // 编辑器markdown 还是 其他形式
   previewStyle: 'vertical', // 是否是切一半的页面,另外参数 tab
   height: window.innerHeight, // 高度
   hideModeSwitch: true, // 不展示底部tab切换
   placeholder: '请输入正文...',
});
展示模式
this.viewer = new toastui.Editor.factory({
       el: document.querySelector('#viewerSection'),
       height: window.innerHeight + 'px',
       viewer: true,
       initialValue: '初始化值'
});
以上是cdn格式使用方式,只展示正文,使用 npm 包引入时只需把 toastui 去掉即可。
编辑器自带的插件
需要单独npm或cdn引入
| npm包名称 | 描述 | cdn css | cdn js |
|---|---|---|---|
| @toast-ui/editor-plugin-chart | 插件呈现图表 | uicdn.toast.com/tui.chart/v… | uicdn.toast.com/editor-plug… |
| @toast-ui/editor-plugin-code-syntax-highlight | 插件突出显示代码语法 | cdnjs.cloudflare.com/ajax/libs/h… | uicdn.toast.com/editor-plug… |
| @toast-ui/editor-plugin-color-syntax | 插件颜色编辑文本 | uicdn.toast.com/tui-color-p… | uicdn.toast.com/editor-plug… |
| @toast-ui/editor-plugin-table-merged-cell | 合并表列的插件 | -- | uicdn.toast.com/editor-plug… |
| @toast-ui/editor-plugin-uml | 呈现UML的插件 | -- | uicdn.toast.com/editor-plug… |
npm install or yarn add {名称}
如何引入这些插件
const { Editor } = toastui;
const { chart, codeSyntaxHighlight, colorSyntax, tableMergedCell, uml } = Editor.plugin;

const chartOptions = {
  minWidth: 100,
  maxWidth: 600,
  minHeight: 100,
  maxHeight: 300
};

// 编辑器
const editor = new Editor({
  el: document.querySelector('#editor'),
  previewStyle: 'vertical',
  height: '500px',
  initialValue: '',
  plugins: [[chart, chartOptions], codeSyntaxHighlight, colorSyntax, tableMergedCell, uml]
});

// 不可编辑的视图
const viewer = Editor.factory({
  el: document.querySelector('#viewer'),
  viewer: true,
  height: '500px',
  initialValue: allPluginsContent,
  plugins: [[chart, chartOptions], codeSyntaxHighlight, tableMergedCell, uml]
});
一些重要的api讲解
钩子函数
addImageBlobHook
初始化时定义 ,用于监听编辑器中文件的变化,从而自定义方法,如:图片上传服务器
this.editor = new tui.Editor({
   el: document.querySelector('#editorSection'),
   height: window.innerHeight, // 高度
   hooks: { // 钩子函数
       addImageBlobHook: (fileOrBlob, callback) => {
           this.uploadImgApi(fileOrBlob).then(path => {
                callback(path, 'T_T,出错了');
           });
       },
   },
});
fileOrBlob 返回一个文件对象 callback 回调函数。
编辑器对象api ToastUIEditor
getCodeMirror
由于编辑器闪烁光标 是 自定义的 div,该编辑器提供获取光标位置对象的方法,在后续源码的挖掘中发现,CodeMirror是tui-editor内部核心解析库,它融入了tui-editor中。
let getCodeMirror = this.editor.getCodeMirror();
insertText(text)
插入文本,注意,这里他会记录上一次的光标位置插入。
this.editor.insertText('```\n\n```');
CodeMirrorExt 光标对象
通过getCodeMirror获取
重点强调两个
getCursor(start)
获取光标位置 start : 'from'|'to'|'head'|'anchor'
setCursor(line,ch)
该方法并非文档中暴露方法,而是阅读源码后知晓的方法。该方法可以更好地控制 光标的位置
let getCodeMirror = this.editor.getCodeMirror();
this.editor.insertText('```\n\n```');
getCodeMirror.setCursor(getCodeMirror.getCursor().line - 1, 0);
上面代码先获取光标对象,在指定位置插入代码段,由于插入后 ,光标会移动到代码段末尾,影响用户体验,于是这里提供了一个 setCursor ,设置光标的位置,达到效果。
Toolbar 顶部快捷菜单 api
获取 顶部 ui 实例的方法
const toolbarArr = [
    {
        name: 'uploadQiniu',
        tooltip: '选择图片',
        el: () => {
            const button = document.createElement('button');
            button.className = 'tui-image tui-toolbar-icons';
            return button;
        },
        index: 14,
        callback: (_this, callback) => {
            _this.uploadImg();
            if (callback) {
                callback();
            }
        }
    },
    {
        name: 'code',
        tooltip: '代码段',
        el: () => {
            const button = document.createElement('button');
            button.className = 'tui-codeblock tui-toolbar-icons';
            return button;
        },
        index: 15,
        callback: (_this, callback) => {
            let getCodeMirror = _this.editor.getCodeMirror();
            _this.editor.insertText('```\n\n```');
            getCodeMirror.setCursor(getCodeMirror.getCursor().line - 1, 0);
            if (callback) {
                callback();
            }
        }
    },
]

this.toolbar = this.editor.getUI().getToolbar();
     toolbarArr.forEach(toolbar => {
     this.editor.eventManager.addEventType(toolbar.name);
     this.editor.eventManager.listen(toolbar.name, () => {
          toolbar.callback(this);
     });
     this.toolbar.insertItem(toolbar.index, {
          type: 'button',
          options: {
               name: toolbar.name,
               className: '',
               event: toolbar.name,
               tooltip: toolbar.tooltip,
               el: toolbar.el()
          }
     });
});
这是推荐的写法,因为项目到后期,新增的toolbar会很多,这里直接把它抽出去,通过数组循环的形式简化了代码。
自定义插件
一个优秀的框架库怎么能缺少自定义插件呢。
我们在原有的基础上实现了众多功能,如下,后续文章中将详细介绍这些插件如何引入和使用。
1、树结构
2、流程图
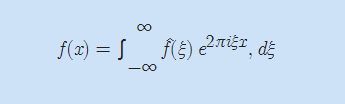
3、插入数学公式
4、mini图展示区域
5、视频播放区域