
哔哩哔哩春季动态banner是怎么实现的?
分类:javascript


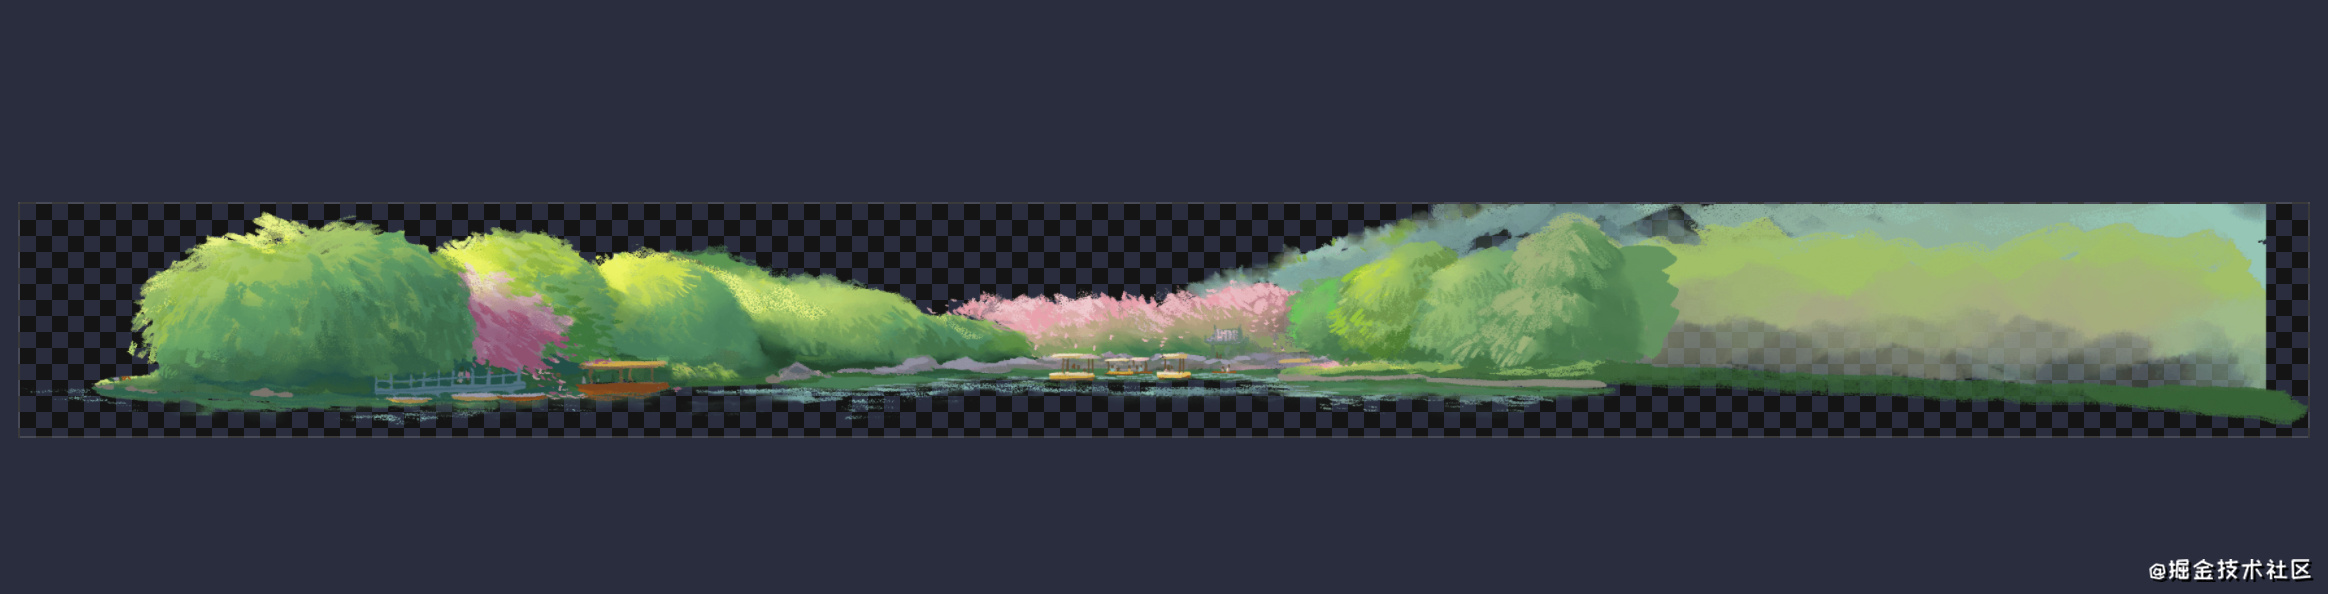
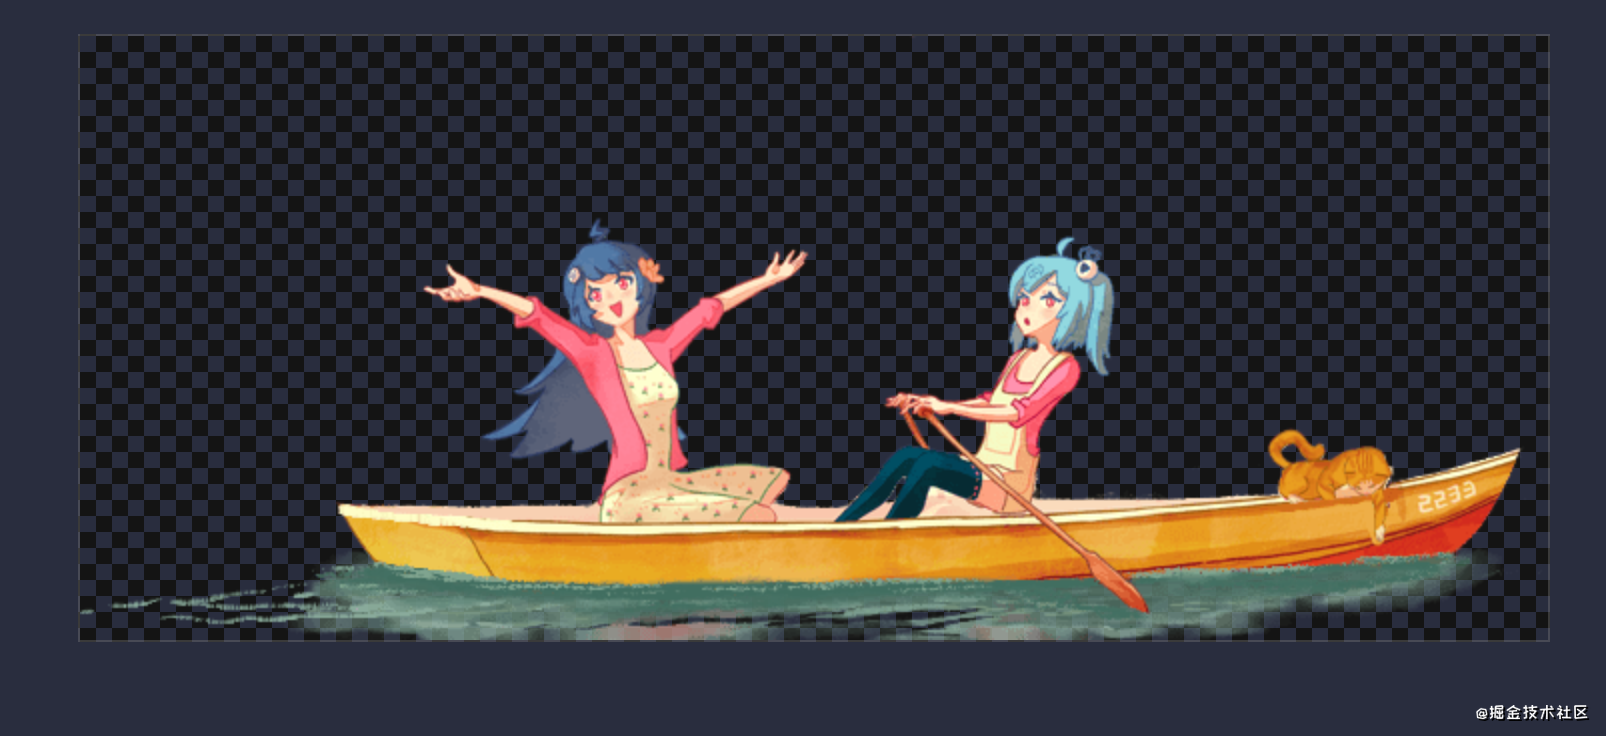
先看看效果呗
github地址
起因
逛b站的时候发现bilibili不知什么时候换了banner,初看banner就是监听鼠标移动来进行图片的移动和变换,(看到2233在奔跑我不经想起了我逝去的青春)心中觉得有趣(估计是我见得少),想仿制一个便有了这个项目。
项目结构
由于是简单的项目随手用vue-cli搭建了一个
├── package.json
├── public
├── src
│   ├── App.vue
│   ├── components
│   │   ├── animatedBanner.vue
│   │   ├── cubicBezier.js
│   │   ├── extensions
│   │   │   ├── particle
│   │   │   │   ├── UniversalCamera.js
│   │   │   │   ├── index.js
│   │   │   │   ├── particle.js
│   │   │   │   ├── shader
│   │   │   │   │   ├── displayFrag.js
│   │   │   │   │   ├── displayVert.js
│   │   │   │   │   ├── flow1.png
│   │   │   │   │   ├── flow2.png
│   │   │   │   │   ├── updateFrag.js
│   │   │   │   │   └── updateVert.js
│   │   │   │   └── shader.js
│   │   │   ├── snow.js
│   │   │   ├── snowflake.png
│   │   │   └── utils.js
│   │   └── position.js
│   ├── main.js
│   └── static
└── vue.config.js
代码分析
animatedBanner.vue
<template>
  <div class="animated-banner" ref="container" />
</template>
先简单的写一个div来作为整个banner的容器,接下来便是逐步完成整个页面的填充
- 第一步需要各类图片素材,先将他们引入,为了省事我就选择本地引入静态图片,也可以通过将图片进行托管后进行引入。
- imgList作为一个数组来进行图片资源映射
export default {
  props: {
    config: { //外部传入图片配置
      required: true,
      default: {}
    }
  },
  data() {
    return {
      entered: false, //鼠标进入flag
      layerConfig: {},//图片配置
      imgList: {
        '01': require('../static/01.png'),//引入本地图片
        '02': require('../static/02.png'),
        …………
      }
    }
  },
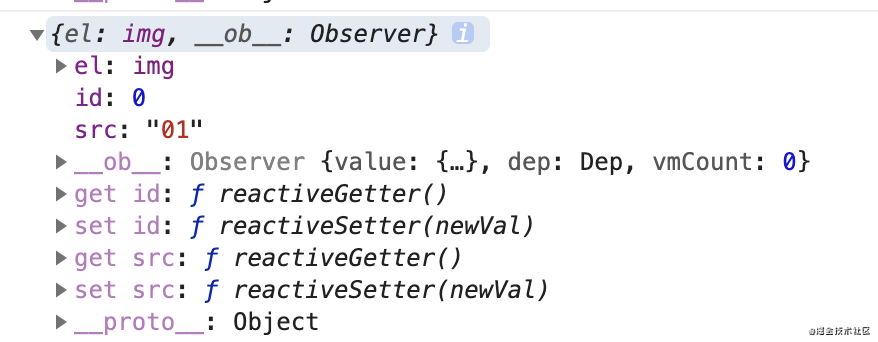
从引入的图片可以看到,图片素材都是擦除背景的png文件,可以通过我们的排列组合最后才能显示一幅画面
- 配置信息
position.js
图片的相关位置和大小我们通过一个json对象来报保存,一般通过后台来返回给我们相关的信息,这里简单演示便选择引入本地的json对象,这里具体包含了图片的缩放状态,位移距离,透明度,高斯模糊等等属性。
export default {
  "version": "1",
  "layers": [{
    "resources": [{
      "src": "01",
      "id": 0
    }],
    "scale": {
      "initial": 0.5
    },
    "rotate": {},
    "translate": {
      "initial": [0, -30],
      "offset": [-200, 0]
    },
    "blur": {},
    "opacity": {},
    "id": 16,
    "name": "15_天空"
  }, {
    "resources": [{
      "src": "02",
      "id": 0
    }],
    …………
  }
- 页面挂载钩子,在mounted函数上完成dom树?的渲染和构建
- 这里的
this.config就是前文传入position.js中的相关图片信息,通过他来构建图片
async mounted() {
    // 只有在启用了动画banner的配置,且浏览器支持css filter时才加载动画banner的图片资源
    this.animatedBannerSupport =
      typeof CSS !== 'undefined' &&
      CSS.supports &&
      CSS.supports('filter: blur(1px)') &&
      !/^((?!chrome|android).)*safari/i.test(navigator.userAgent)
      // safari浏览器在mac屏幕上模糊效果有性能问题,不开启

    if (!this.animatedBannerSupport) {
      return //不支持直接返回
    }
      this.layerConfig = this.config.layers //获取配置信息
    }
}
- 图片的加载
 // 等待页面加载完成
    if (document.readyState !== 'complete') {
      await new Promise((resolve) => window.addEventListener('load', resolve))
    }

    try {
      // 加载所有图片资源
      await Promise.all(
        this.layerConfig.map(async (v) => {
          return Promise.all(
            v.resources.map(async (i, index) => {
                const img = document.createElement('img')
                img.src = this.imgList[i.src] //获取图片资源url
                await new Promise((resolve) => (img.onload = resolve))
                v.resources[index].el = img //将每张图读取到后保留在el上
            })
          )
        })
      )
    } catch (e) {
      console.log('load animated banner images error', e)
      return
    }
每一个layerConfig的元素都包含图片资源el以便于后面生成图片元素
    const layerConfig = this.layerConfig
    if (!layerConfig.length && !this.config.extensions) {
      return //如果layerConfig没有值就不进行后面动态操作,直接展示静态
    }
    //获取元素设置宽高
    const container = this.$refs['container']
    let containerHeight = container.clientHeight
    let containerWidth = container.clientWidth
    let containerScale = containerHeight / 155
    //这里155是样式上设置的最小高度

    layerConfig.forEach((v) => {
      v._initState = { //设置初始值
        scale: 1,
        rotate: v.rotate?.initial || 0,
        translate: v.translate?.initial || [0, 0],
        blur: v.blur?.initial || 0,
        opacity: v.opacity?.initial === undefined ? 1 : v.opacity.initial
      }
      v.resources.forEach((i, index) => {
        const el = v.resources[index].el
        //用naturalHeight,naturalWidth来获取图像文件本身的高度和宽度
        //在图片放大缩小,动态生成图片用该方法更便捷
        el.dataset.height = el.naturalHeight
        el.dataset.width = el.naturalWidth
        const initial = v.scale?.initial === undefined ? 1 : v.scale?.initial
        el.height = el.dataset.height * containerScale * initial
        el.width = el.dataset.width * containerScale * initial
      })
    })
- 初始化图层
// 初始化图层
    const layers = layerConfig.map((v) => {
      const layer = document.createElement('div')
      layer.classList.add('layer')
      container.appendChild(layer)
      return layer
    })
    //定义变量
    let displace = 0
    let enterX = 0 //鼠标进入的x坐标
    let raf = 0
    let lastDisplace = NaN //最后离开值
    this.entered = false
    this.extensions = [] //插件扩展
- 监听鼠标移动方法
 // 根据鼠标位置改变状态
    const af = (t) => {
      try {
        if (lastDisplace === displace) {
          return
        }
        lastDisplace = displace
        layers.map((layer, i) => {
          const v = layerConfig[i]
          const a = layer.firstChild //img元素
          if (!a) {
            return
          }

          const transform = {
            scale: v._initState.scale,
            rotate: v._initState.rotate,
            translate: v._initState.translate
          }
          if (v.scale) {
            const x = v.scale.offset || 0
            const offset = x * displace
            transform.scale = v._initState.scale + offset
          }
          if (v.rotate) {
            const x = v.rotate.offset || 0
            const offset = x * displace
            transform.rotate = v._initState.rotate + offset
          }
          if (v.translate) {
            const x = v.translate.offset || [0, 0]
            const offset = x.map((v) => displace * v)
            const translate = v._initState.translate.map(
              (x, i) =>
                (x + offset[i]) * containerScale * (v.scale?.initial || 1)
            )
            transform.translate = translate
          }
          //为图片元素添加style
          a.style.transform =
            `scale(${transform.scale})` +
            `translate(${transform.translate[0]}px, ${transform.translate[1]}px)` +
            `rotate(${transform.rotate}deg)`
          if (v.blur) {
            const x = v.blur.offset || 0
            const blurOffset = x * displace

            let res = 0
            if (!v.blur.wrap || v.blur.wrap === 'clamp') {
              res = Math.max(0, v._initState.blur + blurOffset)
            } else if (v.blur.wrap === 'alternate') {
              res = Math.abs(v._initState.blur + blurOffset)
            }
            a.style.filter = res < 1e-4 ? '' : `blur(${res}px)`
          }

          if (v.opacity) {
            const x = v.opacity.offset || 0
            const opacityOffset = x * displace
            const initial = v._initState.opacity
            if (!v.opacity.wrap || v.opacity.wrap === 'clamp') {
              a.style.opacity = Math.max(
                0,
                Math.min(1, initial + opacityOffset)
              )
            } else if (v.opacity.wrap === 'alternate') {
              const x = initial + opacityOffset
              let y = Math.abs(x % 1)
              if (Math.abs(x % 2) >= 1) {
                y = 1 - y
              }
              a.style.opacity = y
            }
          }
        })
      } catch (e) {
        console.error(e)
        this.$emit('change', false)
      }
    }
- 初始化图层内图片和帧动画
 // 初始化图层内图片和帧动画
    layerConfig.map((v, i) => {
      const a = v.resources[0].el
      layers[i].appendChild(a)
      requestAnimationFrame(af)
    })
    this.$emit('change', true)
- 定义鼠标事件
    // container 元素上有其他元素,需使用全局事件判断鼠标位置
    const handleLeave = () => {
      const now = performance.now()
      const timeout = 200
      const tempDisplace = displace
      cancelAnimationFrame(raf)
      const leaveAF = (t) => {
        if (t - now < timeout) {
          displace = tempDisplace * (1 - (t - now) / 200)
          af(t)
          requestAnimationFrame(leaveAF)
        } else {
          displace = 0
          af(t)
        }
      }
      raf = requestAnimationFrame(leaveAF)
    }
    this.handleMouseLeave = (e) => {
      this.entered = false
      handleLeave()
    }
    this.handleMouseMove = (e) => {
      const offsetY = document.documentElement.scrollTop + e.clientY
      if (offsetY < containerHeight) {
        if (!this.entered) {
          this.entered = true
          enterX = e.clientX
        }
        displace = (e.clientX - enterX) / containerWidth
        cancelAnimationFrame(raf)
        raf = requestAnimationFrame(af)
      } else {
        if (this.entered) {
          this.entered = false
          handleLeave()
        }
      }

      this.extensions.map((v) => v.handleMouseMove?.({ e, displace }))
    }
    this.handleResize = (e) => {
      containerHeight = container.clientHeight
      containerWidth = container.clientWidth
      containerScale = containerHeight / 155
      layerConfig.forEach((lc) => {
        lc.resources.forEach((i) => {
          const el = i.el
          el.height =
            el.dataset.height * containerScale * (lc.scale?.initial || 1)
          el.width =
            el.dataset.width * containerScale * (lc.scale?.initial || 1)
        })
      })
      cancelAnimationFrame(raf)
      raf = requestAnimationFrame((t) => {
        af(t)
      })
      this.extensions.map((v) => v.handleResize?.(e))
    }
    document.addEventListener('mouseleave', this.handleMouseLeave)
    window.addEventListener('mousemove', this.handleMouseMove)
    window.addEventListener('resize', this.handleResize)
- 在组件销毁前移除监听
 beforeDestroy() {
    document.removeEventListener('mouseleave', this.handleMouseLeave)
    window.removeEventListener('mousemove', this.handleMouseMove)
    window.removeEventListener('resize', this.handleResize)
    if (this.extensions) {
      this.extensions.map((v) => v.destory?.())
      this.extensions = []
    }
  },
- 扩展
此处引用bilibli的樱花下落js 有需要可以去github自取
//添加樱花?
    // if (this.config.extensions?.snow) {
    //   const snow = (
    //     await import(
    //       /* webpackChunkName: 'animated-banner-snow' */ './extensions/snow.js'
    //     )
    //   ).default
    //   this.extensions.push(await snow(this.$refs['container']))
    // }
    if (this.config.extensions?.petals) {
      try {
        const petals = (await import('./extensions/particle/index.js').default
        this.extensions.push(await petals(this.$refs['container']))
      } catch (e) {
        console.error(e)
      }
    }
App.vue
banner通常作为一个组件来被其他页面引用,
<template>
  <div id="app">
    <animatedBanner
      v-if="animatedBannerEnabled"
      :config="position"
      @change="(v) => (animatedBannerShow = v)"
      :style="animatedBannerShow ? '' : `background-image: url(${bannerImg})`"
      :class="animatedBannerShow ? '' : 'staticImg'"
    />
  </div>
</template>

- app页面在挂载时优先展示静态的banner来适配不同浏览器差异
export default {
  name: 'App',
  data() {
    return {
      position, //图片位置相关配置
      animatedBannerShow: false,    //是否显示静态banner
      animatedBannerEnabled: false  //是否可用
    }
  },
  components: {
    animatedBanner
  },
  computed: {
    bannerImg() {
      return require('./static/static.png')
    }
  },
  methods: {
    async animatedBanner() {
      // 优先加载展示静态banner
      const staticBannerImg = document.createElement('img')
      staticBannerImg.src = this.bannerImg
      await new Promise((resolve) => (staticBannerImg.onload = resolve()))
      this.animatedBannerEnabled = true
    }
  },
  mounted() {
    this.animatedBanner()
  }
}
写在最后
其实这里关键还是鼠标事件的监听和初始图片的位置等等信息,如有帮助到你不胜荣幸。
demo