
如何进行地图SDK开发(二)——示例文档
分类:vue
概述
前面的文章文章我们写到了SDK的开发以及ak认证的实现,在本文我们继续讲讲地图SDK开发中的示例文档的实现。
技术点
- vue3
- vite
- element-plus
- monaco-editor
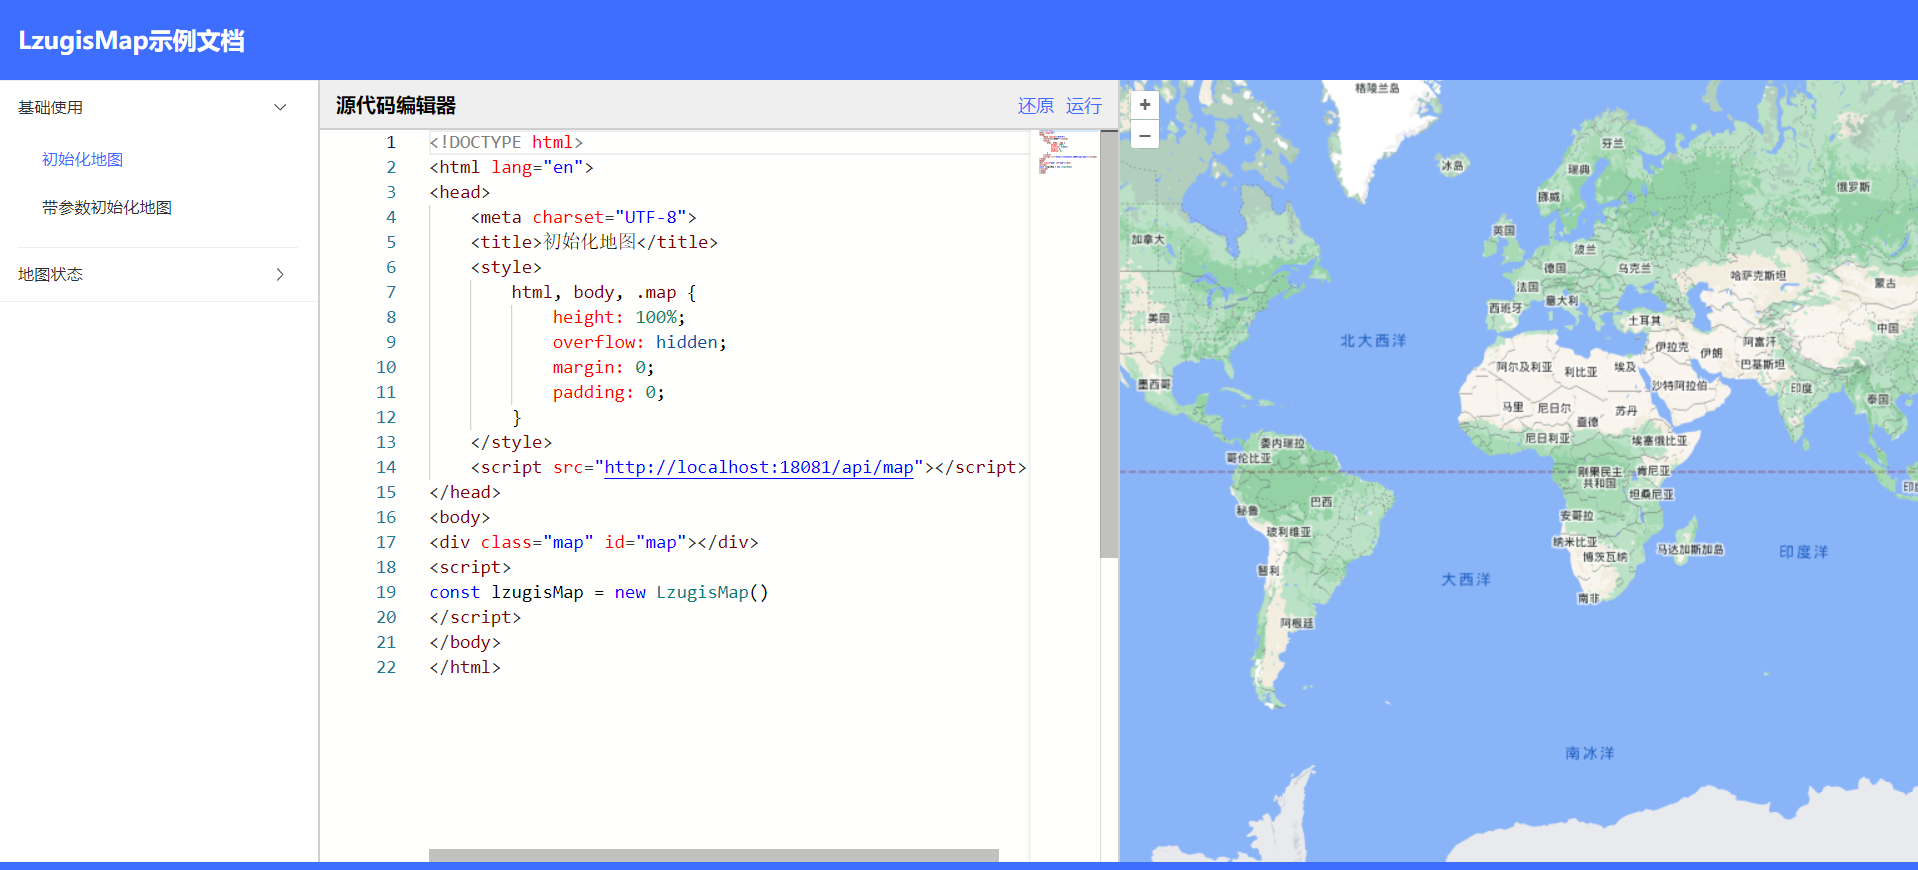
实现后效果

实现
1. 工程初始化
1.1 搭建工程
搭建工程的过程请参照博文(使用vite搭建vue3项目(vite + vue3 + vue router + pinia + element plus))[https://blog.csdn.net/m0_58565372/article/details/128495815].
1.2 添加依赖
运行命令npm i monaco-editor -S添加monaco-editor依赖。
1.3 修改首页布局
修改/src/views/home/index.vue,修改后代码如下:
<template>
  <div class="container">
    <header class="header">
      LzugisMap示例文档
    </header>
    <div class="main-container">
      <div class="file-tree">

      </div>
      <div class="code-container">
        <div class="title-zone">
          源代码编辑器
          <div class="title-tools">
            <a class="btn">还原</a>
            <a class="btn">运行</a>
          </div>
        </div>
        <div class="content-zone"></div>
      </div>
      <div class="run-container">

      </div>
    </div>
    <footer class="footer">
      Copyright © 2015-2022 LZUGIS
    </footer>
  </div>
</template>

<script>

export default {
  name: 'HomePage',
  data() {
    return {}
  },
  methods: {
  }
}
</script>

<style lang="scss" scoped>
$bg-color: #3d6eff;
$border: 0.1rem solid #cfcfcf;

.container {
  height: 100vh;
  overflow: hidden;
  width: 100%;
}

.header, .footer {
  padding: 0 1rem;
  background-color: $bg-color;
  color: white;
  width: 100%;
}
.header {
  height: 4rem;
  line-height: 4rem;
  font-size: 1.2rem;
  font-weight: bold;
}
.footer {
  height: 2rem;
  line-height: 2rem;
  text-align: center;
  font-size: 0.8rem;
}
.main-container {
  width: 100%;
  height: calc(100% - 6rem);
  .file-tree, .code-container, .run-container {
    float: left;
    width: calc(50% - 8.1rem);
    height: 100%;
    border-right: $border;
    overflow: hidden;
  }

  .file-tree {
    width: 16rem;
    overflow-y: auto;
  }

  .code-container, .run-container {
    --title-height: 2.4rem;
    .title-zone {
      height: var(--title-height);
      line-height: var(--title-height);
      padding: 0 0.8rem;
      font-weight: bold;
      background-color: #efefef;
      border-bottom: $border;

      .title-tools {
        float: right;
        .btn {
          font-size: 0.9rem;
          color: $bg-color;
          font-weight: normal;
          margin-left: 0.6rem;
          &:hover {
            cursor: pointer;
            text-decoration: underline;
          }
        }
      }
    }

    .content-zone {
      height: calc(100% - 2.4rem);
    }
  }
  .run-container {
    border-right: none;
  }
}
</style>
1.4. 引入monaco-editor
首先在/src/views/home/index.vue的script添加引入:
import * as monaco from 'monaco-editor/esm/vs/editor/editor.main.js';
import EditorWorker from 'monaco-editor/esm/vs/editor/editor.worker?worker';
import JsonWorker from 'monaco-editor/esm/vs/language/json/json.worker?worker';
import htmlWorker from 'monaco-editor/esm/vs/language/html/html.worker?worker';

self.MonacoEnvironment = {
    getWorker(workerId, label) {
        const workerDict = {
            json: new JsonWorker(),
            html: new htmlWorker()
        }
        return workerDict[label] || new EditorWorker();
    },
};接着在mounted生命周期中调用初始化方法this.init()。
export default {
  name: 'HomePage',
  data() {
    return {}
  },
  mounted() {
    this.init()
  },
  methods: {
    init() {
      if(!editor) {
        const editorDom = this.$refs.editor
        editor = monaco.editor.create(editorDom, {
          value: '', //编辑器初始显示文字
          language: 'html', //此处使用的python,其他语言支持自行查阅demo
          theme: 'vs', //官方自带三种主题"vs" | "vs-dark" | "hc-black" | "hc-light"
          selectOnLineNumbers: true,//显示行号
          roundedSelection: false,
          readOnly: false, // 只读
          cursorStyle: 'line', //光标样式
          automaticLayout: true, //自动布局
          glyphMargin: true, //字形边缘
          useTabStops: false,
          fontSize: 15, //字体大小
          autoIndent: true, //自动布局
          quickSuggestionsDelay: 100, //代码提示延时
        });
      }
    }
  }
}
2. 编写示例
2.1 创建示例目录
创建目录/public/examples,所有的示例文件都放在这个目录下面。
2.1 创建第一个示例
如下图,在examples下新建一个01-basic-基础使用的文件夹,并在下面新建一个01-initmap-初始化地图.html的文件。

说明:
- 文件和文件夹都采用
编号-编码-名称的方式进行命名; 编号能够保证自动生成的目录树排序正确;编号+编码需要唯一,编码为英文;名称是在左侧的目录树上展示的,为中文;
01-initmap-初始化地图.html的内容如下:
<!DOCTYPE html>
<html lang="en">
<head>
    <meta charset="UTF-8">
    <title>初始化地图</title>
    <link type="text/css" rel="stylesheet" href="http://localhost:8088/lib/lzugis-map.css">
    <style>
        html, body, .map {
            height: 100%;
            overflow: hidden;
            margin: 0;
            padding: 0;
        }
    </style>
</head>
<body>
<div class="map" id="map"></div>
<script src="http://localhost:8088/lib/lzugis-map.js"></script>
<script>
const lzugisMap = new LzugisMap()
</script>
</body>
</html>
2.2 生成目录树
在工程根目录下创建files-tree.js文件,内容如下:
import fs from 'fs';
import path from 'path';

const dirName = './public'

function readFileList(dir, filesList = []) {
    const pathName = path.basename(dir);
    const files = fs.readdirSync(dir);
    files.forEach(item => {
        let fullPath = path.join(dir, item);
        const stat = fs.statSync(fullPath);
        if (stat.isDirectory()) {
            readFileList(path.join(dir, item), filesList);  //递归读取文件
        } else {
            const fileName = path.basename(fullPath, '.html');
            const [num, code, name] = fileName.split('-')
            fullPath = fullPath.split('public\').join('')
            filesList.push({
                base: pathName,
                code: [num, code].join('-'),
                name,
                path: fullPath
            });
        }
    });
    return filesList;
}

function getDirTree() {
    let filesList = [];
    readFileList(dirName + '/examples', filesList);
    let dirs = [], dirsDict = {}
    filesList.forEach(f => {
        const base = f.base
        if(!dirs.includes(base)) dirs.push(base)
        if(!dirsDict[base]) dirsDict[base] = []
        dirsDict[base].push(f)
    })
    return dirs.map(d => {
        const children = dirsDict[d]
        const [num, code, name] = d.split('-')
        return {
            code: [num, code].join('-'),
            name,
            children
        }
    })
}
const file = dirName + '/examples-tree.json'
fs.writeFile(file, JSON.stringify(getDirTree()), { encoding: 'utf8' }, err => {})在package.json文件scripts中修改命令,这样每次运行或者打包的时候都会自动生成目录树。
{
  ...,
  "scripts": {
    "dev": "node ./files-tree.js && vite --mode dev",
    "build:sit": "node ./files-tree.js && vite build --mode sit",
    "build": "node ./files-tree.js && vite build -- mode prod",
  }
}生成的目录树文件为/public/examples-tree.json,文件的内容如下:

3. 示例实现
3.1 左侧树实现
通过el-collapse,实现左侧树。
<el-collapse v-model="activeNames">
   <el-collapse-item
       v-for="parent of treeData"
       :key="parent.code"
       :title="parent.name"
       :name="parent.code">
     <ul class="tree-c">
       <li
           v-for="child of parent.children"
           :key="child.code"
           @click="gotoPage(child)"
           :class="child.code === selectPage.code ? 'active' : ''">
         {{ child.name }}
       </li>
     </ul>
   </el-collapse-item>
 </el-collapse>

<script>
{
  // 初始化左侧树结构数据
  init() {
      const url = './examples-tree.json'
      fetch(url).then(res => res.json()).then(res => {
        this.treeData = res
        this.activeNames = [res[0].code]
        this.gotoPage(res[0].children[0])
      })
    }
}
</script>

<style lang="scss" scoped>
.tree-c {
  margin: 0;
  padding: 0;
  overflow: hidden;
  list-style: none;
  --item-h: 2.4rem;
  li {
    margin-left: 1.2rem;
    cursor: pointer;
    height: var(--item-h);
    line-height: var(--item-h);
    &:last-child {
      margin-bottom: 0.8rem;
    }
    &.active, &:hover {
      color: $bg-color;
    }
  }
}
</style>

<style lang="scss">
.el-collapse {
  --el-collapse-header-height: 42px;
  padding: 0 1rem;
  .el-collapse-item__content {
    padding-bottom: 0;
  }
}
</style>
3.2 实现预览
通过iframe来实现代码的预览。
<iframe frameborder="0" class="run-iframe" ref="preview"></iframe>
<script>
export default {
  name: 'HomePage',
  data() {
    return {
      treeData: [],
      activeNames: '',
      selectPage: ''
    }
  },
  mounted() {
    this.init()
  },
  methods: {
    init() {
      const url = './examples-tree.json'
      fetch(url).then(res => res.json()).then(res => {
        this.treeData = res
        this.activeNames = [res[0].code]
        this.gotoPage(res[0].children[0])
      })
    },

    initEditor(code) {
      if(!editor) {
        const editorDom = this.$refs.editor
        editor = monaco.editor.create(editorDom, {
          value: '', //编辑器初始显示文字
          language: 'html', //此处使用的python,其他语言支持自行查阅demo
          theme: 'vs', //官方自带三种主题"vs" | "vs-dark" | "hc-black" | "hc-light"
          selectOnLineNumbers: true,//显示行号
          roundedSelection: false,
          readOnly: false, // 只读
          cursorStyle: 'line', //光标样式
          automaticLayout: true, //自动布局
          glyphMargin: true, //字形边缘
          useTabStops: false,
          fontSize: 15, //字体大小
          autoIndent: true, //自动布局
          quickSuggestionsDelay: 100, //代码提示延时
        });
      }
      editor.setValue(code)
      this.runCode(code)
    },

    runCode(code) {
      let html = code || editor.getValue()
      this.$refs.preview.setAttribute("srcdoc", html);
    },

    reset() {
      this.gotoPage(this.selectPage)
    },

    gotoPage(page) {
      this.selectPage = page
      fetch('./' + page.path).then(res => res.text()).then(res => {
        this.initEditor(res)
      })
    }
  }
}
</script>