
4. 「vue@2.6.11 源码分析」new Vue() 整体流程和组件渲染之前的准备工作
new Vue(...)
// src/core/instance/index.js
function Vue (options) {
this._init(options)
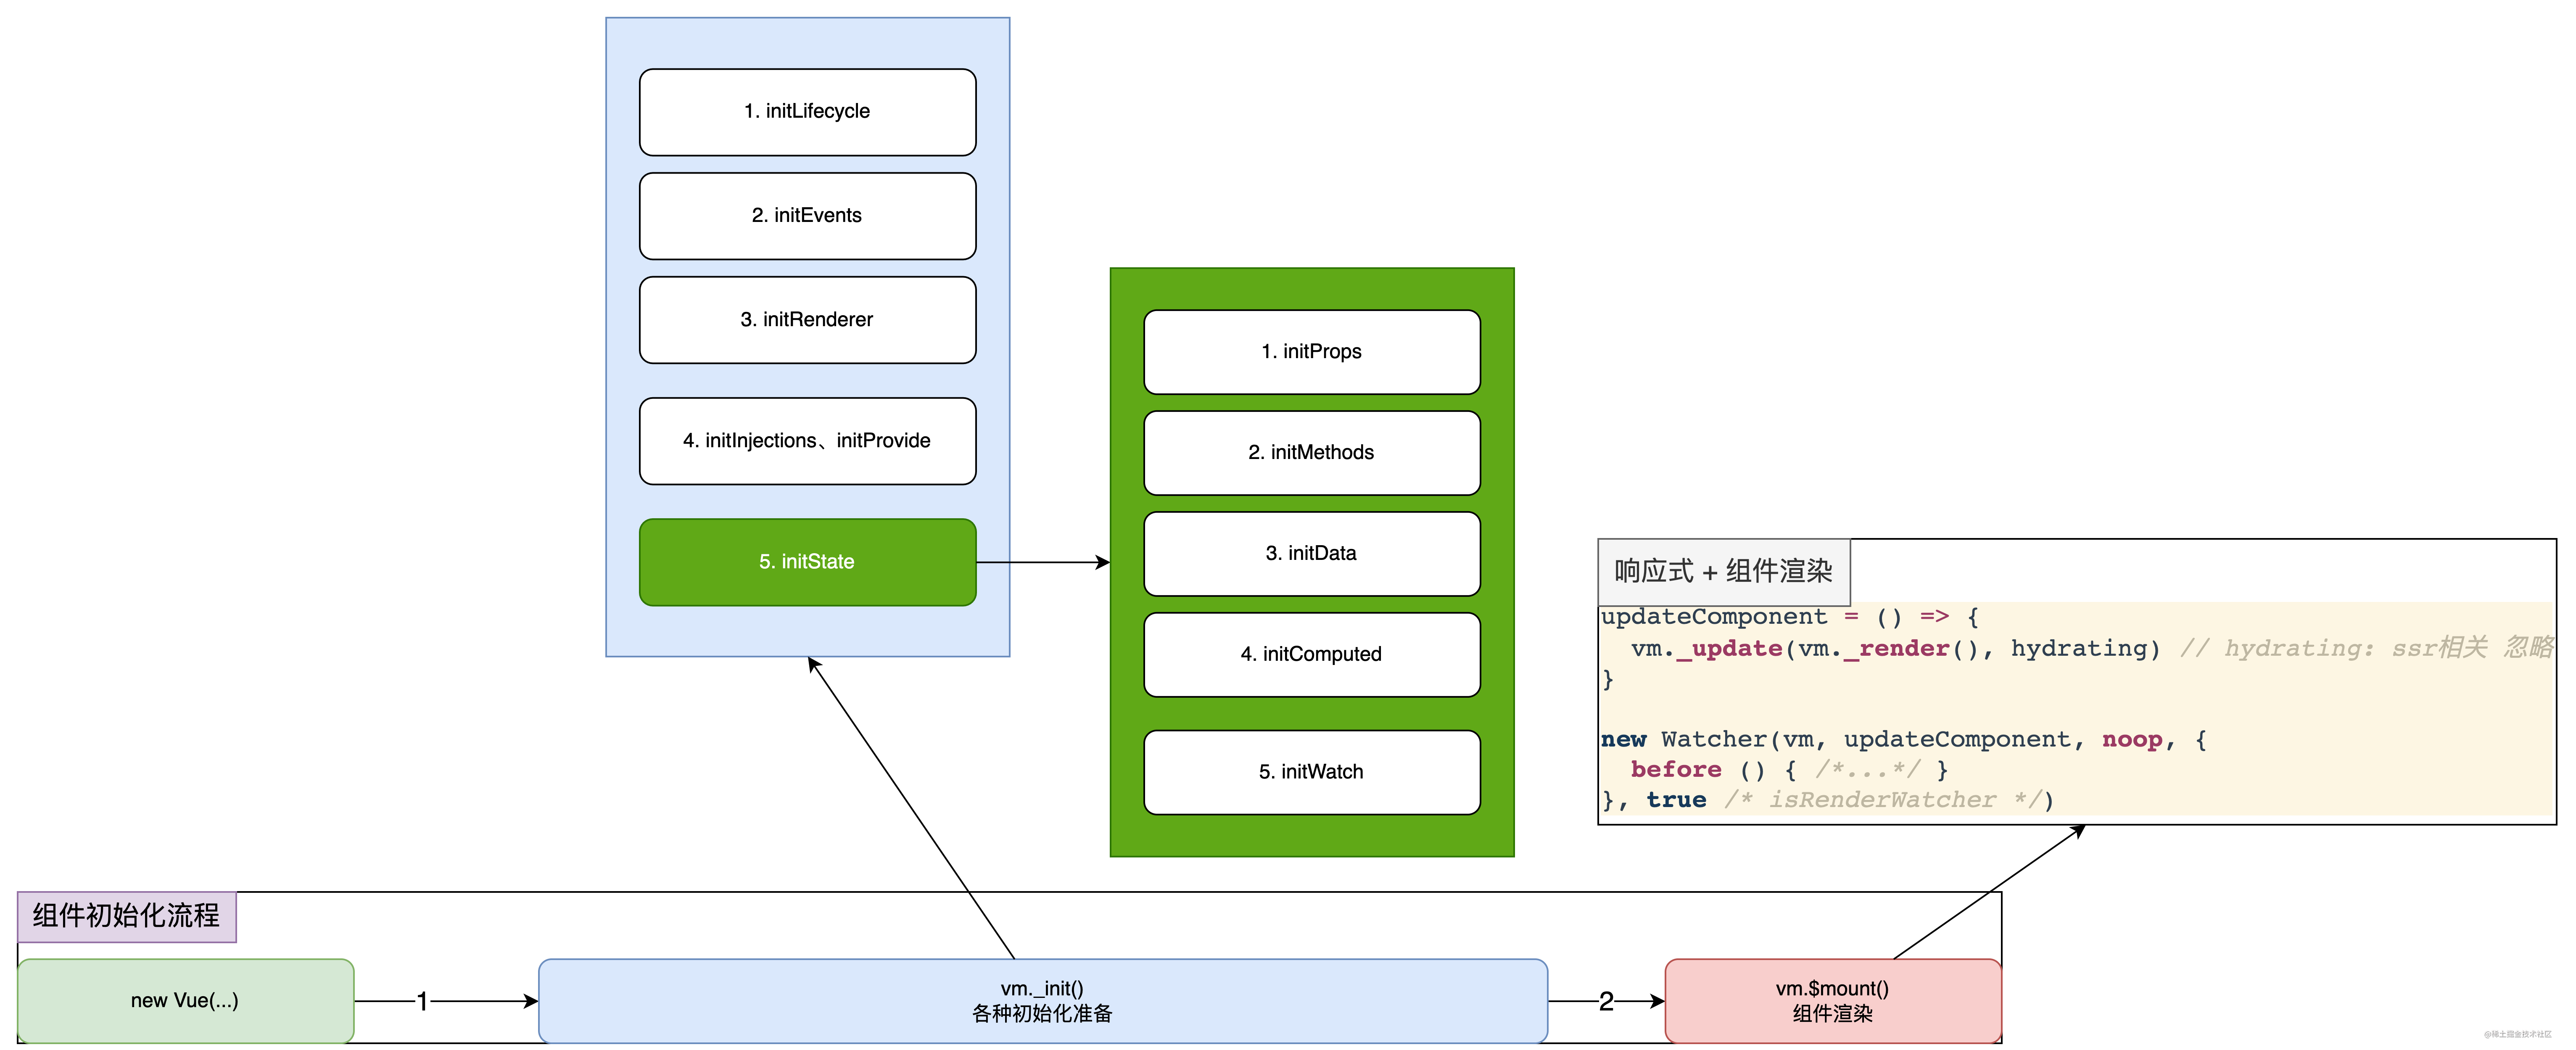
}将组件渲染渲染分为两大步骤:组件信息(事件、方法等等)的初始化,以及组件的渲染。 虽然源码中 $mount方法调用放在了_init方法上,但是感觉拿出来好些,毕竟是两个大的步骤。


_init:组件初始化准备(变量、数据增强,方法注册等等)
// src/core/instance/init.js
export function initMixin (Vue: Class<Component>) {
Vue.prototype._init = function (options?: Object) {
const vm: Component = this
vm._uid = uid++
vm._isVue = true
// merge options
if (options && options._isComponent) {
// optimize internal component instantiation
// since dynamic options merging is pretty slow, and none of the
// internal component options needs special treatment.
initInternalComponent(vm, options) // 组件的实例化,走这里,目的是优化,为何❓
} else {
vm.$options = mergeOptions(resolveConstructorOptions(vm.constructor), options || {}, vm)
}
vm._renderProxy = vm
vm._self = vm // expose real self
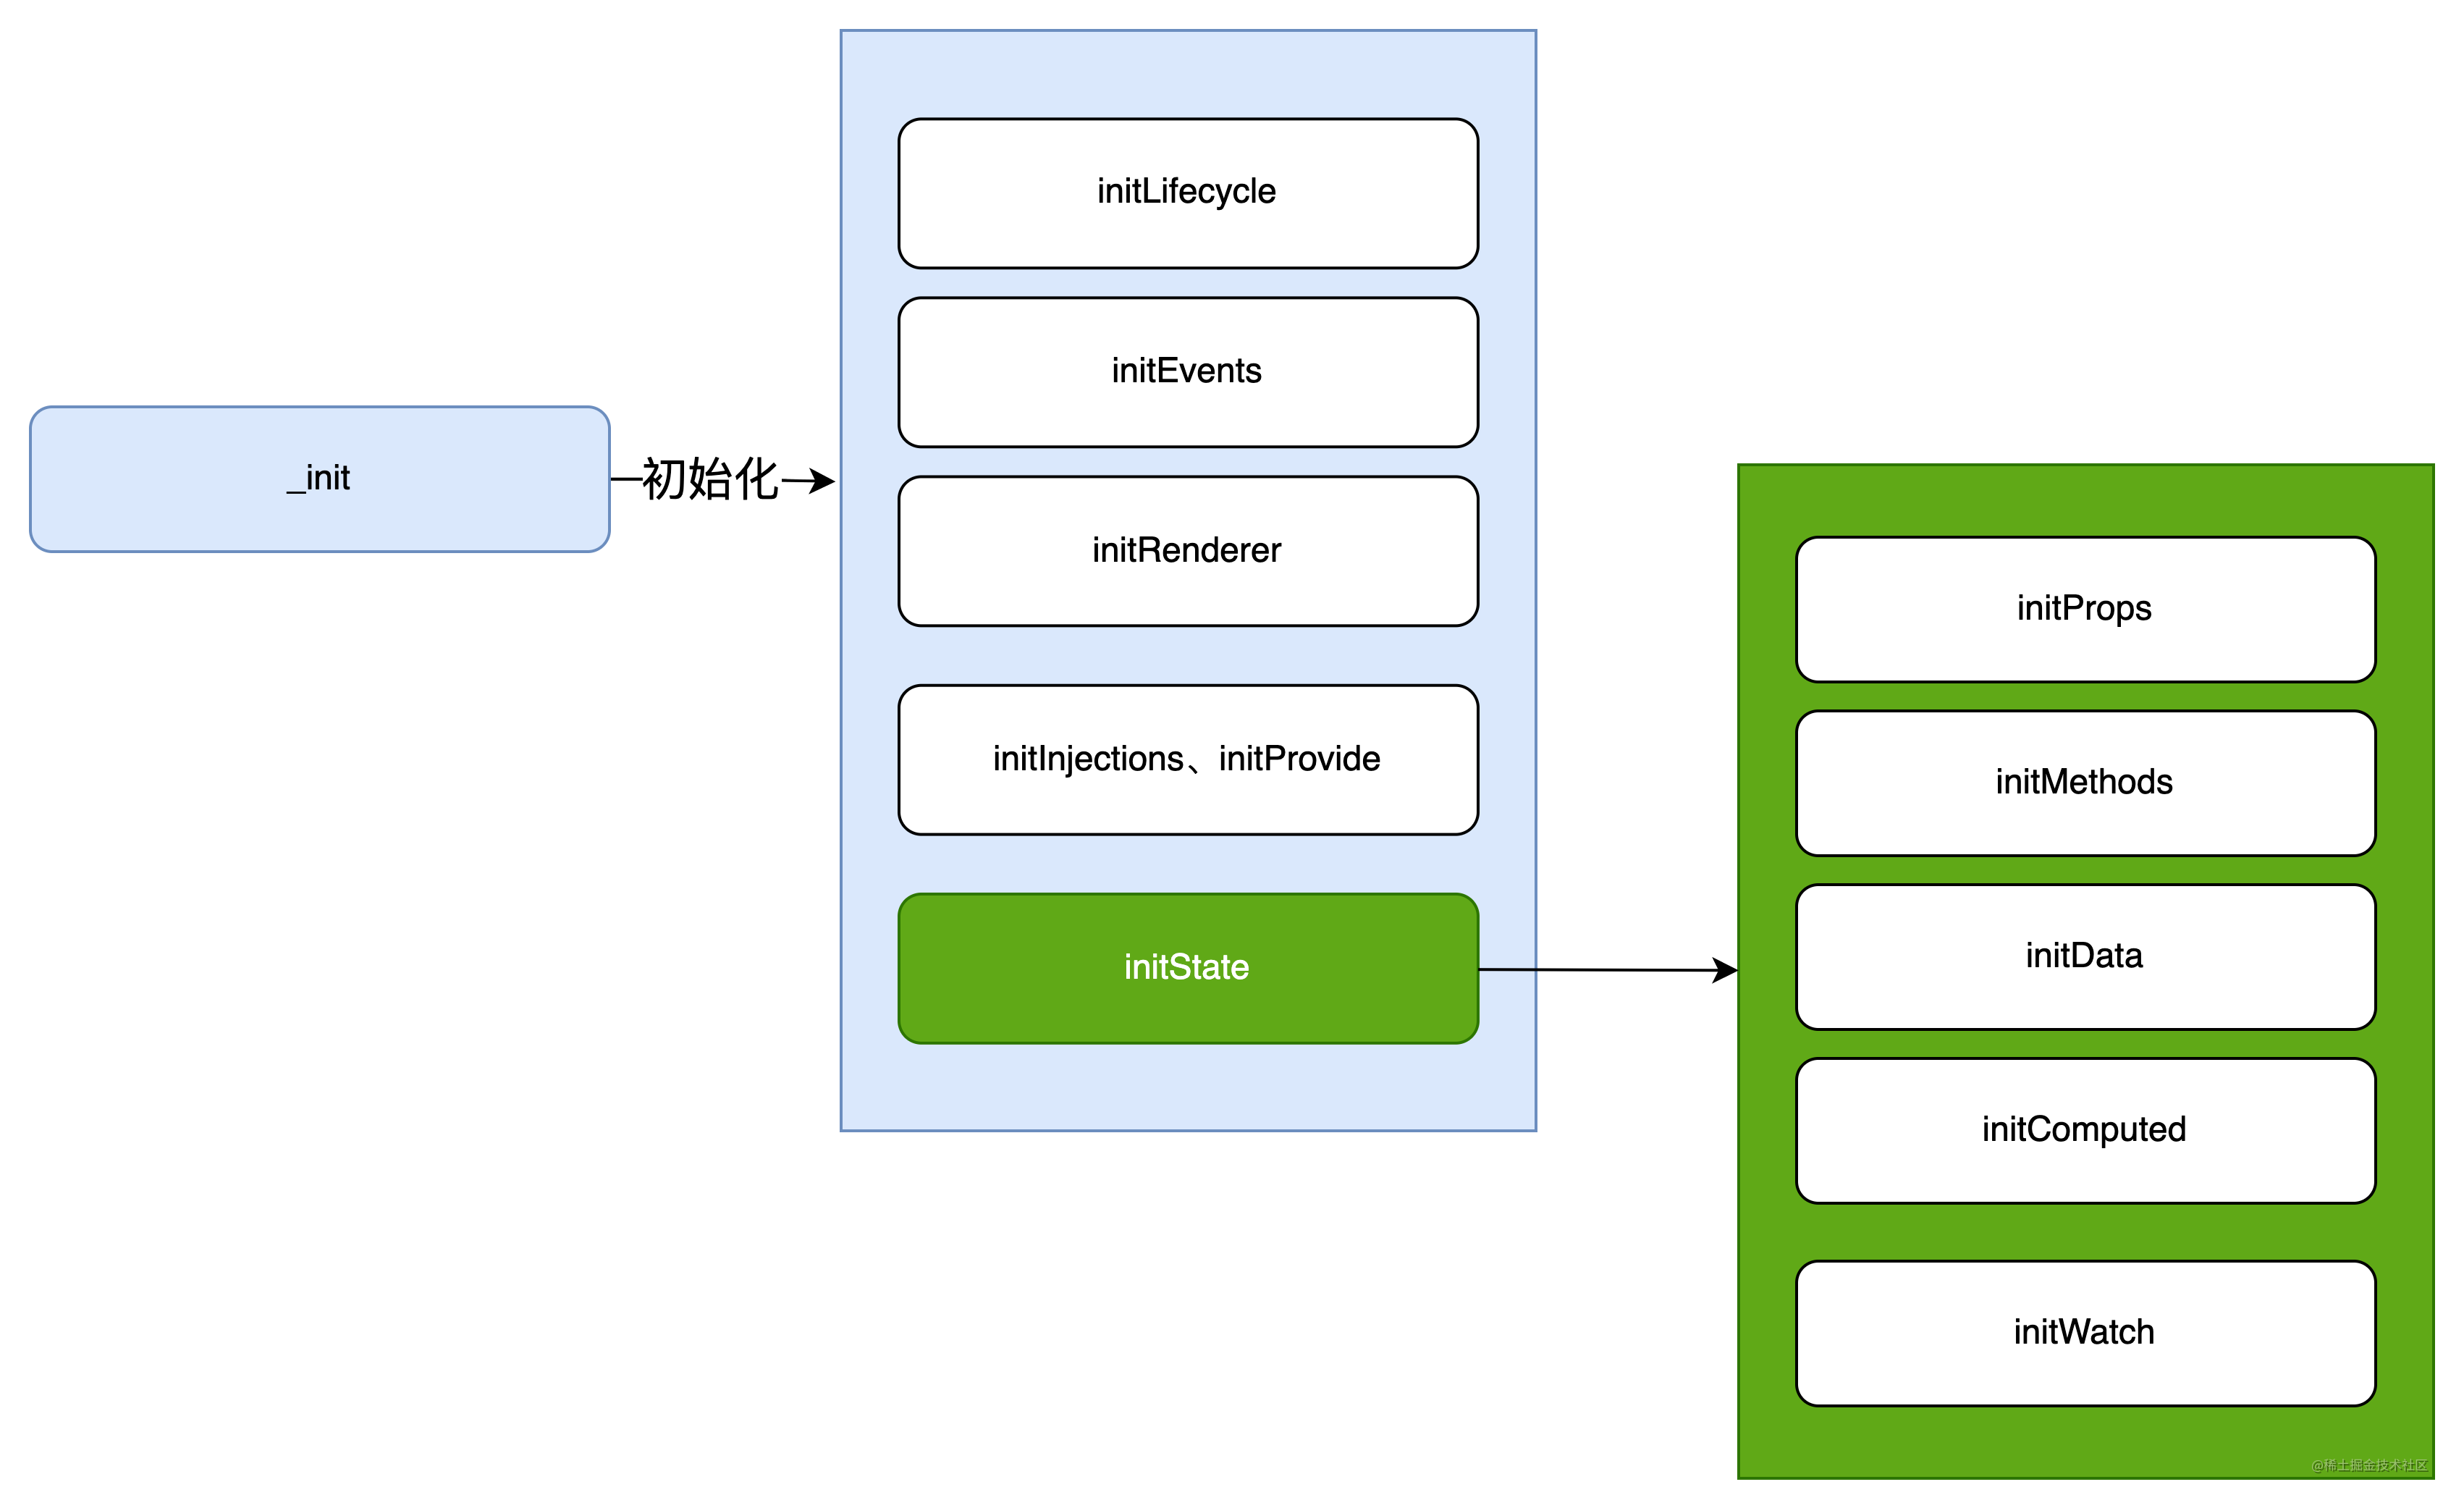
initLifecycle(vm)
initEvents(vm)
initRender(vm)
callHook(vm, 'beforeCreate')
initInjections(vm) // resolve injections before data/props
initState(vm)
initProvide(vm) // resolve provide after data/props
callHook(vm, 'created')
if (vm.$options.el) {
vm.$mount(vm.$options.el)
}
}
}收集options,保存到 vm.$options
- 针对组件的初始化,走
initInternalComponent,给组件实例挂载一些属性和方法,后面会分析到。- 注释写着优化目的❓❓❓ ```
- resolveConstructorOptions:更新选项
- events、生命周期,inject/provede、state(methods、props、data、computed、watch)等初始化
- vm.mount:new Vue场景会提供el参数,从而会执行vm.mount,组件的加载不走这里,后面分析组件加载的时候会再说到。
除了几个initXxx方法,还有两个生命周期的触发:beforeCreate、created
下面具体看看各种(实例vm相关的信息)初始化
initLifecycle
- 设置 parent | root | children | refs: 建立父子组件vue实例关系链:parent、children,这个过程忽略中间的抽象组件实例(
- 添加组件生命周期相关的的标识:
- _inactive、_directInactive、_isMounted、_isDestroyed、_isBeingDestroyed
- 添加
_watcher属性
export function initLifecycle (vm: Component) {
  const options = vm.$options

  // locate first non-abstract parent
  let parent = options.parent
  if (parent && !options.abstract) {
    while (parent.$options.abstract && parent.$parent) {
      parent = parent.$parent
    }
    parent.$children.push(vm)
  }

  vm.$parent = parent
  vm.$root = parent ? parent.$root : vm

  vm.$children = []
  vm.$refs = {}

  vm._watcher = null
  vm._inactive = null
  vm._directInactive = false
  vm._isMounted = false
  vm._isDestroyed = false
  vm._isBeingDestroyed = false
}
initEvents
export function initEvents (vm: Component) {
  vm._events = Object.create(null)
  vm._hasHookEvent = false
  // init parent attached events
  const listeners = vm.$options._parentListeners
  if (listeners) {
    updateComponentListeners(vm, listeners) // src/core/vdom/helpers/update-listeners.js
  }
}每个Vue实例上都有on、off和事件相关的方法,相当于每个组件实例都有事件能力。调用updateComponentListeners将新事件绑定到vm上,移除旧的事件。
vm.options._parentListeners的来处(以<todo-item>组件为例):
- vm._render -> createComponent: 在上层组件渲染过程中,碰到
<todo-item>标签时,会去创建该组件标签即<todo-item>对应的vnode,这个过程会获取 data.on(native事件),并保存到vnode.componentOptions上,在上层组件进行diff过程中(vm._update)开始遇到组件标签的解析此时才会真正进入组件内部创建组件实例和组件的渲染即执行该组件(todo-item)的_init。 这个过程后面会再说到,这里先提一下。 - 而后 vm._init -> initInternalComponent: opts._parentListeners = vnodeComponentOptions.listeners
initRender
export function initRender (vm: Component) {
  vm._vnode = null // the root of the child tree
  vm._staticTrees = null // v-once cached trees

  const options = vm.$options
  const parentVnode = vm.$vnode = options._parentVnode // the placeholder node in parent tree
  const renderContext = parentVnode && parentVnode.context

  vm.$slots = resolveSlots(options._renderChildren, renderContext)
  vm.$scopedSlots = emptyObject

  // bind the createElement fn to this instance
  // so that we get proper render context inside it.
  // args order: tag, data, children, normalizationType, alwaysNormalize
  // internal version is used by render functions compiled from templates
  vm._c = (a, b, c, d) => createElement(vm, a, b, c, d, false)
  // normalization is always applied for the public version, used in
  // user-written render functions.
  vm.$createElement = (a, b, c, d) => createElement(vm, a, b, c, d, true)

  // $attrs & $listeners are exposed for easier HOC creation.
  // they need to be reactive so that HOCs using them are always updated
  const parentData = parentVnode && parentVnode.data
  defineReactive(vm, '$attrs', parentData && parentData.attrs || emptyObject, null, true)
  defineReactive(vm, '$listeners', options._parentListeners || emptyObject, null, true)

}
slot相关,单独出一小节❓❓❓
render函数 的执行,直接挂载到 vm 实例上,区别如下
_c:对于模板编译生成(不管是动态生成还是 vue-loade + webpack 生成,编译核心方法是 compileToFunctions)的render函数(因此最后一个参数 alwaysNormalize = faslse),走这
$createElement:对于开发者自己提供的 render 函数(因此最后一个参数 alwaysNormalize = true),走这
import Vue from 'vue'
import App from './App.vue'

var app = new Vue({
  el: '#app',
  render: h => h(App) // 这里的 h 是 createElement 方法
})
添加 $attrs、$listeners 响应式能力❓❓❓
initInjections、initProvide
- 记个todo
initState
export function initState (vm: Component) {
  vm._watchers = []
  const opts = vm.$options
  if (opts.props) initProps(vm, opts.props)
  if (opts.methods) initMethods(vm, opts.methods)
  if (opts.data) {
    initData(vm)
  } else {
    observe(vm._data = {}, true /* asRootData */)
  }
  if (opts.computed) initComputed(vm, opts.computed)
  if (opts.watch && opts.watch !== nativeWatch) {
    initWatch(vm, opts.watch)
  }
}
相关属性的响应式依赖过程:props -> data -> computed -> watch,因此需要按照这个顺序依次添加响应式能力。methods正常情况下应该无所谓,但是看到注释中提到methods名称不能和props重复,因此先props后methods。
比如 data中可能会到props中的数据,computed可能会用到data中的数据。watch可能会依赖前三者。
因此这里的执行顺序很重要。
initProps
function initProps (vm: Component, propsOptions: Object) {
  const propsData = vm.$options.propsData || {}
  const props = vm._props = {}
  // cache prop keys so that future props updates can iterate using Array
  // instead of dynamic object key enumeration.
  const keys = vm.$options._propKeys = []
  const isRoot = !vm.$parent
  // root instance props should be converted
  if (!isRoot) {
    toggleObserving(false)
  }
  for (const key in propsOptions) {
    keys.push(key)
    const value = validateProp(key, propsOptions, propsData, vm)
    defineReactive(props, key, value)
    if (!(key in vm)) {
      proxy(vm, `_props`, key)
    }
  }
  toggleObserving(true)
}
toggleObserving(false) :有一个专门的提交 avoid conversion when setting props
- 暂不清楚目的是什么?
调用validateProp验证属性是否符合开发者的声明,设置默认值等(并会将默认值变成响应式对象)
将props的各属性变成响应式(defineReactive默认递归处理属性值)。
代理 vm.xxx => vm._props.xxx,见proxy方法实现
export function proxy (target: Object, sourceKey: string, key: string) {
  sharedPropertyDefinition.get = function proxyGetter () {
    return this[sourceKey][key]
  }
  sharedPropertyDefinition.set = function proxySetter (val) {
    this[sourceKey][key] = val
  }
  Object.defineProperty(target, key, sharedPropertyDefinition)
}
initMethods
function initMethods (vm: Component, methods: Object) {
  for (const key in methods) {
    //... 开发环境同名判断,不重要
    vm[key] = typeof methods[key] !== 'function' ? noop : bind(methods[key], vm)
  }
}将方法赋值给vm实例,注意绑定了this指向
initData
function initData (vm: Component) {
  let data = vm.$options.data
  data = vm._data = typeof data === 'function' ? getData(data, vm) : data || {}
  if (!isPlainObject(data)) {
    data = {}
  }
  // proxy data on instance
  const keys = Object.keys(data)
  let i = keys.length
  while (i--) {
    const key = keys[i]
    proxy(vm, `_data`, key)
  }
  // observe data
  observe(data, true /* asRootData */)
}首先是调用getData获取数据,注意防止被上层的watcher订阅,手动pushTarget空值,这样就不会被上层的watcher订阅到。
export function getData (data: Function, vm: Component): any {
  // #7573 disable dep collection when invoking data getters
  pushTarget()
  try {
    return data.call(vm, vm)
  } // catch ...
  } finally {
    popTarget()
  }
}
将data变成响应式数据。
initComputed
const computedWatcherOptions = { lazy: true }

function initComputed (vm: Component, computed: Object) {
  // $flow-disable-line
  const watchers = vm._computedWatchers = Object.create(null)

  for (const key in computed) {
    const userDef = computed[key]
    const getter = typeof userDef === 'function' ? userDef : userDef.get

    // create internal watcher for the computed property.
    watchers[key] = new Watcher(vm, getter || noop, noop, computedWatcherOptions)

    // component-defined computed properties are already defined on the
    // component prototype. We only need to define computed properties defined
    // at instantiation here.
    if (!(key in vm)) {
      defineComputed(vm, key, userDef)
    }
  }
}- 遍历computed,针对每个属性去
new Watcher(...),注意这里的有个lazy的选项即getter并不会立即执行,此时并不会真正的去收集依赖。这里另外的细节是,computed定义的getter中可以使用props\data中的数据,由于props\data在这之前已经是响应式数据,因此即使立即收集依赖也不会有问题,可以正确建立双向关系(观察者和props\data)。- 现在是lazy,那什么时候会真正执行呢❓❓❓
- 调用
defineComputed
defineComputed
export function defineComputed (target: any, key: string, userDef: Object | Function) {
  if (typeof userDef === 'function') {
    sharedPropertyDefinition.get =  createComputedGetter(key)
    sharedPropertyDefinition.set = noop
  } else {
    sharedPropertyDefinition.get = userDef.get ? createComputedGetter(key): noop
    sharedPropertyDefinition.set = userDef.set || noop
  }
  Object.defineProperty(target, key, sharedPropertyDefinition)
}- 调用 createComputedGetter 返回一个闭包函数(持有key的引用)作为新的getter
- 然后将该key和属性描述符(getter/setter)添加到vm上,读取vm[key]这个属性值时会执行上面返回的 computedGetter(什么时候会调用到呢,可能是mounted生命周期,可能是点击事件回调,可能是页面渲染需要的数据)
computedGetter
function createComputedGetter (key) {
  return function computedGetter () {
    const watcher = this._computedWatchers && this._computedWatchers[key]
    if (watcher) {
      if (watcher.dirty) {
        watcher.evaluate()
      }
      if (Dep.target) {
        watcher.depend()
      }
      return watcher.value
    }
  }
}
如果发现数据是脏的,则重新估算该值(这也是之前lazy的价值,延迟执行,真正需要时再去执行)
// Watcher.js
evaluate () {
  this.value = this.get()
  this.dirty = false
}
watcher.depend()的作用
- 场景1:mountComponet → new Watcher 创建一个渲染组件能力的watcher即这里的Dep.target,而上面computedGetter中的watcher是computed属性相关的 watcher
- 如果在render函数中用到了computed中的数据,则会读取,那么会执行computedGetter ,先是执行watcher.evaluate获取computed属性的值(执行属性的handler,这个过程读取响应式数据),这里帮助watcher(computed属性关联的)收集依赖,因此依赖的数据变化时,会重新执行handler计算新值。
- 由于evaluate执行过程中的Dep.target指向的watcher是computed属性关联的(因为watcher.get中会去pushTarget,popTarget原因),而此时渲染Watcher并没有和这部分的相应的数据建立关系。因此在执行完evaluate后(popTarget),此时的Dep.target 指向渲染watcher,需要手动去收集一次依赖即computedGetter 中的watcher.depend()。
- 小结:这里有两个watcher,都应该向对computed[key]依赖的响应式数据添加订阅,但是由于框架的设计时同时只有一个watcher,因此内部的watcher完成后,需要手动触发外层watcher向内层wathcher订阅的依赖订阅一次。(目前只有这一个地方这么用 , 渲染会在nextTick中执行,不会产生性能问题,也行得通;否则应该让外层的watcher向内层的watcher订阅,不过内层的watcher同时需要扮演依赖即Dep的角色。) ```js /**
- Depend on all deps collected by this watcher.
*/ Watcher.prototype.depend = function depend () { var i = this.deps.length; while (i--) { this.deps[i].depend(); } }; ```
- 场景2:如果没有在渲染阶段用到这个computed属性,则不会引起该组件的重新渲染,显然是合理的。因为界面不不需要这些信息。
initWatch
function initWatch (vm: Component, watch: Object) {
  for (const key in watch) {
    const handler = watch[key]
    if (Array.isArray(handler)) {
      for (let i = 0; i < handler.length; i++) {
        createWatcher(vm, key, handler[i])
      }
    } else {
      createWatcher(vm, key, handler)
    }
  }
}

function createWatcher (vm: Component, expOrFn: string | Function, handler: any, options?: Object) {
  if (isPlainObject(handler)) {
    options = handler
    handler = handler.handler
  }
  if (typeof handler === 'string') {
    handler = vm[handler]
  }
  return vm.$watch(expOrFn, handler, options)
}
逻辑很显然,不赘述。
Vue.prototype.$watch
Vue.prototype.$watch = function (expOrFn: string | Function, cb: any, options?: Object): Function {
  const vm: Component = this
  if (isPlainObject(cb)) {
    return createWatcher(vm, expOrFn, cb, options)
  }
  options = options || {}
  options.user = true
  const watcher = new Watcher(vm, expOrFn, cb, options)
  if (options.immediate) {
    try {
      cb.call(vm, watcher.value)
    } //...
  }
  return function unwatchFn () {
    watcher.teardown()
  }
}
添加了对options.immediate支持、返回watcher卸载能力方法。
小结
- initLifecycle
- initEvents
- initRenderer
- initInjections、initProvide
- initState
开始组件挂载:vm.$mount
我们使用的是具有运行时模板编译的版本,意味着我们在new Vue()参数中的template会被构建为render函数,这是“在线编译”的过程,它是调用 compileToFunction 方法实现的。
在 Vue 2.0 版本中,所有 Vue 的组件的渲染最终都需要
render方法,无论我们是用单文件 .vue 方式开发组件,还是写了el或者template属性,最终都会转换成render方法。
// src/platforms/web/entry-runtime-with-compiler.js

import { compileToFunctions } from './compiler/index'

const mount = Vue.prototype.$mount
Vue.prototype.$mount = function (el?: string | Element, hydrating?: boolean): Component {
  el = el && query(el)

  if (el === document.body || el === document.documentElement) {
    // Vue 不能挂载在 body、html 这样的根节点上
    return this
  }

  const options = this.$options
  // resolve template/el and convert to render function
  if (!options.render) {
    let template = options.template
    if (template) {
      if (typeof template === 'string') {
        if (template.charAt(0) === '#') {
          template = idToTemplate(template)
        }
      } else if (template.nodeType) {
        template = template.innerHTML
      } else {
        return this
      }
    } else if (el) {
      template = getOuterHTML(el)
    }
    if (template) {
      const { render, staticRenderFns } = compileToFunctions(template, {...}, this)
      options.render = render
      options.staticRenderFns = staticRenderFns
    }
  }
  return mount.call(this, el, hydrating)
}- 提供 运行时模板编译能力 ,即将 template 转为 render 函数
- Vue 不能挂载在
body、html这样的根节点上 template可以是…,总之需要转html模板- dom id 如 “#app”,获取其 innerHTML
- 又或者是DOM节点,获取其 innerHTML
- 如果没有提供,则获取
el的outerHTML - 或者直接是 HTML字符串模板,如上述 demo
- 调用
compileToFunctions****方法讲template转为render函数
- Vue 不能挂载在
- 调用运行时版本的 mount 函数
- 定义在 src/platforms/web/runtime/index.js 中(web版本的运行时构建入口) ```js // src/platforms/web/runtime/index.js import { mountComponent } from 'core/instance/lifecycle'
Vue.prototype.$mount = function(el?:string| Element, hydrating?:boolean): Component { el = el && inBrowser ? query(el) :undefined return mountComponent(this, el, hydrating) } ```
mountComponent:vm._render + vm._update
export function mountComponent (vm: Component, el: ?Element, hydrating?: boolean): Component {
  vm.$el = el
  callHook(vm, 'beforeMount')

  let updateComponent
  updateComponent = () => {
    vm._update(vm._render(), hydrating)
  }

  // we set this to vm._watcher inside the watcher's constructor
  // since the watcher's initial patch may call $forceUpdate (e.g. inside child
  // component's mounted hook), which relies on vm._watcher being already defined
  new Watcher(vm, updateComponent, noop, {
    before () {
      if (vm._isMounted && !vm._isDestroyed) {
        callHook(vm, 'beforeUpdate')
      }
    }
  }, true /* isRenderWatcher */)

  if (vm.$vnode == null) {
    vm._isMounted = true
    callHook(vm, 'mounted')
  }
  return vm
}
两件事情
挂载和更新 DOM,
new Watcher() :提供了监听数据变化的基础能力,
new Watcher(vm, getter , ...)
// 第一次触发getter 就是 挂载
// 第二次触发getter 就是 更新updateComponent:
_render: VNode 的生成,传递给_update_update: 将_render后关于VNode的结果 挂载或者更新到界面上(生成或者更新DOM
生命周期回调的触发
- beforeMount
- beforeUpdate:根据该生命周期,能猜测出来 new Watcher(..)提供和跟更新能力
- mounted
总结
这一节主要是在说组件渲染之前的准备过程,各种数据的初始化,事件的订阅等等。
下节重点说下组件渲染真正渲染的过程(虚拟DOM的创建和虚拟DOM同步到界面的逻辑)
updateComponent = () => {
  vm._update(vm._render(), hydrating) // hydrating: ssr相关 忽略
}

new Watcher(vm, updateComponent, noop, {
  before () { /*...*/ }
}, true /* isRenderWatcher */)