Vue状态管理——Vuex
文章目录
1、序言
前面我们已经介绍过父子组件之间的通信方式,父组件通过prop向子组件传递数据,子组件通过自定义事件向父组件传递数据。然而,在实际项目中,经常会遇到多个组件需要访问同一数据的情况,且都需要根据数据的变化做出响应,而这些组件之间可能并不是父子组件这种简单的关系。在这种情况下,就需要一个全局的状态管理方案。在Vue开发中,官方推荐Vuex。
Vuex是一个专门为Vue.js应用程序开发的状态管理模式。它采用集中式存储来管理应用程序中所有组件的状态,并以相应的规则保证状态以一种可预测的方式发生变化。Vuex也被集成到了Vue的官方调试工具vue-devtools中,提供了诸如零配置的time-travel调试、状态快照导入/导出等高级调试功能。
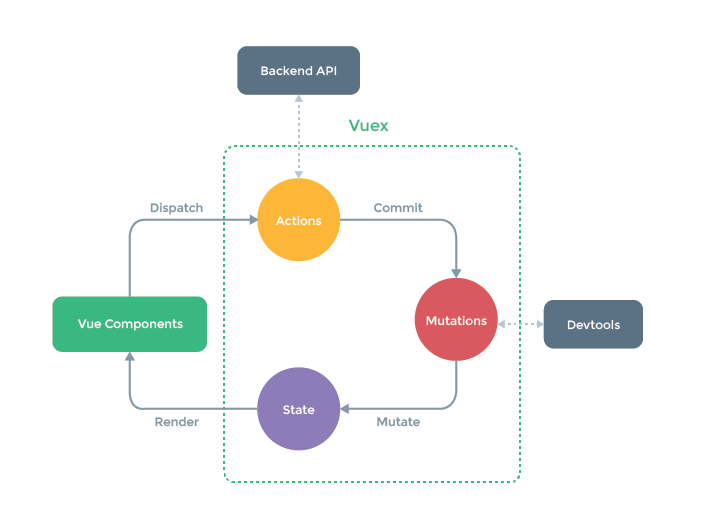
下图所示为Vuex的工作原理图

2、安装Vuex
可以使用CDN方式安装。代码如下所示:
<!--引用最新版-->
<script src="https://unpkg.com/vuex@next"></script>
<!--引用指定版本-->
<script src="https://unpkg.com/vuex@4.0.0-rc.1"></script>
如果使用模块化开发,则使用npm安装方式。执行以下命令安装Vuex:
npm install vuex@next --save或者使用yarn安装,执行下面的命令:
yarn add vuex@next --save在Vue3.0的脚手架项目中使用,在main,js文件中导入createStore,并调用该方法创建一个store实例,之后使用Vue.js应用程序实例的use()方法将该实例作为插件安装。代码如下所示:
import {createApp} from 'vue'
import {createStore} from 'vuex'

//创建新的store实例
const state=createStore({
	state(){
		return{
			count:1
		}
	}
})
const app=createApp({/*根组件*/})
//将store实例作为插件安装
app.use(store)
3、基本用法
Vuex使用单一状态树,也就是说,用一个对象包含了所有应用层级的状态,作为唯一数据源而存在。每一个Vuex应用的核心就是store,store可以理解为保存应用程序状态的容器。store与普通的全局对象的区别有以下两点。
(1)Vue的状态存储是响应式的。当Vue组件从store中检索状态的时候,如果store中的状态发生变化,那么组件也会相应地得到高效更新。
(2)不能直接改变store中的状态。改变store中的状态的唯一途径就是显示地提交mutation。这可以确保每个状态更改都留下可跟踪的记录,从而能够启用一些工具来帮助我们更好地理解应用。
接下来,以一个购物车案例来学习Vuex的使用,按照以下步骤创建脚手架项目,安装Vuex并进行基础配置。
(1)使用Vue CLI创建一个Vue3.0的脚手架项目,项目名为cart,直接选择Defalult(Vue 3.0 Preview)([Vue3]babel,eslint),.开始项目创建。
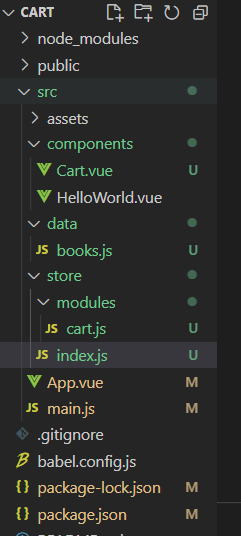
项目目录:
(2)启动VSCode,打开项目所在文件夹,为项目安装Vuex。选择【终端】-》【新终端】选项,在弹出的终端窗口中输入以下命令安装Vuex。
npm install vuex@next --save(4)我们通常是吧状态管理相关文件单独放到一个文件夹下,以集中管理和配置。在src目录下新建一个文件夹store,在该文件夹下新建一个index.js文件。编辑该文件,代码如下所示:
store/index.js
import { createStore } from "vuex";
import cart from './modules/cart'

const store=createStore({
//状态数据通过state()函数返回
 state(){
	return {
	}
 }
})

export default store
(4)在程序入口的main.js文件中使用store实例,从而在整个应用程序中应用Vuex的状态管理功能。
main.js
import { createApp } from 'vue'
import App from './App.vue'
import store from './store'

createApp(App).use(store).mount('#app')
接下来就可以正式开始编写购物车实例了。首先将购物车中的商品数据放到store中统一管理。在实际项目中,购物车中的商品数据是用户在商品页面添加商品保存的,而所有的商品信息都是从后端服务器得到的。简单起见,在前端硬编码一些商品数据,作为购物车中用户选购的商品。在src目录下新建一个文件夹data,在该文件夹下新建一个book.js文件。编辑该文件,代码如下:
data/book.js
export default [
    {
      id: 1,
      title: 'Java无难事',
      price: 188,
      count: 1
    },
    {
      id: 2,
      title: 'VC++深入详解',
      price: 168,
      count: 1
    },
    {
      id: 3,
      title: 'Servlet/JSP深入详解',
      price: 139,
      count: 1
    }
  ]
在books模块中导出一个图书商品的数组,将该数据作为store中状态数据的来源。编辑store目录下的index.js文件。修改后的代码如下所示。
store/index.js
import { createStore } from "vuex";
import book from '@/data/book'

const store=createStore({
    //状态数据通过state()函数返回
     state(){
        return{
            items:books	//使用导入的books对items进行初始化
        }
    }
})

export default store 现在可以使用store.state.items访问商品数据。前面在main.js中已经引入了store实例,该store实例会被注入根组件下的所有子组件中,因此在组件中,就可以通过this.$store访问store。如果在组件中要展示store中的状态,应该使用计算属性返回store的状态。代码如下所示:
computed:{
	books(){
		return this.$store.state.items;
	}
}
之后在组件的模板中就可以直接使用books。当store中的items发生改变时,组件内的计算属性books也会同步发生变化。
如何更改store中的状态呢?注意不要直接修改items的值。例如:
methods:{
	addCart(){
	this.$store.state.items.push({...})	//不要这样写
	}
} 既然选择了Vuex作为应用的状态管理方案,那么就应该遵照Vuex的要求:**通过提交mutation()函数更改store中的状态。**在严格模式下,如果store中的状态改变不是由mutation函数引起的,则会排除错误,而且如果直接修改store中的状态,Vue的调试工具也无法跟踪状态的改变。在开发阶段,可以启用严格模式,以避免直接的状态修改,在创建store时,传入strict:true。代码如下所示:
const store=createStore({
	//...
	strict:true
})
3.1 mutation
Vuex的mutation函数非常类似于事件:每个mutation()函数都有一个字符串的事件类型和一个处理器函数。这个处理器函数就是实际进行状态更改的地方,它接收state作为第1个参数。
代码如下所示:
const store=createStore({
	state(){
		return{
			count:1
		}
	},
	//mutations选项中定义修改状态的方法
	//这些方法接收state作为第1个参数
	mutations:{
		increment(state){
			state.count++
		}
	}
}) 我们不能直接调用一个mutation()处理器函数,mutations选项更像是事件注册,当触发一个类型为increment的mutation时,调用此函数。要调用一个mutation()处理器函数,需要用它的类型调用store.commit()方法。代码如下所示:
store.commit('increment')实际上,提交时指定的mutation的类型就是我们在mutations选项中定义的mutation()处理器函数的名字。
3.1.1 提交载荷(Payload)
在使用store.commit()方法提交mutation()时,还可以传入额外的参数,即mutation()得载荷(payload)。
// ...
mutations: {
  increment (state, n) {
    state.count += n
  }
}
store.commit('increment', 10)在大多数情况下,载荷应该是一个对象,这样可以包含多个字段并且记录的 mutation 会更易读:
// ...
mutations: {
  increment (state, payload) {
    state.count += payload.amount
  }
}
store.commit('increment', {
amount: 10
})3.1.2 对象风格的提交方式
提交 mutation 的另一种方式是直接使用包含 type 属性的对象:
store.commit({
  type: 'increment',
  amount: 10
})
当使用对象风格的提交方式,整个对象都作为载荷传给 mutation 函数,因此处理函数保持不变:
mutations: {
  increment (state, payload) {
    state.count += payload.amount
  }
}
3.1.3 使用常量替代 Mutation 事件类型
使用常量替代 mutation 事件类型在各种 Flux 实现中是很常见的模式。这样可以使 linter 之类的工具发挥作用,同时把这些常量放在单独的文件中可以让你的代码合作者对整个 app 包含的 mutation 一目了然:
// mutation-types.js
export const SOME_MUTATION = 'SOME_MUTATION'
// store.js
import { createStore } from 'vuex'
import { SOME_MUTATION } from './mutation-types'
const store = createStore({
state: { ... },
mutations: {
// 我们可以使用 ES2015 风格的计算属性命名功能来使用一个常量作为函数名
[SOME_MUTATION] (state) {
// 修改 state
}
}
})用不用常量取决于你——在需要多人协作的大型项目中,这会很有帮助。但如果你不喜欢,你完全可以不这样做。
3.2 添加商品实现
接下来,在store中定义一个mutation,通过提交该mutation向购物车中添加商品。修改store目录下得index.js文件,修改后的代码如下所示:
import { createStore } from "vuex";
import book from '@/data/book'

const store=createStore({
    //状态数据通过state()函数返回
     state(){
        return{
            items:books	//使用导入的books对items进行初始化
        }
    },
    mutations:{
		pushItemToCart(state,book){
			state.item.push(book)
		}
	}
})

export default store
接下来编写购物车组件。在components目录下新建Cart.vue,代码如下所示。
<template>
   <div>
    <table>
    <tr>
        <td>商品编号</td>
        <td><input type="text" v-model.number="id"></td>
    </tr>
    <tr>
        <td>商品名称</td>
        <td><input type="text" v-model="title"></td>
    </tr>
    <tr>
        <td>商品价格</td>
        <td><input type="text" v-model="price"></td>
    </tr>
    <tr>
        <td>数量</td>
        <td><input type="text" v-model.number="quantity"></td>
    </tr>
    <tr>
        <td colspan="2"><button @click="addCart">加入购物车</button></td>
    </tr>
    </table>
        <table>
        <thead>
            <tr>
            <th>编号</th>
            <th>商品名称</th>
            <th>价格</th>
            <th>数量</th>
            <th>金额</th>
            <th>操作</th>
            </tr>
        </thead>
        <tbody>
            <tr v-for="book in books" :key="book.id">
            <td>{{ book.id }}</td>
            <td>{{ book.title }}</td>
            <td>{{ book.price }}</td>
            <td>
                <button :disabled="book.count===0" @click="increment({id: book.id, count: -1})">-</button>
                {{ book.count }}
                <button @click="increment({id: book.id, count: 1})">+</button>
            </td>
            <td>{{ itemPrice(book.id) }}</td>
            <td><button @click="deleteItem(book.id)">删除</button></td>
            </tr>
        </tbody>
        </table>
    <span>总价:{{totalPrice}} </span>
  </div>
</template>

<script>
import {mapMutations,mapState,mapGetters,mapActions} from 'vuex'
export default {
    data(){
        return{
           id:'',
           title:'',
           price:'',
           quantity:1
        }
    },
    computed:{
        books(){
            return this.$store.state.items
        }
    },
    methods:{
        addCart(){
             this.$store.commit('pushItemToCart',{
                id:this.id,
                title:this.title,
                price:this.price,
                count:this.quantity
            })
            this.id=''
            this.title='',
            this.price='',
            this.quantity=1
        }
    }
}
</script>

<style scoped>
div {
  width: 800px;
}
table {
  border: 1px solid black;
  width: 100%;
  margin-top: 20px;
}
th {
  height: 50px;
}
th, td {
  border-bottom: 1px solid #ddd;
  text-align: center;
}
span {
  float: right;
}
</style>
简单起见,我们使用表格对购物车中的商品项进行布局。
最后在App.vue组件中删除HelloWorld组件,使用Cart组件。代码如下所示:
<template>
  <Cart/>
</template>

<script>
import Cart from './components/Cart.vue'

export default {
  name: 'App',
  components: {
    Cart
  }
}
</script>

<style>
#app {
  font-family: Avenir, Helvetica, Arial, sans-serif;
  -webkit-font-smoothing: antialiased;
  -moz-osx-font-smoothing: grayscale;
  text-align: center;
  color: #2c3e50;
  margin-top: 60px;
}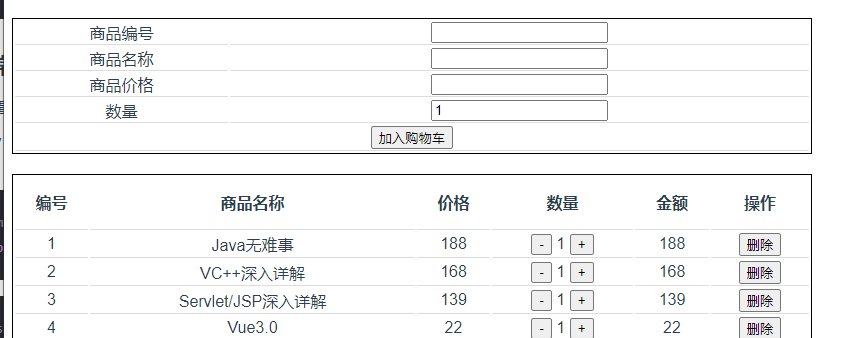
</style> 打开终端窗口,执行npm run serve命令,打开浏览器,访问http://localhost:8080/:,出现如下界面:
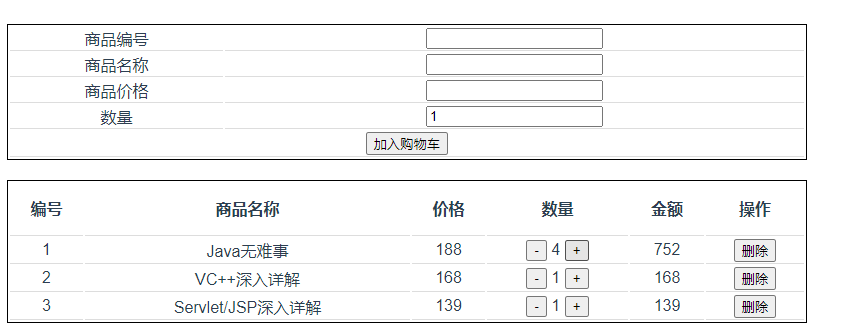
添加一个商品
3.3 mapMutations
继续完善,为购物车添加删除商品功能。删除商品同样要修改store中保存的购物车商品数据,因此继续在mutations选项中定义一个deleteItem mutation。编辑store目录下的index.js文件,修改后的代码如下所示:
store/index.js
const store=createStore({
...,
mutations:{
        pushItemToCart(state,book){//添加商品
            state.items.push(book)
        },
        deleteItem(state,id){//根据id删除商品
            let index=state.items.findIndex(item=>item.id===id)
            if(index>=0){
                state.items.splice(index,1)
            }
        }
    }
})
编辑Cart.vue,为删除按钮添加click事件处理,提交deleteItem mutation。代码如下所示:
<td><button @click="$store.commit('deleteItem',book.id)">删除</button></td> 为了简化mutation的提交,可以使用mapMutations()辅助函数将组件中的方法映射为store.commit()调用。
代码如下所示:
import {mapMutations} from 'vuex'
methods:mapMutations([
	//将this.increment()映射为this.$store.commit('increment')
	'increment',

	//将this.incrementBy(amount)映射为this.$store.commit('incrementBy',amount)
	'incrementBy'
])
除了使用字符串数组外,mapMutations()函数的参数也可以是一个对象。代码如下所示。
import {mapMutations} from 'vuex'
methods:{
	//将this.add()映射为this.$store.commit('increment')
	add:'increment'
}
在大多数情况下,组件还有自己的方法,在这种情况下,可以使用ES6的展开运算符提取mapMutations()函数返回的对象属性,复制到methods选项中。代码如下所示:
import {mapMutations} from 'vuex'
export default{
	//...
	methods:{
		...mapMutations([
			//将this.increment()映射为this.$store.commit('increment')
			'increment',

			//mapMutations也支持载荷
			//将this.incrementBy(amount)映射为this.$store.commit('incrementBy',amount)
			'incrementBy'
		]),
		...mapMutations({
			//将this.add()映射为this.$store.commit('increment')
			add:'increment'
		})
	}
}
修改Cart.vue,使用mapMutations()辅助函数简化mutation的提交。代码如下所示。
 <td><button @click="deleteItem(book.id)">删除</button></td>
 import {mapMutations} from 'vuex'
  methods:{

        ...mapMutations('cart',{
            addItemToCart:'pushItemToCart',
            deleteItem:'deleteItem',
            increment:'incrementItemCount'
        }),
        ...mapActions('cart',{
            addItemToCart:'addItemToCart'
        }),
        addCart(){
            this.addItemToCart({
                id:this.id,
                title:this.title,
                price:this.price,
                count:this.quantity
            })
            this.id=''
            this.title='',
            this.price='',
            this.quantity=1
        }
    }
3.4 mapState
当一个组件需要使用多个store状态属性时,将这些状态都声明为计算属性就会有些重复和冗余。为了解决这个问题,可使用mapState()辅助函数生成计算属性。
在store中定义两个状态
const store=createStore({
	state(){
		return{
			count:0,
			message:'Java无难事'
		}
	},
	...
})
在组件中使用mapState()辅助函数生成计算属性。代码如下所示:
import {mapState} from 'vuex'

export default{
	//...
	computed:mapState({
		//冒号前是计算属性的名字,冒号后是store中状态属性的名字
		//以字符串的形式给出
		count:'count',
		msg:'message'
	})
}
上述代码等价于下面的代码:
import {mapState} from 'vuex'
export default{
	//...
	computed:mapState({
		count:function(state){
			return state.count;
		},
		msg:(state)=>state.message
	})
}
可以看到,不管是使用普通函数,还是箭头函数,都没有直接使用字符串方便。但如果在计算属性中还要访问组件内的数据属性,那么就只能使用普通函数的方式。代码如下所示:
import {mapState} from 'vuex'
export default{
	data(){
		return{
			price:99
		}
	},
	computed:mapState({
		totalPrice(state){
			return this.price*state.count;
		}
	})
}
如果计算属性的名字和store中状态属性的名字相同,那么还可以进一步简化,直接给mapState()函数传递一个字符串数组即可。代码如下所示:
computed:mapState({
	//映射为this.count为store.state.count
	'count',
	//映射this.message为store.state.message
	'message'
})
与mapMutations()一样,mapState()返回的也是一个对象,因此可以使用展开运算符将它和组件内的本地计算属性结合一起使用。代码如下所示:
computed:{
	localComputed(){/*...*/}
	//使用对象展开运算符将此对象混入外部对象中
	...mapState({
		//...
	})
}
接下来修改Cart.vue,使用mapState()辅助函数生成books计算属性。代码如下:
Cart.vue
import {mapMutations,mapState} from 'vuex'
...
computed:{
	...mapState({
		books:'items'
	})
}
3.5 getter
Vuex允许我们在store中定义getters(可以认为是store的计算属性)。与计算属性一样,getter的返回值会根据它的依赖项被缓存起来,且只有在它的依赖项发生改变时才会重新计算。
getter接收state作为其第1个参数。代码如下所示:
const store=createStore({
	store(){
		return{
			books:[
				{id:1,title:'Vue3.x从入门到实战',isSold:false},
				{id:2,title:'VC++深入详解',isSold:true},
				{id:3,title:'Servlet/JSP深入详解',isSold:true},
			]
		}
	},
	getters:{
		sellingBooks:state=>state.books.filter(book=>book.isSold===true)
	}
})
我们定义的getter将作为store.getters对象的计算属性来访问。代码如下所示:
<ul>
	<li v-for="book in this.$store.getters.sellingBooks" :key="book.id">
	{{book.title}}
	</li>
</ul>
getter也可以接收其他getter作为第2个参数。 代码如下所示
getters:{
		sellingBooks:state=>state.books.filter(book=>book.isSold===true)
		sellingBooksCount:(state,getters)=>{
			return getters.sellingBooks.length
		}
	}
在组件内,若想简化getter的调用,同样可以使用计算属性。若要简化getter在计算属性中的访问形式,则可以使用mapGetters()辅助函数,这个辅助函数的用法和mapMutations()、mapState()类似。代码如下所示:
computed:{
	//使用对象展开运算符将getter混入computed中
	//传递数组作为参数
	...mapGetters([
		'sellingBooks',
		'sellingBooksCount',
		//...
	])
	//传递对象作为参数
	...mapGetters({
		//将this.booksCount映射为this.$store.getters.sellingBooksCount
		booksCount:'sellingBooksCount'
	})
}
3.6 商品价格计算步骤
接下来完成购物车中单项商品价格和所有商品总价的计算,单项商品价格是商品价格乘以数量,总价是单项商品价格相加的结果。由于购物车中的商品是存储在store中的,因此单项商品价格和所有商品总价的计算应该通过getter完成,而不是直接在组件内定义计算属性来完成。
编辑store目录下的index.js文件,添加计算单项商品价格和所有商品总价的getter。
store/index.js
部分代码
getters:{
        cartTotalPrice(state){  //计算总价格
           return state.items.reduce((total,item)=>{
                total+=item.price*item.count
                return total
            },0)
        },
        cartItemPrice(state){   //计算单项商品价格
            return function(id){    //根据商品Id计算商品价格
                let item=state.items.find(item=>item.id===id)
                if(item){
                    return item.price*item.count
                }
            }
        }
    }
如果要接收getter参数,则需要返回一个函数来实现给getter传参。
编辑Cart.vue,在computed选项中使用maoGetters()映射上述两个getter,然后修改模板代码,完善单项商品价格计算和购物车中所有商品总价的计算。代码如下:
Cart.vue
<template>
<div>
<table>
<tr>
<td>商品编号</td>
<td><input type="text" v-model.number="id"></td>
</tr>
<tr>
<td>商品名称</td>
<td><input type="text" v-model="title"></td>
</tr>
<tr>
<td>商品价格</td>
<td><input type="text" v-model="price"></td>
</tr>
<tr>
<td>数量</td>
<td><input type="text" v-model.number="quantity"></td>
</tr>
<tr>
<td colspan="2"><button @click="addCart">加入购物车</button></td>
</tr>
</table>
<table>
<thead>
<tr>
<th>编号</th>
<th>商品名称</th>
<th>价格</th>
<th>数量</th>
<th>金额</th>
<th>操作</th>
</tr>
</thead>
<tbody>
<tr v-for="book in books" :key="book.id">
<td>{{ book.id }}</td>
<td>{{ book.title }}</td>
<td>{{ book.price }}</td>
<td>
<button :disabled="book.count===0" @click="increment({id: book.id, count: -1})">-</button>
{{ book.count }}
<button @click="increment({id: book.id, count: 1})">+</button>
</td>
<td>{{ itemPrice(book.id) }}</td>
<td><button @click="deleteItem(book.id)">删除</button></td>
</tr>
</tbody>
</table>
<span>总价:{{totalPrice}} </span>
</div>
</template>
<script>
import {mapMutations,mapState,mapGetters,mapActions} from 'vuex'
export default {
data(){
return{
id:'',
title:'',
price:'',
quantity:1
}
},
computed:{
...mapState('cart',{
books:'items' //不应用模块的写法
// books:state=>state.cart.items //应用模块的写法,用函数
}),
...mapGetters('cart',{
totalPrice:'cartTotalPrice',
itemPrice:'cartItemPrice'
})
},
methods:{
...mapMutations('cart',{
addItemToCart:'pushItemToCart',
deleteItem:'deleteItem',
increment:'incrementItemCount'
}),
...mapActions('cart',{
addItemToCart:'addItemToCart'
}),
addCart(){
this.addItemToCart({
id:this.id,
title:this.title,
price:this.price,
count:this.quantity
})
this.id=''
this.title='',
this.price='',
this.quantity=1
}
}
}
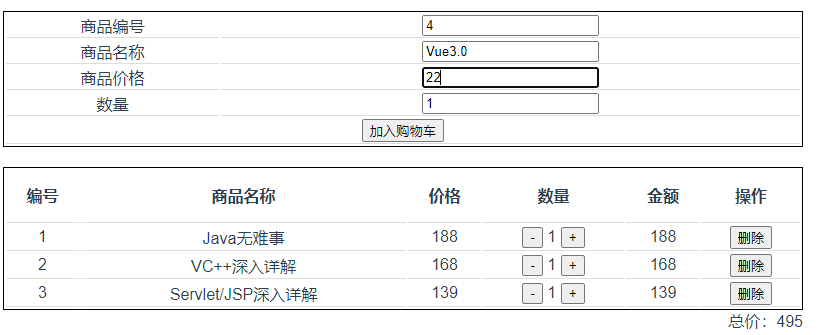
</script>3.7 购物车商品数量计算
购物车中商品数量加1和减1的功能,这个功能的实现与getter无关,因为要修改store中所存储的商品的数量,因此是通过mutation实现商品数量的变化。
store/index.js
mutations:{
        pushItemToCart(state,book){//添加商品
            state.items.push(book)
        },
        deleteItem(state,id){//根据id删除商品
            let index=state.items.findIndex(item=>item.id===id)
            if(index>=0){
                state.items.splice(index,1)
            }
        },
        incrementItemCount(state,{id,count}){   //增加商品数量
            let item=state.items.find(item=>item.id===id)
            if(item){
                item.count+=count
            }
        }
    }
在Cart.vue中,在methods选项中使用mapMutations()辅助函数映射incrementItemCount,并未减号按钮和加号按钮添加click事件处理代码。
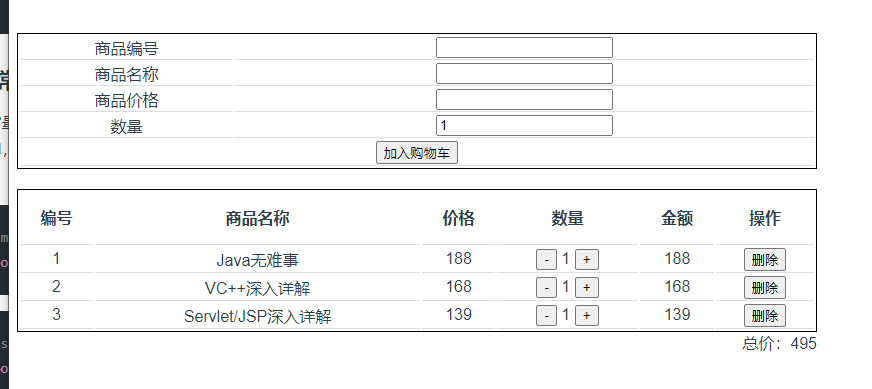
运行项目,单击加减号按钮观察价格变化。