
使用Vue3.0实现一个简单的TodoList案例
随着Vue3.0正式版发布,Vue3.0使用的人也渐渐增多,很多新项目都开始使用Vue3.0,老项目也有的开始迁移到Vue3.0版本,为了能帮助更多人快速上手Vue3.0,这里写一个简单的案例。
其实Vue3.0只是在Vue2.0的基础上新增了一些新特性,比如:Composition API等。同时也废弃了一些特性,比如:过滤器等。
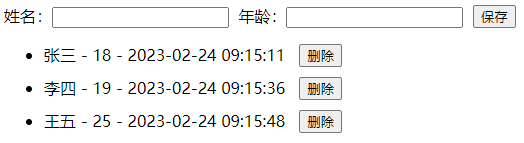
先看一下最终实现效果(也没比较简陋,没有管页面UI,主要是Vue3.0的用法才是重点)

具体来看具体实现
1.初始化项目
使用命令vue create todo-list初始化一个名为todo-list的项目
2.安装项目所需依赖
这个项目用到一个工具qdtool,这是一个前端工具包,也推荐大家使用,这里面有非常丰富的js常用工具类。官网地址: https://www.qdtool.net ,自己可以到官网查询具体使用方法,上面有对应的文档教程和视频教程。
使用命令npm install qdtool --save-dev安装qdtool工具
3.在vue的template标签中编写html代码
<template>
  <div>
    <!-- 输入表单 -->
    <div>
      姓名:<input type="text">
      年龄:<input type="text">
      <button>添加</button>
    </div>
    <!-- 遍历列表 -->
    <div>
      <ul>
        ...
      </ul>
    </div>
  </div>
</template>
静态页面为下图所示

4.获取用户输入框的值
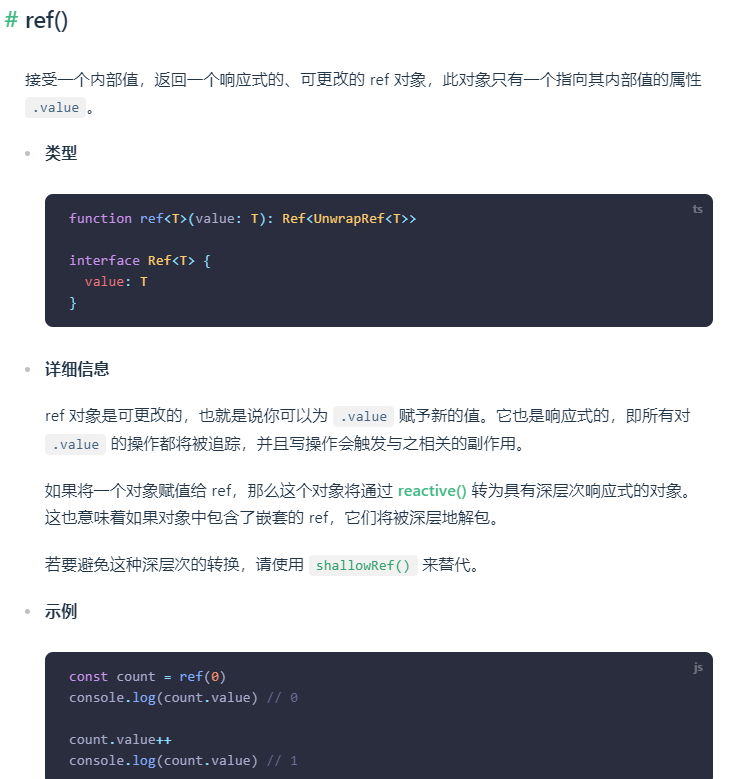
在vue里是用v-model这样的绑定方式来双向绑定一个变量的,vue3中<script>标签的setup语法糖编写的代码,书写风格和react非常相似。这里需要用到vue里的的ref方法。看一下Vue官方对ref的解释
回到正题
了解了ref的使用,就先定义变量叫做name和age来绑定input框来获取用户的输入。
此时name.value、age.value就和input框的value绑定了。
import { ref } from 'vue'
const name = ref('')
const age = ref('')
5.设计添加button功能的实现
在这个按钮之前,要设定一个空的数组,来接收用户的输入数据。
const list = reactive([])接下来先渲染出我们默认的数据。在template标签中写
<li v-for="(item,index) in listc" :key="index">
  {{ item.name }} -
  {{ item.age }} -
  {{ item.time2 }}

  <button @click="handleDelItem(index)">删除</button>
</li>
6.添加
获取到数据后,点击添加按钮,实现添加到list列表中
给添加按钮绑定一个事件handleAddItem,事件实现方法
const handleAddItem = () => {
  if(name.value && age.value) {
    list.push({
      name: name.value,
      age: age.value,
      // 获得当前时间,保存为时间戳
      time: new Date().getTime()
    })
    name.value = '';
    age.value = '';
  }
};
7.遍历
添加成功后,就要对数据进行展示,遍历代码
<ul>
  <li v-for="(item,index) in listc" :key="index">
    {{ item.name }} -
    {{ item.age }} -
    {{ item.time2 }}

    <button @click="handleDelItem(index)">删除</button>
  </li>
</ul>
存入的时候存的是时间戳,展示时间应该转换成年月日时分秒,这里使用一个工具:qdtool,前面已经安装过了,这里直接使用;Vue2.0版本可以使用过滤器,由于Vue3.0废弃了过滤器,所以这里使用计算属性进行转换
先在main.js全局引入qdtool工具
import qdtool from 'qdtool'
app.config.globalProperties.qdtool = qdtool;
具体实现代码
computed: {
  listc() {
    this.list.filter((p) => {
      const { appContext } = getCurrentInstance()
      // 使用qdtool工具的时间戳转日期
      return p.time2 = appContext.config.globalProperties.qdtool.timestampToTime(p.time, "yyyy-MM-dd hh:mm:ss");
    })
    return this.list
  }
},
实现效果

8.删除
点击删除按钮,应该删除这条数据,给删除按钮绑定一个事件handleDelItem,实现代码
const handleDelItem = (index) => {
  list.splice(index, 1);
};
9.全部代码
<template>
  <div>
    <!-- 输入表单 -->
    <div>
      姓名:<input type="text" v-model="name">
      年龄:<input type="text" v-model="age">
      <button @click="handleAddItem">添加</button>
    </div>
    <!-- 遍历列表 -->
    <div>
      <ul>
        <li v-for="(item,index) in listc" :key="index">
          {{ item.name }} -
          {{ item.age }} -
          {{ item.time2 }}

          <button @click="handleDelItem(index)">删除</button>
        </li>
      </ul>
    </div>
  </div>
</template>

<script>
import { ref, reactive, getCurrentInstance } from 'vue'

export default {
  name: 'TodoList',
  computed: {
    listc() {
      this.list.filter((p) => {
        const { appContext } = getCurrentInstance()
        // 使用qdtool工具的时间戳转日期
        return p.time2 = appContext.config.globalProperties.qdtool.timestampToTime(p.time, "yyyy-MM-dd hh:mm:ss");
      })
      return this.list
    }
  },
  setup() {
    const list = reactive([])
    const name = ref('')
    const age = ref('')

    const handleAddItem = () => {
      if(name.value && age.value) {
        list.push({
          name: name.value,
          age: age.value,
          // 获得当前时间,保存为时间戳
          time: new Date().getTime()
        })
        name.value = '';
        age.value = '';
      }
    };

    const handleEditItem = (index) => {
      name.value = list[index].name
      age.value = list[index].age
    };

    const handleDelItem = (index) => {
      list.splice(index, 1);
    };

    return {
      name,
      age,
      list,
      handleAddItem,
      handleEditItem,
      handleDelItem
    }
  }
}
</script>

<style scoped>
li {
  margin-bottom: 10px;
}
</style>