
基础使用
vue3 使用 createApp 这个方法来创建并挂载组件,我们在 main 文件中引入 APP 根组件,通过 createApp 函数的 mount 方法将根组件挂载到 id 为 #app 这个节点下面
// main 文件中引入根组件,通过 createApp 方法挂载根组件到 #app 节点
import { createApp } from 'vue'
import App from './App.vue'

createApp(App).mount('#app')
所以通过 main 文件我们可以初步得到组件渲染为 DOM 主要分为两步
- 通过
createApp方法创建组件实例 - 通过
mount方法挂载元素
组件挂载为 DOM 实现原理
创建组件实例
createApp 方法定义在 packages/runtime-dom/src/index.ts 文件下,可以看到函数主要分为两个步骤:生成 app 实例和重写 mount 方法,我们首先先看 app 实例如何通过 ensureRenderer 方法生成
export const createApp = ((...args) => {
  // 调用 ensureRenderer 方法生成 app 实例
  const app = ensureRenderer().createApp(...args)

  // 从 app 实例中获取 mount 方法并重写
  const { mount } = app
  app.mount = (containerOrSelector: Element | ShadowRoot | string): any => {
    // 重写 mount 方法过程
  }

  // 返回 app 实例
  return app
}) as CreateAppFunction<Element>
ensureRenderer 通过中间函数 createRenderer 的封装,最后会调用 baseCreateRenderer 方法,在 baseCreateRenderer 中定义了渲染过程的核心方法,并在最后返回了 render 和 createApp 这两个方法,而 createApp 使用的是 createAppAPI
function ensureRenderer() {
  return (
    renderer ||
    // 调用 createRenderer 方法,renderer 变量缓存结果
    (renderer = createRenderer<Node, Element | ShadowRoot>(rendererOptions))
  )
}

export function createRenderer<
  HostNode = RendererNode,
  HostElement = RendererElement
>(options: RendererOptions<HostNode, HostElement>) {
  // 调用 baseCreateRenderer 方法
  return baseCreateRenderer<HostNode, HostElement>(options)
}

function baseCreateRenderer(
  options: RendererOptions,
  createHydrationFns?: typeof createHydrationFunctions
): any {

  // options 中包含了处理 DOM 元素常用的方法
  const { /*...*/ } = options

  // 定义渲染过程核心方法,这里只列了暂时使用的 render 方法
  const render = () => { /*...*/ }

  // 返回 render 和 createApp 方法
  return {
    render,
    hydrate, // 服务端渲染使用
    createApp: createAppAPI(render, hydrate)
  }
}
接下来我们来看 createAppAPI 方法的实现过程,整体过程主要分为三步
- 通过
createAppContext创建 app 上下文 - 创建 app 实例,app 实例主要包含基础私有属性和实例方法,除了挂载过程使用的
mount方法外,还有component、directive、mixin等方法,这里不多做讨论 - 将 app 实例放在
createApp方法中作为一个函数返回
export function createAppAPI<HostElement>(
  render: RootRenderFunction<HostElement>,
  hydrate?: RootHydrateFunction
): CreateAppFunction<HostElement> {
  // 结果返回 createApp 函数
  return function createApp(rootComponent, rootProps = null) {

  // 创建 app 上下文
  const context = createAppContext()

  // 创建 app 实例
  const app: App = (context.app = {
    _uid: uid++,
    _component: rootComponent as ConcreteComponent,
    _props: rootProps,
    _container: null,
    _context: context,
    _instance: null,

    // 挂载方法
    mount(rootContainer) { /*...*/ }
  }

  // 返回 app 实例
  return app
}
组件挂载过程
在 createApp 方法中创建完 app 实例之后,进入第二步重写 mount 方法,主要过程分为三步
- 通过
normalizeContainer获取挂载的容器 - 获取模板的内容
- 清空 innerHTML ,创建挂载的代理方法并作为结果返回,代理方法通过 app 实例中的
mount方法实现
export const createApp = ((...args) => {
  // 调用 ensureRenderer 方法生成 app 实例
  const app = ensureRenderer().createApp(...args)

  // 从 app 实例中获取 mount 方法并重写
  const { mount } = app
  app.mount = (containerOrSelector: Element | ShadowRoot | string): any => {
    // 1.获取挂载容器
    const container = normalizeContainer(containerOrSelector)
    if (!container) return

    // 2.获取模板内容
    const component = app._component
    if (!isFunction(component) && !component.render && !component.template) {
      component.template = container.innerHTML
    }

    // 3. 挂载前清空 innerHTML 并创建挂载方法
    container.innerHTML = ''
    const proxy = mount(container, false, container instanceof SVGElement)

    return proxy
  }

  // 返回 app 实例
  return app
}) as CreateAppFunction<Element>
虽然重写了 mount 方法,但是最后返回的代理方法仍然是在 app 实例中创建,app 实例中的 mount 方法方法同样也分为三步
- 通过
createVNode方法创建 vnode 节点 - 通过
render方法将 vnode 渲染为 DOM 节点 - 通过
getExposeProxy暴露 expose 对象中的属性和方法
// 创建 app 实例
  const app: App = (context.app = {

    // 挂载方法
    mount(rootContainer) {
      if (!isMounted) {
        // 1. 创建一个 vnode 节点
        const vnode = createVNode(
          rootComponent as ConcreteComponent,
          rootProps
        )
        vnode.appContext = context

        // 2. 将 vnode 节点渲染为 DOM 节点
        render(vnode, rootContainer, isSVG)

        isMounted = true
        app._container = rootContainer

        // 3. TODO
        return getExposeProxy(vnode.component!) || vnode.component!.proxy
      }
    }
  }
创建 vnode
我们首先看第一步 createVNode 的实现过程,createVNode 函数调用的实际是 _createVNode 方法,_createVNode 方法在对节点属性做一些处理后,最后调用 createBaseVNode 方法生成 vnode
_createVNode 方法主要过程
- 如果当前节点是 vnode 类型,直接返回一个克隆的 vnode
- 标准化 props、class、style 相关属性
- 处理设置组件类型,主要包括:元素、Suspense、Teleport、组件、函数式组件
- 调用 createBaseVNode 创建 vnode
function _createVNode(
  type: VNodeTypes | ClassComponent | typeof NULL_DYNAMIC_COMPONENT,
  props: (Data & VNodeProps) | null = null,
  children: unknown = null,
  patchFlag: number = 0,
  dynamicProps: string[] | null = null,
  isBlockNode = false
): VNode {
  // 如果当前节点是 vnode 类型,直接返回一个克隆的 vnode
  if (isVNode(type)) {
    const cloned = cloneVNode(type, props, true /* mergeRef: true */)
    // ...
    return cloned
  }

  // 标准化 props、class、style 相关属性
  if (props) {
    // ...
  }

  // 处理设置组件类型,主要包括:元素、Suspense、Teleport、组件、函数式组件
  const shapeFlag = isString(type)
    ? ShapeFlags.ELEMENT
    : __FEATURE_SUSPENSE__ && isSuspense(type)
    ? ShapeFlags.SUSPENSE
    : isTeleport(type)
    ? ShapeFlags.TELEPORT
    : isObject(type)
    ? ShapeFlags.STATEFUL_COMPONENT
    : isFunction(type)
    ? ShapeFlags.FUNCTIONAL_COMPONENT
    : 0

  // 调用 createBaseVNode 创建 vnode
  return createBaseVNode(
    type,
    props,
    children,
    patchFlag,
    dynamicProps,
    shapeFlag,
    isBlockNode,
    true
  )
}
在 createBaseVNode 方法中,定义 vnode 的主要属性,核心属性定义我放在了备注中
function createBaseVNode(
  /* 相关参数 */
) {
  const vnode = {
    __v_isVNode: true, // 内部属性,定义该对象是否是一个 vnode 对象
    __v_skip: true, // 内部属性,是否跳过该节点的处理过程
    type, // 节点类型
    props, // 节点属性
    key: props && normalizeKey(props), // 唯一标识符,优化 diff 算法
    ref: props && normalizeRef(props), // 节点模板引用
    scopeId: currentScopeId, // 节点的 scopeId,用于样式作用域
    slotScopeIds: null, // 插槽作用域 Id 列表,处理插槽的样式作用域
    children, // 子节点
    component: null, // 节点是组件时,组件的实例对象
    suspense: null, // 节点是 suspense 时,保存 suspense 的实例对象
    ssContent: null, // 节点是 suspense 时,保存 suspense 的内容节点
    ssFallback: null, // 节点是 suspense 时,保存 suspense 的 fallback 节点
    dirs: null, // 当前节点所有指令
    transition: null, // 过度对象
    el: null, // 节点对应真实 DOM 元素
    anchor: null, // 当前节点在父节点中的锚点元素,用于处理 patch 过程中的移动操作
    target: null, // 当前节点的挂载目标,用于处理 teleport 组件
    targetAnchor: null, // 当前节点在挂载目标中的锚点元素,用于处理 teleport 组件
    staticCount: 0, // 当前节点及其子节点中静态节点的数量
    shapeFlag, // 节点的类型标识符
    patchFlag, // 优化 patch 过程标识符
    dynamicProps, // 动态绑定属性
    dynamicChildren: null, // 动态自己诶单
    appContext: null, // 节点上下文,提供全局配置或者插件等操作
    ctx: currentRenderingInstance
  } as VNode

  return vnode
}
这里要说明一下 vnode 属性中 type 和 shapFlag 的区别
-
type 定义的类型是唯一的,用于处理不同的 vnode,比如 type 为 text 表示节点是文本类型,为 component 表示节点是组件类型,不同类型需要调用不同的方法
-
shapeFlag 定义可能有多个,比如一个 VNode 表示一个带有
v-if和v-for的组件,那么它的 shapeFlag 一共有四个。shapeFlag 的作用在于优化渲染过程。在渲染过程中,根据shapeFlag的不同,采用不同的渲染方式和算法,从而提高渲染性能shapeFlag: ShapeFlags.STATEFUL_COMPONENT | ShapeFlags.COMPONENT_SHOULD_KEEP_ALIVE | ShapeFlags.SLOTS_CHILDREN | ShapeFlags.STABLE_FRAGMENT // 表示当前节点是一个,有状态组件、子节点是插槽、需要跳过 keep-alive 缓存、子节点是一个稳定的片段
渲染为真实 DOM 过程
在创建完 vnode 节点后,下面进入第二步 render ,将 vnode 转换为真实 DOM 的过程。在 baseCreateRenderer 定义的 render 函数调用的是 patch 函数进行 DOM 挂载
const render: RootRenderFunction = (vnode, container, isSVG) => {
  if (vnode == null) {
    // 如果 container 中存在 vnode 节点,需要先移除再挂载
    if (container._vnode) {
      unmount(container._vnode, null, null, true)
    }
  } else {
    patch(container._vnode || null, vnode, container, null, null, null, isSVG)
  }
  // 更新 container 缓存的 vnode 节点
  container._vnode = vnode
}
在 patch 函数中会根据不同类型节点类型处理不同类型 (type 不同) 的 vnode 节点,其中最核心的是 processElement 处理元素类型和processComponent 处理组件类型。patch 过程主要分为以下五步
- 新旧节点相同直接返回
- 旧节点存在,且新旧节点类型不同,卸载旧节点
- PatchFlags.BAIL 时,会直接跳过该节点以及其后代节点的更新过程,以此优化性能
- 根据不同类型节点类型处理
- 定义 ref 模板引用(实现原理可以参考我的另一篇文章)
const patch: PatchFn = ( /* 相关参数 */) => {
    // 新旧节点相同直接返回
    if (n1 === n2) {
      return
    }

    // 旧节点存在,且新旧节点类型不同,卸载旧节点
    if (n1 && !isSameVNodeType(n1, n2)) {
      anchor = getNextHostNode(n1)
      unmount(n1, parentComponent, parentSuspense, true)
      n1 = null
    }

    // PatchFlags.BAIL 时,会直接跳过该节点以及其后代节点的更新过程,以此优化性能
    // 当前节点的 props 和 children 都没有发生变化,可以认为该节点不需要重新渲染
    // 当前节点的子树中包含了一个被 keep-alive 组件包裹的节点,该节点被缓存起来并不需要更新,也可以直接跳过该节点以及其后代节点的更新过程
    if (n2.patchFlag === PatchFlags.BAIL) {
      optimized = false
      n2.dynamicChildren = null
    }

    // 根据不同类型节点类型处理,核心:`processElement` 处理元素类型,`processComponent` 处理组件类型
    const { type, ref, shapeFlag } = n2
    switch (type) {
			  // 其他类型处理过程省略...
      default:
        // 其他类型处理过程省略...
        if (shapeFlag & ShapeFlags.ELEMENT) {
          processElement( /* 相关参数 */)
        } else if (shapeFlag & ShapeFlags.COMPONENT) {
          processComponent( /* 相关参数 */)
        }
    }

    // 定义 ref 模板引用
    if (ref != null && parentComponent) {
      setRef(ref, n1 && n1.ref, parentSuspense, n2 || n1, !n2)
    }
  }
元素类型 vnode
在挂载节点时,n1 – 旧节点为 null,直接进入 mountElement 方法挂载元素节点。在 mountElement 方法处理过程包括
- 根据 vnode 节点,通过
hostCreateElement创建 DOM 节点 - 调用
mountChildren方法首先处理子节点,mountChildren本质也是遍历调用patch方法处理 vnode - 分别处理 vnode 指令、scopeId、props 等属性
- 通过
hostInsert方法将创建好的 el 元素挂载到容器中
const mountElement = ( /* 相关参数 */) => {
    let el: RendererElement
    let vnodeHook: VNodeHook | undefined | null
    const { type, props, shapeFlag, transition, dirs } = vnode

    // 根据 vnode 创建 DOM 节点
    el = vnode.el = hostCreateElement(
      vnode.type as string,
      isSVG,
      props && props.is,
      props
    )

    // 处理子子节点过程,子节点如果是文本类型直接挂载文本,否则通过 patch 方法继续处理
    if (shapeFlag & ShapeFlags.TEXT_CHILDREN) {
      hostSetElementText(el, vnode.children as string)
    } else if (shapeFlag & ShapeFlags.ARRAY_CHILDREN) {
      mountChildren( /* 相关参数 */)
    }

  	// 处理 vnode 指令、scopeId、props 等属性
    // ...

    // 创建好的 el 元素挂载到容器中
    hostInsert(el, container, anchor)
  }
组件类型 vnode
和元素类型节点类似,这里直接进入 mountComponent 方法挂载组件节点。mountComponent 实现过程主要有三步
- 通过
compatMountInstance创建了一个组件实例 instance,instance 本质也是包含组件运行过程属性的对象 - 通过
setupComponent方法初始化 instance 上的 props、slots、attrs、emit - 调用
setupRenderEffect方法设置并运行带副作用的渲染函数
const mountComponent: MountComponentFn = ( /* 相关参数 */) => {
    // 创建一个函数组件的实例
    const instance: ComponentInternalInstance =
      compatMountInstance ||
      (initialVNode.component = createComponentInstance(
        initialVNode,
        parentComponent,
        parentSuspense
      ))

    //...
    // 初始化 instance 上的 props、slots、attrs、emit
    setupComponent(instance)
    //...

    // 设置并运行带副作用的渲染函数
    setupRenderEffect( /* 相关参数 */)
  }
在 setupRenderEffect 方法中,定义了一个 componentUpdateFn 并通过 ReactiveEffect 转换一个副作用的渲染函数,最后执行副作用函数的 update 方法完成组件渲染为 DOM 的过程
const setupRenderEffect: SetupRenderEffectFn = ( /* 相关参数 */) => {

  const componentUpdateFn = () => { /* 具体函数实现 */ }

  // 创建副作用渲染函数
  const effect = (instance.effect = new ReactiveEffect(
    componentUpdateFn,
    () => queueJob(update),
    instance.scope // track it in component's effect scope
  ))

  const update: SchedulerJob = (instance.update = () => effect.run())
  update.id = instance.uid
  // allowRecurse
  // #1801, #2043 component render effects should allow recursive updates
  toggleRecurse(instance, true)

  update()
}
接下来看组件类型挂载实现的核心函数 componentUpdateFn 的实现,因为是第一次挂载,所以 isMounted 属性为 false,直接进入第一分支(以下只列了最为核心的函数实现),主要过程包括
- 通过
renderComponentRoot方法渲染子树 vnode,renderComponentRoot方法本质是执行了 instance 的render方法,就是 vue 的 template 被编译后的 render 函数 - 通过
patch方法挂载子树到 container,并标记当前组件已挂载
const componentUpdateFn = () => {
  if (!instance.isMounted) {

    // 渲染子树 vnode
    const subTree = (instance.subTree = renderComponentRoot(instance))

    // 挂载子树到 container
    patch(null, subTree, container, anchor, instance, parentSuspense, isSVG)
    initialVNode.el = subTree.el

    // 标记当前组件已挂载
    instance.isMounted = true
  }
}
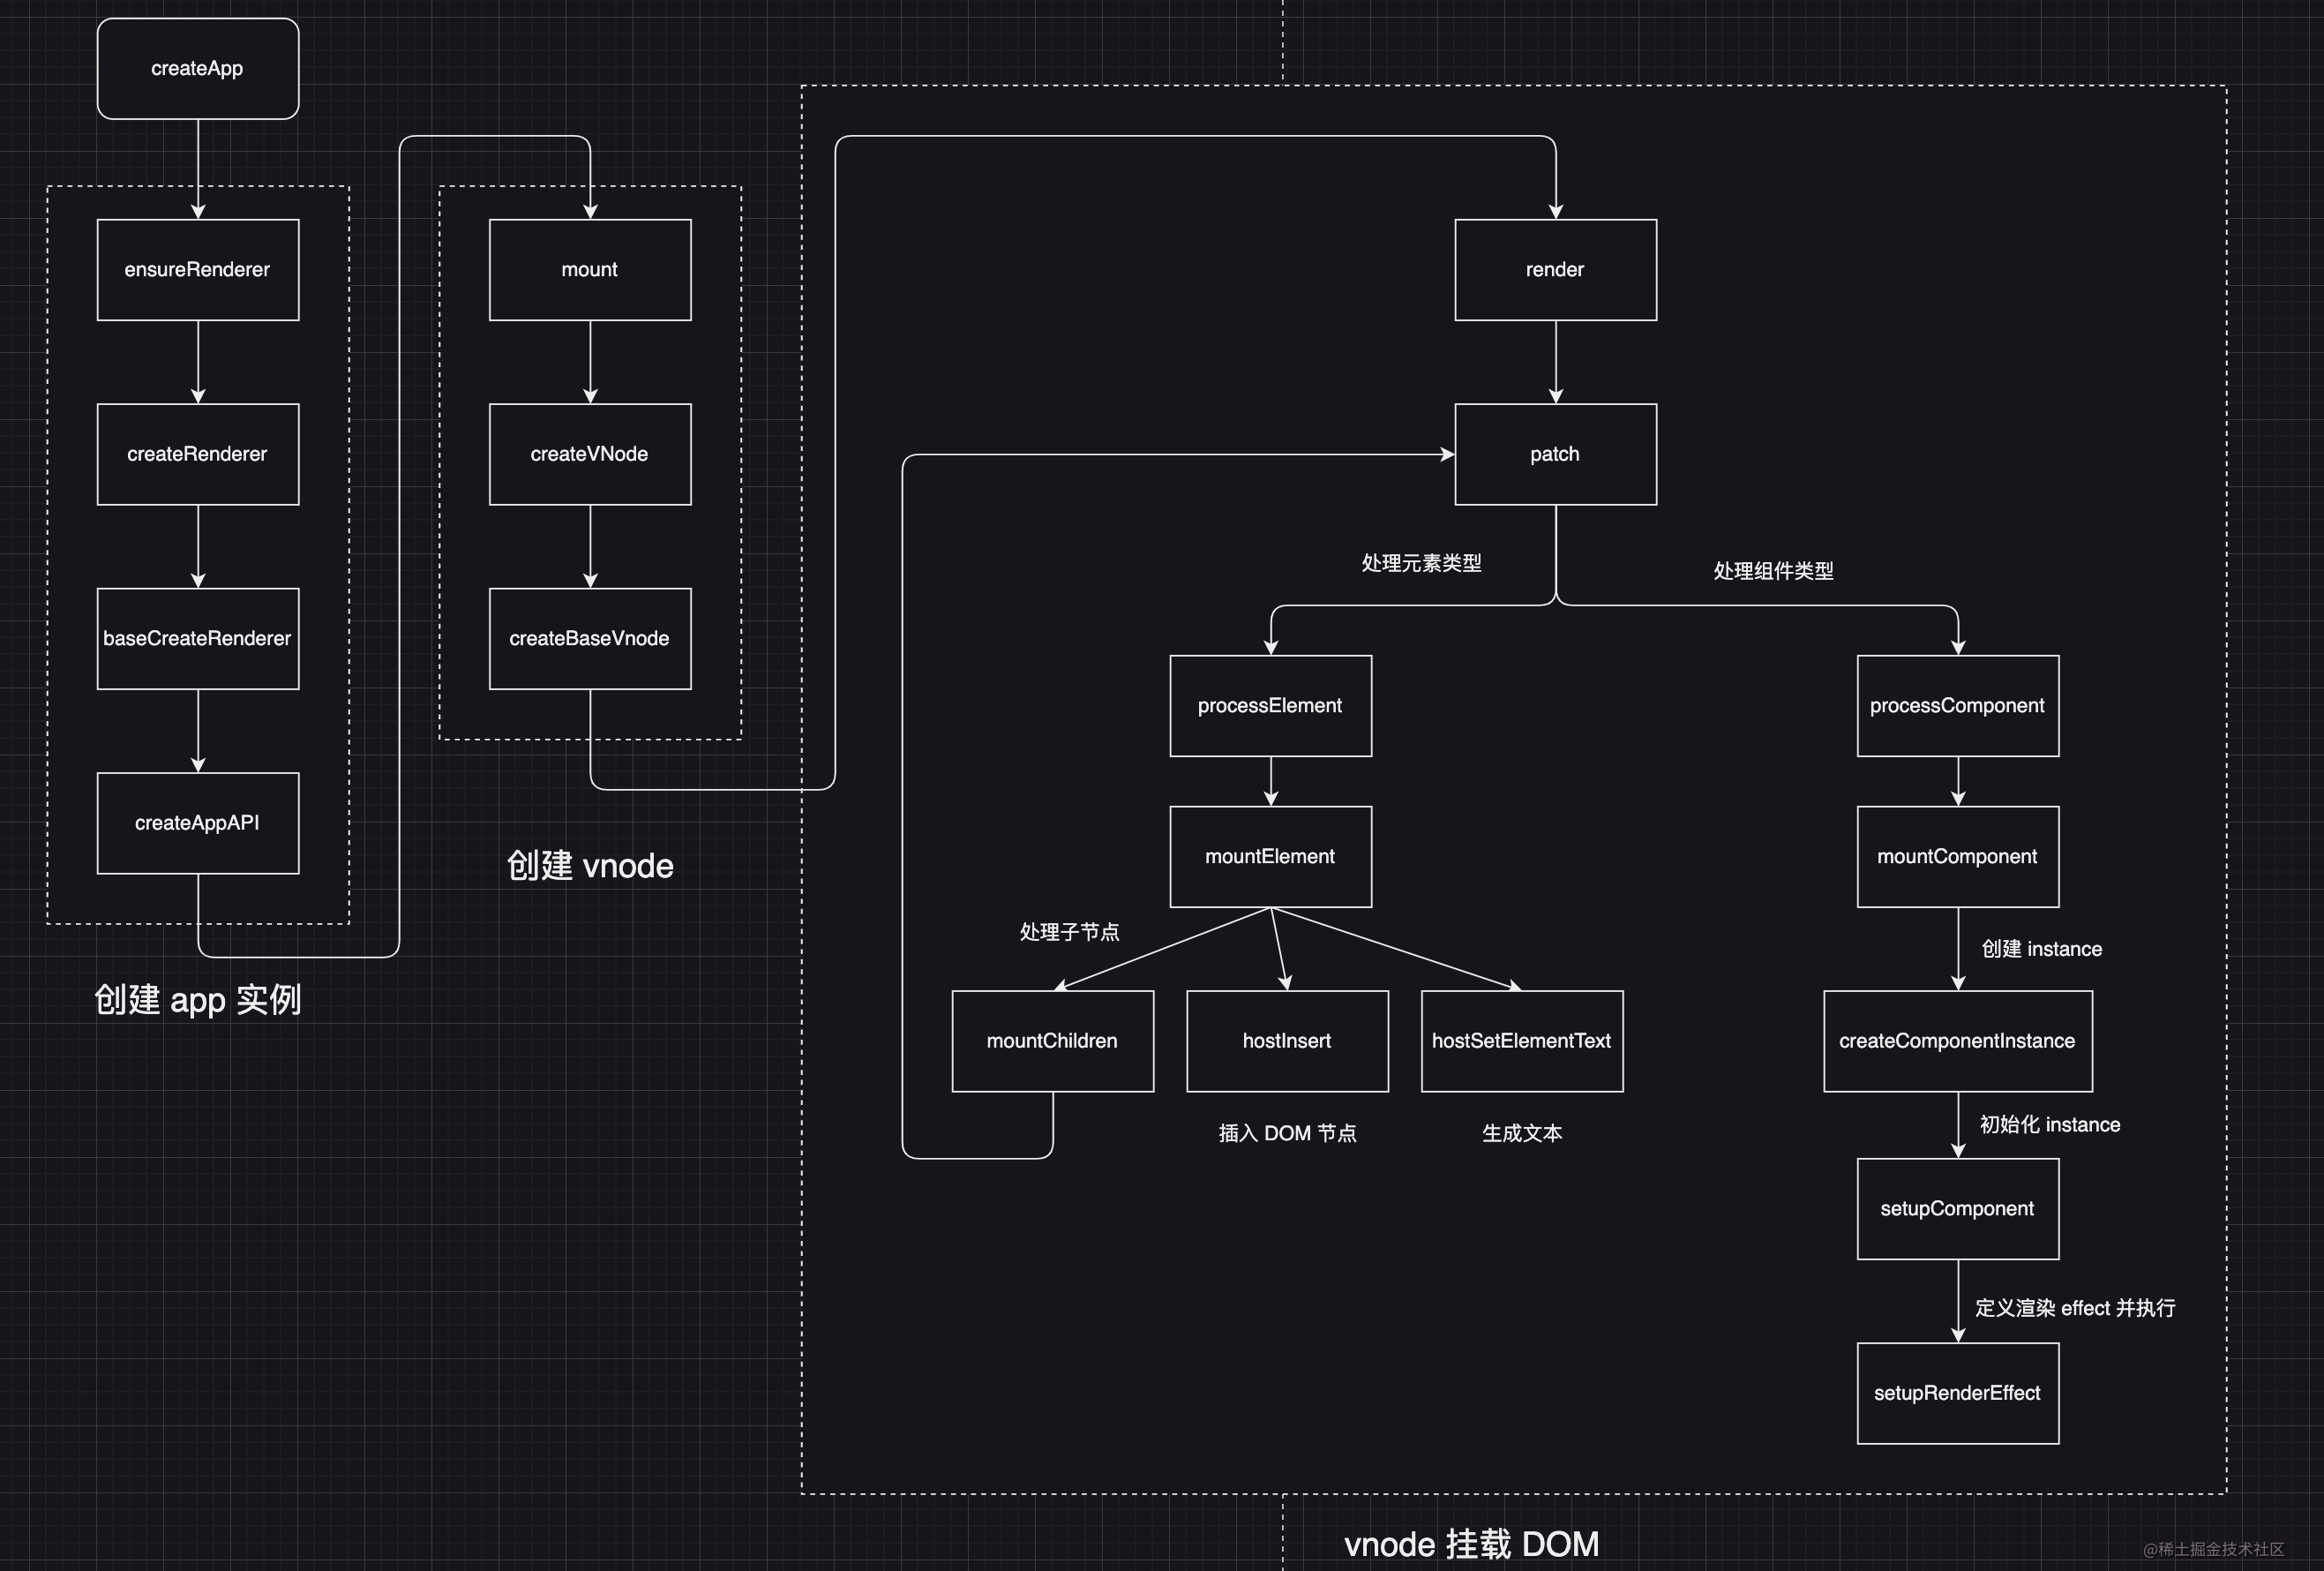
组件挂载 DOM 过程回顾
最后再回顾一下组件挂载为 DOM 的整体流程
- 创建 app 实例,通过入口函数
createApp,最终调用createAppAPI方法创建 app 实例对象 - 调用
mount方法,通过重写 app 实例对象定义的mount方法- 通过
createVNode创建虚拟节点 vnode - 通过
render方法,调用patch方法处理不同类型的 vnode,核心包括processElement处理元素类型节点和processComponent处理组件类型节点
- 通过
整体挂载过程如下图所示

本文正在参加「金石计划」
原文链接:https://juejin.cn/post/7218411904699187260 作者:WujieLi