
本文是一篇个人学习总结,实现了在 Gitlab 使用 ChatGPT 实现 Code Review,主要是为了了解一下 ChatGPT。
最近,看到了一个使用 ChatGPT 进行 Code Review 的项目 ChatGPT-CodeReview。它实现了一个代码审查机器人,当你在 GitHub 上创建一个新的 Pull request 时,机器人会自动进行代码审查,审查信息将显示在 PR timeline / file changes 中。恰巧最近想了解一下 ChatGPT,因此照猫画虎在 Gitlab 上实现了一个类似的功能,来学习一下如何使用 ChatGPT。
数据请求
使用 Node.js 开发 ChatGPT 项目一般都会使用 chatgpt 这个库,它里面用到了 fetch 做数据请求,因此对 Node 版本有一定的要求,如果 Node.js 版本低于 18 需要做 polyfill。由于国内需要翻墙等原因,在调试过程中可能会出现各种意想不到的问题,比如 fetch 一直报错请求不到 ChatGPT,最后放弃使用了该库,使用 Axios 简单封装了一下实现接口请求:
import axios from 'axios';
import type { InternalAxiosRequestConfig, AxiosResponse, AxiosError } from 'axios';

const createRequest = (
  host: string,
  { headers, data, params }: { headers?: Record<string, string>; data?: Record<string, any>, params?:  Record<string, any> }
) => {
  const instance = axios.create({
    baseURL: host,
    // timeout: 5000,
  });

  instance.interceptors.request.use(
    function (config: InternalAxiosRequestConfig) {
      // Do something before request is sent
      if (params) {
        config.params = { ...params, ...config.params };
      }
      if (headers) {
        config.headers.set(headers);
      }

      if (data) {
        config.data = { ...data, ...config.data };
      }
      return config;
    },
    function (error: AxiosError) {
      // Do something with request error
      return Promise.reject(error);
    }
  );

  instance.interceptors.response.use(
    function (response: AxiosResponse) {
      return response;
    },
    function (error: AxiosError) {
      // Any status codes that falls outside the range of 2xx cause this function to trigger
      // Do something with response error
      console.log(error);
      return Promise.reject(error);
    }
  );

  return instance;
};

export default createRequest;
只是简单封装了一下请求头和请求参数等,后面用它来实现请求 ChatGPT API 和 Gitlab API。
ChatGPT API
官方文档中对 ChatGPT API 有一些介绍,这里不做罗列了。如果不确定是否能访问得通 ChatGPT 的 API,可以简单 curl 一下,甚至 OPENAI_API_KEY 都不需要填:
curl https://api.openai.com/v1/chat/completions \
  -H "Content-Type: application/json" \
  -H "Authorization: Bearer $OPENAI_API_KEY" \
  -d '{
    "model": "gpt-3.5-turbo",
    "messages": [{"role": "user", "content": "Hello!"}]
  }'
如果访问通了,就会显示下面的信息,否则就会报超时错误。
{
    "error": {
        "message": "You didn't provide an API key. You need to provide your API key in an Authorization header using Bearer auth (i.e. Authorization: Bearer YOUR_KEY), or as the password field (with blank username) if you're accessing the API from your browser and are prompted for a username and password. You can obtain an API key from https://platform.openai.com/account/api-keys.",
        "type": "invalid_request_error",
        "param": null,
        "code": null
    }
}
接口 /v1/chat/completions 可以与 ChatGPT 完成一次对话,我们在这里使用这个接口来询问 ChatGPT 进行 Code Review:
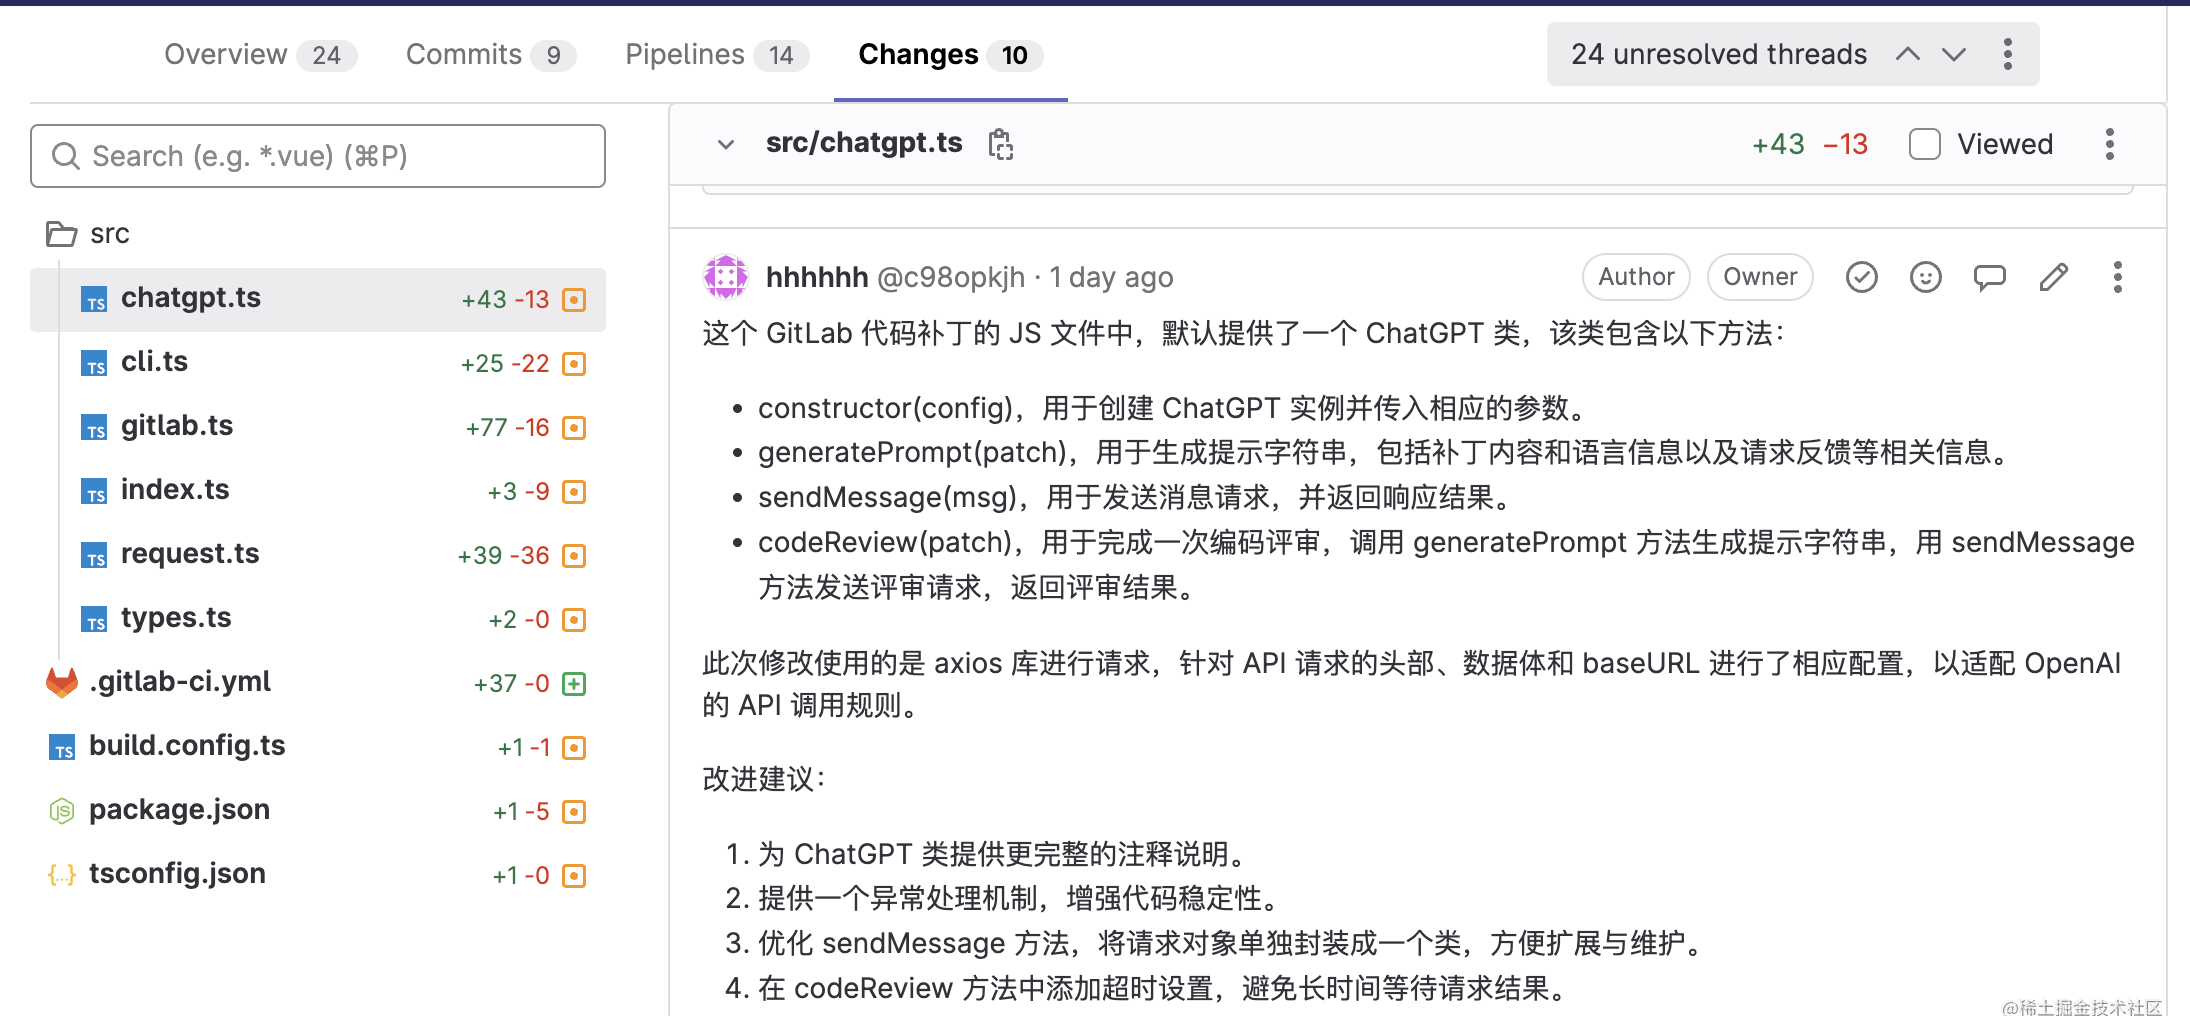
- 定义了一个 ChatGPT 类,在它的构造函数中使用相关参数生成了一个 request 对象
- sendMessage 方法负责将具体要 Reveiw 的代码和相关上下文发送给 ChatGPT
- 对外暴露了 codeReview 方法,通过调用 sendMessage 方法,完成 Reveiw 工作
import createRequest from './request';
import { logger } from './utils';

import type { AxiosInstance } from 'axios';
import { ChatGPTConfig } from './types';

export default class ChatGPT {
  private language: string;
  private request: AxiosInstance;

  constructor(config: ChatGPTConfig) {
    const host = 'https://api.openai.com';
    this.request = createRequest(host, {
      headers: {
        'Content-Type': 'application/json',
        Authorization: `Bearer ${config.apiKey}`,
      },
      data: {
        model: config.model || 'gpt-3.5-turbo',
        temperature: +(config.temperature || 0) || 1,
        top_p: +(config.top_p || 0) || 1,
        presence_penalty: 1,
        stream: false,
        max_tokens: 1000,
      },
    });
    this.language = config.language || 'Chinese';
  }

  private generatePrompt = (patch: string) => {
    const answerLanguage = `Answer me in ${this.language},`;

    return `Bellow is the gitlab code patch, please help me do a brief code review,${answerLanguage} if any bug risk and improvement suggestion are welcome
    ${patch}
    `;
  };

  private sendMessage = async (msg: string) => {
    const currentDate = new Date().toISOString().split('T')[0];
    return this.request.post('/v1/chat/completions', {
      messages: [
        {
          role: 'system',
          content:
            'You are ChatGPT, a large language model trained by OpenAI. Answer as concisely as possible.\n' +
            'Knowledge cutoff: 2021-09-01\n' +
            `Current date: ${currentDate}`,
        },
        { role: 'user', content: msg, name: undefined },
      ],
    });
  };

  public codeReview = async (patch: string) => {
    if (!patch) {
      logger.error('patch is empty');
      return '';
    }

    const prompt = this.generatePrompt(patch);
    const res = await this.sendMessage(prompt);
    const { choices } = res.data;

    if (Array.isArray(choices) && choices.length > 0) {
      return choices[0]?.message?.content;
    }

    return '';
  };
}
这段代码相对来说不并不复杂,主要是一些参数定义和接口请求。其中 codeReview 方法中的参数 patch,就是要 CodeReview 的代码片段,这段代码主要借鉴了前面提到的 ChatGPT-CodeReview 项目。
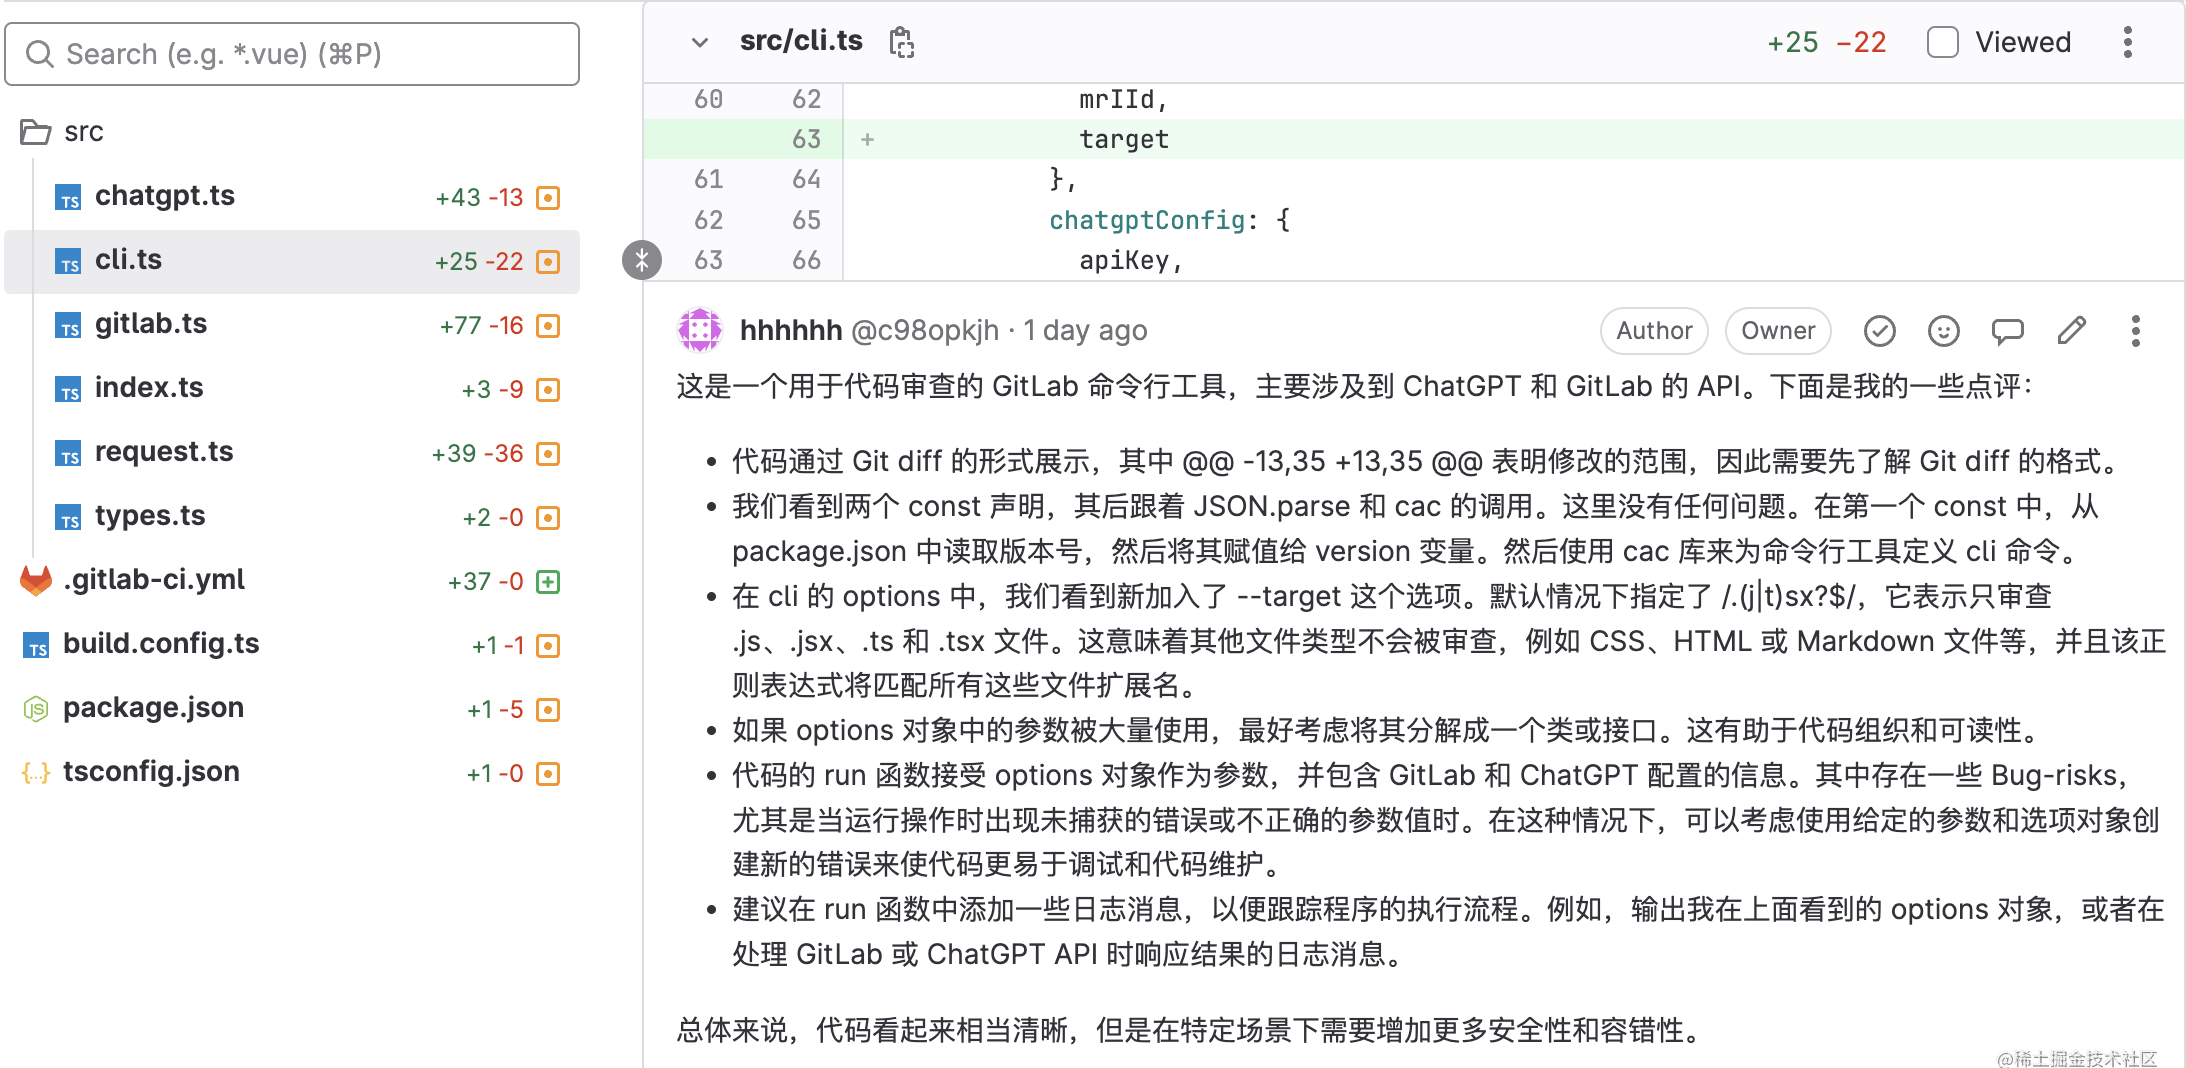
Gitlab API
主要涉及两个 API:
-
一个是获取 Merge Request 变更的代码:
/api/v4/projects/${projectId}/merge_requests/${mergeRequestIId}/changes,在这个接口返回的 changes 字段中就是所有的代码变更,我们只需按文件维度传给 ChatGPT 即可。 -
一个是将评论写入 Merge Request:
/api/v4/projects/${projectId}/merge_requests/${mergeRequestIId}/discussions,这里需要做一些处理工作,我们要把 ChatGPT 返回的结果作为评论写到 Merge Request 中每个文件的最后一行。Gitlab 的每一行 diff 其实是由三种状态组成 ‘+’ ‘-’ 和 ‘’:如果最后一行是 ‘+’,则给该接口传入 new_line 和 new_path;如果最后一行是 ‘-’ ,则给该接口传入 old_line 和 old_path;如果最后一行是 ‘’, 则 new_line、new_path 和 old_line、old_path 都要传入。对于 diff 的主要处理代码如下:
const parseLastDiff = (gitDiff: string) => {
  const diffList = gitDiff.split('\n').reverse();
  const lastLineFirstChar = diffList?.[1]?.[0];
  const lastDiff =
    diffList.find((item) => {
      return /^@@ \-\d+,\d+ \+\d+,\d+ @@/g.test(item);
    }) || '';

  const [lastOldLineCount, lastNewLineCount] = lastDiff
    .replace(/@@ \-(\d+),(\d+) \+(\d+),(\d+) @@.*/g, ($0, $1, $2, $3, $4) => {
      return `${+$1 + +$2},${+$3 + +$4}`;
    })
    .split(',');

  if (!/^\d+$/.test(lastOldLineCount) || !/^\d+$/.test(lastNewLineCount)) {
    return {
      lastOldLine: -1,
      lastNewLine: -1,
    };
  }

  const lastOldLine = lastLineFirstChar === '+' ? -1 : (parseInt(lastOldLineCount) || 0) - 1;
  const lastNewLine = lastLineFirstChar === '-' ? -1 : (parseInt(lastNewLineCount) || 0) - 1;

  return {
    lastOldLine,
    lastNewLine,
  };
};
Gitlab 的 API 请求实现如下:
- 定义了 Gitlab 类,在 getChanges 和 postComment 两个方法中调用上面提到的两个 API
- target 参数用于限定了对哪些类型的文件进行 Review
- codeReview 方法是对外暴露的访问方法
import camelCase from 'camelcase';
import createRequest from './request';
import { logger } from './utils';
import type { GitlabConfig, GitlabDiffRef, GitlabChange } from './types';
import type { AxiosInstance } from 'axios';
const formatByCamelCase = (obj: Record<string, any>) => {
const target = Object.keys(obj).reduce((result, key) => {
const newkey = camelCase(key);
return { ...result, [newkey]: obj[key] };
}, {});
return target;
};
export default class Gitlab {
private projectId: string | number;
private mrIId: number | string;
private request: AxiosInstance;
private target: RegExp;
constructor({ host, token, projectId, mrIId, target }: GitlabConfig) {
this.request = createRequest(host, { params: { private_token: token } });
this.mrIId = mrIId;
this.projectId = projectId;
this.target = target || /\.(j|t)sx?$/;
}
getChanges() {
/** https://docs.gitlab.com/ee/api/merge_requests.html#get-single-merge-request-changes */
return this.request
.get(`/api/v4/projects/${this.projectId}/merge_requests/${this.mrIId}/changes`)
.then((res) => {
const { changes, diff_refs: diffRef, state } = res.data;
const codeChanges: GitlabChange[] = changes
.map((item: Record<string, any>) => formatByCamelCase(item))
.filter((item: GitlabChange) => {
const { newPath, renamedFile, deletedFile } = item;
if (renamedFile || deletedFile) {
return false;
}
if (!this.target.test(newPath)) {
return false;
}
return true;
})
.map((item: GitlabChange) => {
const { lastOldLine, lastNewLine } = parseLastDiff(item.diff);
return { ...item, lastNewLine, lastOldLine };
});
return {
state,
changes: codeChanges,
ref: formatByCamelCase(diffRef) as GitlabDiffRef,
};
})
.catch((error) => {
logger.error(error);
return {
state: '',
changes: [],
ref: {} as GitlabDiffRef,
};
});
}
postComment({
newPath,
newLine,
oldPath,
oldLine,
body,
ref,
}: {
newPath?: string;
newLine?: number;
oldPath?: string;
oldLine?: number;
body: string;
ref: GitlabDiffRef;
}) {
/** https://docs.gitlab.com/ee/api/discussions.html#create-a-new-thread-in-the-merge-request-diff */
return this.request
.post(`/api/v4/projects/${this.projectId}/merge_requests/${this.mrIId}/discussions`, {
body,
position: {
position_type: 'text',
base_sha: ref?.baseSha,
head_sha: ref?.headSha,
start_sha: ref?.startSha,
new_path: newPath,
new_line: newLine,
old_path: oldPath,
old_line: oldLine,
},
})
.catch((error) => {
logger.error(error);
});
}
async codeReview({
change,
message,
ref,
}: {
change: GitlabChange;
message: string;
ref: GitlabDiffRef;
}) {
const { lastNewLine = -1, lastOldLine = -1, newPath, oldPath } = change;
if (lastNewLine === -1 && lastOldLine === -1) {
logger.error('Code line error');
return;
}
const params: { oldLine?: number; oldPath?: string; newLine?: number; newPath?: string } = {};
if (lastOldLine !== -1) {
params.oldLine = lastOldLine;
params.oldPath = oldPath;
}
if (lastNewLine !== -1) {
params.newLine = lastNewLine;
params.newPath = newPath;
}
return await this.postComment({
...params,
body: message,
ref,
});
}
}
组合实现
- 使用 Gitlab 的实例获取 Merge Request 代码变更
- 使用 ChatGPT 的实例获取代码 Review 结果
- 然后 将 Review 结果写回到 Merge Request
async function run({
gitlabConfig,
chatgptConfig,
}: {
gitlabConfig: GitlabConfig;
chatgptConfig: ChatGPTConfig;
}) {
const gitlab = new Gitlab(gitlabConfig);
const chatgpt = new ChatGPT(chatgptConfig);
const { state, changes, ref } = await gitlab.getChanges();
if (state !== 'opened') {
logger.log('MR is closed');
return;
}
if (!chatgpt) {
logger.log('Chat is null');
return;
}
for (let i = 0; i < changes.length; i += 1) {
const change = changes[i];
const message = await chatgpt.codeReview(change.diff);
const result = await gitlab.codeReview({ message, ref, change });
logger.info(message, result?.data);
}
}
Review 结果
ChatGPT 会对代码的含义做一些解释和说明,并能够指出一些代码潜在的风险,以及代码风格问题等。比如,最初在写 ChatGPT 类名时,不小心拼写成了 ChatGTP,它也能给指出拼写错误。除此之外,对于一些好的实现,也会有一些阐述。整体上来看,对于那些很大的 MR 来说,先让 ChatGPT Review 一下,再人工介入去看一下会很省力。一图省千言,下面是 Review 的效果图:

这个仓库的代码放在了 Gitlab 官方免费版上的,所以能直接访问到 ChatGPT,国内的各个公司的 Gitlab 应该还是要翻墙。另外,可以通过 Gitlab 的 CI 去触发 Code Review。
感兴趣的话,可以访问仓库 github.com/ikoofe/chat… 查看源码。
原文链接:https://juejin.cn/post/7218947399195541560 作者:KooFE