

版本:vuepress v1.9.9;vuepress-plugin-demo-container v^0.2.0
基于elementui v2.13.2、echarts图标库做的二次封装组件库;
组件库技术栈:vue 2.7.14 css预编译器stylus
1.环境准备
- 安装 VuePress 安装为本地依赖
yarn add -D vuepress # npm install -D vuepress
2. 创建你的第一篇文档
mkdir docs && echo '# Hello VuePress' > docs/README.md
3. 在 package.json 中添加一些 scripts(opens new window)
这一步骤是可选的,但我们推荐你完成它。在下文中,我们会默认这些 scripts 已经被添加。

    {
      "scripts": {
        "docs:dev": "vuepress dev docs",
        "docs:build": "vuepress build docs"
      }
    }
4. 在本地启动服务器
    yarn docs:dev # npm run docs:dev

VuePress 会在 [http://localhost:8080 (opens new window)](http://localhost:8080/)启动一个热重载的开发服务器。
2.配置vuepress
- 首页的配置,在
docs/README.md的markdown文件中编写配置
---
home: true
heroImage: /logo.png
actionText: Get Started →
actionLink: /components/basic/Card
features:
- title: vue2
  details: 渐进式 JavaScript 框架易学易用,性能出色,适用场景丰富的 Web 前端框架.
- title: element-ui
  details: Element,一套为开发者、设计师和产品经理准备的基于 Vue 2.0 的桌面端组件库.
- title: echarts
  details: 一个基于 JavaScript 的开源可视化图表库.

footer: MIT Licensed | Copyright © 2018-present Evan You
---
actionLink 是 actionText 对应按钮的链接;home:true确定是否为首页,更多看官网吧
docs/.vuepress/config.jsvuepress 中的config配置;
const sidebars = require("./sidebar/sidebar");
module.exports = {
    title: '公共组件库',
    description: 'dongni-ui',
    base:'/frontend/doc/dnui/',
    markdown: {
        lineNumbers: true
    },
    themeConfig: {
        logo: '/logo.png',
        nav: [
            {
                text: '组件',
                link: '/components/basic/Card'
            },
            {
                text: 'utils',
                link: '/utils/'
            },
            {
                text: 'element-ui',
                link: 'https://element.eleme.io/#/zh-CN/component/installation'
            },
            {
                text: 'vue2',
                link: 'https://v2.cn.vuejs.org/v2/guide/'
            }
        ],
        sidebarDepth: 0,
        sidebar: sidebars
    }
}
这里介绍一下themeConfig中的配置:
logo:网站logo;
nav: 组件库顶部的导航菜单配置;
sildebar: 页面下的侧边栏菜单;
sidebarDepth:用于重写默认显示的侧边栏深度,默认是1
- sildebar的单独维护
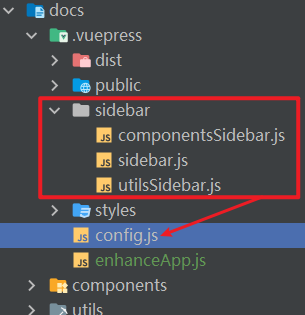
在.vuepress目录下新建sidebar文件夹用来管理sidebar,如下图所示:

- 配置sildebar文件
sildebar可以auto,也可以像下面一样配置:
module.exports = {
    '/components/': require('./componentsSidebar'),
    '/utils/': require('./utilsSidebar')
};
创建componentsSidebar文件,写入自己的配置;这里我用了分组的模式;
module.exports = [
    {
        title: '基础组件',
        path: "/components/basic/Card",
        collapsable: false,
        children: [
            "/components/basic/Card"
        ]
    },
    {
        title: '导航',
        path: "/components/nav/ImagePagination",
        collapsable: false,
        children: [
            "/components/nav/ImagePagination",
            "/components/nav/TablePagination"
        ]
    },
    {
        title: '数据录入',
        collapsable: false,
        path: '/components/dataEntry/inputSearch',
        children: [
            '/components/dataEntry/inputSearch',
            '/components/dataEntry/richText'
        ]
    },
    {
        title: '反馈',
        collapsable: false,
        path: '/components/feedback/Modal',
        children: [
            '/components/feedback/Modal'
        ]
    }
];
5. 在components文件夹下分别创建对应的分组README文件;
至此基础的配置也差不多了;这时候就可以重新运行启动服务;这里如果你看不到侧边栏,试着关闭一下
vue devTools工具。我当时是遇到这个问题;
3.加入组件demo
这里使用的是vuepress-plugin-demo-container
基础使用
- 安装
使用 yarn 安装 vuepress-plugin-demo-container 组件:
yarn add vuepress-plugin-demo-container -D
或者使用 npm 安装它:
npm i vuepress-plugin-demo-container --save-dev
2. 配置
打开 .vuepress/config.js 文件,然后在合适的位置引用插件:
这里只要写demo-container而不用写vuepress-plugin-demo-container是因为,vuepress会自动处理加载以vuepress-plugin-xxx的插件;
module.exports = {
  ...
  plugins: ['demo-container']
  ...
}
3. 在README中使用:
::: demo 此处放置代码示例的描述信息,支持 `Markdown` 语法,**描述信息只支持单行**
```html
<template>
  <div class="red-center-text">
      <p>{{ message }}</p>
      <input v-model="message" placeholder="Input something..."/>
  </div>
</template>
<script>
export default {
  data() {
    return {
      message: 'Hello Vue'
    }
  }
}
</script>
<style>
.red-center-text {
  color: #ff7875;
  text-align: center;
}
</style>
```
:::
4. 在 Vuepress 中 引入 自己的 组件库:
首先要在docs/.vuepress目录下创建enhanceApp.js
import UI from '../../packages/index'
import '../../packages/theme-chalk/element-variables.scss'
import '../../packages/theme-chalk/vars.styl'
import '../../packages/theme-chalk/index.styl'
export default ({
                    Vue, // VuePress 正在使用的 Vue 构造函数
                    options, // 附加到根实例的一些选项
                    router, // 当前应用的路由实例
                    siteData, // 站点元数据
                    isServer // 当前应用配置是处于 服务端渲染 或 客户端
                }) => {
    Vue.use(UI)
}
5. 问题处理
问题1
这个时候在 vuepress中应该就可以使用 UI里边的组件了。可是,启动项目后发现会报这样的错误,Cannot find module 'core-js/library/fn/xxx/xxx':
是 UI 组件中依赖的core-js包和vuepress所依赖的core-js包版本不兼容造成的。需要在vuepress配置文件config.js中进行如下配置:
module.exports = {
    chainWebpack: config => {
        config.resolve.alias.set('core-js/library/fn', 'core-js/features')
    }
}
问题2
发现还是报错,这是因为引入了elementui的样式element-variables.scss,而没有安装node-sass、sass,sass-loader;这里需要安装一下:这里的版本是:
"node-sass": "4.14.1",
"sass-loader": "7.3.1",
问题3
在浏览器打开发现组件的样式的颜色变量并没被解析;这里通过webpack引入解析;
在 config.js中配置: 首先要安装一下style-resource、style-resources-loader
module.exports = {
    ...
    chainWebpack: (config, isServer) => {
        const types = ['vue-modules', 'vue', 'normal-modules', 'normal']
        types.forEach(type => addStyleResource(config.module.rule('stylus').oneOf(type)))
    }
}
function addStyleResource (rule) {
    rule.use('style-resource')
        .loader('style-resources-loader')
        .options({
            patterns: [
                path.resolve(__dirname, '../../packages/theme-chalk/vars.styl')
            ]
        })
}
问题4
vuepress table样式污染(element ,vxetable) 样式错位;这里可以在docs/.vuepress下新建styles文件夹,然后新建index.styl文件,写入下面的代码,这里做的事情是覆盖vuepress源码中node_modules@vuepress\theme-default\styles\index.styl 166行的样式;更具需求也可自行删改;
.vxe-table, .el-table
  table
    border-collapse unset
    margin unset
    display inherit
    overflow-x unset
  tr
    border-top unset
    &:nth-child(2n)
      background-color unset
  th, td
    border unset
    padding unset
4.打包部署
打包报错: 打包render报错, HTMLElement is not defined
这里是因为 VuePress 应用程序是在 Node 中服务器渲染的.js所以在生成静态构建时,任何 Vue 的使用都必须符合通用代码要求。简而言之,确保只在挂载或挂载钩子之前访问浏览器/DOM API;
可以使用动态导入语法来使用对 SSR 不友好的 UI 库:
import '../../packages/theme-chalk/element-variables.scss'
import '../../packages/theme-chalk/vars.styl'
import '../../packages/theme-chalk/index.styl'
export default ({
                    Vue, // VuePress 正在使用的 Vue 构造函数
                    options, // 附加到根实例的一些选项
                    router, // 当前应用的路由实例
                    siteData, // 站点元数据
                    isServer // 当前应用配置是处于 服务端渲染 或 客户端
                }) => {
    if (!isServer) {
        import('../../packages/index').then(DongniUI => {
            Vue.use(DongniUI.default)
        })
    }
}
原文链接:https://juejin.cn/post/7223673824528695352 作者:前端_库日天