

背景:作为使用三年 react.js 的搬运工,目前正在积极学习 vue.js 语法,而在学习的过程中,总是喜欢和 react.js 进行对比,这里也不是说谁好谁坏,而是怀有他有我也有,他没我还有的思想去学习,去总结。
- React18
- Vue3
内容较长,干货较多
现在无论是 React 开发还是 Vue 开发,都有如下特点:
- 单页面
SPA开发(SSR 除外)。 - 基于组件化开发。
基于上面的特点之一,理解组件通信,是至关重要的。
组件可以分成多种类型,比如说页面组件,功能组件等等。那么针对组件的通信也可大可小,但是总的类型分为三种:
- 父传子(简称:T1)
- 子传父(简称:T2)
- 跨组件传递(简称:T3)
话不多说,正题开始。
下面的案例都是采用 ts 写法,如果想写 js 写法,只需要去掉类型即可。
React:组件通信
在前面的一篇中,梳理了对 React&Vue 系列:props ,正好可以充分利用 props。
T1: props 传递
子组件想要的数据(变量,方法),父组件就通过属性传递下去。当父组件中的状态发生了变化,父组件重新渲染,子组件也就会跟着渲染,保持同步(数据单向流)。
// Son.tsx
import type { FC } from "react";
interface Props {
name: string;
}
const Son: FC<Props> = (props) => {
const { name } = props;
return (
<>
<h2>我是子组件</h2>
<div>{name}</div>
</>
);
};
export default Son;
// Father.tsx
import { useState } from "react";
import Son from "./Son";
const Father = () => {
const [name, setName] = useState("copyer");
return (
<>
<h2>我是父组件</h2>
{/* 传递 name 属性 */}
<Son name={name}></Son>
</>
);
};
export default Father;
T2:props 传递
利用 props 的回调函数,实现子传父。
实现思路:子组件调用父组件传递过来的 props(方法),以参数的形式传递给父组件,改变父组件状态。
// Son.tsx
import type { FC } from "react";
interface Props {
name: string;
setName?: (name: string) => void;
}
const Son: FC<Props> = (props) => {
const { name, setName } = props;
const btn = () => {
// 调用父组件的方法,改变父组件的状态
setName && setName("james");
};
return (
<>
<h2>我是子组件</h2>
<div>{name}</div>
<button onClick={btn}>点击</button>
</>
);
};
export default Son;
// Father.tsx
import { useState } from "react";
import Son from "./Son";
const Father = () => {
const [name, setName] = useState("copyer");
const changeName = (name: string) => {
setName(name);
};
return (
<div>
<h2>我是父组件</h2>
<Son name={name} setName={changeName}></Son>
</div>
);
};
export default Father;
T2:ref 获取数据
利用 ref 操作 dom 方式,拿取子节点,强行获取数据。
实现思路:
- 父组件在使用子组件的时候,传递一个 ref 给子组件。
- 但是又由于 jsx 转化为虚拟 DOM 的过程中,ref 是一个保留属性,是不会传递到 props 中的,就需要使用 forwardRef 进行转化,拿取到 ref。
- 父组件就通过 ref 直接调用暴露(useImperativeHandle)出来的方法,拿取数据。
// Son.tsx
import type { Ref } from "react";
import { useImperativeHandle, forwardRef, useState } from "react";
interface Props {
name: string;
}
type RefType = Ref<{ getData: () => string }>;
const Son = (props: Props, ref: RefType) => {
const { name } = props;
const [data, setDate] = useState("我是子组件中的数据");
// 暴露方法供外部组件调用
useImperativeHandle(ref, () => {
return {
getData: () => data,
};
});
return (
<>
<h2>我是子组件</h2>
<div>{name}</div>
</>
);
};
// 转化ref
const ForwardRefSon = forwardRef(Son);
export default ForwardRefSon;
// Father.tsx
import { useState, useRef } from "react";
import type { ElementRef } from "react";
import Son from "./Son";
const Father = () => {
const [name, setName] = useState("copyer");
const ref = useRef<ElementRef<typeof Son>>(null);
const getSonData = () => {
// 拿取子组件的数据
const data = ref.current?.getData();
};
return (
<div>
<h2>我是父组件</h2>
<Son ref={ref} name={name} />
<button onClick={getSonData}>获取子组件数据</button>
</div>
);
};
export default Father;
T3:context 分享数据
context 就类似一个上层的汇集地,提供了共享的属性和方法,供下层组件使用。最常用的使用场景:系统主题的变量等。 当然 redux, react-router-dom 的内部实现都是采用的 context。
这里就提供函数组件的写法,类组件的写法就是在消耗的时候,写法不一样
// Father.tsx
import { useState, useRef, createContext } from "react";
import Son from "./Son";
interface ContextValue {
name: string;
changeName?: (value: string) => void;
}
// 定义一个 Context
export const FatherContext = createContext<ContextValue>({
name: "默认的名称",
});
const Father = () => {
const [name, setName] = useState("copyer");
const changeName = (name: string) => {
setName(name);
};
return (
<div>
<h2>我是父组件</h2>
{/* Context 提供者 */}
<FatherContext.Provider value={{ name, changeName }}>
<Son />
</FatherContext.Provider>
</div>
);
};
export default Father;
// Son.tsx
import type { FC } from "react";
import { useContext } from "react";
import { FatherContext } from "./Father";
const Son: FC = () => {
// 消耗者(获取属性和方法)
const context = useContext(FatherContext);
const { name, changeName } = context;
const btn = () => {
changeName && changeName("james");
};
return (
<>
<h2>我是子组件</h2>
<div>{name}</div>
<button onClick={btn}>点击</button>
</>
);
};
export default Son;
T3: 状态管理库 @reduxjs/toolkit
Redux Toolkit 是官方新推荐的编写 Redux 逻辑的方法(可能官方也感觉以前 redux 学习成本高,写法复杂吧,猜测哈)。
可以自己看下:为什么 Redux Toolkit 是如今使用 Redux 的方式
虽然 redux 出现了新的语法,使用变得更加的简洁,但是其中的基础概念还是必须了解一下。
重点理解:
- 单项数据流
- redux 的三大核心概念:action | reducer | store
- redux 的数据流(基于单项数据流)
具体使用。
安装
pnpm add @reduxjs/toolkit react-redux
具体使用
第一步:定义 slice,假设关于用户的名称(userSlice)
// userSlice.ts
import { createSlice } from "@reduxjs/toolkit";
interface IUser {
name: string;
}
const initialState: IUser = {
name: "copyer",
};
// 定义初始值和 reducer
const userSlice = createSlice({
name: "user",
initialState,
reducers: {
changeName: (state, actions) => {
state.name = actions.payload.name;
},
},
});
// 暴露 actions
export const { changeName } = userSlice.actions;
// 导入注册reducer
export default userSlice.reducer;
第二步:注册所有的 reducer,并导出 store
import { configureStore } from "@reduxjs/toolkit";
import userReducer from "./slices/userSlice";
const store = configureStore({
// 注册所有的 reducer
reducer: {
user: userReducer,
},
});
// 这里的类型,为了后面两个自定义 hooks 做准备
export type RootState = ReturnType<typeof store.getState>;
export type Dispatch = typeof store.dispatch;
export default store;
第三步(可选):为了后面书写 ts 更加的方便,自定义两个 hooks,代替 react-redux 提供的 hooks
// hooks/useAppStore.ts
import { TypedUseSelectorHook, useDispatch, useSelector } from "react-redux";
import type { RootState, Dispatch } from "@/store";
export const useAppDispatch: () => Dispatch = useDispatch;
export const useAppSelector: TypedUseSelectorHook<RootState> = useSelector;
第四步:为 React 提供 store
import { Provider as StoreProvider } from "react-redux";
const App = () => {
return <StoreProvider store={store}>{/* 内部代码 */}</StoreProvider>;
};
第五步:组件中使用
// Son.tsx
import type { FC } from "react";
import { useAppDispatch, useAppSelector } from "@/hooks/useAppStore";
import { changeName } from "@/store/slices/userSlice";
const Son: FC = () => {
const { name } = useAppSelector((state) => state.user);
const dispatch = useAppDispatch();
const btn = () => {
dispatch(changeName({ name: "james" }));
};
return (
<>
<h2>我是子组件</h2>
<div>{name}</div>
<button onClick={btn}>点击</button>
</>
);
};
export default Son;
基本使用的大致流程就是这样的,相对于以前的 redux 写法(文件多)简便太多了,还是值得推荐的。
异步?RTK 内部已经集成了 redux-thunk, store.dispatch() 可以接受一个函数。
具体看:额外知识:RTK 异步处理
dva/core 也是一种选择,基于 redux 的,写法也简便。不过有了 RTK,还是选择 RTK 吧。
T3: 状态管理库 mobx
mobx 是另外的一种状态管理库,也可以在其他框架中使用。其特点:
- 简单、可扩展的状态管理工具
- 函数响应式编程(利用 proxy)
可以先熟悉一下额外补充:mobx 的知识要点
安装
pnpm add mobx mobx-react-lite
# mobx-react-lite 针对函数组件
# mobx-react 函数组件,类组件都可
具体使用
第一步:定义类,创建响应式对象
// store/User.ts
import { observable, action, computed, makeObservable } from "mobx";
class User {
name: string;
constructor() {
this.name = "copyer";
makeObservable(this, {
name: observable,
changeName: action,
upperName: computed,
});
}
changeName(value: string) {
this.name = value;
}
get upperName() {
return this.name.toUpperCase();
}
}
export default User;
第二步:收集类,创建一个根类,供应用使用。也创建一个 Context,一个自定义 hook,使用 useContext
// store/index.ts
import { createContext, useContext } from "react";
import UserStore from "./User";
// 创建一个根类
class RootStore {
userStore: UserStore;
constructor() {
// 集中类
this.userStore = new UserStore();
}
}
const rootStore = new RootStore();
// 创建 Context
const RootStoreContext = createContext<RootStore>({} as RootStore);
// 创建一个自定义 hook, 用来消费 Context
const useStore = () => {
return useContext(RootStoreContext);
};
export { rootStore, useStore };
export default RootStoreContext;
第三步:在系统应用中注册(提供,provider)
import React from "react";
import ReactDOM from "react-dom/client";
import App from "./App.tsx";
import "./index.css";
import RootStoreContext, { rootStore } from "./mobxStore";
ReactDOM.createRoot(document.getElementById("root")!).render(
<React.StrictMode>
<RootStoreContext.Provider value={rootStore}>
<App />
</RootStoreContext.Provider>
</React.StrictMode>
);
第四步:在组件中消耗(consumer)
// App.tsx
import { observer } from "mobx-react-lite";
import { useStore } from "../mobxStore";
const AppInner = () => {
const userStore = useStore().userStore;
const asynClick = () => {
userStore.changeName("james");
};
return (
<div>
<span>{userStore.name}</span>
<span>{userStore.upperName}</span>
<button onClick={asynClick}>同步</button>
</div>
);
};
// 为了解决 eslint 的警告(这里会存在命名强迫症,不知道怎么命名)
const App = observer(AppInner);
export default App;
mobx 的基本使用的大致流程就是这样的。
Vue: 组件通信
T1: props 传递
正常的传递 props 给子组件,实现父传子的通信。
<!-- Father.vue -->
<script setup lang="ts">
import Son from "./Son.vue";
import { ref } from "vue";
const name = ref("copyer");
</script>
<template>
<div class="father">
<h3>我是父组件</h3>
<Son :name="name" />
</div>
</template>
<!-- Son.vue -->
<script setup lang="ts">
const props = defineProps<{ name: string }>();
</script>
<template>
<div class="son">
<h3>我是子组件</h3>
<span>{{ props.name }}</span>
</div>
</template>
T1: props 传递(id, class,style)
如果在组件上使用 id,class,style 或则绑定事件(click)等,那么会是什么样的效果呢?怎么拿取呢?
可以看看以前写的 vue3 中的透传 attributes
<!-- Father.vue -->
<script setup lang="ts">
import Son from "./Son.vue";
const btn = () => {
console.log("父组件的点击事件");
};
</script>
<template>
<div class="father">
<h3>我是父组件</h3>
<!-- 组件上传递 id style 点击事件-->
<Son id="abc" style="color: red" @click="btn" />
</div>
</template>
<!-- Son.vue -->
<script setup lang="ts">
import { useAttrs } from "vue";
const attrs = useAttrs();
console.log("attrs======>", attrs);
const btn = () => {
console.log("子组件的点击事件");
};
</script>
<template>
<div class="son" @click="btn">
<h3>我是子组件</h3>
</div>
</template>
具体效果
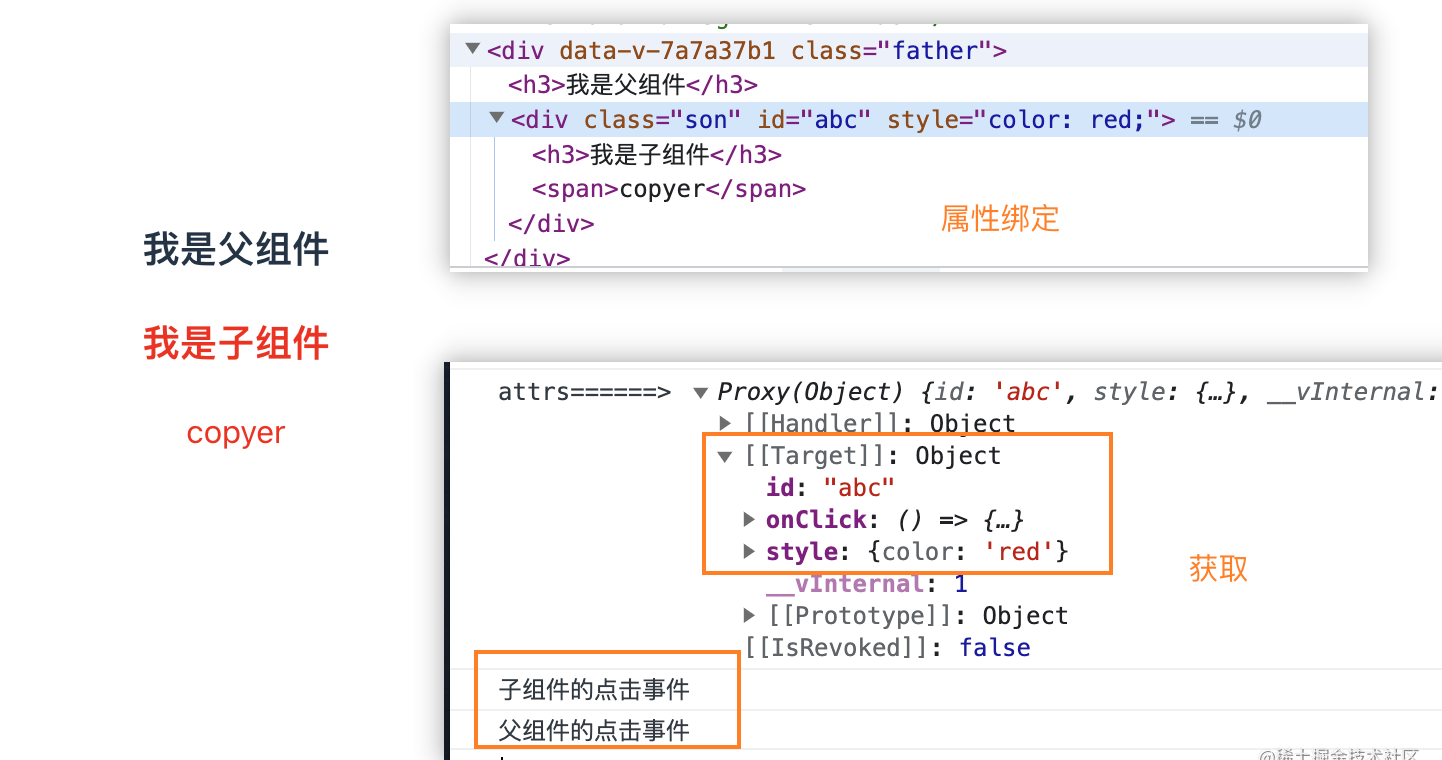
虽然在平时开发过程中,使用这种方式很少,但也可以看成一种通信方式,传递 class 或者 style,给子组件;也可以利用绑定事件来处理一些组件互动逻辑。
T2: emit
emit 方式实现子传父
实现思路: 触发父组件传递过来的方法,利用参数实现组件通信
<!-- Father.vue -->
<script setup lang="ts">
import Son from "./Son.vue";
import { ref } from "vue";
const name = ref("copyer");
const changeName = (newName: string) => {
name.value = newName;
};
</script>
<template>
<div class="father">
<h3>我是父组件</h3>
<!-- 给子组件传递一个函数,让子组件调用 -->
<Son @changeName="changeName" />
</div>
</template>
<!-- Son.vue -->
<script setup lang="ts">
// 数组形式
// const emit = defineEmits(['changeName'])
// 对象形式
const emit = defineEmits<{
(e: "changeName", newName: string): void;
}>();
const btn = () => {
// 触发父组件函数,参数通信
emit("changeName", "james");
};
</script>
<template>
<div class="son">
<h3>我是子组件1</h3>
<button @click="btn">点击</button>
</div>
</template>
T2: v-model
v-model 一般用于在表单上实现数据的双向绑定。但是在 vue3 中,v-model 已经可以组件上玩出花招了,实现组件间的双向绑定。
<!-- Father.vue -->
<script setup lang="ts">
import Son from "./Son.vue";
import { ref } from "vue";
const name = ref("copyer");
</script>
<template>
<div class="father">
<h3>我是父组件</h3>
<Son3 v-model="name" />
</div>
</template>
<!-- Son.vue -->
<script setup lang="ts">
const props = defineProps<{ modelValue: string }>();
const emit = defineEmits<{
(e: "update:modelValue", value: string): void;
}>();
const btn = () => {
emit("update:modelValue", "james");
};
</script>
<template>
<div class="son">
<h3>我是子组件</h3>
<span>{{ props.modelValue }}</span>
<button @click="btn">点击</button>
</div>
</template>
如果对上面的写法感到陌生的话,额外知识:Vue3 中不一样的 v-model可以帮助你学习。
T2: ref 获取数据
使用 <script setup> 的组件取到的组件实例是默认关闭的,也就是说通过 ref 是拿取不到的。那么需要借助编译器宏 defineExpose 来暴露属性,供其他组件使用。
<!-- Son.vue -->
<script setup lang="ts">
import { ref } from "vue";
const name = ref("我是子组件的信息");
// 暴露了 name 属性
defineExpose({
name,
});
</script>
<template>
<div class="son">
<h3>我是子组件</h3>
</div>
</template>
<!-- Father.vue -->
<script setup lang="ts">
import Son from "./Son.vue";
import { ref } from "vue";
const sonRef = ref();
const changeName = () => {
console.log("sonRef======>", sonRef.value.name)
}
</script>
<template>
<div class="father">
<h3>我是父组件</h3>
<Son ref="sonRef" />
<button @click="changeName">点击</button>
</div>
</template>
点击按钮,就能拿取子组件中暴露出来的数据了。
T3: provide / inject 方式
有点类似于 React 中的 Context,主要提供全局的响应数据。
<script setup lang="ts">
import Son from "./Son.vue";
import { ref, provide } from "vue";
const name = ref("copyer");
// 提供数据,供后代组件使用
provide("name", name);
const changeName = () => {
name.value = "james";
};
</script>
<template>
<div class="father">
<h3>我是父组件</h3>
<Son />
<button @click="changeName">点击</button>
</div>
</template>
<!-- Son.vue -->
<script setup lang="ts">
import { inject } from "vue";
const name = inject("name");
</script>
<template>
<div class="son">
<h3>我是子组件</h3>
<span>{{ name }}</span>
</div>
</template>
T3: mitt 三方库
Vue2 使用 EventBus 进行组件通信,而 Vue3 推荐使用 mitt 进行组件通信。其特点:
- 小,仅有 200bytes
- 支持事件监听和移除
- 跨框架使用
- ts 支持友好
安装
pnpm add mitt
使用 第一步:创建一个事件总线
// utils/eventBus.ts
import mitt from "mitt";
// 定义注册事件名称,和触发事件 handler 参数的类型,自动推导
type Events = {
changeName: string;
};
export default mitt<Events>();
第二步:使用
<!-- Father.vue -->
<script setup lang="ts">
import Son from "./Son.vue";
import { ref } from "vue";
import mitt from "./utils/EventBus";
const name = ref("copyer");
// 注册事件,value 的类型也会自动推断
mitt.on("changeName", (value) => {
name.value = value;
});
</script>
<template>
<div class="father">
<h3>我是父组件</h3>
<span>{{ name }}</span>
<Son />
</div>
</template>
<!-- Son.vue -->
<script setup lang="ts">
import mitt from "./utils/EventBus";
const btn = () => {
// 触发事件
mitt.emit('changeName', 'james')
}
</script>
<template>
<div class="son">
<h3>我是子组件</h3>
<button @click="btn">点击</button>
</div>
</template>
mitt 的基本使用大致就是这样。mitt 也提供了其他函数,看看 额外知识:mitt 小知识点 吧!
T3: 状态管理 vuex
vuex 作为 vue 全家桶的一员就不用多做解释。
Vuex 是一个专为 Vue.js 应用程序开发的状态管理模式 + 库。它采用集中式存储管理应用的所有组件的状态,并以相应的规则保证状态以一种可预测的方式发生变化。
安装
pnpm add vuex
使用
第一步:定义 store
// store/index.ts
const store = createStore({
// 定义 state
state() {
return {
name: 'copyer'
}
},
// state 衍生值
getters: {
getNameToUpperCase(state, getters) {
return state.name.toLocaleUpperCase();
},
},
// 修改 state 的唯一途径
mutations: {
changeName(state, payload) {
state.name = payload.name
}
},
// 异步间接修改 state(通过触发 mutations 来改变 state)
actions: {
asyncChangeName(context, payload) {
setTimeout(() => {
context.commit("changeName", payload);
}, 2000);
},
},
modules: {
// ...其他模块
}
})
第二步:全局注册 store
// main.ts
const app = createApp(App)
app.use(store) // 中间件,全局注册store
第三步:在组件中使用 store
<script setup lang="ts">
import { useStore } from "vuex";
// 获取 store
const store = useStore();
const asynBtn = () => {
// 同步修改通过 commit
store.commit("changeName", { name: "james" });
};
const asyncBtn = () => {
// 异步修改通过 dispatch
store.dispatch("asyncChangeName", { name: "curry" });
};
</script>
<template>
<div class="home">
<div>{{ $store.state.name }}</div>
<button @click="asynBtn">同步修改state</button>
<button @click="asyncBtn">异步修改state</button>
</div>
</template>
这里就不介绍 modules 了,可以自己去研究一下。
Vuex 的基本使用大致就是这样了。
T3: 状态管理 pinia
起源
pinia 起始于 2019 年 11 月左右的一次实验,其目的是设计一个拥有组合式 API 的 Vue 状态管理库(也就是 vuex5),结果写着写着,最后发现 pinia 已经具备了 vuex5 (vuex 的下一次迭代) 中的大部分内容,所以决定使用 pinia 代替 vuex5 的出现。
pinia 也是新起之秀,vue 全局桶新的一员,也是需要掌握的。
安装
pnpm add pinia
使用
第一步:创建 store
// store/userStore.ts
import { defineStore } from 'pinia'
// 创建一个 store 实例
const useUserStore = defineStore('user', {
// 定义 state
state() {
return {
name: 'copyer'
}
},
// state 的变形
getters: {
getNameToUpperCase(state) {
return (str) => {
return state.name + '' + str
}
}
},
// 修改 state(同步,异步都行)
actions: {
async changeName(name) {
this.name = name
}
}
})
第二步:创建 pinia,全局注册
// store/index.ts
import { createPinia } from "pinia";
// 创建一个 pinia 实例
const pinia = createPinia();
export default pinia;
// main.ts
import store from './store'
const app = createApp(App)
app.use(pinia) // 中间件,全局注册store
第三步:在组件中使用
<script setup lang="ts">
import { storeToRefs } from "pinia";
import { useUserStore } from "../store/useUserStore";
const userStore = useUserStore();
// 解构,使其具有响应式
const { name } = storeToRefs(userStore);
const btn = () => {
userStore.changeName("kobe");
};
</script>
<template>
<div class="home">
<div>{{ name }}</div>
<button @click="btn">同步修改state</button>
</div>
</template>
pinia 的基本使用大致就是这样了。
当然,pinia 还提供了一些批量修改的方法($patch、$state、$reset)在 额外知识:vuex 与 pinia 的总结和对比 都所介绍。
额外知识
RTK 异步处理
在上面已经介绍了 RTK 的基本使用流程,修改 state,同步到 view。但是还存在一种情况,就是 state 的数据源来至于服务器,也就是所谓的异步操作,那么这时候该如何写呢?
方式一:RTK 内部集成了 redux-thunk 中间件,那么就增强了 dispatch 函数,可以接受一个函数作为参数。
// Son.tsx
import type { FC } from "react";
import { useAppDispatch, useAppSelector } from "@/hooks/useAppStore";
import { changeName } from "@/store/slices/userSlice";
import { Dispatch } from "../store";
const Son: FC = () => {
const { name } = useAppSelector((state) => state.user);
const dispatch = useAppDispatch();
// 该函数会注册进两个参数:dispatch 和 getState
// 为了参数,也可以设置成一个高阶函数
async function getName(dispatch: Dispatch) {
const res = await new Promise((resolve) => {
setTimeout(() => {
resolve("curry");
}, 2000);
});
dispatch(changeName({ name: res }));
}
const btn = () => {
// dispatch 被增强,接受一个函数
dispatch(getName);
};
return (
<>
<h2>我是子组件</h2>
<div>{name}</div>
<button onClick={btn}>异步点击</button>
</>
);
};
export default Son;
方式二:RTK 内部也提供了一个函数 createAsyncThunk 专门用于异步请求数据,然后通过 extraReducers 添加额外的 reducer 函数,使 state 成为响应式。
import { createSlice, createAsyncThunk } from "@reduxjs/toolkit";
interface IUser {
name: string;
}
const initialState: IUser = {
name: "copyer",
};
// 异步请求数据
export const fetchUsers = createAsyncThunk("user/fetchUsers", async () => {
const res = await new Promise((resolve) => {
setTimeout(() => {
resolve("curry");
}, 2000);
});
return res;
});
// 定义初始值和 reducer
const userSlice = createSlice({
name: "user",
initialState,
reducers: {
changeName: (state, actions) => {
state.name = actions.payload.name;
},
},
extraReducers(builder) {
// 监听 fetchUsers 的完成状态
builder.addCase(fetchUsers.fulfilled, (state, action) => {
state.name = action.payload as string;
});
},
});
// 暴露 actions
export const { changeName } = userSlice.actions;
// 导入注册reducer
export default userSlice.reducer;
在组件中使用
dispatch(fetchUsers());
对于方式一和方式二的选择,按照个人习惯还是喜欢方式一,也许更加符合以前的 redux 开发模式吧。
mobx 的知识要点
第一点:mobx 的三个核心概念
state响应式(observable)数据(利用 proxy 实现的)actions修改 state 的方法derivations衍生值,根据 state 衍生出来的值,并具有缓存 (computed)。
第二点:定义可观察对象
利用 mobx 两个函数 makeObservable 或则 makeAutoObservable,第二个函数式加强版。简单理解,一个是手动版,一个是自动版。
class User {
name = "copyer";
constructor() {
// 写法一:手动指定
makeObservable(this, {
name: observable,
changeName: action,
upperName: computed,
});
// 写法二:自动推断
makeAutoObservable(this);
}
changeName(value: string) {
this.name = value;
}
get upperName() {
return this.name.toUpperCase();
}
}
第三点:makeAutoObservable 参数解析
// 参数1:target,把谁变成响应式(可观察)
// 参数2:排除属性和方法
// 参数3:利用 autoBind 指定自动绑定 this
makeAutoObservable(this, { decrement: true }, { autoBind: true });
第四点:this 的绑定
class 中的方法不会默认绑定 this,this 指向取决于如何调用。那么对于类的属性正确的使用,就需要绑定 this。
// 也只是针对 action, 改成 action.bound ,就能正确的绑定 this
makeObservable(this, {
  name: observable,
  changeName: action.bound,
  upperName: computed,
});
第五点:变量监听
如果你理解 Vue3 中的 watch 和 watchEffect 这两个函数,那么这两个函数很好理解:
reaction ===> watch
autorun ===> watchEffect
它们的特点:
autorun:从名字上,就可以看出第一次会自动运行一次(为了收集依赖),当依赖发生变化了,再次执行。
// 这里要保证只会 autorun 初始化一次
useEffect(() => {
  autorun(() => {
    // 代码逻辑
  });
}, []);
reaction:接受两个参数,第一个要监听的属性,第二个就是回调函数,默认不会执行,只有当监听的属性发生变化才会执行。
useEffect(() => {
  reaction(
    () => userStore.name,
    (current, previous) => {
      console.log(current);
      console.log(previous);
    }
  );
}, []);
第六点:异步处理
利用 runInAction 函数里面来修改状态
changeName(){
    setTimeout(() => {
      runInAction(() => {
        this.name='curry'
      })
    }, 1000)
  }
Vue3 中不一样的 v-model
在 vue3 中 v-model 可以在组件上也能实现数据的双向绑定。
<!-- v-model 写法 -->
<Father v-model="msg" />
<!--  动态值绑定 modelValue 与 update:modelValue 事件 实现     -->
<Father :modelValue="msg" @update:modelValue="changeValue" />
上面这两种写法是等价的。也就是说 v-model 也是一种语法糖。
组件中的 v-model:动态绑定 moelValue 属性和事件 update:modelValue 的语法糖
表单中的 v-model: 动态绑定 value 属性和事件 input/change 的语法糖
设置动态绑定属性
v-model 默认绑定的属性是 modelValue,但是也可以自定义的属性
<!-- v-model 写法 -->
<Father v-model:name="msg" />
<!--  动态值绑定 name 与 update:name 事件 实现     -->
<Father :name="msg" @update:name="changeValue" />
当然在子组件中的定义也要跟随修改。
多次使用 v-model
在组件中,也可以多次使用 v-model
<!-- v-model 写法 -->
<Father v-model:name="name" v-model:age="age" />
那么 name 和 age 属性也就双向绑定了
mitt 小知识点
简单总结一下 mitt 中提供的方法
// 监听事件
mitt.on("foo", (e) => console.log("foo", e));
// 监听所有事件,注意 handler 的参数(两个)
mitt.on("*", (type, e) => console.log(type, e));
// 触发事件
mitt.emit("foo", { a: "b" });
// mitt 注销事件
mitt.off("foo");
// 注销所有事件
mitt.all.clear(); // mitt.off("*") 的区别
mitt.off(“*”) 好像注销不了,还不知道为什么
vuex 与 pinia 的总结和对比
在面前的时间里,总结一篇关于 vuex 和 pinia 使用和对比,还是比较全面的,推荐看一下。
总结
无论是 React 的组件通信方式,还是 vue 的组件通信方式还是比较多的,在平时的开发中也非常的常见,采用的技术手段也是自己的技术选型,所以掌握多个通信方式总是没有错的。
汇集,总结一下:
| React | Vue |
|---|---|
| T1: props 传递,实现父传子 | T1: props 传递,实现父传子 |
| T2: 利用 props 传递回调函数,实现子传父 | T2: emit 利用 props 传递回调函数,实现子传父 |
| T2: 通过 ref 拿取子节点,实现子传父 | T2: 通过 ref 拿取子节点,实现子传父 |
| T3: context 跨组件 | T3: provide/inject 跨组件 |
| T3: 状态管理库 redux mobx | T3: 状态管理库 vuex pinia |
| T1: id, class 等 特殊 props 传递 | |
| T2: v-model 组件双向绑定 | |
| T3: mitt |
也不难发现,vue 的通信方式也更多,也可以说 vue 在语法层面比 react 相对于来说更多;当然,这些都不是重点,重点的会了就行。
关于 react 和 vue 的组件通信总结到此结束了,如果存在问题,请多多指教哟。
原文链接:https://juejin.cn/post/7260140790545547319 作者:copyer_xyf