
经常在看同事写代码的时候,一股脑的ctrl+c+ctrl+v,不管三七二十一,不管别人代码写的对不对,好的坏的先复制来写业务再说。我改这部分代码的时候就有点看不下去了,搬出来给大伙鉴赏一下。
// 这不是在写hook,只是一个普通函数
function getTableInfoData() {
    // 声明了两个ref的变量,作为变量使用
    let getNewData = ref();
    let getData = ref([]);

    // 取数据,然后做了一个像是筛选的操作
    getNewData.value = getTableInfo.value.selectedValue().value;
    getNewData.value.forEach((item) => {
      getWarehouseInfo.value.filter((i) => {
        if (i.id == item.id) {
          getData.value.push(i);
        }
      });
    });
    // 将整理好的数据赋值给外面的ref变量
    getWarehouseInfo.value = getData.value;
}
看起来这位同事不太理解什么是变量,他用ref只是为了存个能变的值。
  <a-modal v-model:visible="showInfo" title="审批历史" :footer="null" wrapClassName="full-modal" :destroyOnClose="false" width="100%" @cancel="closeInfoOk">
    <HistoricDetail :procInstId="procInstId" v-if="showInfo" />
  </a-modal>
还有上面这种,<a-modal>里面再套一个v-if,行吧,可能是为了双保险。
为什么拿这两段拿出来说呢,因为我见过不止一次。
确实,对于新手实习生来说,变量常量响应式隐藏销毁什么的概念太多了,我刚写代码的时候还搞不明白为什么函数/方法要有返回值,而且传参我都写个全局变量或者给类加个属性来曲线传参。
谁是万恶之源已经不得而知了,不过这都不重要了,还是说讨论下怎么解决吧,既然ctrl+cv不可避免,那就让复制粘贴的操作优雅一点。我找了两种办法,一是外挂一个代码生成插件plop,写点命令就生成一套增删改查的代码。另一种就是利用vscode的代码片段功能,也就是snippets,这个大家肯定都用过,很多插件就是做这个的,也可以自己自定义。但是,vscode也可以给某个项目单独设置专用的代码片段,然后我们项目成员就可以共同维护这一套代码片段或模板。
Plop.js
Plop.js 是一个基于Node.js的自动化代码生成工具。它可以帮助开发者快速生成模板文件、组件等重复性高的代码,从而提高开发效率。
安装Plop.js
npm install --save-dev plop
安装inquirer-directory,选择输出目录时用到
npm install inquirer-directory -D
创建Plopfile
安装完成后,在项目根目录下创建一个名为plopfile.js的文件。这个文件是用来定义我们要生成的代码模板的,可以理解为plop的入口。
const inquirerDirectory = require('inquirer-directory');

module.exports = function (plop) {
  plop.setPrompt('directory', inquirerDirectory);
  plop.setWelcomeMessage('请选择需要创建的模式:');

  // 这里设置page、component选项,选择不同的选项代表使用不同的模板
  plop.setGenerator('page', require('./plop-templates/page/prompt'));
  plop.setGenerator('component', require('./plop-templates/component/prompt'));
};
定义Generator
上面用plop.setGenerator('page', require('./plop-templates/page/prompt'));声明了一个模板选项,接下来就填充这个选项的文件。
./plop-templates/page/prompt.js
const path = require('path');

module.exports = {
  description: '创建页面',
  prompts: [
    {
      // 使用 directory 类型就可以在命令行选目录了
      type: 'directory',
      name: 'path',
      message: '请选择页面创建目录',
      basePath: './src/views',
    },
    {
      type: 'input',
      name: 'modelName',
      message: '请输入模块名称',
      validate: (v) => {
        if (!v || v.trim === '') {
          return '模块名称不能为空';
        } else {
          return true;
        }
      },
    },
  ],
  actions: (data) => {
  // 获取选中的路径,父路径
    const filePath = 'src/views/' + data.path;
    const relativePath = path.relative('src/views', data.path);

    const { modelName } = data;

    const actions = [
      {
        type: 'add',
        // 生成的位置
        path: `${filePath}/index.vue`,
        // 模板位置
        templateFile: 'plop-templates/page/index.hbs',
        // 传递到模板文件的变量
        data: {
          relativePath,
          modelName,
        },
      },
      {
        type: 'add',
        path: `${filePath}/data.ts`,
        templateFile: 'plop-templates/page/data.hbs',
        data: {
          relativePath,
          modelName,
        },
      },
      {
        type: 'add',
        path: `${filePath}/api.ts`,
        templateFile: 'plop-templates/page/api.hbs',
        data: {
          relativePath,
          modelName,
        },
      },
    ];

    return actions;
  },
};
上面的代码中,我们定义了一个名为创建页面的generator。它包含了以下三个配置项:
- description:描述这个generator的作用;
- prompts:定义了需要提供哪些参数,例如上面的代码需要提供组件的名称;
- actions:定义了生成文件时需要执行的操作,例如复制模板文件并替换其中的占位符。
actions最后返回一个数组,数组里的对象是需要生成的模板文件。在上面这段代码,我返回的数组有三个文件要生成。
创建模板文件
最后就是模板文件,上面的示例我用到了三个模板文件。hbs是一个Handlebars模板,可以通过一些特定的语法来引用变量、表达式。如我们使用{{properCase modelName }}来引用用户输入的名称,它会被自动替换成PascalCase格式的字符串。详细文档看这里。
下面这三个模板文件就是项目中可能用到的增删改查的代码示例,篇幅有限删除了部分内容。放这里只是为了给想实践的朋友直接复制使用的便利,代码没有参考价值。
plop-templates/page/index.hbs
<script setup name="Page" lang="ts">
import { {{properCase modelName }}PageStructure } from './data';
import { useListPage } from '/@/hooks/system/useListPage';
import { BasicTable } from '/@/components/Table';
import { Space } from 'ant-design-vue';
import { query{{properCase modelName }}List, {{camelCase modelName }}BatchDelete, delete{{properCase modelName }}ById } from './api';
import { showDeleteModal } from '/@/utils/confirm';
// 列表页面公共参数、方法
const { tableContext } = useListPage({
designScope: 'role-template',
tableProps: {
rowKey: 'id',
showIndexColumn: true,
showActionColumn: false,
title: '列表',
api: query{{properCase modelName }}List,
rowSelection: {
type: 'checkbox',
},
columns: {{properCase modelName }}PageStructure.tableColumns,
size: 'small',
formConfig: {
schemas: {{properCase modelName }}PageStructure.searchFormSchema,
},
striped: true,
showTableSetting: true,
bordered: true,
tableSetting: { fullScreen: true },
},
});
const [registerTable, { reload, setSelectedRowKeys, getSelectRowKeys }] = tableContext;
/* 单个删除的弹窗 */
function deleteRecord(record: any) {
const { id } = record;
showDeleteModal({
content: '确认删除吗?',
onOk() {
return deleteUserById(id).then(() => {
reload();
});
},
});
}
/* 批量删除的弹窗 */
function batchDeleteRecord() {
const ids = getSelectRowKeys();
showDeleteModal({
content: `确认删除${ids.length}条数据吗?`,
onOk() {
return userBatchDelete(ids).then(() => {
setSelectedRowKeys([]);
reload();
});
},
});
}
</script>
<template>
<div class="col">
<BasicTable
@register="registerTable"
:rowSelection="{
type: 'checkbox',
}"
>
<template #tableTitle>
<Space>
<a-button type="primary" preIcon="ant-design:plus-outlined" @click="modalHandler.showModal('add')">新增</a-button>
<a-button :disabled="getSelectRowKeys().length === 0" type="primary" danger preIcon="ant-design:delete-outlined" @click="batchDeleteRecord">批量删除</a-button>
</Space>
</template>
<template #action="{ record }">
<a-button type="link" danger @click="deleteRecord(record)">删除</a-button>
<a-button type="link" :loading="record.loading">编辑</a-button>
</template>
</BasicTable>
</div>
</template>
<style lang="less" scoped></style>
plop-templates/page/data.hbs
import { BasicColumn, FormSchema } from '/@/components/Table';
export const {{properCase modelName }}PageStructure: { tableColumns: BasicColumn[]; searchFormSchema: FormSchema[] } = {
tableColumns: [
{
title: '名称',
dataIndex: 'name',
width: 'auto',
},
{
title: '操作',
dataIndex: 'action',
slots: { customRender: 'action' },
width: 250,
},
],
searchFormSchema: [
{
label: '名称',
field: 'name',
component: 'Input',
colProps: { span: 12 },
},
],
};
plop-templates/page/api.hbs
import { defHttp } from '/@/utils/http/axios';
const baseUrl = '';
export function query{{properCase modelName }}List(params: any) {
return defHttp.get({ url: baseUrl + '/queryList', params });
}
export function query{{properCase modelName }}ById(id: string | number) {
return defHttp.get({ url: baseUrl + '/queryById', params: { id } });
}
export function add{{properCase modelName }}(data: any) {
return defHttp.post({ url: baseUrl + '/add', data });
}
export function edit{{properCase modelName }}(data: any) {
return defHttp.post({ url: baseUrl + '/edit', data });
}
export function {{camelCase modelName }}BatchDelete(ids: string[]) {
return defHttp.delete({
url: baseUrl + '/edit',
params: {
ids: ids.join(','),
},
});
}
export function delete{{properCase modelName }}ById(id: string | number) {
return defHttp.delete({
url: baseUrl + '/delete',
params: {
id: id,
},
});
}
运行生成器
最后,就是运行生成器了,在package.json里添加一条命令:
{
...省略内容,
"scripts": {
+ "new": "plop"
}
}
然后在命令行运行npm run new,就可以看到:

然后选文件夹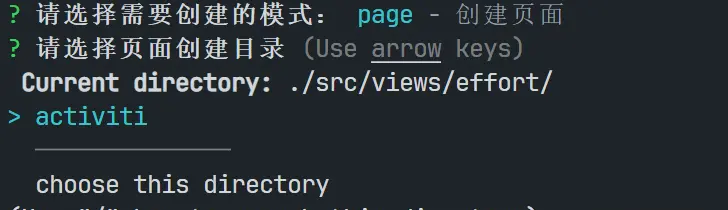
最后输入模块名
然后就可以生成了。
vscode 代码片段
代码片段就比较简单了,我们先在项目根目录下建个文件夹.vscode,然后再建立文件ts-code.code-snippets,最后以vscode代码片段的格式写就可以了。
{
"Print to console": {
"prefix": "csg",
"scope": "typescript",
"body": [
"console.log('$1');",
"$2"
],
"description": "Log output to console"
}
}
值得注意的是scope字段,指定你写的代码片段使用的语言,上面这段代码我想在ts语言中用,我就可以指定为typescript,同理vue的代码可以指定为vue。
最后可以使用这个工具网站snippet generator,复制代码进去就生成vscode需要的代码片段格式了。
原文链接:https://juejin.cn/post/7263035828569325623 作者:背对疾风