

引言
最近项目里要用到 OCR 拍照识别文本的能力。小编一开始想要的是接入百度的 OCR sdk,奈何领导直接说不批任何费用,看来只能另谋出路了。
于是,小编找到了这个库 google_mlkit_text_recognition,该库支持传入图片识别文本,最重要的还是免费。
闲话不多说,先来一张实现的效果图:
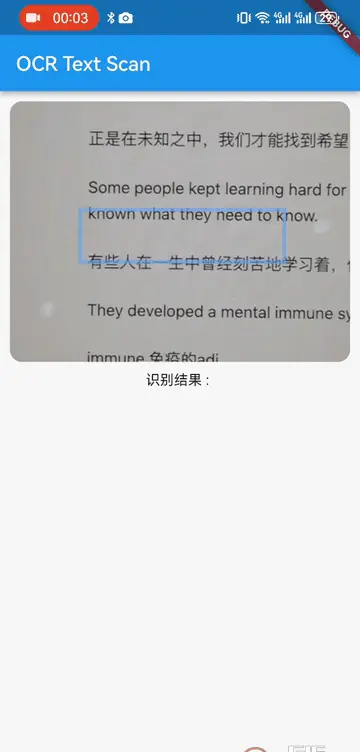

拍照支持局部识别,下面来说说实现步骤。
实现方式
为了实现拍照识别,分别依赖了下面三个库:
dependencies:
  flutter:
    sdk: flutter
  camera: ^0.10.2+1
  google_mlkit_commons: ^0.5.0
  google_mlkit_text_recognition: ^0.9.0
通过 camera 库实现相机预览能力
CameraPreview(
  cameraController,
)
并且相机开启预览后 cameraController 可以拿到每一帧的图片数据
cameraController.startImageStream(_processCameraImage);
将每一帧的图片数据,调用文本识别的google库,返回该图像内所有识别到的文本内容(注意:这里要自行做节流处理,我们不需要每帧都进行图像分析的开销)
Future _processCameraImage(CameraImage image) async {
  final WriteBuffer allBytes = WriteBuffer();
  for (final Plane plane in image.planes) {
    allBytes.putUint8List(plane.bytes);
  }
  final bytes = allBytes.done().buffer.asUint8List();

  final Size imageSize = Size(
    image.width.toDouble(),
    image.height.toDouble(),
  );

  final camera = _cameras[0];
  final imageRotation = InputImageRotationValue.fromRawValue(
    camera.sensorOrientation,
  );
  if (imageRotation == null) return;

  final inputImageFormat = InputImageFormatValue.fromRawValue(
    image.format.raw,
  );
  if (inputImageFormat == null) return;

  final planeData = InputImageMetadata(
    size: imageSize,
    rotation: imageRotation,
    format: inputImageFormat,
    bytesPerRow: image.planes[0].bytesPerRow,
  );
  final inputImage = InputImage.fromBytes(
    bytes: bytes,
    metadata: planeData,
  );
  processImage(inputImage);
}
Future<void> processImage(InputImage inputImage) async {
  final recognizedText = await _textRecognizer.processImage(inputImage);
  // 这是识别到的整张图片的文本
  final scanText = recognizedText.text;
}
但是我们要做局部识别又该如何处理呢?那么我们不能直接拿到 scanText 就直接使用,我们需要做筛选处理:
recognizedText 会返回识别到的文本内容,同时会返回其对应的坐标信息,使用这些信息于我们示例GIF中绘制的蓝色框框的坐标进行包含判断,只筛选出坐标处于蓝色框框坐标范围内的数据。
大致代码如下:
String scannedText = '';
for (final textBunk in recognizedText.blocks) {
  for (final element in textBunk.lines) {
    for (final textBlock in element.elements) {
      final left = translateX(
        (textBlock.boundingBox.left),
        rotation,
        size,
        absoluteImageSize,
      );
      final top = translateY(
        (textBlock.boundingBox.top),
        rotation,
        size,
        absoluteImageSize,
      );
      final right = translateX(
        (textBlock.boundingBox.right),
        rotation,
        size,
        absoluteImageSize,
      );

      // 判断是否蓝色框框坐标范围内
      if (left >= boxLeft &&
          right <= boxRight &&
          (top >= (boxTop + 15) && top <= (boxBottom - 20))) {
        scannedText += " ${textBlock.text}";
      }
    }
  }
}
log('蓝色框框内识别的文本:$scannedText')
根据符合筛选范围的数据,自己拼出结果内容。
如果不使用相机预览,直接从相册选中识别呢?
从上面的代码可以看到,文本识别的入参是一个 inputImage 实例。
final recognizedText = await _textRecognizer.processImage(inputImage);
inputImage 是 google_mlkit_common 中提供的类型,查看代码如下:
/// Creates an instance of [InputImage] from path of image stored in device.
factory InputImage.fromFilePath(String path) {
  return InputImage._(filePath: path, type: InputImageType.file);
}

/// Creates an instance of [InputImage] by passing a file.
factory InputImage.fromFile(File file) {
  return InputImage._(filePath: file.path, type: InputImageType.file);
}

/// Creates an instance of [InputImage] using bytes.
factory InputImage.fromBytes(
    {required Uint8List bytes, required InputImageMetadata metadata}) {
  return InputImage._(
      bytes: bytes, type: InputImageType.bytes, metadata: metadata);
}
其提供根据文件路径构造实例的方法。
推荐一下宝子,各种功能库扩展
题外话,Google ML Kit提供多种可免费使用的实用功能库。支持 Android、iOS,例如:
告别国内厂家的收费模式,开发应用变得更加简洁。
demo 已开源
本篇示例代码已上传到 github : github.com/liyufengrex…
该封装工具库已开源发布:flutter_ocr_text_recognization
使用方式:
dependencies:
    flutter_ocr_text_recognization: x.x.x
import 'package:flutter_ocr_text_recognization/flutter_ocr_text_recognization.dart';
TextOrcScan(
      paintboxCustom: Paint()
          ..style = PaintingStyle.stroke
          ..strokeWidth = 4.0
          ..color = const Color.fromARGB(153, 102, 160, 241),
      boxRadius: 12,
      painBoxLeftOff: 5,
      painBoxBottomOff: 2.5,
      painBoxRightOff: 5,
      painBoxTopOff: 2.5,
      widgetHeight: MediaQuery.of(context).size.height / 3,
      getScannedText: (value) {
        setText(value);
      },
)
参数说明:
| Parameter | Description |
|---|---|
painBoxLeftOff |
蓝色框框左偏移量 |
painBoxBottomOff |
蓝色框框下偏移量 |
painBoxRightOff |
蓝色框框右偏移量 |
painBoxTopOff |
蓝色框框上偏移量 |
getScannedText |
返回识别出的文本 |
本库参考自 pub-web.flutter-io.cn/packages/fl… , 因项目需要,分析内部实现后,修复部分原库发现的问题,新建的该工具库。
原文链接:https://juejin.cn/post/7311876701909614601 作者:李小轰_Rex