
由于最近感受到JYM都在学习HarmonyOS开发外加公司新年可能发N系列之大礼包,我也跑步入场了特写此文记录学习过程。 我学习HarmonyOS开发流程基本分为两部,由简入繁先熟悉大致概念,然后实操理解。


了解开发工具
熟悉基本使用方法、安装、环境配置、调试
了解基本概念
timeline
      title HarmonyOS开发概念
      1、两种开发范式 : 声明式开发范式
            : 类Web开发范式
      2、两种模型 : Stage
           : Fa
      3、页面生命周期 : onPageShow
           : onPageHide
           : onBackPresson
      4、组件生命周期 : aboutToAppear
            : aboutToAppear
      5、装饰器 : @Entry
           : @Component
           : @State
           : @Builder
           : @BuilderParam
           : @Styles
           : @Extend
           : ...
      6、状态管理  : 管理组件拥有的状态
      : 管理应用拥有的状态
      : 其他状态管理
      7、渲染控制概述 : if/else:条件渲染
      : ForEach:循环渲染
      : LazyForEach:数据懒加载
1、开发范式
声明式开发范式:采用基于TypeScript声明式UI语法扩展而来的ArkTS语言,从组件、动画和状态管理三个维度提供UI绘制能力。
类Web开发范式:采用经典的HML、CSS、JavaScript三段式开发方式,即使用HML标签文件搭建布局、使用CSS文件描述样式、使用JavaScript文件处理逻辑。该范式更符合于Web前端开发者的使用习惯,便于快速将已有的Web应用改造成方舟开发框架应用。
|
开发范式名称 |
语言生态 |
UI更新方式 |
适用场景 |
适用人群 |
|---|---|---|---|---|
|
声明式开发范式 |
ArkTS语言 |
数据驱动更新 |
复杂度较大、团队合作度较高的程序 |
移动系统应用开发人员、系统应用开发人员 |
|
类Web开发范式 |
JS语言 |
数据驱动更新 |
界面较为简单的程序应用和卡片 |
Web前端开发人员 |
2、模型
|
应用模型 |
页面形态 |
支持的UI开发范式 |
|---|---|---|
|
Stage模型(推荐) |
应用或服务的页面 |
声明式开发范式(推荐) |
|
卡片 |
声明式开发范式(推荐) 类Web开发范式 |
|
|
FA模型 |
应用或服务的页面 |
声明式开发范式 类Web开发范式 |
|
卡片 |
类Web开发范式 |
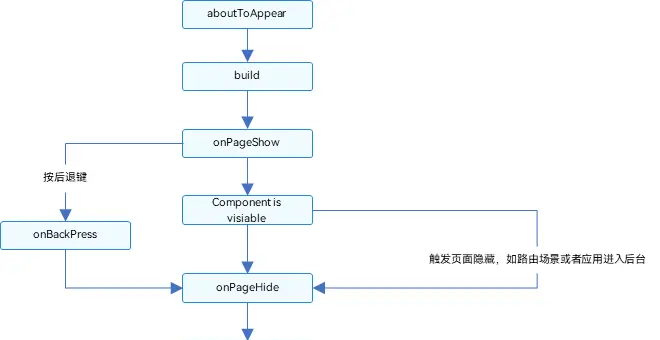
3、页面生命周期
- onPageShow:页面每次显示时触发一次,包括路由过程、应用进入前台等场景,仅@Entry装饰的自定义组件生效。
- onPageHide:页面每次隐藏时触发一次,包括路由过程、应用进入前后台等场景,仅@Entry装饰的自定义组件生效。
- onBackPress:当用户点击返回按钮时触发,仅@Entry装饰的自定义组件生效。
4、组件生命周期
- aboutToAppear:组件即将出现时回调该接口,具体时机为在创建自定义组件的新实例后,在执行其build()函数之前执行。
- aboutToDisappear:在自定义组件析构销毁之前执行。不允许在aboutToDisappear函数中改变状态变量,特别是@Link变量的修改可能会导致应用程序行为不稳定。
生命周期
5、装饰器
-
装饰器: 用于装饰类、结构、方法以及变量,并赋予其特殊的含义。如上述示例中@Entry、@Component和@State都是装饰器,@Component表示自定义组件,@Entry表示该自定义组件为入口组件,@State表示组件中的状态变量,状态变量变化会触发UI刷新。
-
UI描述:以声明式的方式来描述UI的结构,例如build()方法中的代码块。
-
自定义组件:可复用的UI单元,可组合其他组件,如上述被@Component装饰的struct Hello。
-
系统组件:ArkUI框架中默认内置的基础和容器组件,可直接被开发者调用,比如示例中的Column、Text、Divider、Button。
-
属性方法:组件可以通过链式调用配置多项属性,如fontSize()、width()、height()、backgroundColor()等。
-
事件方法:组件可以通过链式调用设置多个事件的响应逻辑,如跟随在Button后面的onClick()。
-
系统组件、属性方法、事件方法具体使用可参考基于ArkTS的声明式开发范式。
除此之外,ArkTS扩展了多种语法范式来使开发更加便捷:
- @Builder/@BuilderParam:特殊的封装UI描述的方法,细粒度的封装和复用UI描述。
- @Extend/@Style:扩展内置组件和封装属性样式,更灵活地组合内置组件。
- stateStyles:多态样式,可以依据组件的内部状态的不同,设置不同样式。
6、状态管理
应用逻辑使用LocalStorage
let storage = new LocalStorage({ 'PropA': 47 }); // 创建新实例并使用给定对象初始化
let propA = storage.get('PropA') // propA == 47
let link1 = storage.link('PropA'); // link1.get() == 47
let link2 = storage.link('PropA'); // link2.get() == 47
let prop = storage.prop('PropA'); // prop.get() = 47
link1.set(48); // two-way sync: link1.get() == link2.get() == prop.get() == 48
prop.set(1); // one-way sync: prop.get()=1; but link1.get() == link2.get() == 48
link1.set(49); // two-way sync: link1.get() == link2.get() == prop.get() == 49
从UI内部使用LocalStorage
// 创建新实例并使用给定对象初始化
let storage = new LocalStorage({ 'PropA': 47 });

@Component
struct Child {
  // @LocalStorageLink变量装饰器与LocalStorage中的'PropA'属性建立双向绑定
  @LocalStorageLink('PropA') storLink2: number = 1;

  build() {
    Button(`Child from LocalStorage ${this.storLink2}`)
      // 更改将同步至LocalStorage中的'PropA'以及Parent.storLink1
      .onClick(() => this.storLink2 += 1)
  }
}
// 使LocalStorage可从@Component组件访问
@Entry(storage)
@Component
struct CompA {
  // @LocalStorageLink变量装饰器与LocalStorage中的'PropA'属性建立双向绑定
  @LocalStorageLink('PropA') storLink1: number = 1;

  build() {
    Column({ space: 15 }) {
      Button(`Parent from LocalStorage ${this.storLink1}`) // initial value from LocalStorage will be 47, because 'PropA' initialized already
        .onClick(() => this.storLink1 += 1)
      // @Component子组件自动获得对CompA LocalStorage实例的访问权限。
      Child()
    }
  }
}
@LocalStorageProp和LocalStorage单向同步的简单场景
在下面的示例中,CompA 组件和Child组件分别在本地创建了与storage的’PropA’对应属性的单向同步的数据,我们可以看到:
-
CompA中对this.storProp1的修改,只会在CompA中生效,并没有同步回storage;
-
Child组件中,Text绑定的storProp2 依旧显示47。
   // 创建新实例并使用给定对象初始化
let storage = new LocalStorage({ 'PropA': 47 });
// 使LocalStorage可从@Component组件访问
@Entry(storage)
@Component
struct CompA {
  // @LocalStorageProp变量装饰器与LocalStorage中的'PropA'属性建立单向绑定
  @LocalStorageProp('PropA') storProp1: number = 1;

  build() {
    Column({ space: 15 }) {
      // 点击后从47开始加1,只改变当前组件显示的storProp1,不会同步到LocalStorage中
      Button(`Parent from LocalStorage ${this.storProp1}`)
        .onClick(() => this.storProp1 += 1)
      Child()
    }
  }
}

@Component
struct Child {
  // @LocalStorageProp变量装饰器与LocalStorage中的'PropA'属性建立单向绑定
  @LocalStorageProp('PropA') storProp2: number = 2;

  build() {
    Column({ space: 15 }) {
      // 当CompA改变时,当前storProp2不会改变,显示47
      Text(`Parent from LocalStorage ${this.storProp2}`)
    }
  }
}
@LocalStorageLink和LocalStorage双向同步的简单场景
// 构造LocalStorage实例
let storage = new LocalStorage({ 'PropA': 47 });
// 调用link(api9以上)接口构造'PropA'的双向同步数据,linkToPropA 是全局变量
let linkToPropA = storage.link('PropA');

@Entry(storage)
@Component
struct CompA {

  // @LocalStorageLink('PropA')在CompA自定义组件中创建'PropA'的双向同步数据,初始值为47,因为在构造LocalStorage已经给“PropA”设置47
  @LocalStorageLink('PropA') storLink: number = 1;

  build() {
    Column() {
      Text(`incr @LocalStorageLink variable`)
        // 点击“incr @LocalStorageLink variable”,this.storLink加1,改变同步回storage,全局变量linkToPropA也会同步改变

        .onClick(() => this.storLink += 1)

      // 并不建议在组件内使用全局变量linkToPropA.get(),因为可能会有生命周期不同引起的错误。
      Text(`@LocalStorageLink: ${this.storLink} - linkToPropA: ${linkToPropA.get()}`)
    }
  }
}
兄弟节点之间同步状态变量
下面的示例展示了通过@LocalStorageLink双向同步兄弟节点之间的状态。
先看Parent自定义组件中发生的变化:
- 点击“playCount ${this.playCount} dec by 1”,this.playCount减1,修改同步回LocalStorage中,Child组件中的playCountLink绑定的组件会同步刷新;
- 点击“countStorage ${this.playCount} incr by 1”,调用LocalStorage的set接口,更新LocalStorage中“countStorage”对应的属性,Child组件中的playCountLink绑定的组件会同步刷新;
- Text组件“playCount in LocalStorage for debug ${storage.get(‘countStorage’)}”没有同步刷新,因为storage.get(‘countStorage’)返回的是常规变量,常规变量的更新并不会引起Text组件的重新渲染。
Child自定义组件中的变化:
- playCountLink的刷新会同步回LocalStorage,并且引起兄弟组件和父组件相应的刷新。
let storage = new LocalStorage({ countStorage: 1 });

@Component
struct Child {
  // 子组件实例的名字
  label: string = 'no name';
  // 和LocalStorage中“countStorage”的双向绑定数据
  @LocalStorageLink('countStorage') playCountLink: number = 0;

  build() {
    Row() {
      Text(this.label)
        .width(50).height(60).fontSize(12)
      Text(`playCountLink ${this.playCountLink}: inc by 1`)
        .onClick(() => {
          this.playCountLink += 1;
        })
        .width(200).height(60).fontSize(12)
    }.width(300).height(60)
  }
}

@Entry(storage)
@Component
struct Parent {
  @LocalStorageLink('countStorage') playCount: number = 0;

  build() {
    Column() {
      Row() {
        Text('Parent')
          .width(50).height(60).fontSize(12)
        Text(`playCount ${this.playCount} dec by 1`)
          .onClick(() => {
            this.playCount -= 1;
          })
          .width(250).height(60).fontSize(12)
      }.width(300).height(60)

      Row() {
        Text('LocalStorage')
          .width(50).height(60).fontSize(12)
        Text(`countStorage ${this.playCount} incr by 1`)
          .onClick(() => {
            storage.set<number>('countStorage', 1 + storage.get<number>('countStorage'));
          })
          .width(250).height(60).fontSize(12)
      }.width(300).height(60)

      Child({ label: 'ChildA' })
      Child({ label: 'ChildB' })

      Text(`playCount in LocalStorage for debug ${storage.get<number>('countStorage')}`)
        .width(300).height(60).fontSize(12)
    }
  }
}
将LocalStorage实例从UIAbility共享到一个或多个视图
上面的实例中,LocalStorage的实例仅仅在一个@Entry装饰的组件和其所属的子组件(一个页面)中共享,如果希望其在多个视图中共享,可以在所属UIAbility中创建LocalStorage实例,并调用windowStage.loadContent。
// EntryAbility.ts
import UIAbility from '@ohos.app.ability.UIAbility';
import window from '@ohos.window';
let para:Record<string,number> = { 'PropA': 47 };
let localStorage: LocalStorage = new LocalStorage(para);
export default class EntryAbility extends UIAbility {
  storage: LocalStorage = localStorage

  onWindowStageCreate(windowStage: window.WindowStage) {
    windowStage.loadContent('pages/Index', this.storage);
  }
}
在UI页面通过GetShared接口获取在通过loadContent共享的LocalStorage实例。
// 通过GetShared接口获取stage共享的LocalStorage实例
let storage = LocalStorage.GetShared()

@Entry(storage)
@Component
struct CompA {
  // can access LocalStorage instance using
  // @LocalStorageLink/Prop decorated variables
  @LocalStorageLink('PropA') varA: number = 1;

  build() {
    Column() {
      Text(`${this.varA}`).fontSize(50)
    }
  }
}
7、渲染控制概述
使用if进行条件渲染
    @Entry
@Component
struct ViewA {
  @State count: number = 0;

  build() {
    Column() {
      Text(`count=${this.count}`)

      if (this.count > 0) {
        Text(`count is positive`)
          .fontColor(Color.Green)
      }

      Button('increase count')
        .onClick(() => {
          this.count++;
        })

      Button('decrease count')
        .onClick(() => {
          this.count--;
        })
    }
  }
}
ForEach:循环渲染
分为三种
1.数据源不变
2.数据源数组项发生变化编写示例
3.数据源数组项子属性变化
// 数据源数组项发生变化编写示例
@Entry
@Component
struct ArticleListView {
  @State isListReachEnd: boolean = false;
  @State articleList: Array<Article> = [
    new Article('001', '第1篇文章', '文章简介内容'),
    new Article('002', '第2篇文章', '文章简介内容'),
    new Article('003', '第3篇文章', '文章简介内容'),
    new Article('004', '第4篇文章', '文章简介内容'),
    new Article('005', '第5篇文章', '文章简介内容'),
    new Article('006', '第6篇文章', '文章简介内容')
  ]

  loadMoreArticles() {
    this.articleList.push(new Article('007', '加载的新文章', '文章简介内容'));
  }

  build() {
    Column({ space: 5 }) {
      List() {
        ForEach(this.articleList, (item: Article) => {
          ListItem() {
            ArticleCard({ article: item })
              .margin({ top: 20 })
          }
        }, (item: Article) => item.id)
      }
      .onReachEnd(() => {
        this.isListReachEnd = true;
      })
      .parallelGesture(
        PanGesture({ direction: PanDirection.Up, distance: 80 })
          .onActionStart(() => {
            if (this.isListReachEnd) {
              this.loadMoreArticles();
              this.isListReachEnd = false;
            }
          })
      )
      .padding(20)
      .scrollBar(BarState.Off)
    }
    .width('100%')
    .height('100%')
    .backgroundColor(0xF1F3F5)
  }
}

@Component
struct ArticleCard {
  @Prop article: Article;

  build() {
    Row() {
      Image($r('app.media.icon'))
        .width(80)
        .height(80)
        .margin({ right: 20 })

      Column() {
        Text(this.article.title)
          .fontSize(20)
          .margin({ bottom: 8 })
        Text(this.article.brief)
          .fontSize(16)
          .fontColor(Color.Gray)
          .margin({ bottom: 8 })
      }
      .alignItems(HorizontalAlign.Start)
      .width('80%')
      .height('100%')
    }
    .padding(20)
    .borderRadius(12)
    .backgroundColor('#FFECECEC')
    .height(120)
    .width('100%')
    .justifyContent(FlexAlign.SpaceBetween)
  }
}
LazyForEach:数据懒加载
-
首次渲染
在LazyForEach首次渲染时,会根据上述键值生成规则为数据源的每个数组项生成唯一键值,并创建相应的组件。
// Basic implementation of IDataSource to handle data listener
class BasicDataSource implements IDataSource {
private listeners: DataChangeListener[] = [];
private originDataArray: string[] = [];
public totalCount(): number {
return 0;
}
public getData(index: number): string {
return this.originDataArray[index];
}
// 该方法为框架侧调用,为LazyForEach组件向其数据源处添加listener监听
registerDataChangeListener(listener: DataChangeListener): void {
if (this.listeners.indexOf(listener) < 0) {
console.info('add listener');
this.listeners.push(listener);
}
}
// 该方法为框架侧调用,为对应的LazyForEach组件在数据源处去除listener监听
unregisterDataChangeListener(listener: DataChangeListener): void {
const pos = this.listeners.indexOf(listener);
if (pos >= 0) {
console.info('remove listener');
this.listeners.splice(pos, 1);
}
}
// 通知LazyForEach组件需要重载所有子组件
notifyDataReload(): void {
this.listeners.forEach(listener => {
listener.onDataReloaded();
})
}
// 通知LazyForEach组件需要在index对应索引处添加子组件
notifyDataAdd(index: number): void {
this.listeners.forEach(listener => {
listener.onDataAdd(index);
})
}
// 通知LazyForEach组件在index对应索引处数据有变化,需要重建该子组件
notifyDataChange(index: number): void {
this.listeners.forEach(listener => {
listener.onDataChange(index);
})
}
// 通知LazyForEach组件需要在index对应索引处删除该子组件
notifyDataDelete(index: number): void {
this.listeners.forEach(listener => {
listener.onDataDelete(index);
})
}
}
class MyDataSource extends BasicDataSource {
private dataArray: string[] = [];
public totalCount(): number {
return this.dataArray.length;
}
public getData(index: number): string {
return this.dataArray[index];
}
public addData(index: number, data: string): void {
this.dataArray.splice(index, 0, data);
this.notifyDataAdd(index);
}
public pushData(data: string): void {
this.dataArray.push(data);
this.notifyDataAdd(this.dataArray.length - 1);
}
}
@Entry
@Component
struct MyComponent {
private data: MyDataSource = new MyDataSource();
aboutToAppear() {
for (let i = 0; i <= 20; i++) {
this.data.pushData(`Hello ${i}`)
}
}
build() {
List({ space: 3 }) {
LazyForEach(this.data, (item: string) => {
ListItem() {
Row() {
Text(item).fontSize(50)
.onAppear(() => {
console.info("appear:" + item)
})
}.margin({ left: 10, right: 10 })
}
}, (item: string) => item)
}.cachedCount(5)
}
}
在上述代码中,键值生成规则是keyGenerator函数的返回值item。在LazyForEach循环渲染时,其为数据源数组项依次生成键值Hello 0、Hello 1 … Hello 20,并创建对应的ListItem子组件渲染到界面上。
运行效果如下图所示。

- 非首次渲染
当LazyForEach数据源发生变化,需要再次渲染时,开发者应根据数据源的变化情况调用listener对应的接口,通知LazyForEach做相应的更新,点击查看使用方法
原文链接:https://juejin.cn/post/7312294489221398528 作者:Web_宁缺