
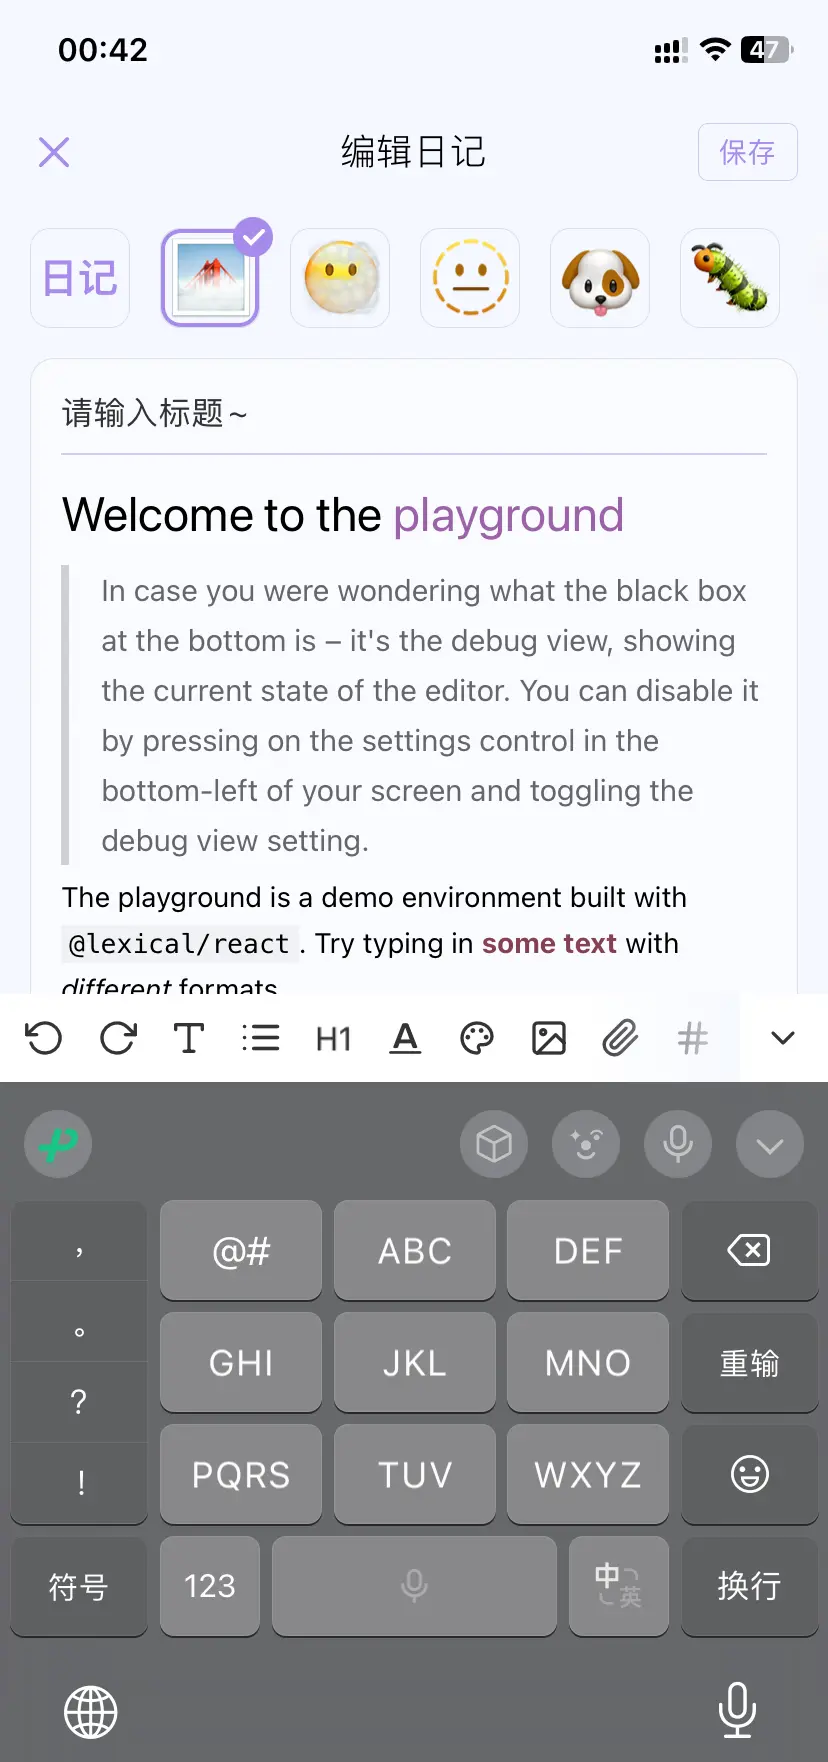
今年做了自己的第一款独立应用,日记类的app(Android,Ios可下载体验),核心就是富文本编辑器,技术选项做了很久,最后选了lexical,优势是可扩展,可实现很多自定义的功能。下面分享一下我的经验(ps:顺便求个职)。

准备工作
由于富文本编辑器在webview里面使用,所以我们需要先安装以下包
- react-native-webview
- react-native-vector-icons 图标库
- react-native-render-html 渲染html
富文本编辑器
这里只是简单带一下,感兴趣的话后面再出个详细的lexical教程
lexical本身是可以不依赖框架使用的,但是官方的很多示例都在react环境下使用,最初我也使用该方式,但是由于引入react以后,虽然可以使功能更加丰富,也带来了加载速度慢的问题,后期还是选择原生开发的方式。
- lexical (core)
- @lexical/clipboard
- @lexical/code
- @lexical/dragon
- @lexical/file
- @lexical/hashtag
- @lexical/headless
- @lexical/history
- @lexical/link
- @lexical/list
- @lexical/markdown
- @lexical/offset
- @lexical/plain-text
- @lexical/rich-text
- @lexical/selection
- @lexical/table
- @lexical/text
- @lexical/utils
lexical的核心是nodes+plugin,node用来做渲染层,plugin用来处理一些交互逻辑或者事件,以我自己实现的imageNode举例
import { $applyNodeReplacement, createEditor, DecoratorNode } from 'lexical'
import { postAppMessage } from '../../utils/utils'
function convertImageElement(domNode) {
if (domNode instanceof HTMLImageElement) {
const { alt: altText, src, width, height, className } = domNode
const node = $createImageNode({ altText, height, src, width, size: className })
return { node }
}
return null
}
export class ImageNode extends DecoratorNode {
// 这里都是自己定义的属性,需要在创建image节点的时候传入,并方便在整个节点的范围内使用
__src
__altText
__width
__height
__maxWidth
__showCaption
__caption
__captionsEnabled
__size
__uuid
constructor(src, altText, maxWidth, width, height, showCaption, caption, captionsEnabled, key, size, uuid) {
super(key)
this.__src = src
this.__altText = altText
this.__maxWidth = maxWidth
this.__width = width || '100%'
this.__height = height || 'auto'
this.__showCaption = showCaption || false
this.__caption = caption || createEditor()
this.__captionsEnabled = captionsEnabled || captionsEnabled === undefined
this.__size = size || 'large'
this.__uuid = uuid
// 这里是我的业务逻辑,webview中无法使用本地图片,所以会通过base64方式传入图片的url
if (uuid && src !== uuid) {
postAppMessage({
type: 'GET_IMAGE',
data: uuid,
})
}
}
static getType() {
return 'image'
}
// clone节点使用,需要把初始化的值都传入,以免出现生成错误的问题
static clone(node) {
return new ImageNode(node.__src, node.__altText, node.__maxWidth, node.__width, node.__height, node.__showCaption, node.__caption, node.__captionsEnabled, node.__key, node.__size, node.__uuid)
}
// 导入导出时使用,如果不需要lexical的导入导出,可不实现
static importJSON(serializedNode) {
const { altText, height, width, maxWidth, caption, src, showCaption, uuid } = serializedNode
const node = $createImageNode({
altText,
height,
maxWidth,
showCaption,
src: uuid,
width,
uuid,
})
const nestedEditor = node.__caption
const editorState = nestedEditor.parseEditorState(caption.editorState)
if (!editorState.isEmpty()) {
nestedEditor.setEditorState(editorState)
}
return node
}
exportDOM() {
const element = document.createElement('img')
element.setAttribute('src', this.__src)
element.setAttribute('alt', this.__altText)
element.setAttribute('width', this.__width.toString())
element.setAttribute('height', this.__height.toString())
element.setAttribute('class', this.__size)
element.setAttribute('uuid', this.__uuid)
return { element }
}
static importDOM() {
return {
img: node => ({
conversion: convertImageElement,
priority: 0,
}),
}
}
exportJSON() {
return {
altText: this.getAltText(),
caption: this.__caption.toJSON(),
height: this.__height === 'inherit' ? 0 : this.__height,
maxWidth: this.__maxWidth,
showCaption: this.__showCaption,
src: this.__uuid,
type: 'image',
version: 1,
width: this.__width === 'inherit' ? 0 : this.__width,
class: this.__size,
uuid: this.__uuid,
}
}
// 支持外接修改图片的宽高
setWidthAndHeight(width, height) {
const writable = this.getWritable()
writable.__width = width
writable.__height = height
}
// 支持更新src
setImageSrc(uuid, src) {
const writable = this.getWritable()
if (uuid == writable.__uuid) {
writable.__src = src
}
}
// 设置图片的标题,app内暂未开放该功能
setShowCaption(showCaption) {
const writable = this.getWritable()
writable.__showCaption = showCaption
}
// view 层,需要创建dom节点并return出去
createDOM(config) {
const span = document.createElement('span')
const theme = config.theme
const className = theme.image
if (className !== undefined) {
span.className = className
}
const image = document.createElement('img')
image.src = this.__src
image.style.width = this.__width
image.style.height = this.__height
image.className = this.__size
image.id = this.__uuid
span.appendChild(image)
return span
}
// 更新样式
updateDOM(prevNode, dom, config) {
dom.style.width = this.__width
dom.style.height = this.__height
return dom
}
getSrc() {
return this.__src
}
getSize() {
return this.__size
}
setSize(size) {
const writable = this.getWritable()
writable.__size = size
postAppMessage({
type: 'LOG',
data: `setSize ${size}`,
})
}
getAltText() {
return this.__altText
}
}
// 创建一个图片节点
export function $createImageNode({ altText, height = 'auto', maxWidth = '100%', captionsEnabled, src, width = '100%', showCaption, caption, key, size = 'large', uuid }) {
return $applyNodeReplacement(new ImageNode(src, altText, maxWidth, width, height, showCaption, caption, captionsEnabled, key, size, uuid))
}
// 判断传入的节点是否为图片节点
export function $isImageNode(node) {
return node instanceof ImageNode
}
一个自定义节点需要使用class的形式声明并且继承DecoratorNode,它上面本身包含了自定义节点的所有方法和函数,只需要补充对应的方法即可。
在上面的代码中,createDOM方法对应ui层,需要按照传入的数据去创建dom结构。
工具栏
由于在手机端使用富文本,工具栏需要贴着键盘,并且需要调用rn的部分功能,所以工具栏不能做到webview中。
我的实现方式是在rn端写好对应的ui结构,点击事件调用webview中暴露的方式来实现交互。
const CreateDiary = props => {
const editorRef = useRef(null)
const editorBoxRef = useRef(null)
return (
<Layout ref={layoutRef} backgroundColor={getLayoutBackground(form?.color)}>
<KeyboardAvoidingView behavior={Platform.OS === 'ios' ? 'padding' : ''} style={Style.container}>
<SafeAreaView style={Style.safeAreaView}>
<View ref={editorBoxRef}>
<Editor
ref={editorRef}
initialFocus={true}
data={form}
scrollRef={scrollRef}
onChange={(attr, value) => {
}}
toolbarProps={{
onPressAddImage: onImagePicker,
onPressTemplate: onTemplatePicker,
onImageDelete: onImageDelete,
}}
onFocus={setFocus}
onCursorPosition={handleCursorPosition}
/>
</View>
<EditorToolbar
focus={focus}
richText={editorRef}
editorBoxRef={editorBoxRef}
data={form}
onFocus={setFocus}
toolbarProps={{
onPressAddImage: onImagePicker,
onPressTemplate: onTemplatePicker,
onPressTags: onTagsPicker,
onImageDelete: onImageDelete,
}}
onChange={(attr, value) => {
}}
/>
</SafeAreaView>
</KeyboardAvoidingView>
</Layout>
)
}
RN端和Webview的通信
这块是相对比较重要的东西了,首先在react-native-webview中提供了两种通信的方式,postMessage和onMessage。
-
postMessage 可以通过调用 webview 的 ref 上的 postMessage 方法向 webview 中发送消息
-
onMessage webview 中通过 postMessage 向rn端发送消息
react-native端需要做的事情
当我们在工具栏点击了某个按钮的时候,会通过 postMessage 发送个消息过去,webview 需要知道我们到底要做什么事情,所以需要先设置好模型,比如设置字体的大小。
export const actions = {
undo: 'undo',
redo: 'redo',
paragraph: 'paragraph',
headingH1: 'h1',
headingH2: 'h2',
headingH3: 'h3',
headingH4: 'h4',
headingH5: 'h5',
headingH6: 'h6',
fontSize: 'fontSize',
bullet: 'bullet',
check: 'check',
number: 'number',
quote: 'quote',
codeBlock: 'codeBlock',
topic: 'topic',
file: 'file',
image: 'image',
bold: 'bold',
italic: 'italic',
underline: 'underline',
strikethrough: 'strikethrough',
code: 'code',
link: 'link',
color: 'color',
background: 'background',
textLeft: 'textLeft',
textCenter: 'textCenter',
textRight: 'textRight',
justify: 'justify',
outdent: 'outdent',
indent: 'indent',
clear: 'clear',
blur: 'blur',
mic: 'mic',
sticky: 'sticky',
};
const RichTextEditor = React.forwardRef((props, ref) => {
const [height, setHeight] = useState(initialHeight);
const webviewBridgeRef = useRef(null);
const unmountRef = useRef(false);
const onMessage = event => {
try {
const message = JSON.parse(event.nativeEvent.data);
const data = message.data;
switch (message.type) {
case 'LOG':
console.log('FROM EDIT:', data);
break;
case 'DELETE_IMAGE':
toolbarProps.onImageDelete(data);
console.log('gxs --> % onMessage % data:\n', data);
break;
case 'INIT':
console.log('INIT data', props.data);
if (!props.data) return;
if (props.data.describeJson) {
setContentJSON(props.data.describeJson);
} else if (props.data.describe) {
setContentHTML(props.data.describe);
}
break;
default:
onMessage?.(message);
break;
}
} catch (e) {}
};
const sendAction = (action, data, options) => {
const jsonString = JSON.stringify({
type: action,
data: data || {},
options: options || {},
});
if (!unmountRef.current && webviewBridgeRef.current) {
webviewBridgeRef.current.postMessage(jsonString);
}
};
const insertImage = attributes => {
sendAction(actions.image, attributes);
};
return (
<View style={[{height: height}]} onLayout={onViewLayout}>
<WebView
useWebKit={true}
scrollEnabled={false}
// 隐藏键盘附件视图
hideKeyboardAccessoryView={true}
// 键盘显示需要用户操作
keyboardDisplayRequiresUserAction={false}
// 嵌套滚动已启用
nestedScrollEnabled={false}
style={[styles.webview, {height}]}
ref={webviewBridgeRef}
onMessage={onMessage}
bounces={false}
javaScriptEnabled={true}
source={{
uri: 'http://localhost:5173/',
}}
onLoad={handleLoad}
/>
</View>
);
});
export default RichTextEditor;
所以我们会有上面 sendAction 方法去调用,参数是执行的动作类型以及具体的参数。
在 webview 中也通过相同的方式通过 onMessage 向 rn 端传递对应的事件。
webview 中需要做的事情
在 webview 中我们可以实现一个 MessagePlugin 的插件,用来做rn的事件和 lexical 通信
export const MessagePlugin = editor => {
const Actions = {
// 缩进
indent: () => {
editor.update(() => {
editor.dispatchCommand(INDENT_CONTENT_COMMAND, undefined)
})
},
// 清空
clear: () => {
editor.update(() => {
editor.dispatchCommand(CLEAR_EDITOR_COMMAND, undefined)
})
},
// 失焦
blur: () => {
editor.blur()
postAppMessage({ type: 'CONTENT_BLUR' })
},
focus: () => {
editor.update(() => {
editor.focus()
const contentEditableElement = document.getElementById('ContentEditable__root')
contentEditableElement.focus()
postAppMessage({ type: 'CONTENT_FOCUSED' })
})
},
}
postAppMessage({
type: 'INIT',
data: '',
})
const message = function (event) {
if (event && event.data && event.data !== undefined) {
if (!event.data) {
event.data = '{}'
}
var dataStr = event.data && typeof event.data === 'string' ? event.data : '{}'
var msgData = {}
var action = ''
try {
msgData = JSON.parse(dataStr)
action = Actions[msgData?.type]
} catch (error) {
console.log(error)
throw error
}
if (action) {
action(msgData.data)
}
}
}
document.addEventListener('message', message, false)
window.addEventListener('message', message, false)
// 动态调整webview的高度
const resizeObserver = new ResizeObserver(() => {
postAppMessage({
type: 'OFFSET_HEIGHT',
data: rootElement.clientHeight + 50,
})
})
// 开始观察目标元素的大小变化
resizeObserver.observe(rootElement)
}
webview 中需要做的事情很多,比如焦点、编辑器的高度,以及对应的生命周期,按照自己的需求接收 rn 事件和回调
这样就实现了一个基础的react-native的富文本编辑器。
如何渲染富文本及自定义节点
rn端渲染富文本我使用的是 react-native-render-html ,好处是可以针对标签去做处理,还可以定制渲染的样式。
import RenderHtml from 'react-native-render-html';
export const HtmlView = React.memo(() => {
const richText = useRef(null);
const {width: ScreenWidth, height: ScreenHeight} = useWindowDimensions();
const system = useSelector(state => state.system);
return (
<View style={{}}>
<RenderHtml
enableExperimentalBRCollapsing
renderersProps={{
ul: {
markerBoxStyle: {
width: 0,
height: 0,
opacity: 0,
},
markerTextStyle: {},
},
}}
contentWidth={width || ScreenWidth}
tagsStyles={{
h1: {
...Typography['text50BO'],
color: Colors.$textDefault,
marginBottom: 10,
marginTop: 5,
},
}}
classesStyles={{
br: {
height: 10,
},
PlaygroundEditorTheme__ltr: {
textAlign: 'left',
},
PlaygroundEditorTheme__rtl: {
textAlign: 'right',
},
}}
baseStyle={{
...Typography[fontSize || defaultFontSize],
lineHeight:
Typography[fontSize || defaultFontSize].lineHeight +
(lineHeight || 0),
letterSpacing: letterSpacing || 0,
color: Colors.$textDefault,
opacity: 1,
}}
source={{
html: newValue,
}}
renderers={{
img: prop => {
const imageData = getRenderImage(
prop.tnode.init.domNode.attribs.uuid,
);
return (
<View style={{}}>
<FastImage
resizeMode="contain"
style={{
width: '100%',
borderRadius: 10,
aspectRatio: imageData.width / imageData.height,
}}
source={{
uri: imageData.uri,
}}
/>
</View>
);
},
code: ({TDefaultRenderer, tnode, style, ...prop}) => {
return (
<Text>
<Text
style={{
backgroundColor: Colors.cardBackground,
borderRadius: 10,
}}>
<TDefaultRenderer {...prop} style={style} tnode={tnode} />{' '}
</Text>{' '}
</Text>
);
},
}}
enableExperimentalMarginCollapsing={true}
backgroundColor={Colors.transparent}
renderChild={option => {
console.log('option', option);
}}
/>
</View>
);
},
);
我针对对应的 html 标签和 classname 进行了一些列的主题颜色尺寸定义,以更好的跟app的主题相配合
总结
最近公司裁员失业了,宅在家里使劲投简历面试,奈何一个offer都没有,索性给自己找点事情干,本来想学一学鸿蒙顺便做个移植,结果鸿蒙那边的开发体验实在够呛,看后面有没有出来一些组件库之类的东西再继续。
这篇文章其实写的并不细,因为涉及到的细节非常多,本文当个引子,后面继续更新其他的。
原文链接:https://juejin.cn/post/7315846805919907849 作者:万叶小兄弟