
Vue.js 中,组件自身的状态在 data 函数中定义,同时可以在渲染函数中通过 this 访问由 data 函数返回的状态数据。
const MyComponent = {
  name: 'MyComponent',
  // 用 data 函数来定义组件自身的状态
  data() {
    return {
      foo: 'hello world'
    }
  },
  render() {
    return {
      type: 'div',
      children: `foo 的值是: ${this.foo}` // 在渲染函数内使用组件状态
    }
  }
}
实现组件自身状态的初始化需要两个步骤:
-
通过组件的选项对象取得 data 函数并执行,然后调用 reactive 函数将 data 函数返回的状态包装为响应式数据;
-
在调用 render 函数时,将其 this 的指向设置为响应式数据 state,同时将 state 作为 render 函数的参数传递。
经过上述两步工作后,我们就实现了对组件自身状态的支持,以及在渲染函数内访问组件自身状态的能力。
通过组件的选项对象取得 data 函数并执行,然后调用 reactive 函数将 data 函数返回的状态包装为响应式数据的代码逻辑在 applyOptions 函数中,代码位置 packages\runtime-core\src\componentOptions.ts
export function applyOptions(instance: ComponentInternalInstance) {
  const options = resolveMergedOptions(instance)
  const publicThis = instance.proxy! as any

  const {
    // state
    data: dataOptions
  } = options

  if (dataOptions) {
    // 通过组件的选项对象取得 data 函数并执行,
    // 然后调用 reactive 函数将 data 函数返回的状态包装为响应式数据
    const data = dataOptions.call(publicThis, publicThis)
    instance.data = reactive(data)
  }
}
为了方便对原理的理解,上述代码省略了一些无关的代码逻辑。publicThis 为实例上下文的代理对象。
function setupStatefulComponent(instance: ComponentInternalInstance) {
  instance.proxy = markRaw(new Proxy(instance.ctx, PublicInstanceProxyHandlers))
}
在调用 render 函数时,将其 this 的指向设置为响应式数据 state,同时将 state 作为 render 函数的参数传递的代码逻辑在 renderComponentRoot 函数中,代码位置 packages\runtime-core\src\componentRenderUtils.ts
export function renderComponentRoot(
  instance: ComponentInternalInstance
): VNode {
  const {
    render,
    proxy,
    withProxy,
    data
  } = instance
  let result
  const proxyToUse = withProxy || proxy
  result = normalizeVNode(
    // 在调用 render 函数时,将其 this 的指向设置为响应式数据 state,
    // 同时将 state 作为 render 函数的参数传递
    render!.call(
      proxyToUse,
      data
    )
  )
  return result
}
相关函数调用栈如下:


当组件自身状态发生变化时,我们需要有能力触发组件更新,即组件的自更新。为此,我们需要将整个渲染任务包装到一个 effect 中,如下面的代码所示:
源码位置 packages\runtime-core\src\renderer.ts
const mountComponent: MountComponentFn = (
  initialVNode,
  container,
  anchor
) => {
  // 将渲染任务包装到 effect 中
  setupRenderEffect(
    instance,
    initialVNode,
    container,
    anchor
  )
}

const setupRenderEffect: SetupRenderEffectFn = (
  instance,
  initialVNode,
  container,
  anchor
) => {
  const componentUpdateFn = () => {
    // 组件更新的处理函数
  }
  // 将渲染任务包装到 effect 中
  const effect = (instance.effect = new ReactiveEffect(
    componentUpdateFn,
    // 调度器
    () => queueJob(update)
  ))

  const update: SchedulerJob = (instance.update = () => effect.run())
  // id 为自增的数字
  update.id = instance.uid
}
如上面的代码,将渲染任务包装到 effect 中后,一旦组件自身的响应式数据发生变化,组件就会自动重新执行渲染函数,从而完成更新。但是,由于 effect 的执行是同步的,因此当响应式数据发生变化时,与之关联的副作用函数会同步执行。换句话说,如果多次修改响应式数据的值,将会导致渲染函数执行多次,这实际上是没有必要的。因此,我们需要设计一个机制,以使得无论对响应式数据进行多少次修改,副作用函数都只会重新执行一次。为此,我们需要实现一个调度器,当副作用函数需要重新执行时,我们不会立即执行它,而是将它缓冲到一个微任务队列中,等到执行栈清空后,再将它从微任务队列中取出并执行。有了缓存机制,我们就有机会对任务进行去重,从而避免多次执行副作用函数带来的性能开销。
JavaScript 的异步任务不会阻塞浏览器的 DOM 渲染,可以提高页面的响应性能,也是因为这个原因,建议大家可以将耗时的操作放入异步任务中,以避免阻塞浏览器的主线程,提升页面的性能。
在 Vue3 源码中,这个调度器的实现如下:
let isFlushing = false
const queue: SchedulerJob[] = []
let flushIndex = 0

export function queueJob(job: SchedulerJob) {
  if (
    !queue.length ||
    !queue.includes(
      job,
      isFlushing && job.allowRecurse ? flushIndex + 1 : flushIndex
    )
  ) {
    if (job.id == null) {
      queue.push(job)
    } else {
      queue.splice(findInsertionIndex(job.id), 0, job)
    }
    queueFlush()
  }
}
调度器 queueJob 中将副作用函数存储到队列 queue 中,并使用数组方法 includes 去重。这里不使用 Set 数据结构来去重,是为了保证队列中副作用函数的顺序。Set 是无序的数据结构,它不会保持元素的插入顺序。另外数组自带的 includes 方法提供了 startIndex 参数,可以更灵活地进行去重搜索,即指定从特定的索引开始搜索。
如果副作用函数唯一标识符 (id 为 null),则直接使用 push 方法将副作用函数添加到队列(queue)末尾。
如果副作用函数有唯一标识符,调用 findInsertionIndex 函数找到副作用函数在队列中插入位置,并使用 splice 方法将副作用函数插入到队列中。
function findInsertionIndex(id: number) {
  // the start index should be `flushIndex + 1`
  let start = flushIndex + 1
  let end = queue.length

  while (start < end) {
    const middle = (start + end) >>> 1
    const middleJobId = getId(queue[middle])
    middleJobId < id ? (start = middle + 1) : (end = middle)
  }

  return start
}
const getId = (job: SchedulerJob): number =>
  job.id == null ? Infinity : job.id
findInsertionIndex 函数使用二分查找在队列中找到合适的位置,可以保证队列中的副作用函数 id 保持递增顺序,可以防止副作用函数被跳过,也可以避免重复调用副作用函数。
function queueFlush() {
  if (!isFlushing && !isFlushPending) {
    isFlushPending = true
    currentFlushPromise = resolvedPromise.then(flushJobs)
  }
}
queueFlush 函数用于启动副作用函数(任务)刷新的流程,并将 flushJobs 函数放入微任务队列中。
function flushJobs(seen?: CountMap) {
  isFlushPending = false
  isFlushing = true
  if (__DEV__) {
    seen = seen || new Map()
  }

  // Sort queue before flush.
  // This ensures that:
  // 1. Components are updated from parent to child. (because parent is always
  //    created before the child so its render effect will have smaller
  //    priority number)
  // 2. If a component is unmounted during a parent component's update,
  //    its update can be skipped.
  queue.sort(comparator)

  // 用于检测是否是无限递归,最多 100 层递归,否则就报错,只会开发模式下检查
  const check = __DEV__
    ? (job: SchedulerJob) => checkRecursiveUpdates(seen!, job)
    : NOOP

  try {
    // 循环组件异步更新队列,执行 job
    for (flushIndex = 0; flushIndex < queue.length; flushIndex++) {
      const job = queue[flushIndex]
      if (job && job.active !== false) {
        if (__DEV__ && check(job)) {
          continue
        }
        // 调用 job,带有错误处理
        callWithErrorHandling(job, null, ErrorCodes.SCHEDULER)
      }
    }
  } finally {
    flushIndex = 0
    // 清空任务队列
    queue.length = 0

    // 执行 Post 队列
    flushPostFlushCbs(seen)

    isFlushing = false
    currentFlushPromise = null
    // some postFlushCb queued jobs!
    // keep flushing until it drains.
    if (queue.length || pendingPostFlushCbs.length) {
      flushJobs(seen)
    }
  }
}
实现刷新任务队列的函数是 flushJobs 。在刷新任务队列时,会先调用 sort 方法对任务队列进行排序,通过任务对象的 id 与 pre 属性来判断任务队列中的优先级。如上面源码中的注释也说明了对任务队列进行排序的原因:
-
确保先执行父组件的渲染任务,因为父组件总是在子组件之前创建,所以父组件渲染任务的 id 值会比子组件的小,使用 sort 排序后,可保证任务队列中的任务 id 保持递增的顺序,这样可以保证父组件的任务比子组件的任务先执行。
-
如果在父组件更新过程中卸载了子组件,则该子组件的更新可以跳过
export function flushPostFlushCbs(seen?: CountMap) {
  // 存在等待执行的 Post 任务队列
  if (pendingPostFlushCbs.length) {
    // 执行 Post 任务队列前去重,并赋值到 deduped
    const deduped = [...new Set(pendingPostFlushCbs)]
    // 清空 pendingPostFlushCbs
    pendingPostFlushCbs.length = 0

    // #1947 已经存在激活的 Post 队列,说明是在一个嵌套的 flushPostFlushCbs 调用中,
    // 则将去重后的任务队列 push 到当前激活的任务队列中
    if (activePostFlushCbs) {
      activePostFlushCbs.push(...deduped)
      return
    }

    activePostFlushCbs = deduped
    // 执行 Post 任务队列前先对任务排序,保证任务的执行顺序正确
    activePostFlushCbs.sort((a, b) => getId(a) - getId(b))

    // 循环执行 Post 任务队列中的任务
    for (
      postFlushIndex = 0;
      postFlushIndex < activePostFlushCbs.length;
      postFlushIndex++
    ) {
      // 开发模式下,校验无限递归的情况
      if (
        __DEV__ &&
        checkRecursiveUpdates(seen!, activePostFlushCbs[postFlushIndex])
      ) {
        continue
      }
      // 取出 Post 任务队列中的任务执行
      activePostFlushCbs[postFlushIndex]()
    }
    // 收尾工作
    activePostFlushCbs = null
    postFlushIndex = 0
  }
}
flushPostFlushCbs 函数用于刷新 Post 队列的任务。Post 任务队列在 Vue3 任务调度系统中的一种任务队列类型,在组件自更新完毕后,Vue3 会刷新 Post 任务队列。
const comparator = (a: SchedulerJob, b: SchedulerJob): number => {
  const diff = getId(a) - getId(b)
  if (diff === 0) {
    if (a.pre && !b.pre) return -1
    if (b.pre && !a.pre) return 1
  }
  return diff
}
comparator 函数是用于比较任务(副作用函数)优先级的函数,comparator 函数首先通过调用 getId 函数获取两个任务( SchedulerJob 对象)的 id 值,并计算它们的差值,将结果保存在变量 diff 中。
如果 diff 大于 0,则说明 a 的优先级高于 b
如果 diff 小于 0,则说明 a 的优先级低于 b
如果 diff 等于 0 ,则说明两个任务( SchedulerJob 对象)的 id 值相等,这个情况下会进一步比较它们的 pre 属性。
如果 a.pre 为 true,而 b.pre 为 false,则说明 a 的任务应该先执行,此时函数返回 -1 。相反,如果 b.pre 为 true,而 a.pre 为 false,则说明 b 的任务应该先执行,此时函数返回 1 。
const getId = (job: SchedulerJob): number =>
  job.id == null ? Infinity : job.id
如果两个任务对象(SchedulerJob)的 id 属性都为 null 或 undefined,则将它们的 id 视为 Infinity,表示它们的优先级最低。因为 id 为 Infinity 的任务会排在任务队列的最后面,因此会最后执行。
总结
Vue 组件自身的状态在 data 函数中定义,Vue 在渲染组件的时候(mountComponent 方法)会通过组件的选项对象取得 data 函数并执行,然后调用 reactive 函数将 data 函数返回的状态包装为响应式数据;在调用 render 函数时,将其 this 的指向设置为响应式数据 state ,同时将 state 作为 render 函数的参数传递。这样我们就实现了对组件自身状态的支持,以及在渲染函数内访问组件自身状态的能力。
当组件自身的状态发生变化时,我们需要有能力触发组件更新,即需要重新渲染组件(组件的自更新),因此,我们将整个渲染任务包装到 effect 中,由于 effect 是同步执行的,当组件自身的状态发生多次变化时,会导致多次执行渲染任务,为了提高 Vue 的渲染性能,Vue 设计了一个任务调度系统,对组件自更新的渲染任务做了优先级划分和去重处理,保证了渲染任务以正确的顺序执行和避免了多次执行同一渲染任务的性能开销。这个任务调度系统的实现原理是队列和微任务。首先给所有渲染任务添加唯一的 id 标识,同时也是用于判断任务优先级的机制,然后放入队列中,之后利用数组的 includes 、Set 数据结构手段进行去重处理,最后为了保证渲染任务不阻塞浏览器的 DOM 渲染,在微任务中刷新任务队列,从而完成组件的自更新。
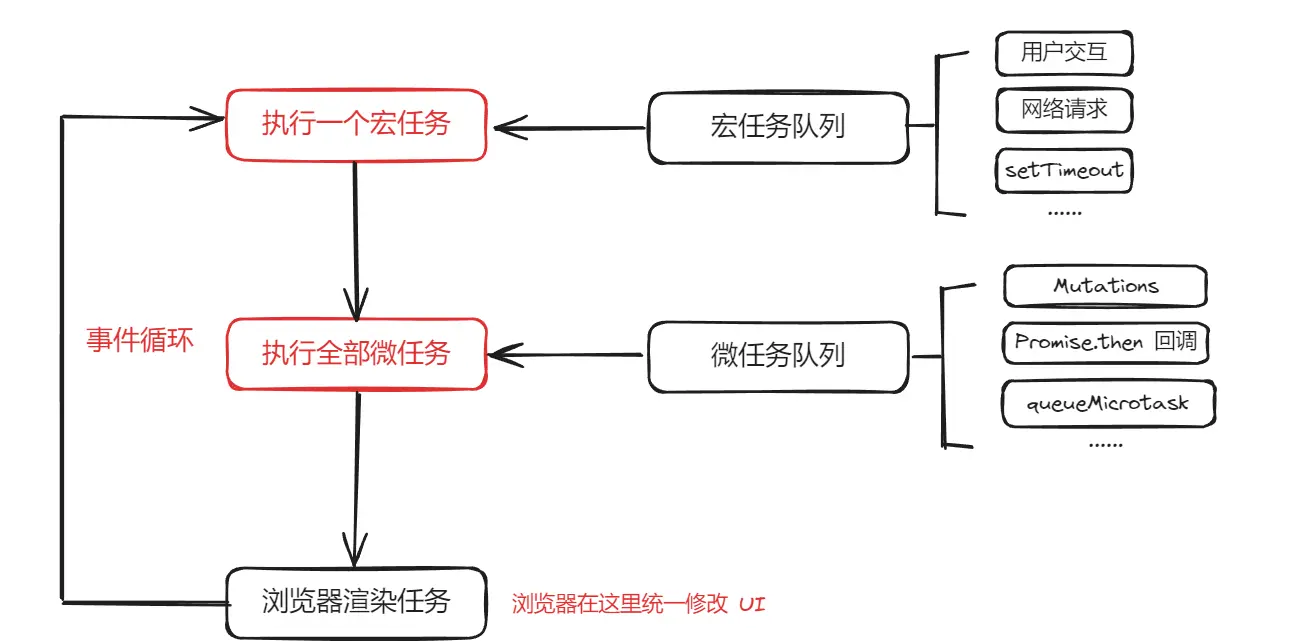
在这里读者可能会有个疑问,宏任务也不会阻塞浏览器的 DOM 渲染,为何不在宏任务中刷新任务队列?
因为在一个事件循环中,浏览器只会取一个宏任务执行,而微任务则是执行全部,在微任务执行 queueJob ,能在最快时间执行队列(任务的执行效率更高,对用户的影响更小),并且接下来浏览器就会执行渲染页面,更新 UI 。
否则,如果 queueJob 使用宏任务,极端情况下,可能会有多个宏任务在 queueJob 之前,而每次事件循环,只会取一个宏任务,则 queueJob 的执行时机会在非常的后,这对用户体验来说是有一定的伤害的,这对一个优秀的前端框架来说是不被允许的。
浏览器事件循环示意图:
参考
-
《Vue.js 设计与实现》霍春阳·著
原文链接:https://juejin.cn/post/7323456063569854490 作者:云浪