
摘要
在上一篇文章中的末尾,我们也完成了Input组件的属性面板配置。现在我们的低代码项目已经小有成就了。但是后面的内容还是不少的。
如果你是第一次看到这篇文章,那么请移步到第一节: 从零实现一套低代码(保姆级教程) — 【1】初始化项目,实现左侧组件列表


来到本系列的第六节,我们回顾一下之前的实现内容。
- 当我从左侧拖拽组件到画布区时,是怎么实现组件交互的
- 当我选中画布区的组件时,右侧属性面板是怎么展示的
- 未来我们可能通过点击层级树,选中节点要怎么做
- 未来我们可能会在全局放置一个模型,要怎么做等等等
前两点,我们目前是通过window,来实现组件的信息传递的。那既然有很多地方用,所以我们需要有一个全局的状态管理,管理组件的信息。
所以,这时候我们就要引入redux了,用redux我们可以统一管理组件相关的信息。这样就不需要在我们的leftPart和rightPart或者mainPart中,处理组件的存储管理了。
我们开始

1.引入redux
OK,现在我们进行引入redux,这里我们使用的是@reduxjs/toolkit,所以在控制台输入:
npm install --save @reduxjs/toolkit
安装完成后,在pages同级目录下,新建一个store文件夹
在index.ts中,我们写一下redux的初始化逻辑。
import { configureStore } from '@reduxjs/toolkit'

const initialState  = { comList: [], dragCom: void 0 }

const comReducer = (state: any = initialState, action: any) => {

}

export default configureStore({
  reducer: comReducer,
  middleware:getDefaultMiddleware => getDefaultMiddleware({
    //关闭redux序列化检测
    serializableCheck:false
  })
});
在这里,我们用暂时先用两个state,一个是comList,用来表示当前画布区的组件列表。一个是nowCom,用来表示从左侧拖拽组件的type(就是从左侧组件列表拖拽的组件)。
那如果我们将组件的信息保存在redux中,当redux里面的内容发生改变时,在使用redux的地方就需要更新,所以我们封装一个自定义HOOK,作为当redux数据发生改变时,更新对应的组件。
在store中新建一个subscribe文件:
import { useState, useEffect } from 'react'
import Store from './index'

function subscribeHook() {
  // eslint-disable-next-line react-hooks/rules-of-hooks
  const [update, setUpdate] = useState<any>({})

  // eslint-disable-next-line react-hooks/rules-of-hooks
  useEffect(() => {
    Store.subscribe(() => {
      setUpdate({...update})
    })
  }, [])
}

export {
  subscribeHook
}
补充一句,目前我们要引入redux,就是要将我们之前的window上挂载的东西,全部干掉!
2.修改左侧组件到画布区
之前,我们从左侧组件列表,拖拽组件的时候,在onDragStart方法里,在window上挂载了一个nowCom属性。现在,我们不在window上挂载了,直接修改Store中的dragCom。
import Store from '../../../store';

  const onDragStart = (name: string) => {
    return () => {
      // 更新当前拖拽的节点
      Store.dispatch({type: 'changeNowCom', value: name});
    }
  }
那我们之前是在什么地方引用的window.nowCom呢?是在mainPart中,现在我们改为从Store中拿,同时将更新组件的subscribe方法引入。
import Store from '../../../store/index'
import { subscribeHook } from '../../../store/subscribe'


export default function MainCom() {

  const [comList, setComList] = useState<ComJson []>([])
  const [dragCom, setDragCom] = useState<ComJson | null>(null)
  const [selectId, setSelectId] = useState<string>('')
  // 拿到当前拖拽的节点类型
  const nowCom = Store.getState().dragCom
  subscribeHook()

  const onDrop = (e: any) => {
	// 其他代码
    }else{
      style = {
        position: 'absolute',
        left: distance.current.endLeft + 'px',
        top: distance.current.endTop + 'px',
        zIndex:100
      }
      let comId = `comId_${Date.now()}`
      const comNode = {
      	// 不从window上拿,直接从store中取
        comType: nowCom,
        style,
        comId
      }
      comList.push(comNode)
      window.renderCom = comNode;
      window.comList = comList;
      window.setComList = setComList
      setSelectId(comId)
    }
    setComList([...comList])
  }
切记,subscribe方法是一定要记得引入,不然无法让画布区组件更新。
现在,我们从左侧拖拽组件也保持正常了。
3.修改画布区中组件拖拽
在mainPart中,我们也不需要使用自己的state去管理comList了,直接从Store中拿就行了。
const comList = JSON.parse(JSON.stringify(Store.getState().comList))
记得之前,我们在画布区拖拽组件调整位置的时候,是通过dragCom来保存当前节点的信息。现在我们只需要记录一个comId,然后去comList中找即可。
  const [dragComId, setDragComId] = useState<string>('')

  const onDragStart = (com: ComJson) => {
    return (e: any) => {
      // 设置当前拖拽节点的comId
      setDragComId(com.comId);
      distance.current.startLeft = e.clientX;
      distance.current.startTop = e.clientY;
    }
  }
在拖拽结束时,我们可以去comList中找到对应的节点,然后修改它的style。最后,通过Store.dispatch去更新画布区。
  const onDrop = (e: any) => {
    // 只需要判断是否有dragComId
    if(dragComId) {
      const node = comList.find((item:ComJson) => item.comId === dragComId)
      node.style = {
        ...node.style,
        left: parseInt(node.style.left) + (e.clientX - (distance.current.startLeft || 0)) + 'px',
        top: parseInt(node.style.top) + (e.clientY - (distance.current.startTop || 0)) + 'px'
      }
      // 切记,拖拽完组件要记得清空这个id
      setDragComId('')
    }else{
		// 其他代码
    }
    // 更新Store,从而更新画布区
    Store.dispatch({type: 'changeComList', value: comList})
  }
因为这一篇章修改的会比较多,最好可以对比着github的提交记录来看,因为上面有着改动记录。
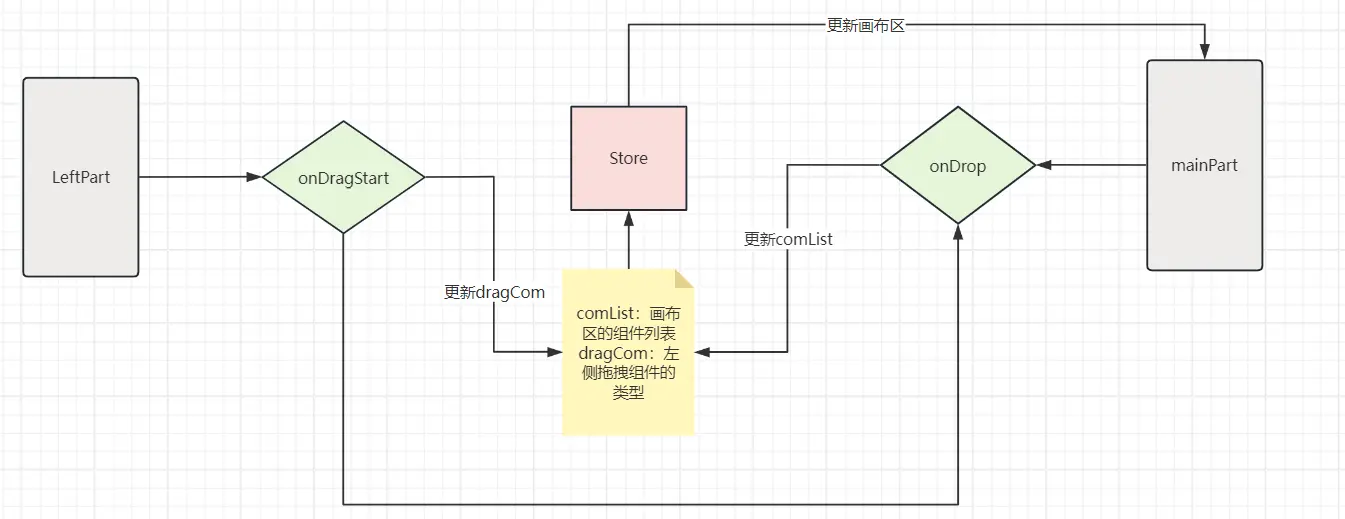
在说右侧属性面板之前,我先画一个图来表示上面的逻辑,让读者更加清晰一点。
4.右侧属性面板的显示
之前我们是通过window上的renderCom,以及将setComList挂载在window上,和右侧属性面板进行通信,现在不用了。我们直接从Store中取。
首先在Store中,我们新增一个变量,用于存储选中的节点(就是右侧属性面板对应的组件ID)。
const initialState  = { comList: [], dragCom: '', selectCom: '' }

const comReducer = (state: any = initialState, action: any) => {
  switch (action.type) {
    case 'changeNowCom': {
      return {...state, dragCom: action.value}
    }
    case 'changeComList': {
      return {...state, comList: action.value}
    }
    // 增加selectCom用来表示选中的节点
    case 'changeSelectCom': {
      return {...state, selectCom: action.value}
    }
    default: {
      return state
    }
  }
}
在mainPart中,当我拖拽组件结束时,或者点击组件的时候,就要更新选中的节点。
  const onDrop = (e: any) => {
    distance.current.endLeft = e.clientX;
    distance.current.endTop = e.clientY;
    let style: any;
    if(dragComId) {
	  // 其他代码,
      setDragComId('')
      // 更改当前选中的节点ID
      Store.dispatch({type: 'changeSelectCom', value: dragComId});
    }else{
	  // 其他代码
      setSelectId(comId)
      // 更改当前选中的节点ID
      Store.dispatch({type: 'changeSelectCom', value: comId})
    }
    Store.dispatch({type: 'changeComList', value: comList})
  }

  const selectCom = (com: ComJson) => {
    return () => {
      setSelectId(com.comId);
      // 更新当前选中的节点
      Store.dispatch({type: 'changeSelectCom', value: com.comId});
    }
  }
现在我们来到右侧属性面板,我们也不需要update这个变量了,我们从Store中拿到comList和selectCom,这样我们就知道要渲染什么类型的组件属性了。
我们修改一下getAttributePanel方法:
import Store from '../../../store/index'
import { subscribeHook } from '../../../store/subscribe'

  const comList = JSON.parse(JSON.stringify(Store.getState().comList))
  const selectCom = Store.getState().selectCom
  const selectNode = comList.find((item: any) => item.comId === selectCom)
  subscribeHook()

  const getAttributePanel = () => {
  	// 不从window上拿了。直接从store中取。
    const comType = selectNode?.comType;
    const comAttributeList = attributeMap[comType] || []
    return <div>
      {
        comAttributeList.map((item,index) => {
          return <div key={index} className='attributeItem'>
          <label className='attributeLabel'>{item.label}</label>
          <div className='attributeItemValue'>
            <InputComponent {...item} onChange={changeComAttribute(item.value)}/>
          </div>
        </div>
        })
      }
    </div>
  }
这里面有一个问题是什么呢?因为根据组件ID找到对应组件的方法,比较常用,不能每次都取comList遍历结果。所以我们后面会封装一个方法,专门用来处理,根据ID找对应节点的情况。
现在,当你拖拽组件或者点击组件的时候,右侧属性面板就可以直接显示了。不需要像之前那样,还要切换tab页签。
5.修改属性到组件渲染
现在我们就差最后一步了,就是在右侧属性面板中修改组件属性,然后映射到组件上了。
之前我们是通过window上的setComList修改组件,现在呢,我们要通过Store的dispatch方法去修改组件的属性:
  const changeComAttribute = (value: string) => {
    return (e: any) => {
      let attribute = e;
      if(typeof e === 'object') {
        attribute = e.target.value;
      }
      // 通过Store的dispatch更改组件属性
      selectNode[value] = attribute;
      Store.dispatch({type: 'changeComList', value:comList})
    }
  }
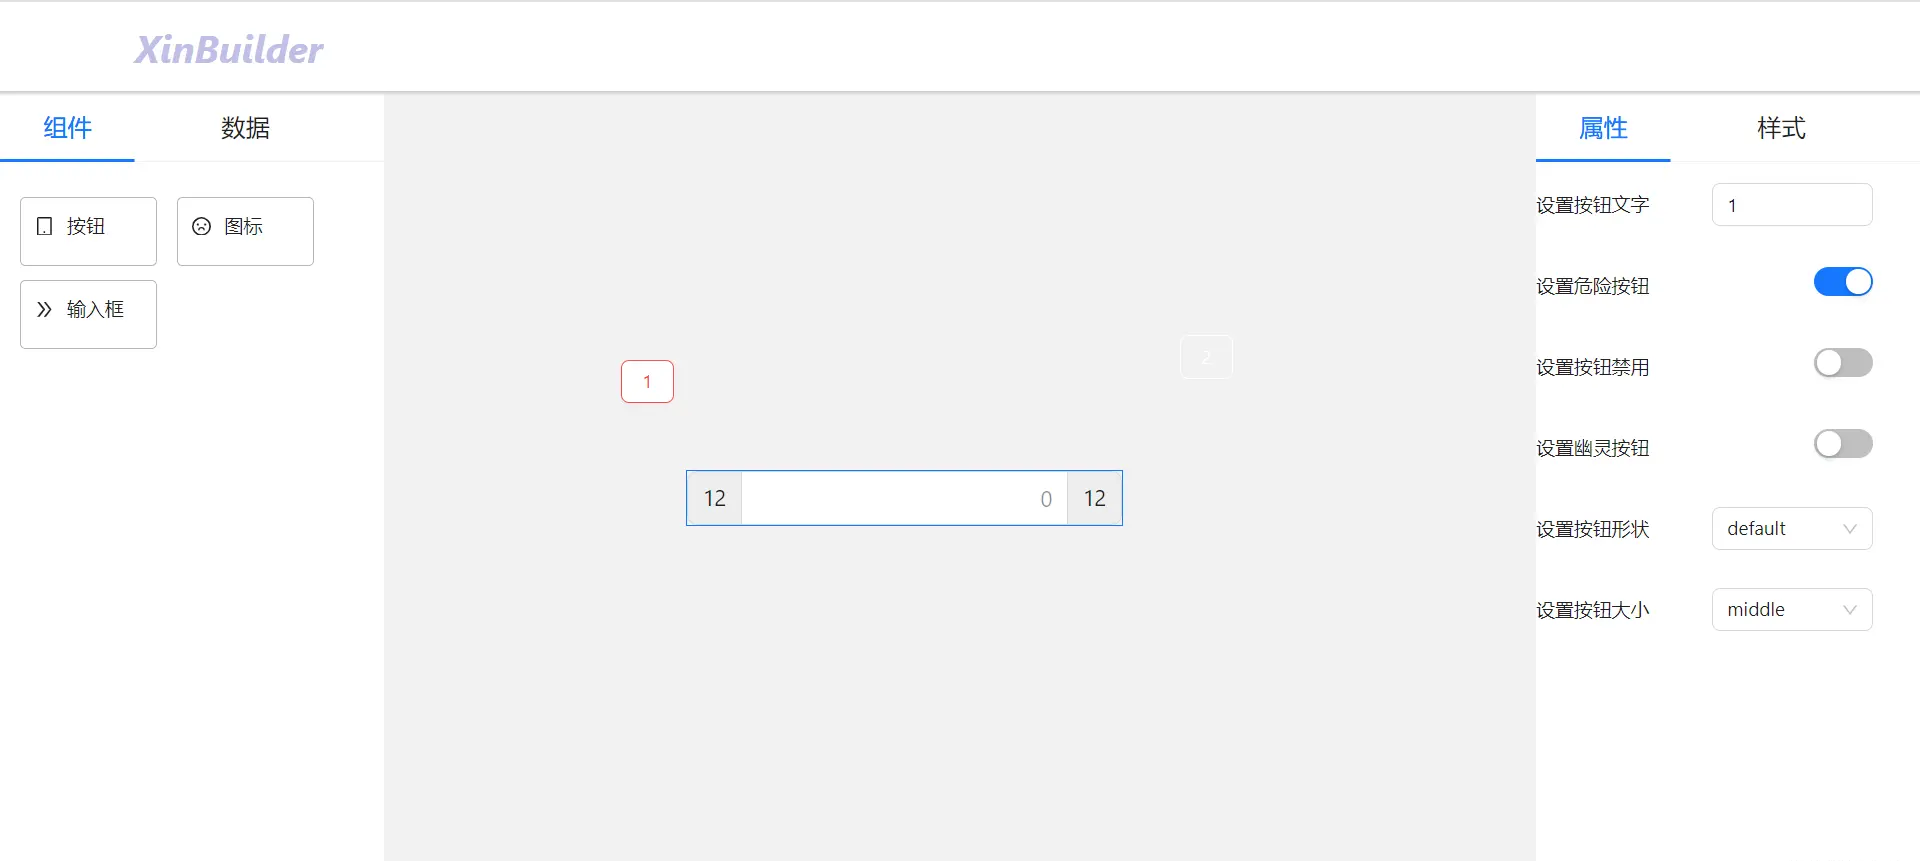
现在,你就可以更改组件属性来尝试了,组件会正常根据属性的配置进行渲染。
但是呢?有一个问题,当我给第一个组件配置好属性后,选中第二个组件。你会发现,右侧的属性面板还是之前的配置。这是为甚呢?
因为我们在实现右侧属性面板的时候,并没有做回显的功能,那属性面板应该怎么回显呢?
应该根据当前组件的属性,去回显。OK,现在我们实现一下:
首先给InputComponent组件,将当前节点传递过去
  const getAttributePanel = () => {
			// 其他代码
			// selectNode当做节点穿过去
            <InputComponent selectNode={selectNode} {...item} onChange={changeComAttribute(item.value)}/>
          </div>
        </div>
        })
      }
    </div>
  }
来到InputComponent组件里面,我们修改一下组件的默认值:
  const { onChange, type, defaultValue, options, selectNode, value } = props

  const getComponent = () => {
    switch (type) {
      case 'input': {
      	// value为组件的默认值
        return <Input value={selectNode[value] || ''} style={{width:'120px'}} defaultValue={defaultValue} onChange = {onChange}/>
      }
      case 'switch': {
        return <Switch value={selectNode[value] || false} defaultValue={defaultValue} onChange = {onChange}/>
      }
      case 'select': {
        return <Select value={selectNode[value] || defaultValue} style={{width:'120px'}}  options={options} defaultValue={defaultValue} onChange={onChange}></Select>
      }
    }
  }
到这里,我们就实现了redux的引入,整个项目的组件,我们就使用redux进行管理了。
现在检查一下你的代码是否还有window,如果有,请删掉,如果删掉不好使,那一定是哪里漏了。
因为改动比较大,引入了redux之后,删了不少之前的代码,所以建议读者还是照着github的提交记录来看。
本章内容会提交在github上:
github.com/TeacherXin/…
commit: 第六节:在项目中使用redux状态管理
如果可以的话,可以给博主的GitHub点亮一颗小星星(╹▽╹)
原文链接:https://juejin.cn/post/7324384067155443753 作者:前端小盆友