
一.前言
小编最近接触的比较多的是在学校实验室团队中合同开发的小程序的项目,想复习一下Vue3的知识点(大家都知道Vue2在23年年底就停止维护了,Vue3必定是大势所趋,所以小编最近就抽空开发一个基于vite创建的Vue3项目,整体效果在文章最后面展示给大家,有什么错误欢迎大佬在评论区指正谢谢。)
二.为什么使用vite创建项目而不使用vue脚手架呢?
首先我们得知道这两种方式创建SPA项目有什么区别:
2.1.构建速度:Vite 是一种基于现代浏览器原生 ES 模块的构建工具,利用浏览器的原生模块机制来实现快速的冷启动和热更新,从而提供了更快的构建速度。相比之下,Vue 脚手架使用 webpack 进行构建,其构建速度相对较慢。
2.2.生态系统:Vue 脚手架是 Vue.js 官方推荐的脚手架工具,具有广泛的社区支持和丰富的插件生态系统。而 Vite 是一个相对较新的构建工具,尽管它与 Vue.js 兼容,并且可以与大多数现有的 Vue 插件一起使用,但其插件生态系统相对较小。随着时间的推移,Vite 的生态系统将会扩大。
总的来说就是vite比较新,功能完善度小而巧,目前不建议在企业级开发中使用,而vue-cli功能完善度大而全,建议在企业级开发中使用。小编因为想复习知识点嘛,所以想从0到1搭一个后台管理系统,所以选择了生态还不够完善的vite,因为它默认安装的插件很少,所以需要自己额外配置,对我来说是一个很好的锻炼机会。接下来让我们进入正题吧,建议开始阅读之前先翻到底部第十点开始,先看一下整体的页面效果,然后再返回来接着看,有助于理解。
三.技术栈:Vue3 + vite3
四.项目搭建
4.1.1.项目搭建(摘自vite官网):
# npm 7+, extra double-dash is needed:
npm create vite@latest my-vue-app -- --template vue

# yarn
yarn create vite my-vue-app --template vue

# pnpm
pnpm create vite my-vue-app --template vue

# bun
bunx create-vite my-vue-app --template vue
4.1.2.切换到项目根目录:
cd my-project
4.1.3.安装项目依赖
npm install
4.1.4.运行项目
npm run dev
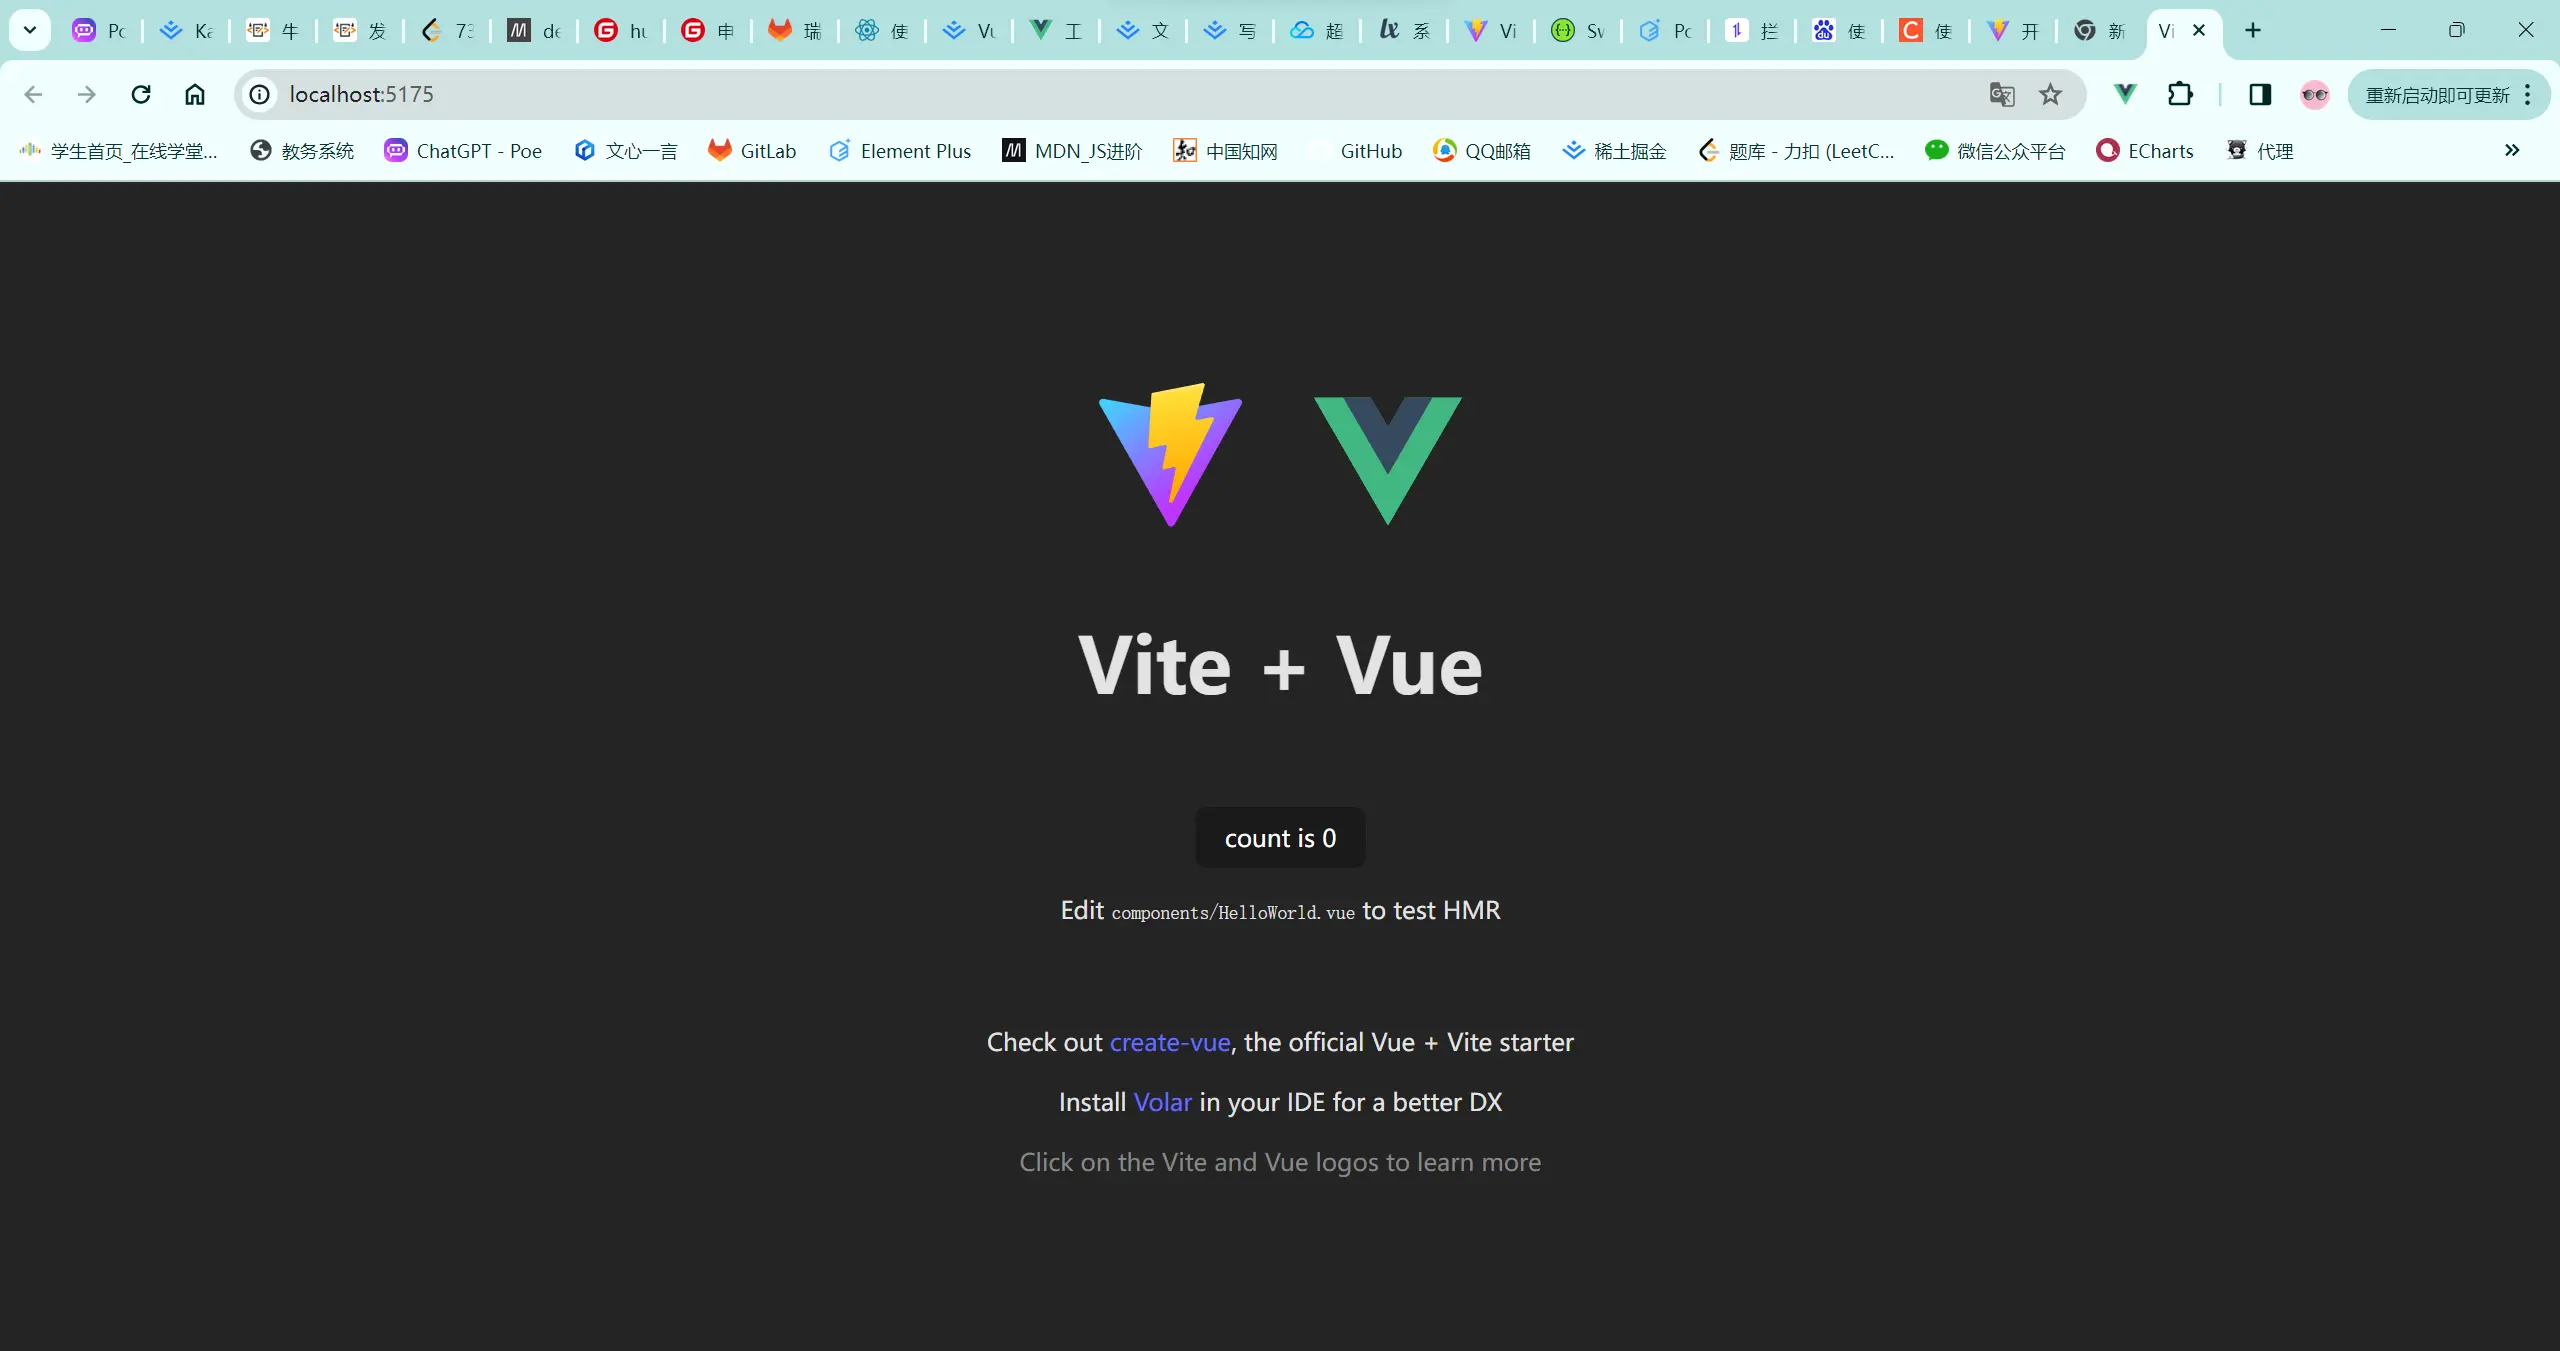

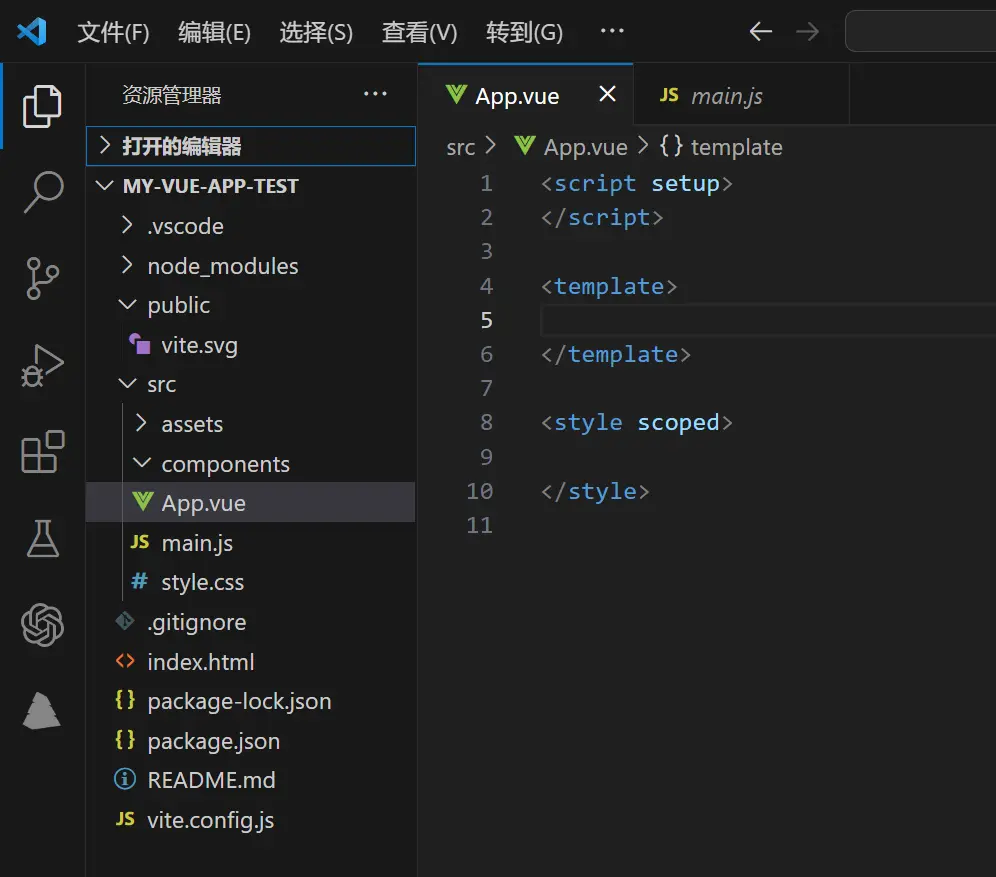
4.1.5.初始化项目
删除默认的HelloWorld组件,同时修改App.vue
五.安装项目相关配置
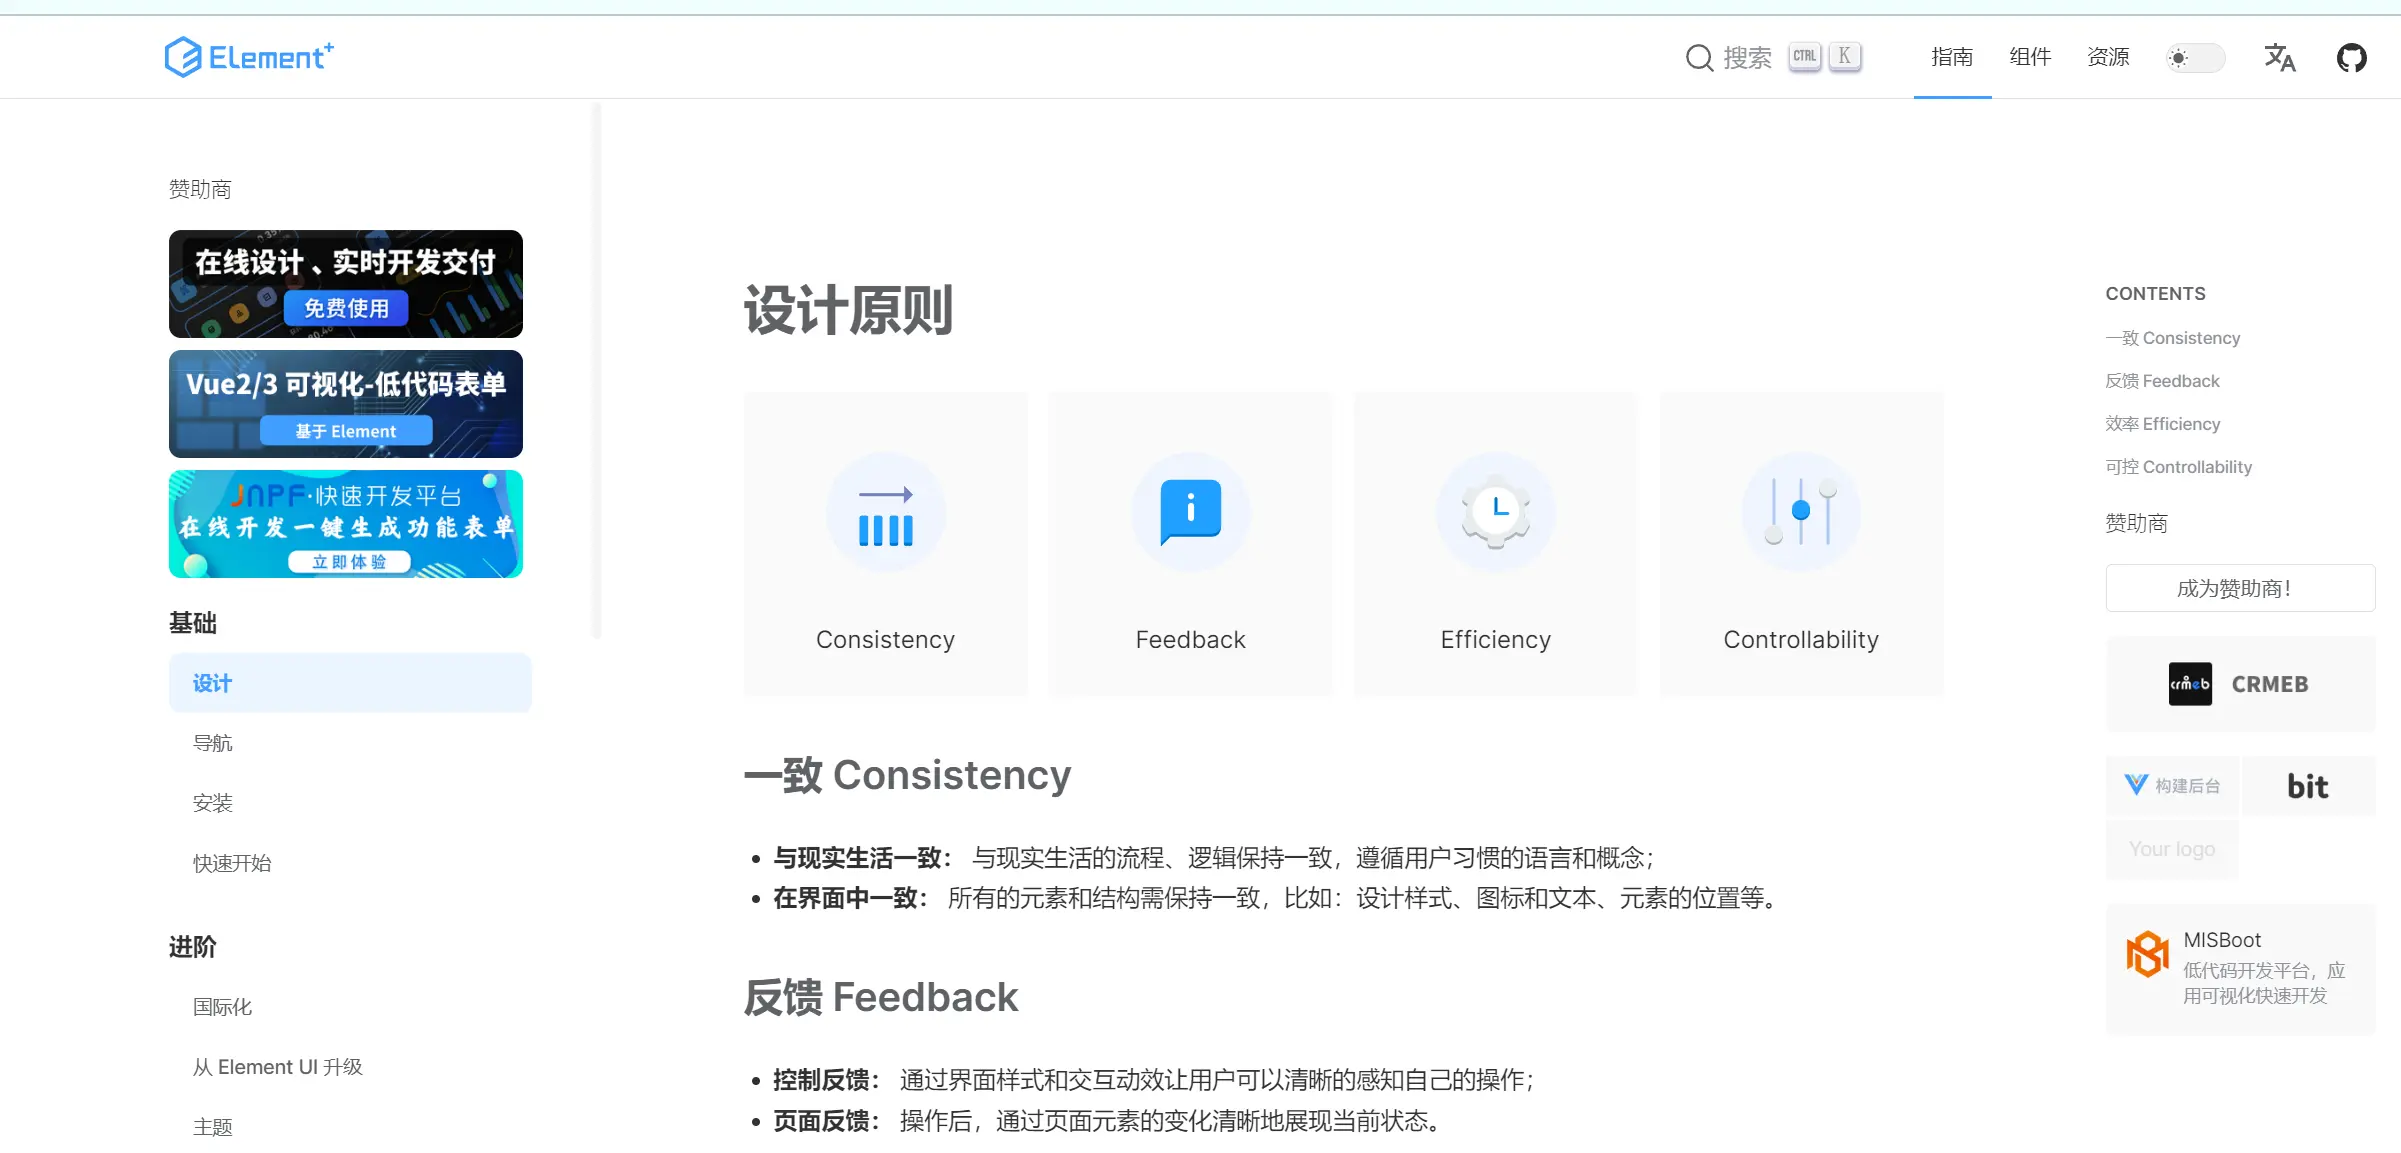
5.1.1.Element Plus
npm install element-plus --save
5.1.2.官网地址:
https://element-plus.org/zh-CN/guide/design.html
5.1.3.按需引入组件:
npm install -D unplugin-vue-components unplugin-auto-import
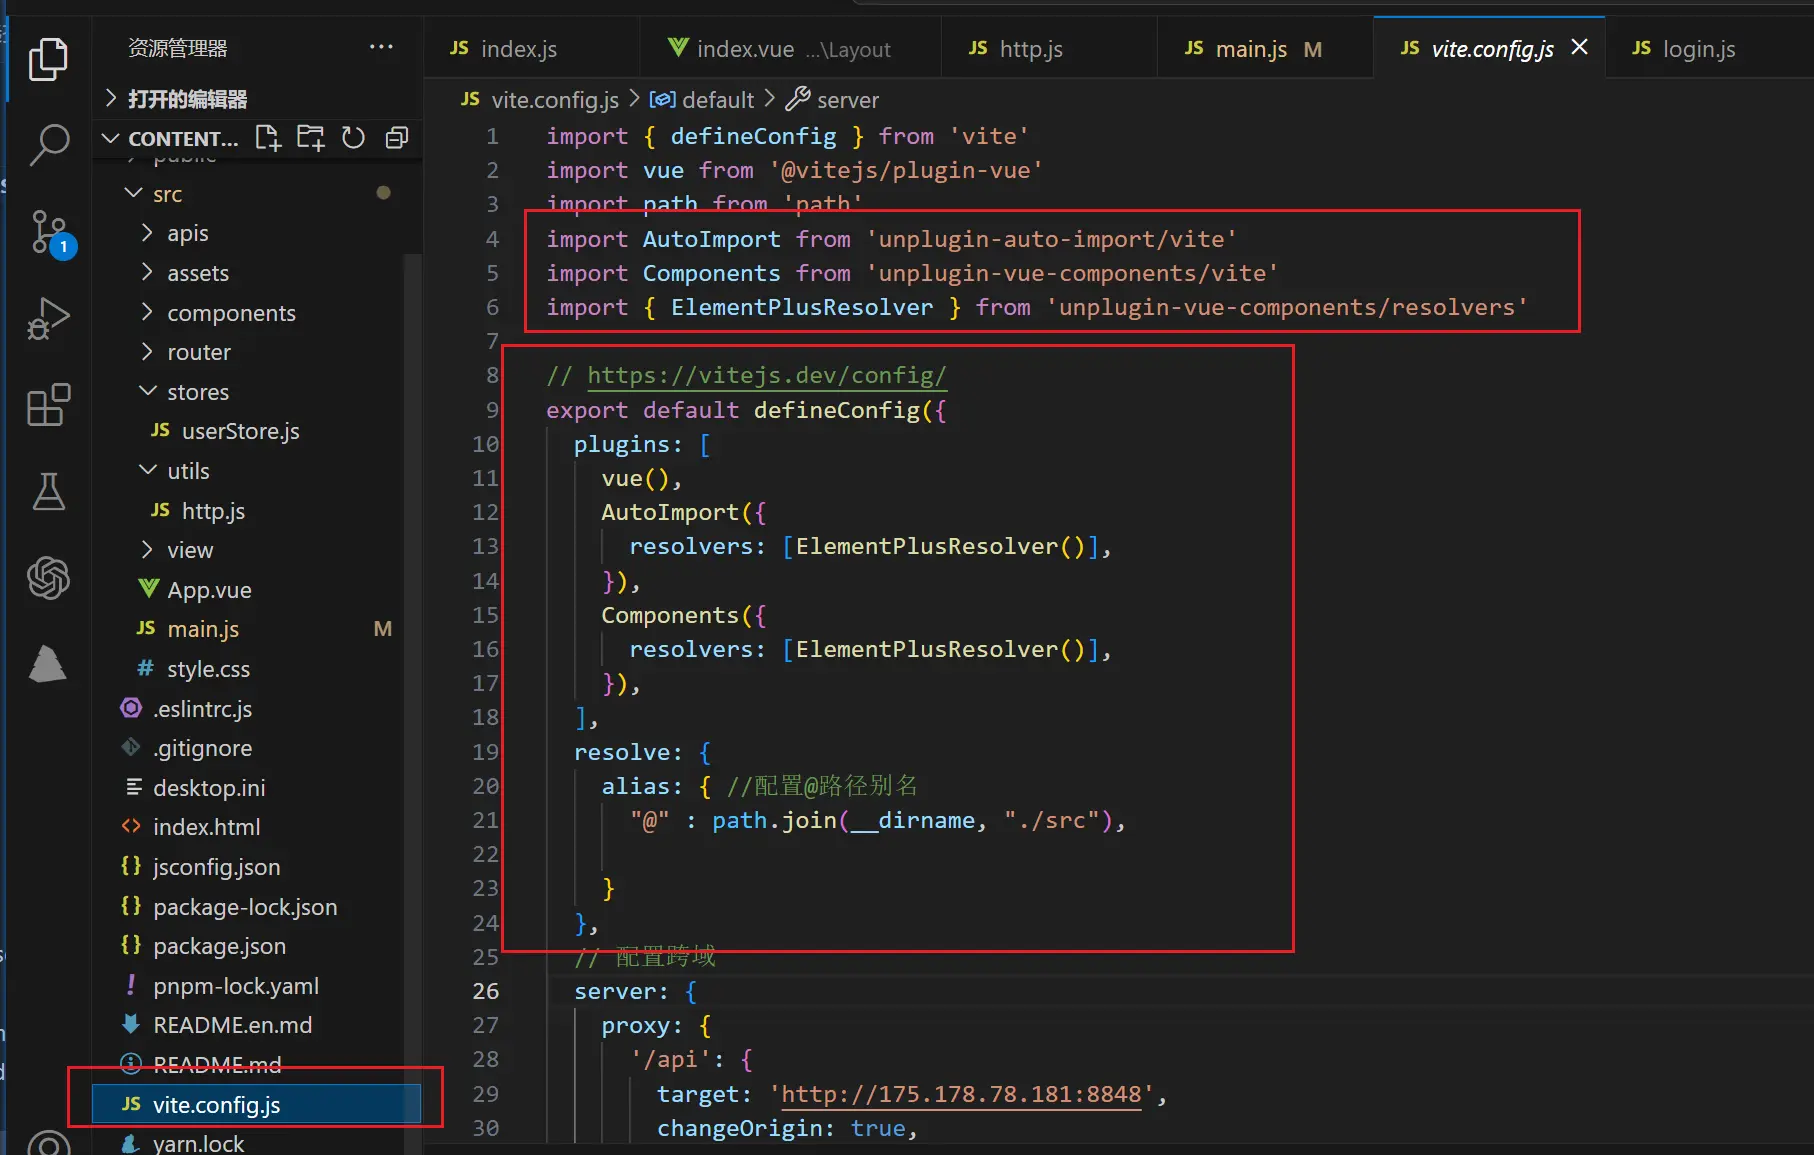
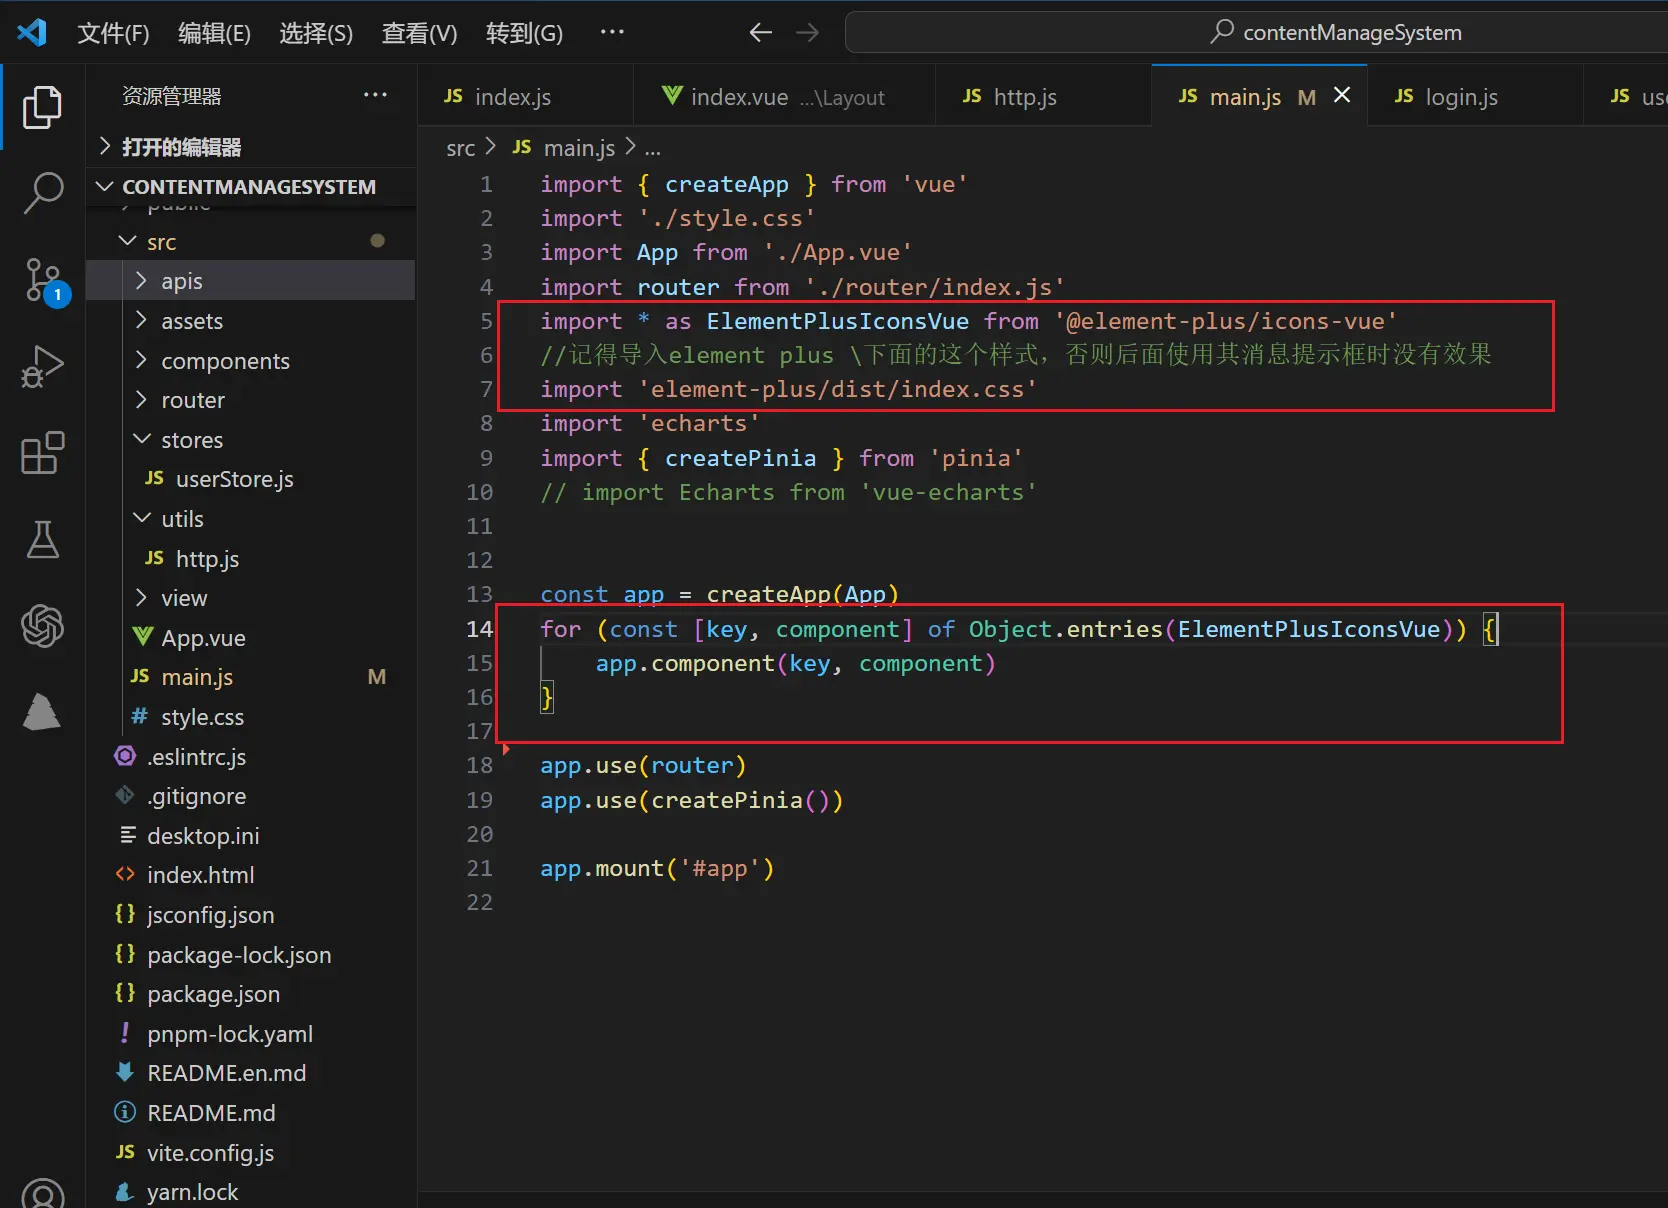
5.1.4.小编在这里按需引入element plus组件,并且icon组件需要另外引入,我连同其样式也引入了,否则之后使用里面的提示框时没有样式效果,因此我先在main.js中引入element plus并配置好这些参数。
5.2.1.配置pinia
//使用 yarn
yarn add pinia
//或者使用 npm
npm install pinia
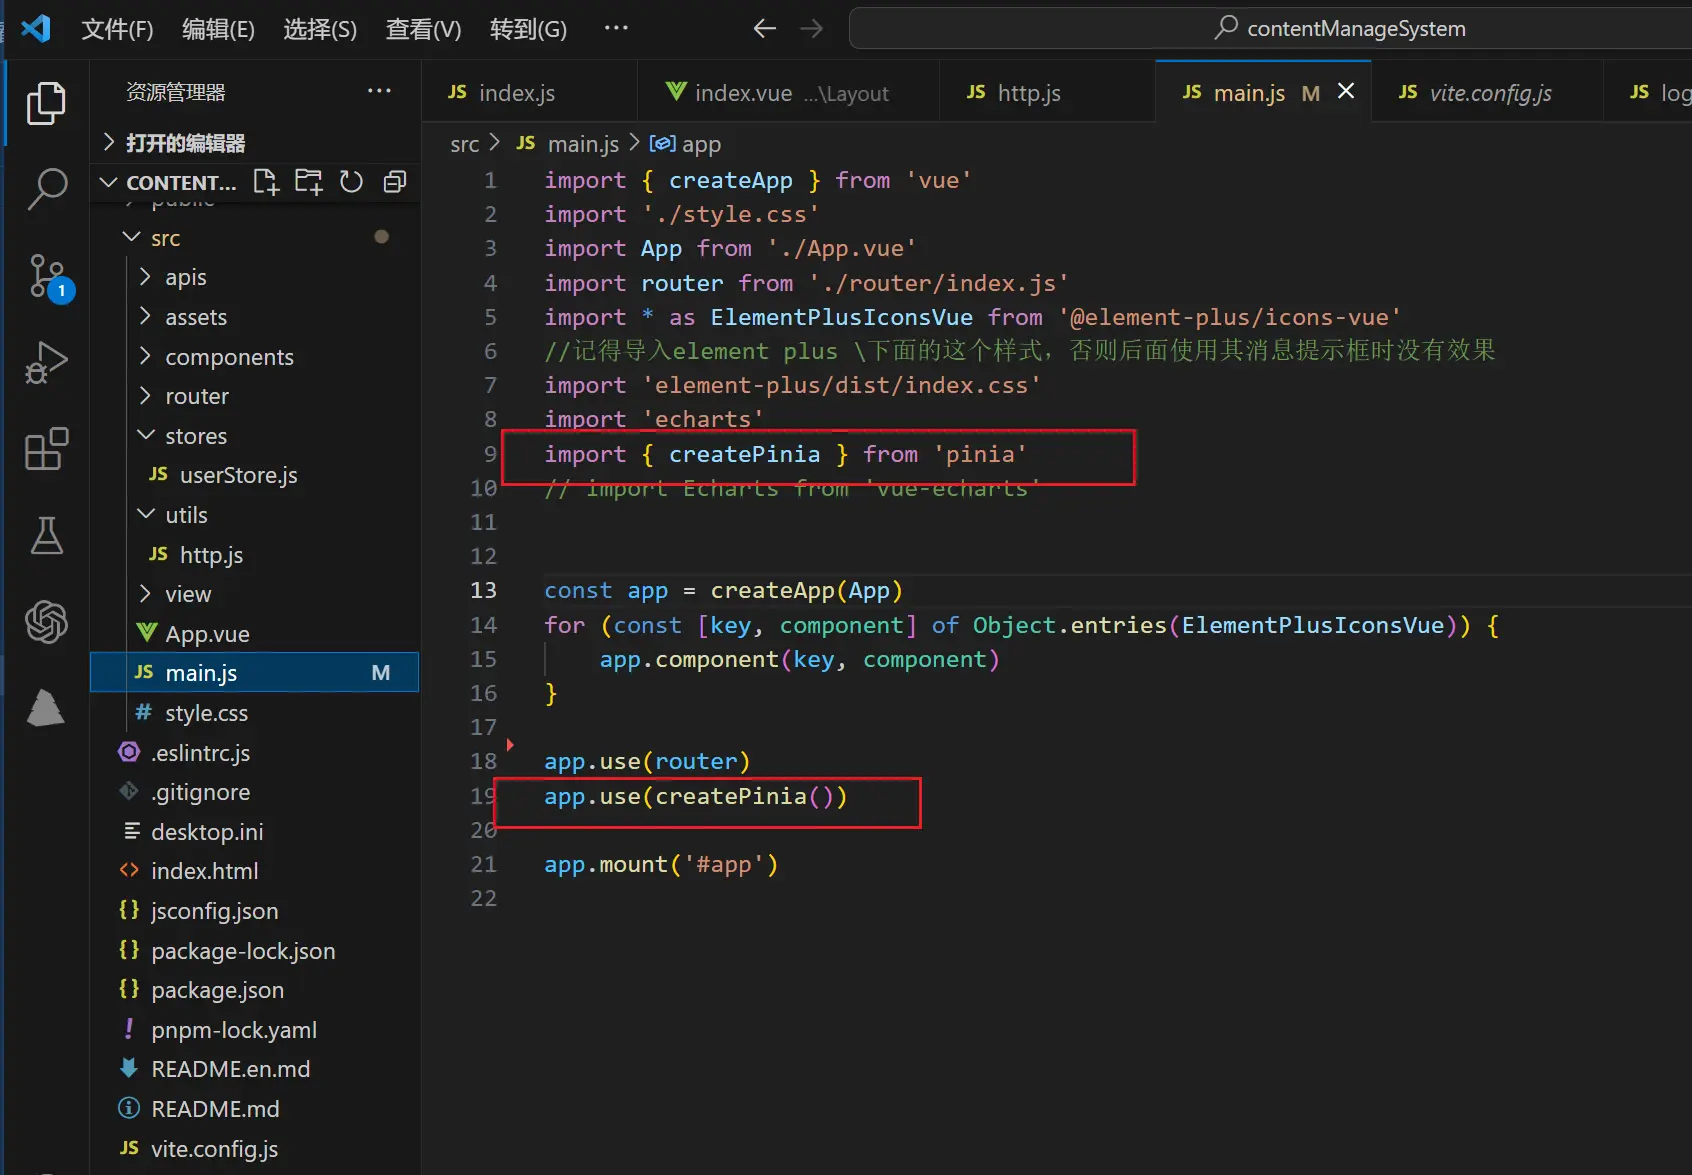
5.2.2在main.js中引入pinia
5.3.配置axios
// npm
npm install axios

//yarn
yarn add axios
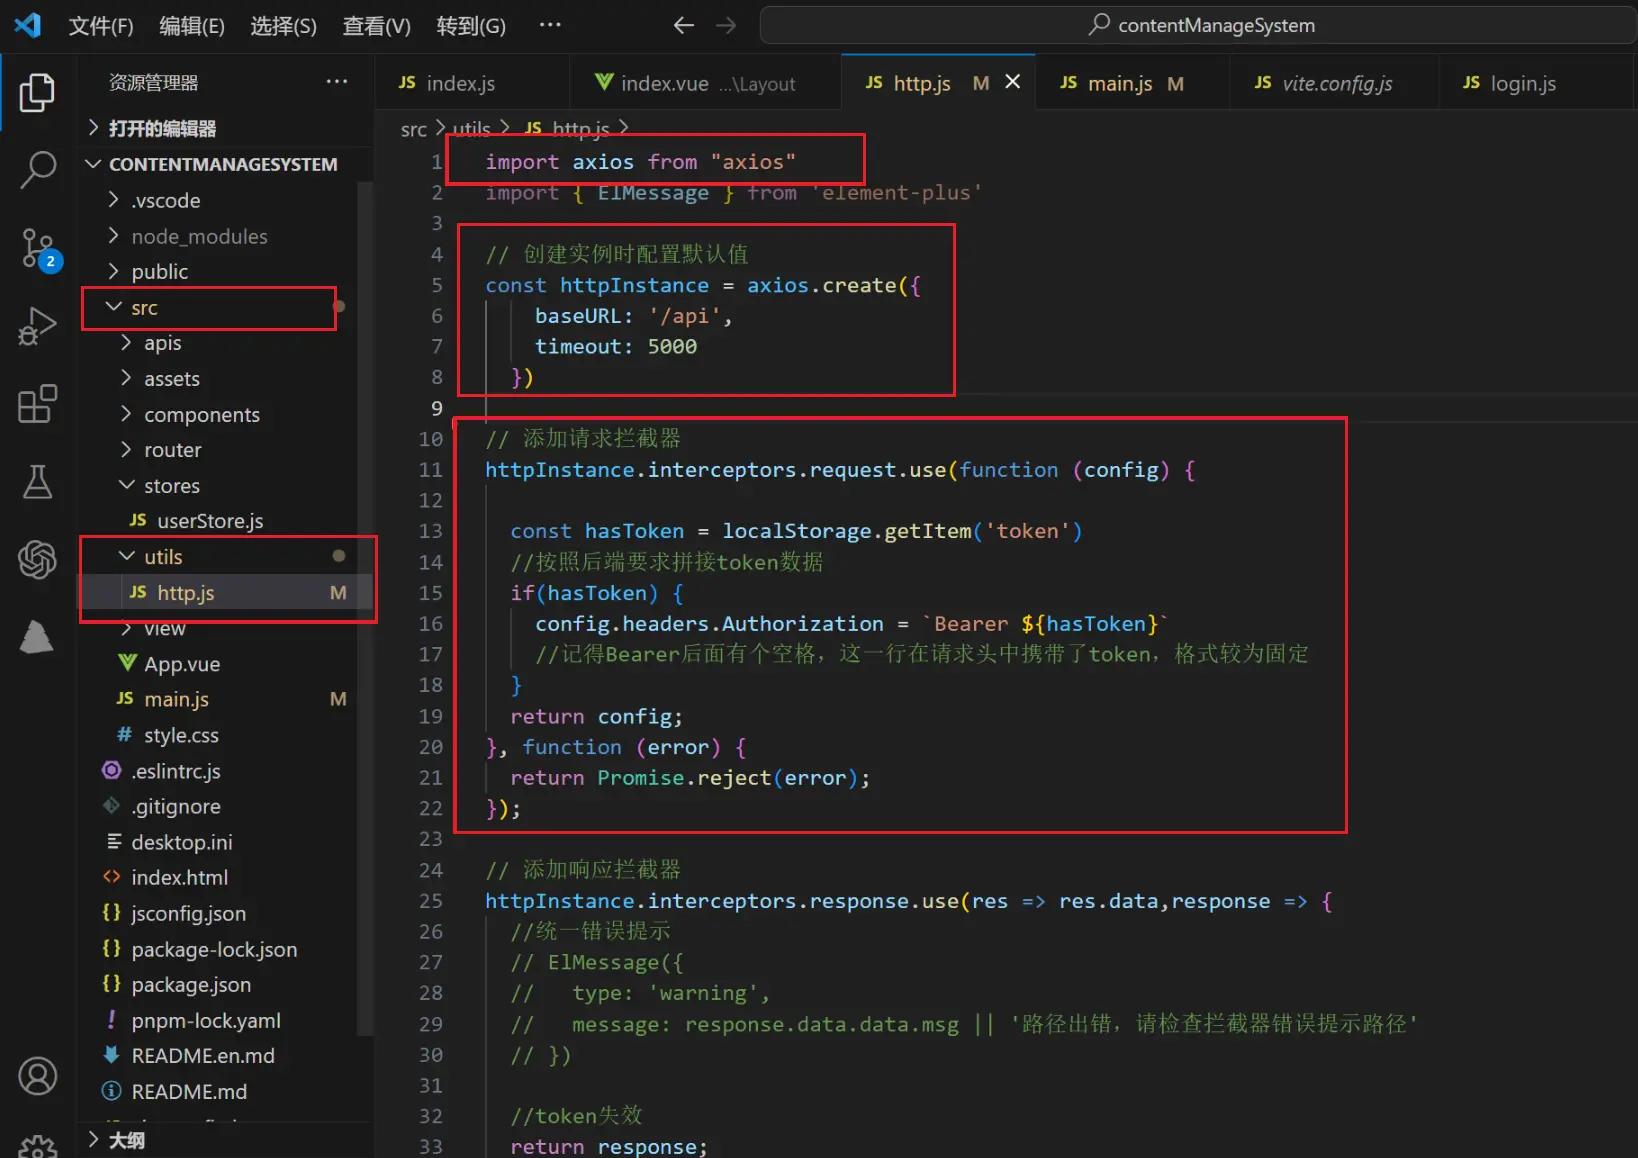
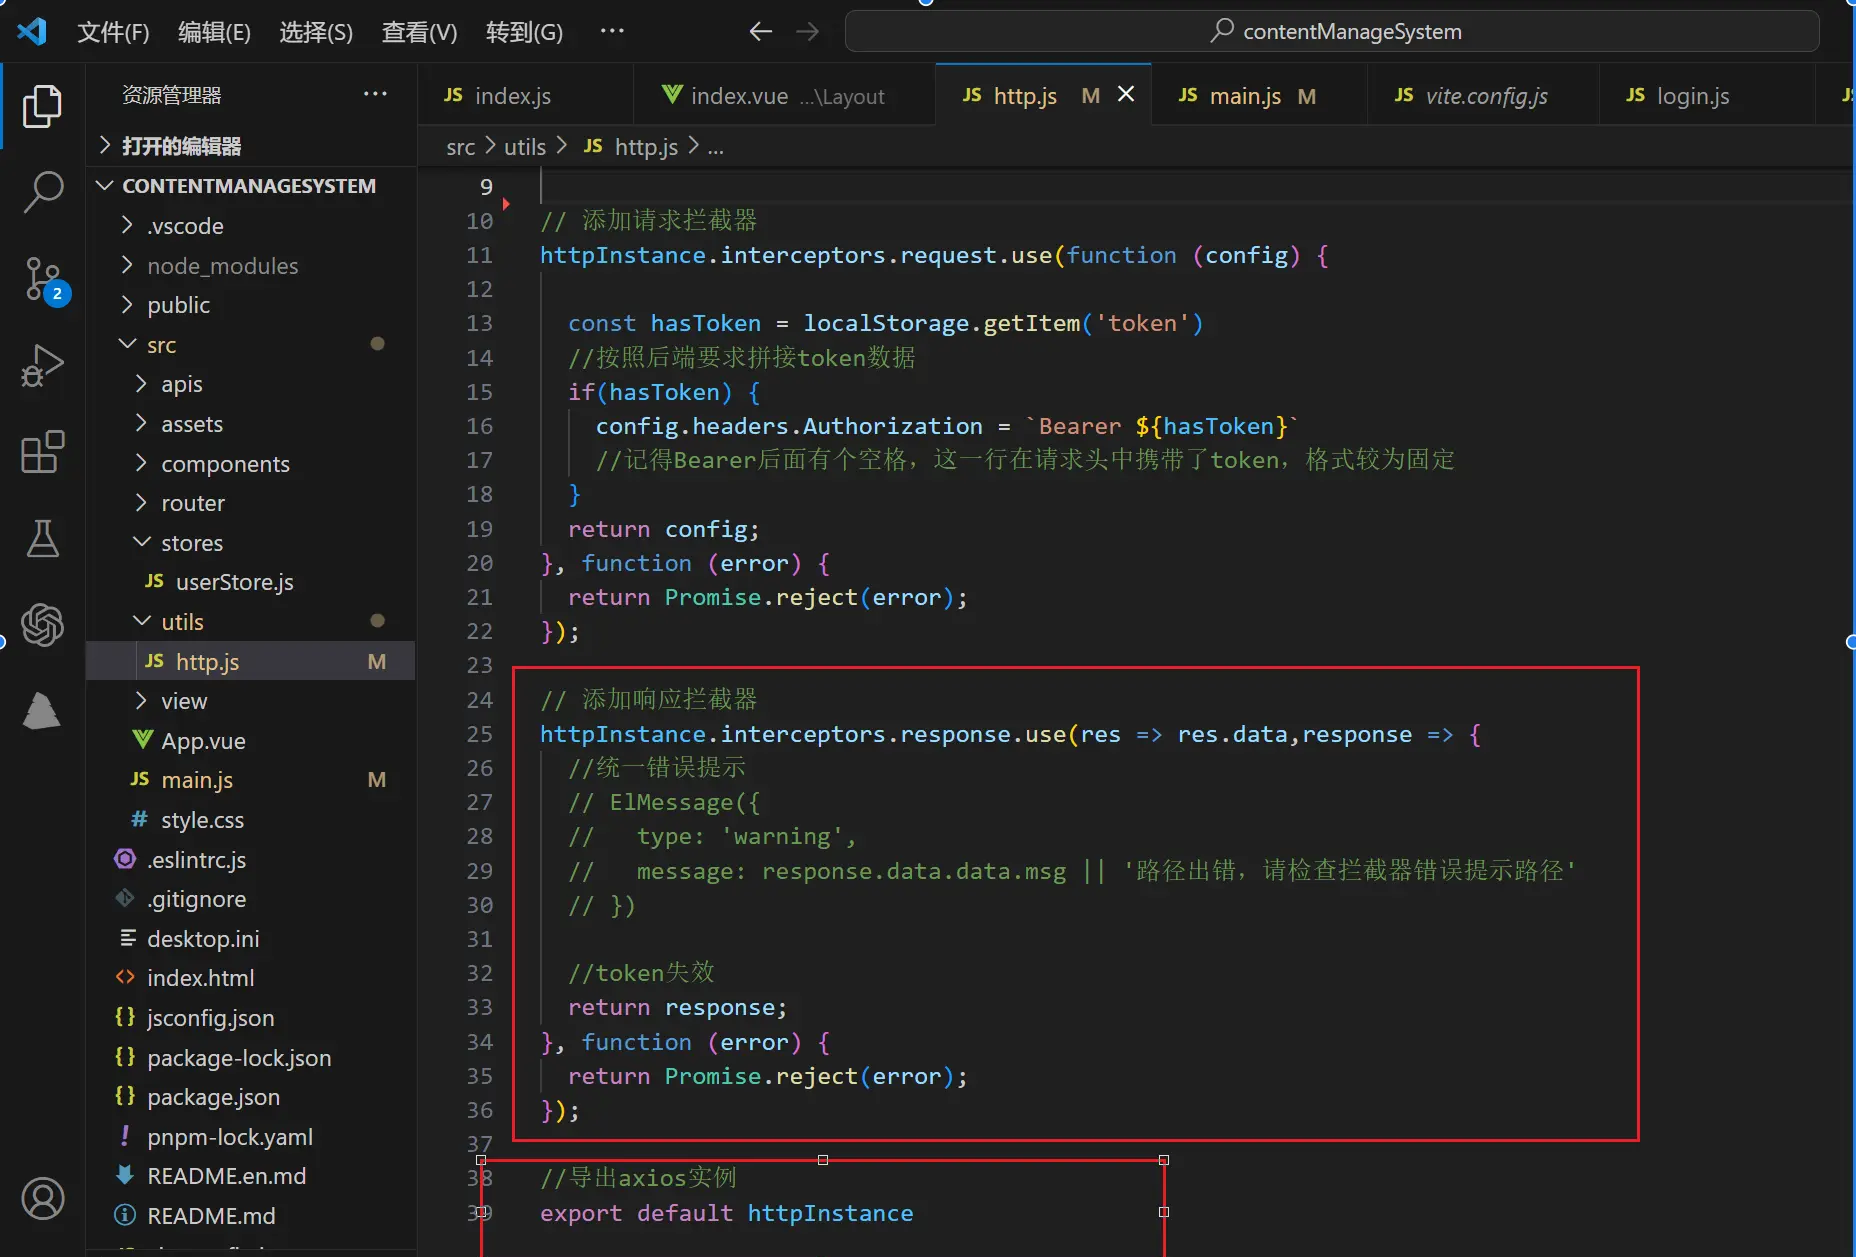
5.3.1.在src目录下新建utils文件夹,再新建http.js文件,在里面创建axios实例以及配置请求拦截器和响应拦截器
5.3.2.在vite.config.js中配置跨域!!!(我原本忘记了这一步,请求数据时才反应过来,大家引以为戒)
target 是后台接口地址(端口号也要写上)。
/api 就是 axios 实例的 baseURL 属性。
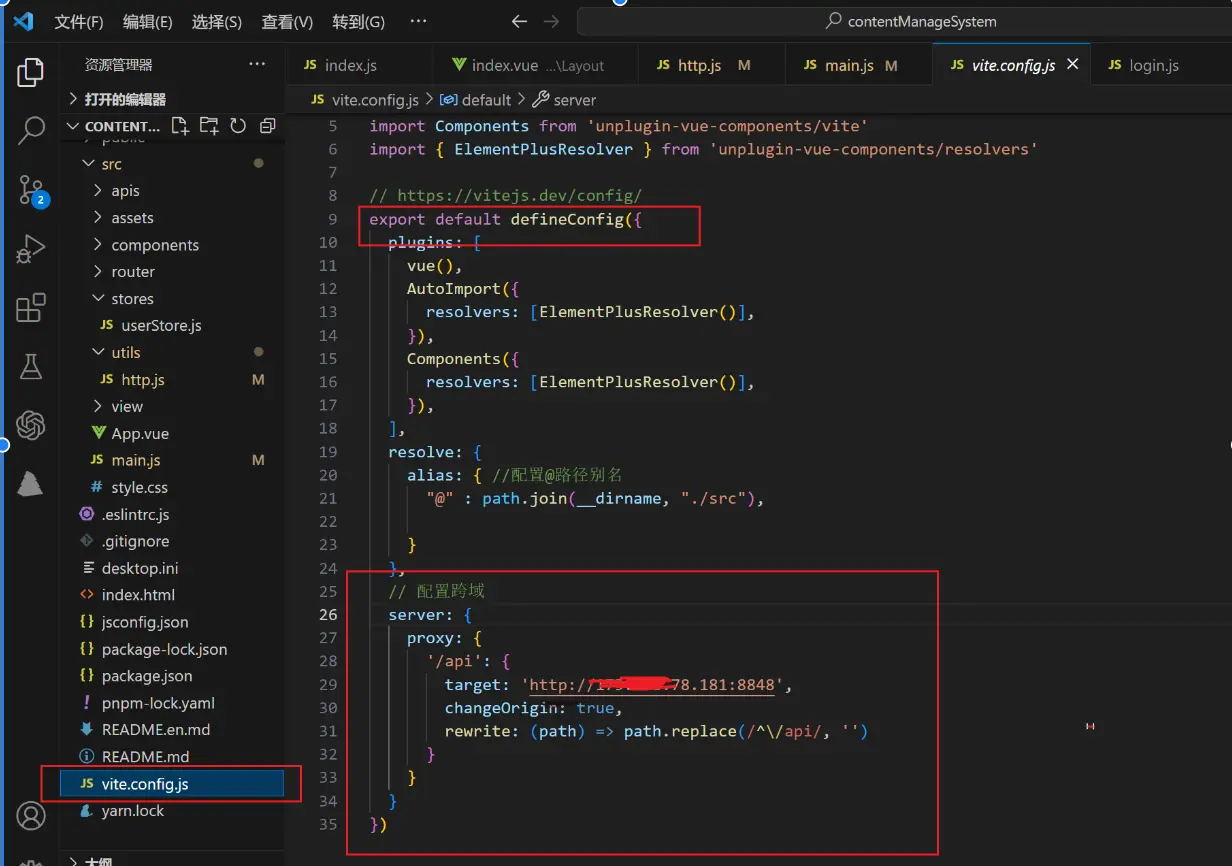
5.3.3.如果不配置跨域的话小伙伴可能会和我一样碰到下面的问题,不要慌,按我上面的操作来即可。

5.4.配置路由
// npm
npm install vue-router --save
// yarn
yarn add vue-router@4
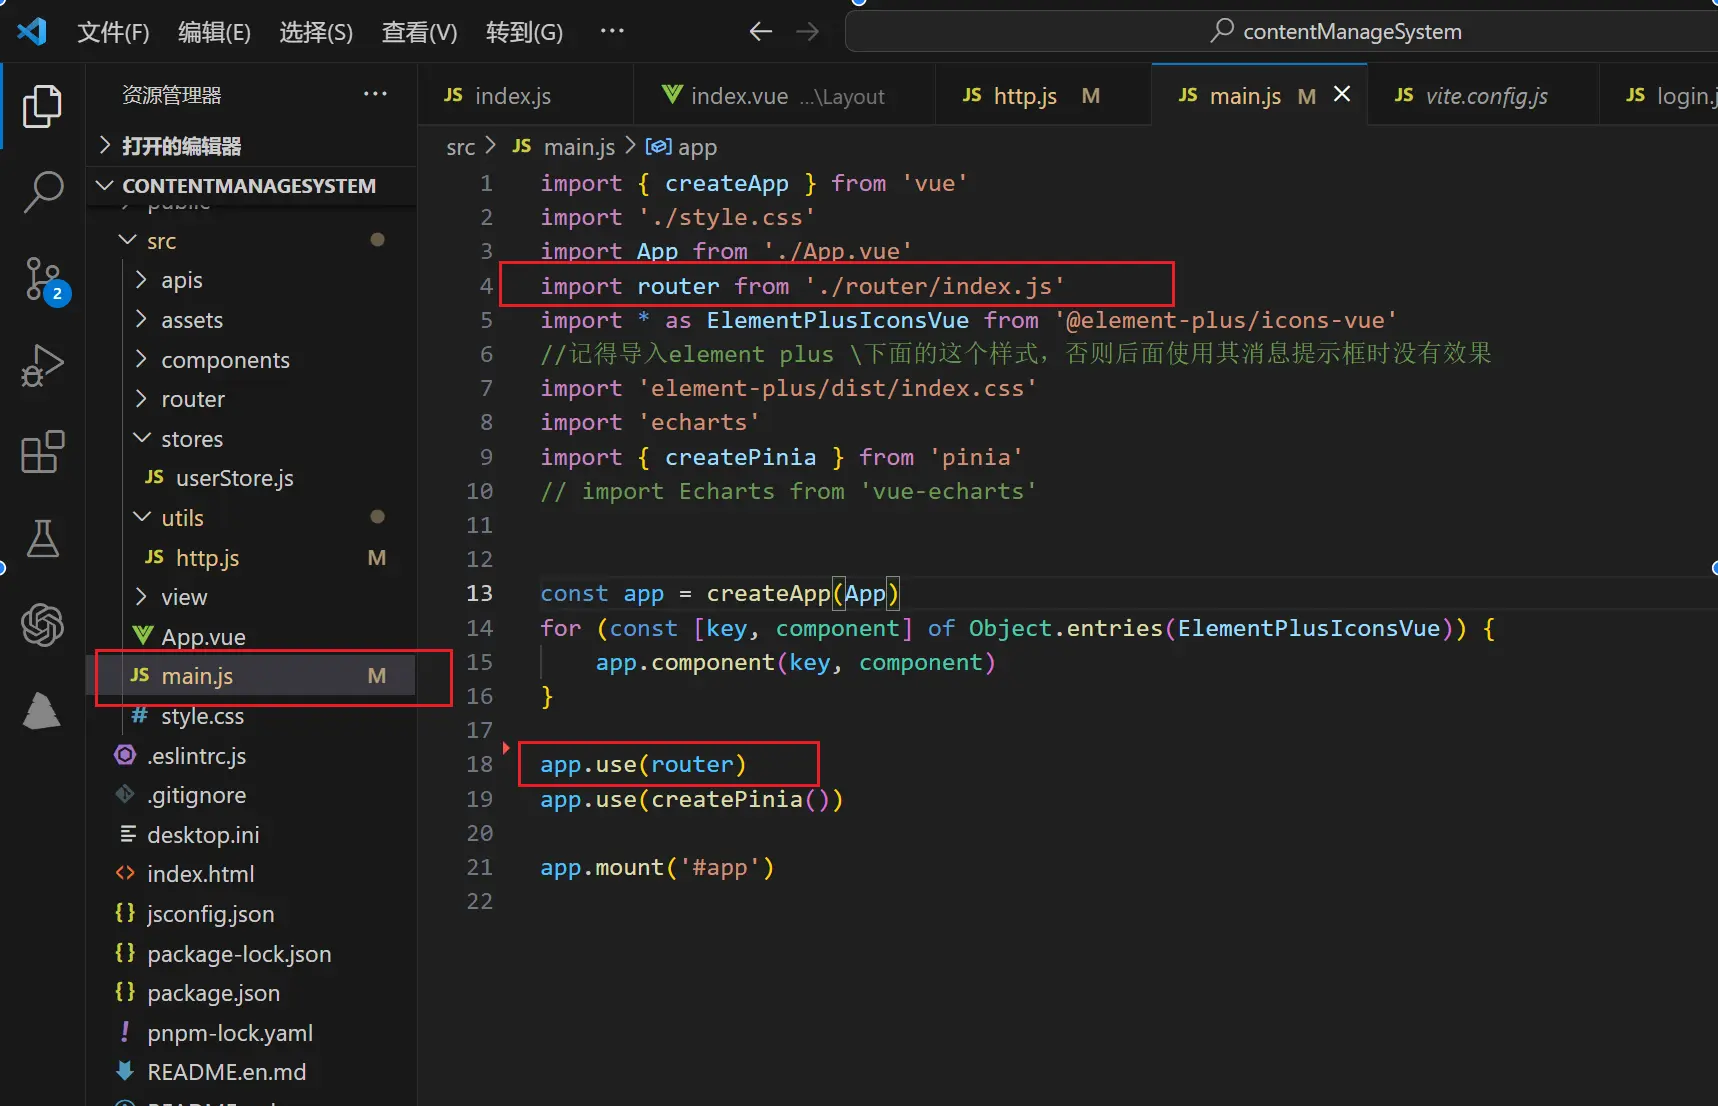
5.4.1.在main.js中引入路由
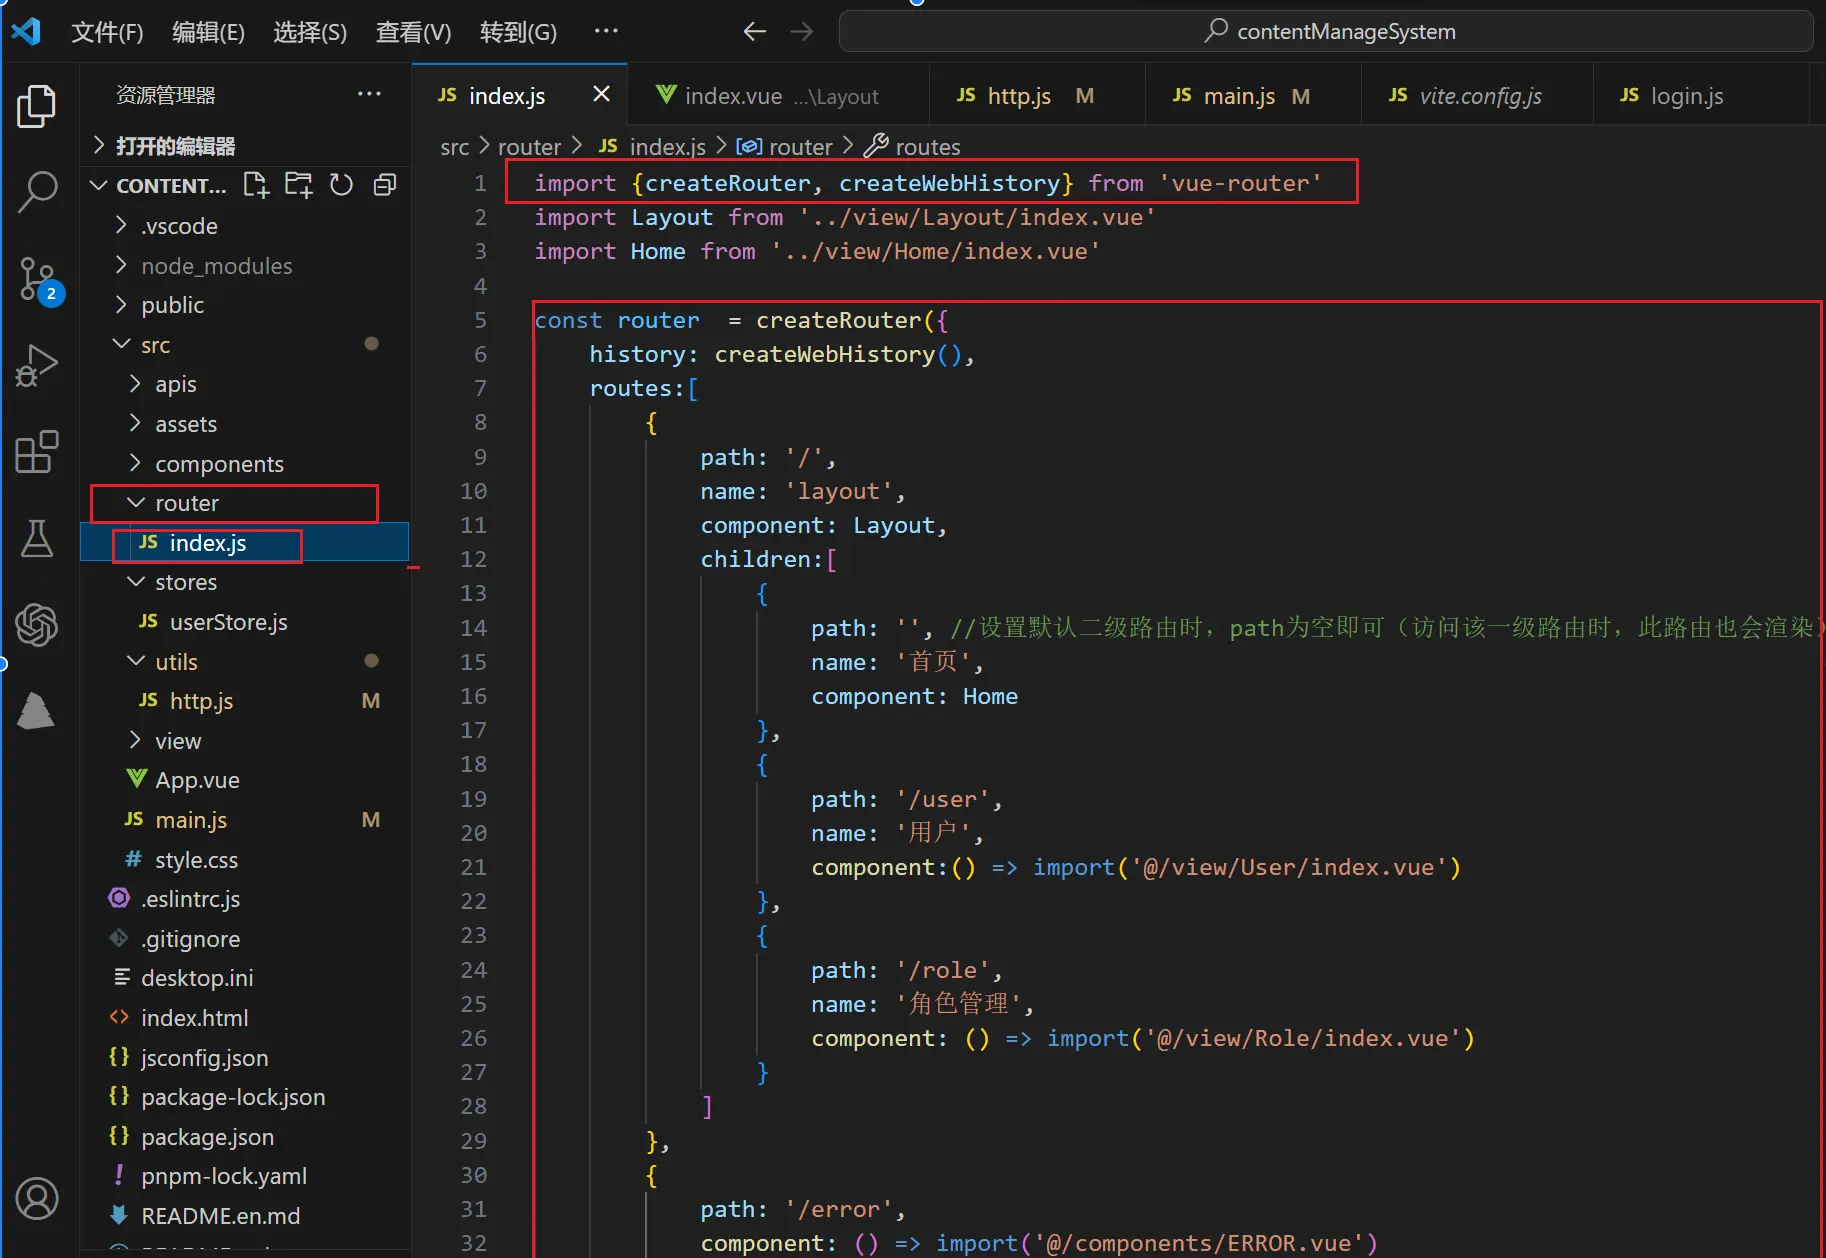
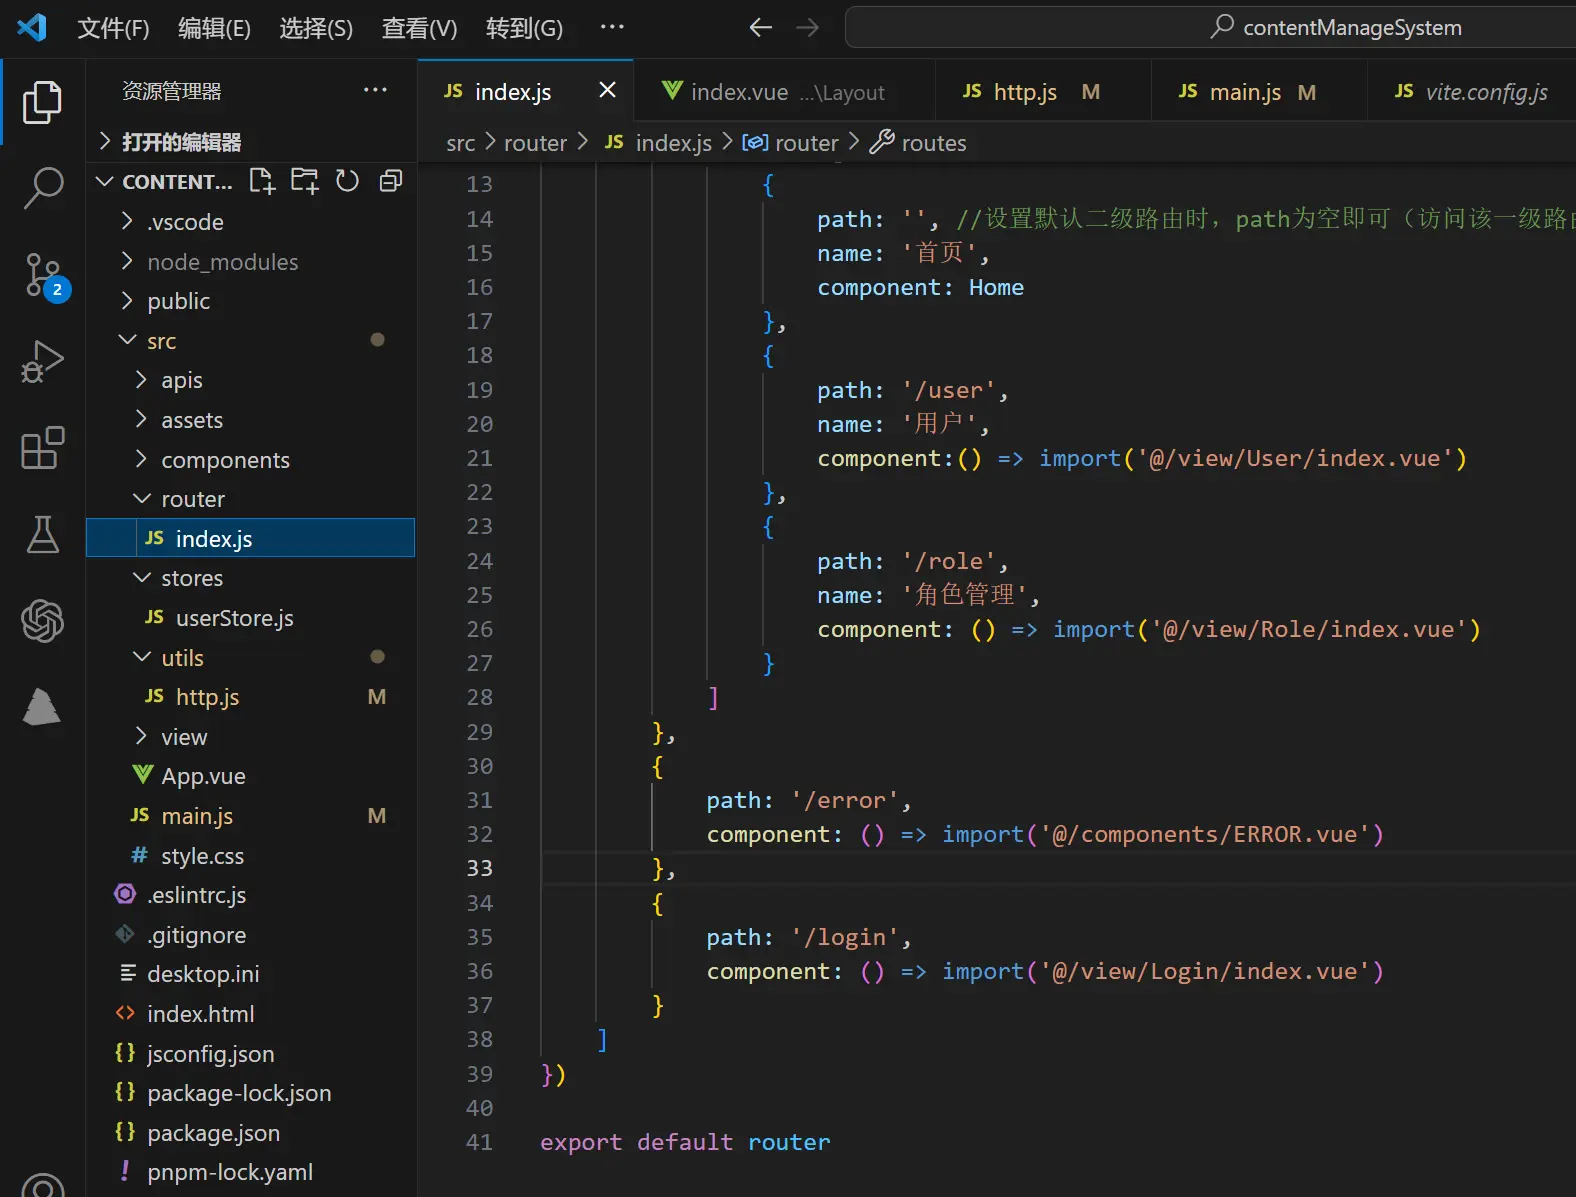
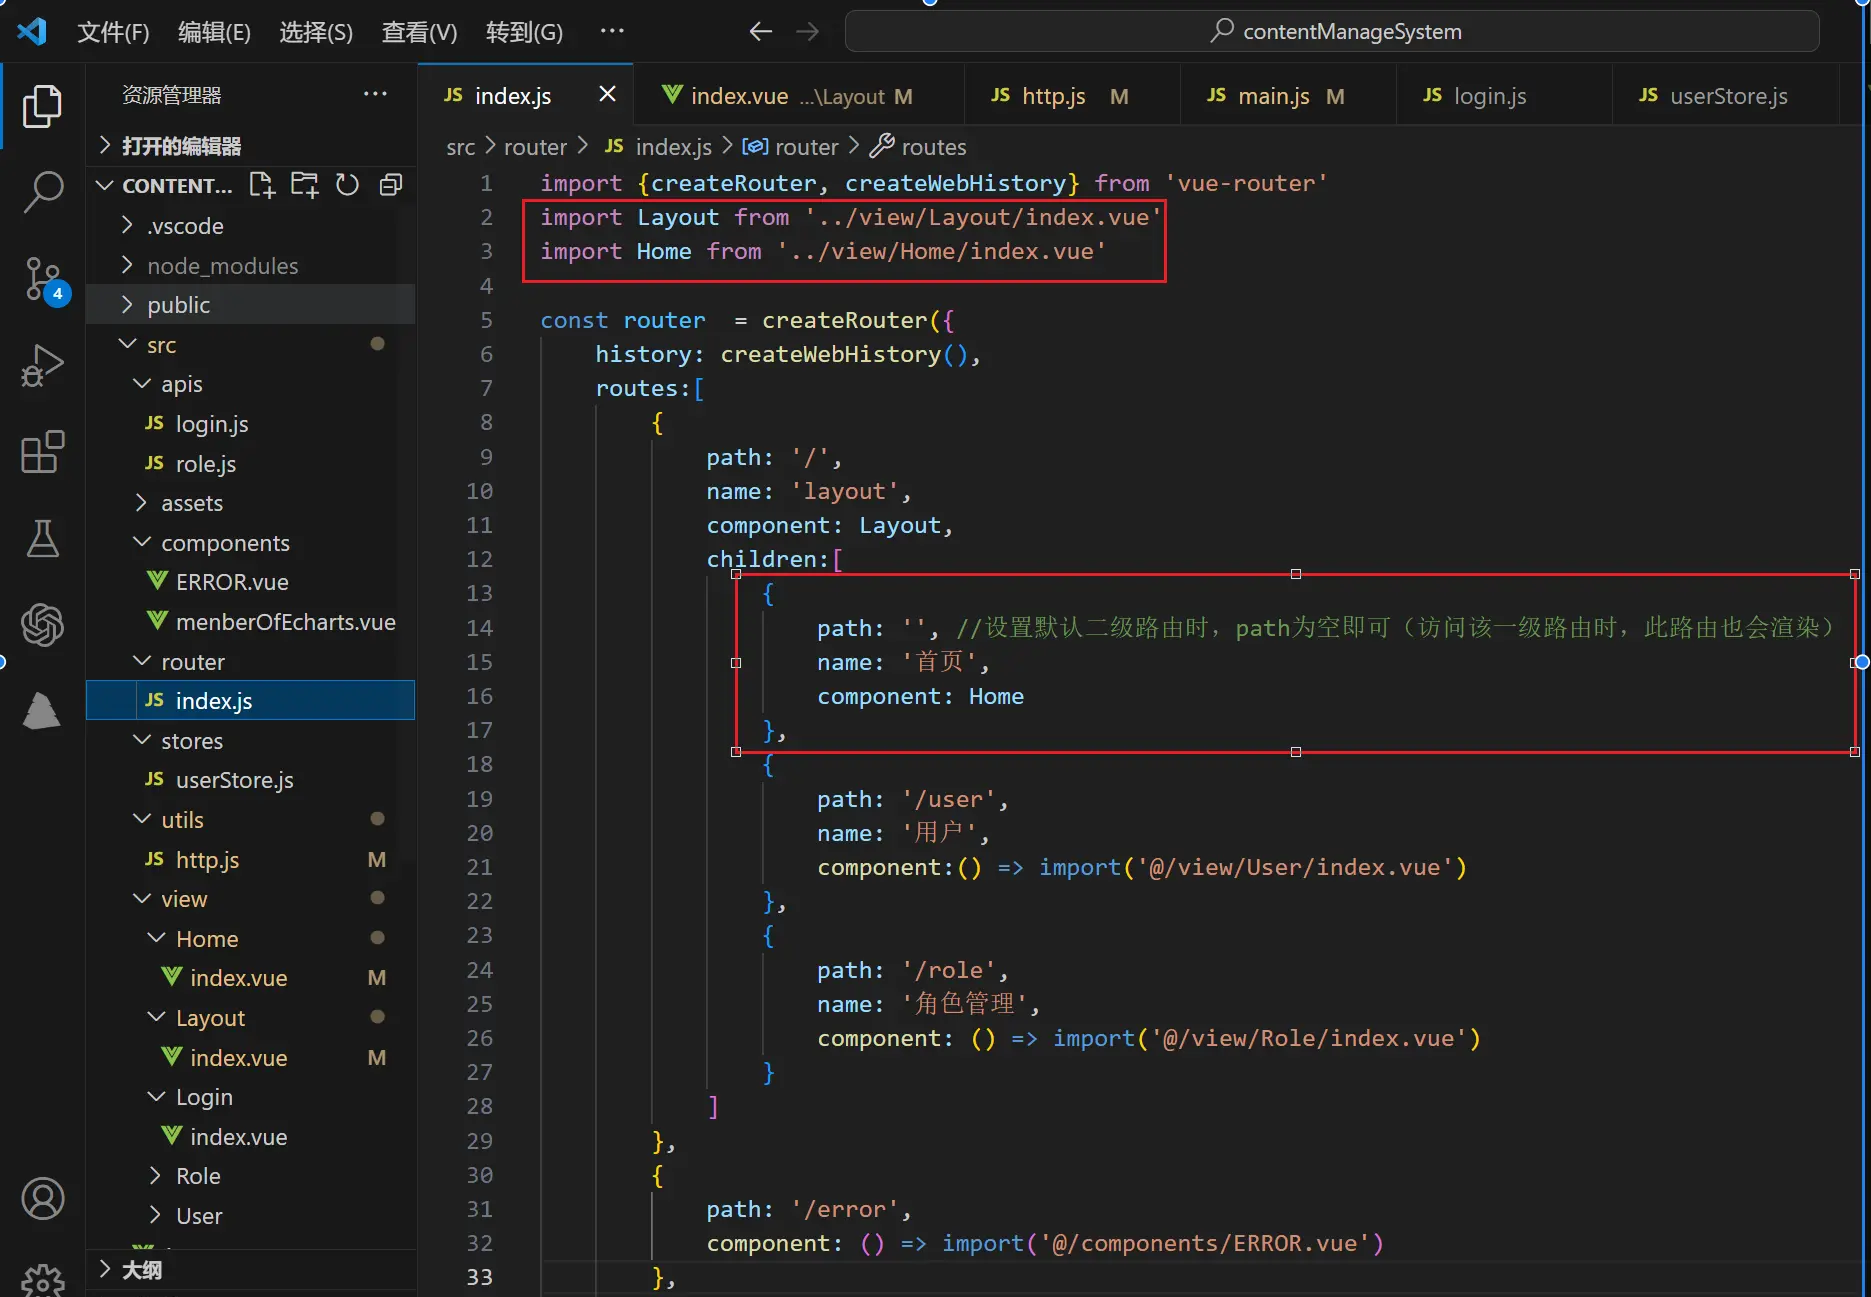
5.4.2在根目录下新建router文件夹,在里面新建index.js(小编在这里其实已经写好了几个页面搭起路由组件了,不过不要紧,后面我会一一说明)
5.5.配置less
解释:Less(Leaner CSS)是一种动态样式表语言,它扩展了普通的 CSS 语法并添加了一些额外的功能。Less 提供了一种更简洁、更灵活的方式来编写样式表,并具有一些高级功能,如变量、嵌套规则、混合(Mixin)等。Less 的主要目标是简化 CSS 的编写和维护过程。它通过引入变量来实现样式的重用和可维护性,通过嵌套规则来组织样式结构,以及通过混合来实现样式的复用和组合。这些功能使得 Less 更加灵活、易于管理和扩展。
npm install -g less
六.搭建登录页
6.1.在view下新建Login文件夹,里面新建index.vue
6.1.1.搭建页面结构
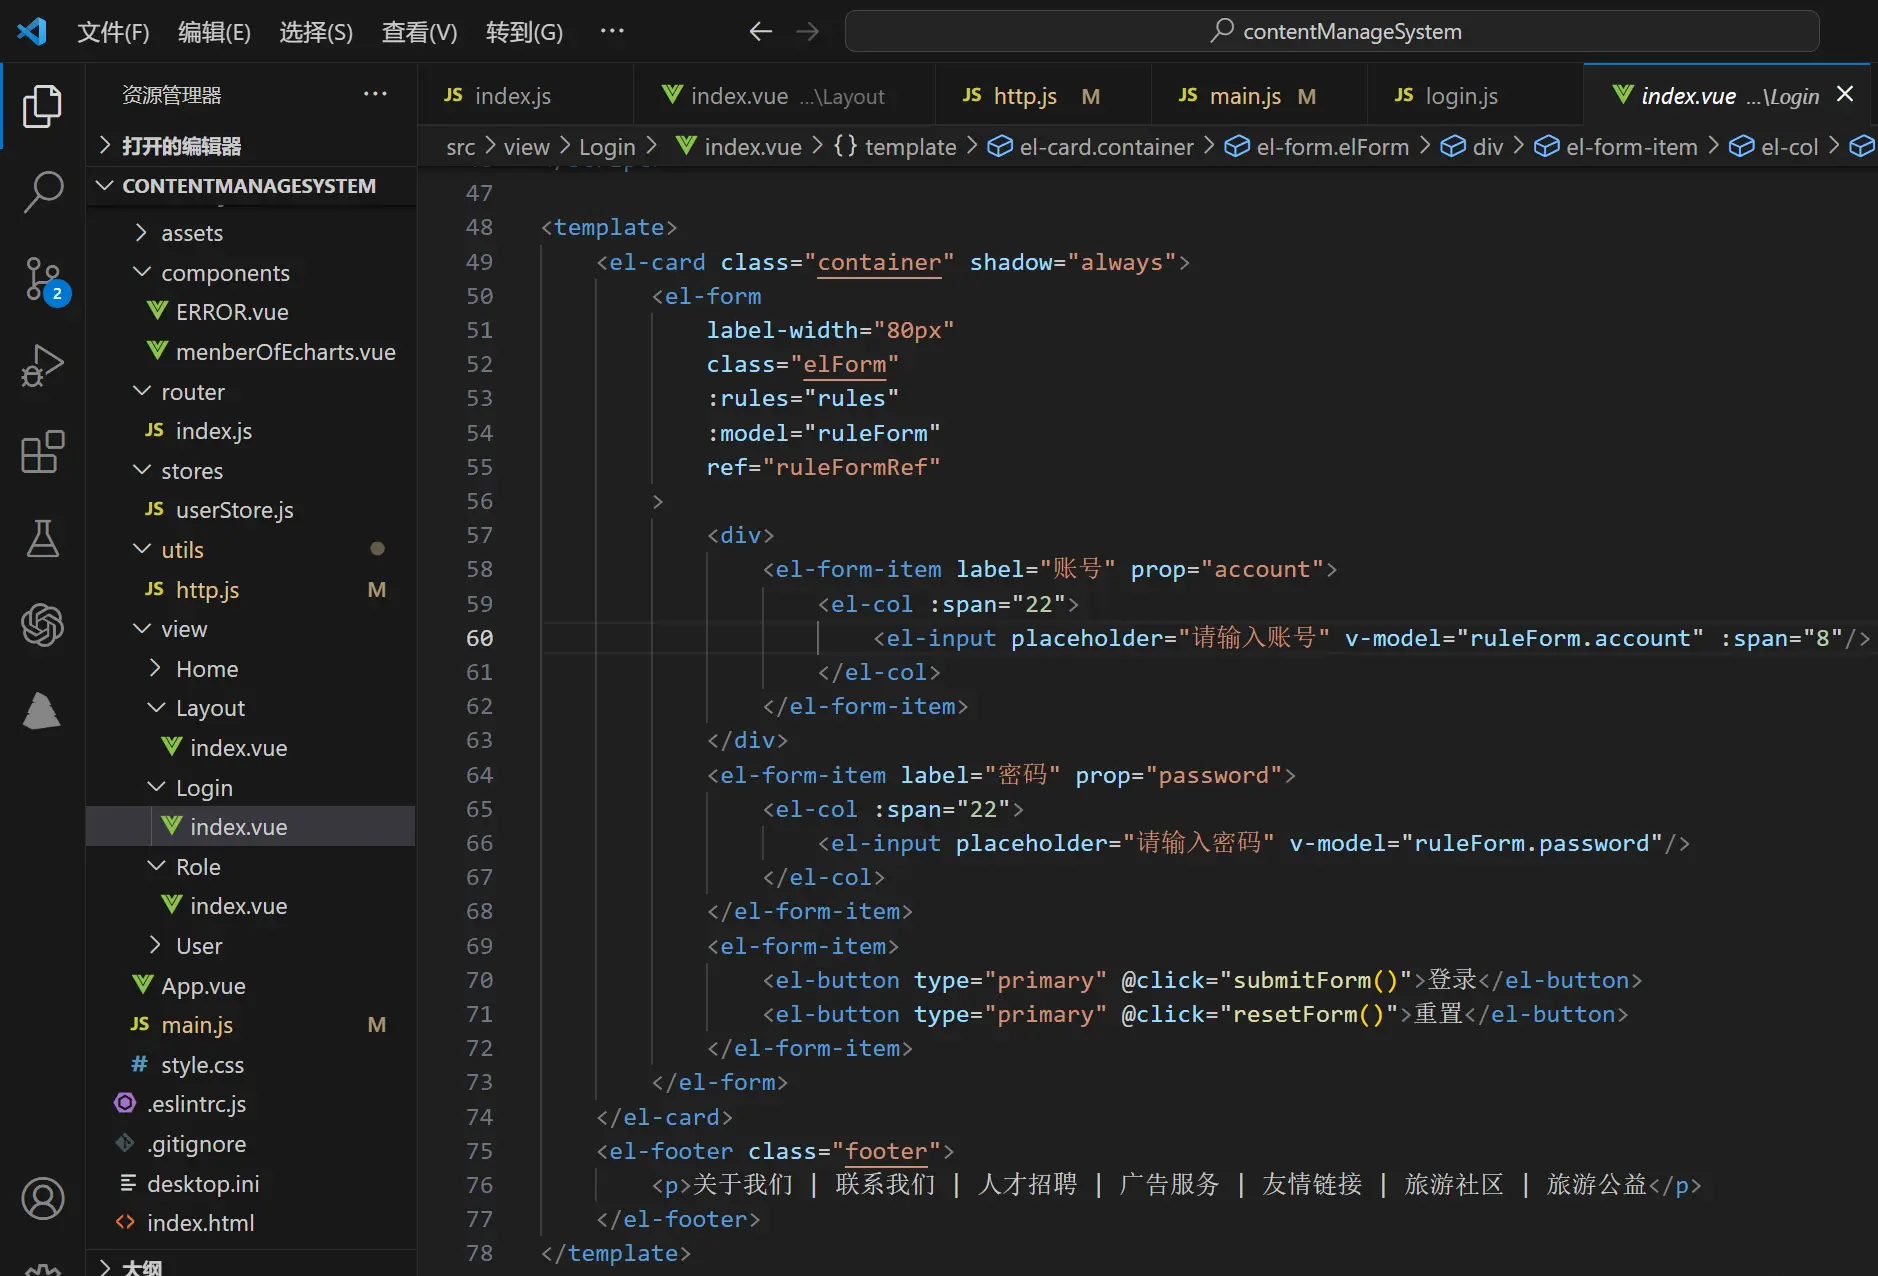
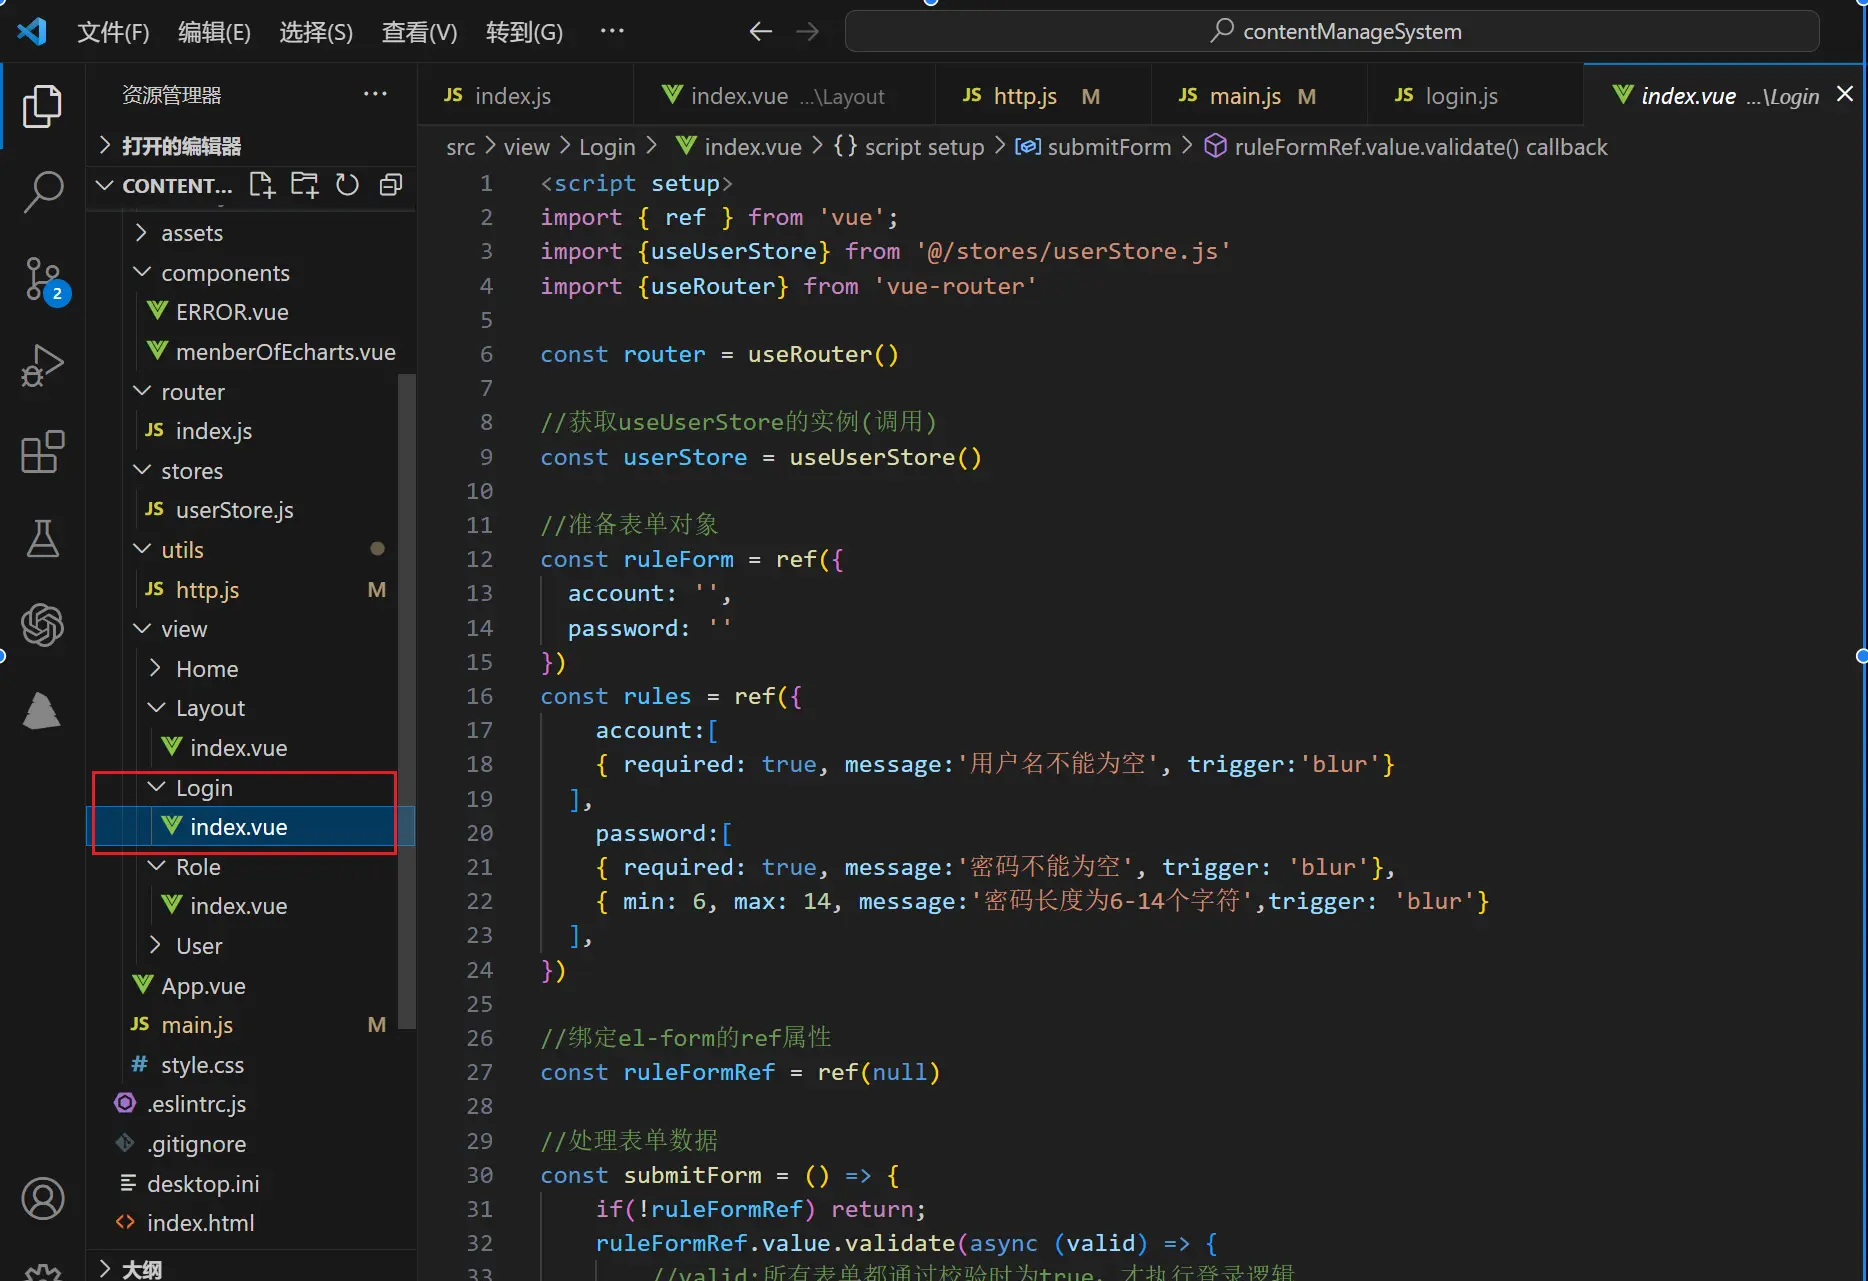
6.1.2.准备表单对象 && 表单验证规则 && 绑定el-form的ref属性
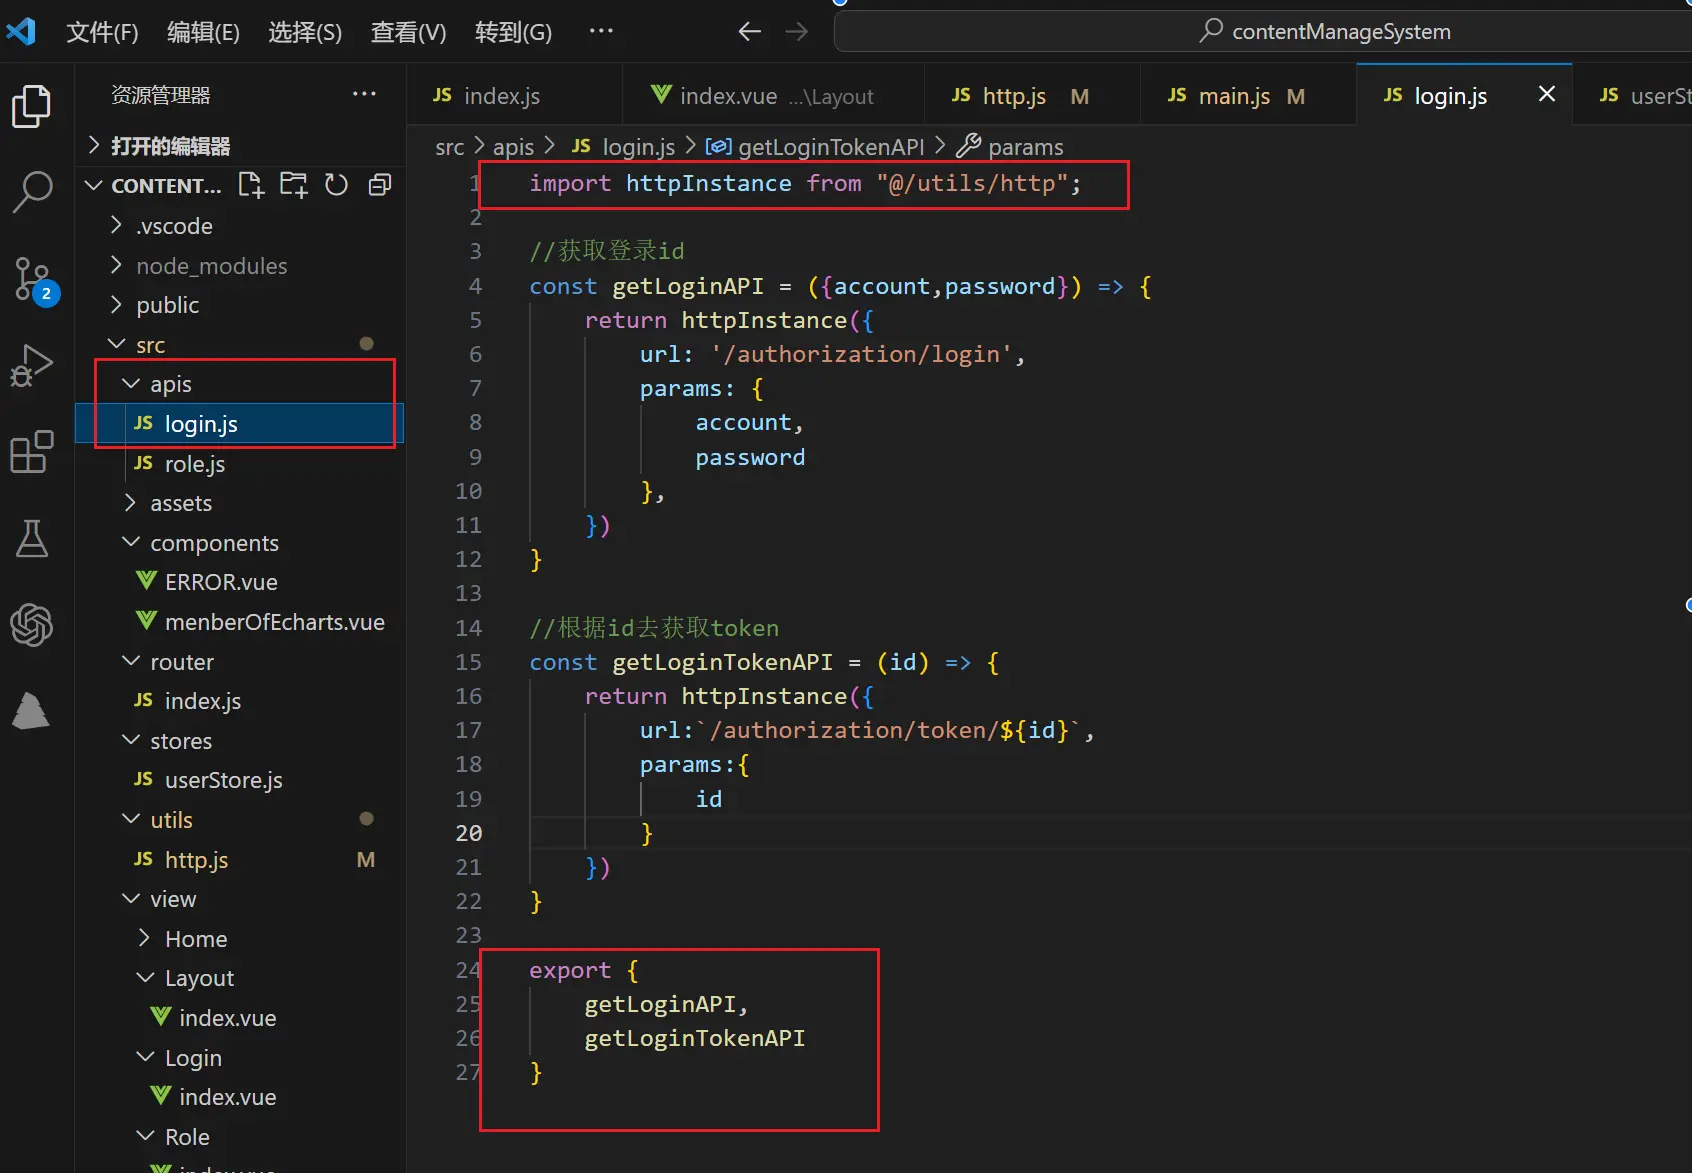
6.1.3.在src下新建一个apis文件夹,新建一个login.js,封装登录所需的接口
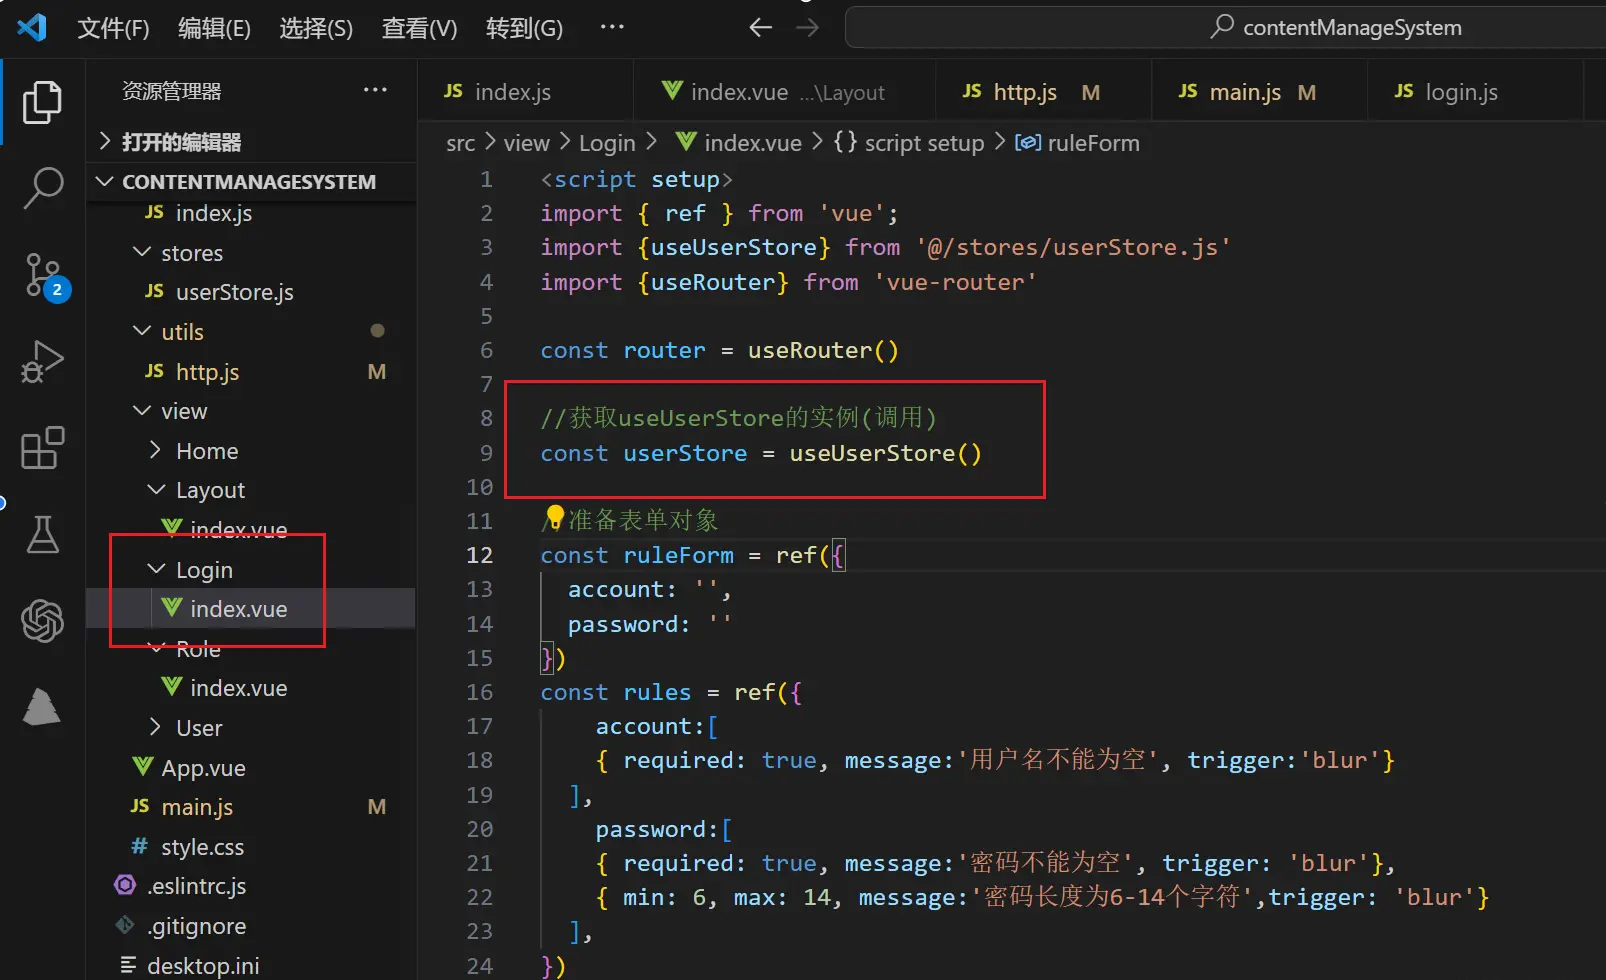
6.1.4.在src下面新建一个stores文件夹,对数据进行统一管理(pinia),里面再建一个userStore.js,用来统一管理用户相关的数据,其实单纯登录这里我觉得没必要单独放到pinia中保存,在登录页也可以实现这一整套逻辑(这个接口主要是获取并保存token),小编这里主要是为了复习知识点…

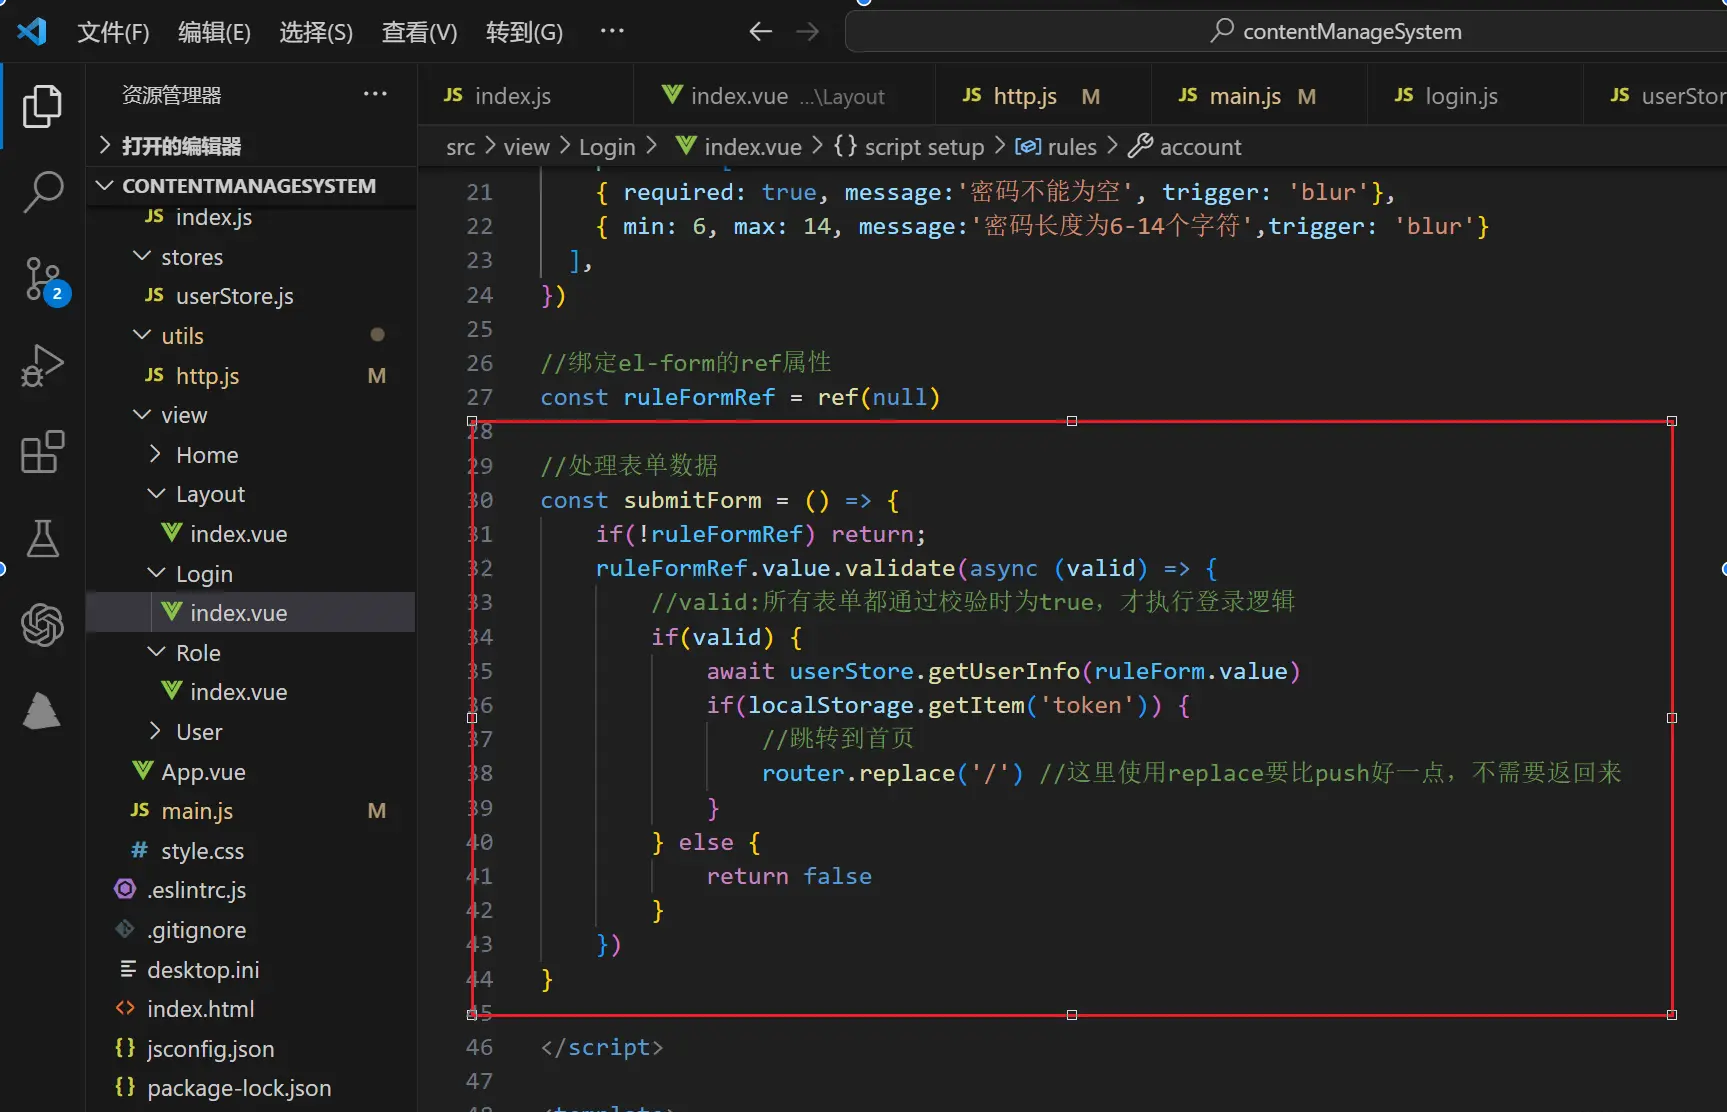
6.1.5.调用pinia中的action函数 && 处理表单数据
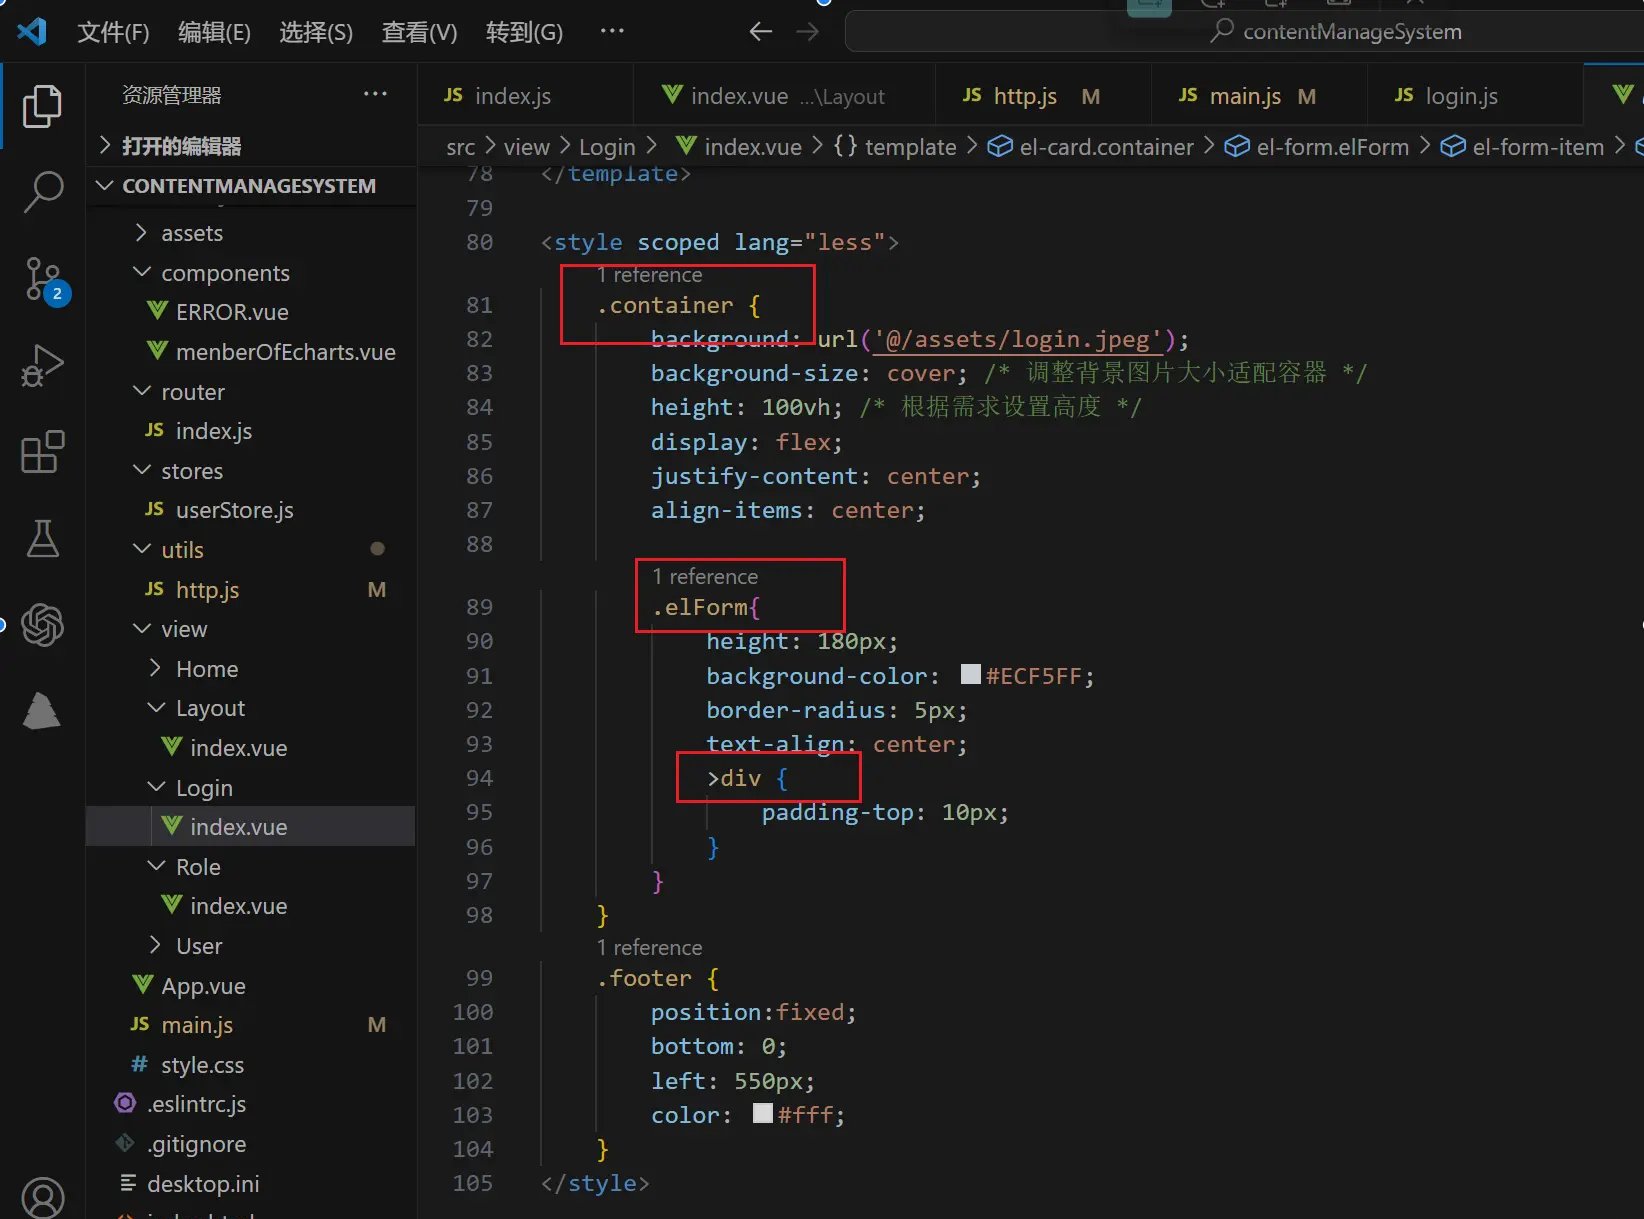
6.1.6.下面我附一张登录页面的样式设置,怕有的小伙伴不知道我5.5配置less有什么作用,如图所示,我举一个例子,类名elForm实在类名为container的内部的,所以我把elForm嵌套在container样式的大括号的作用范围内,是不是感觉很香呢?因为我们到后期维护样式的时候,我们知道这个样式是在哪个容器之内的话,就可以到相应的容器内查找啦,而不是像原生的样式一样的并列的写法,不方便维护,不同容器也可能出现变量名冲突,影响我们的正常开发。
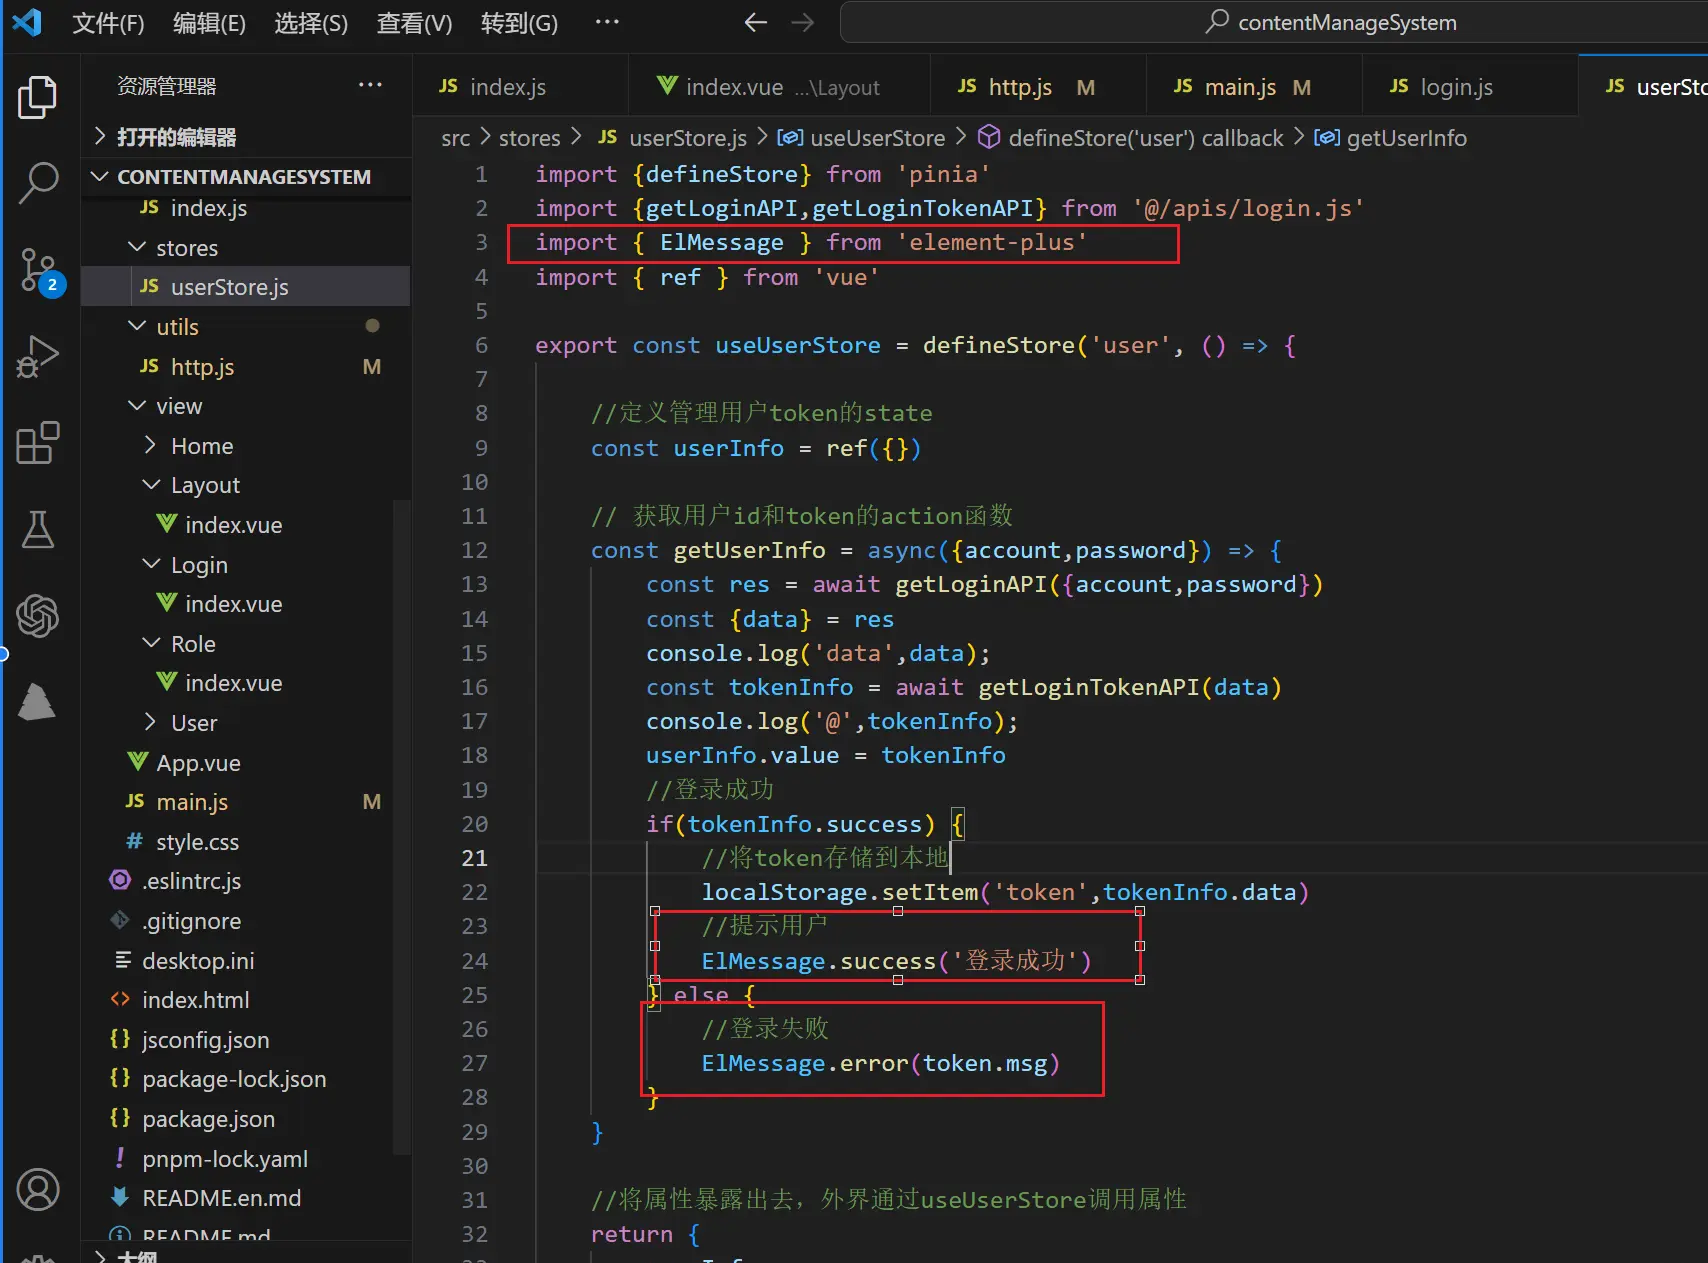
6.1.7.登录成功或者失败后的消息提示(注意,element plus的消息提示框需要额外引入)
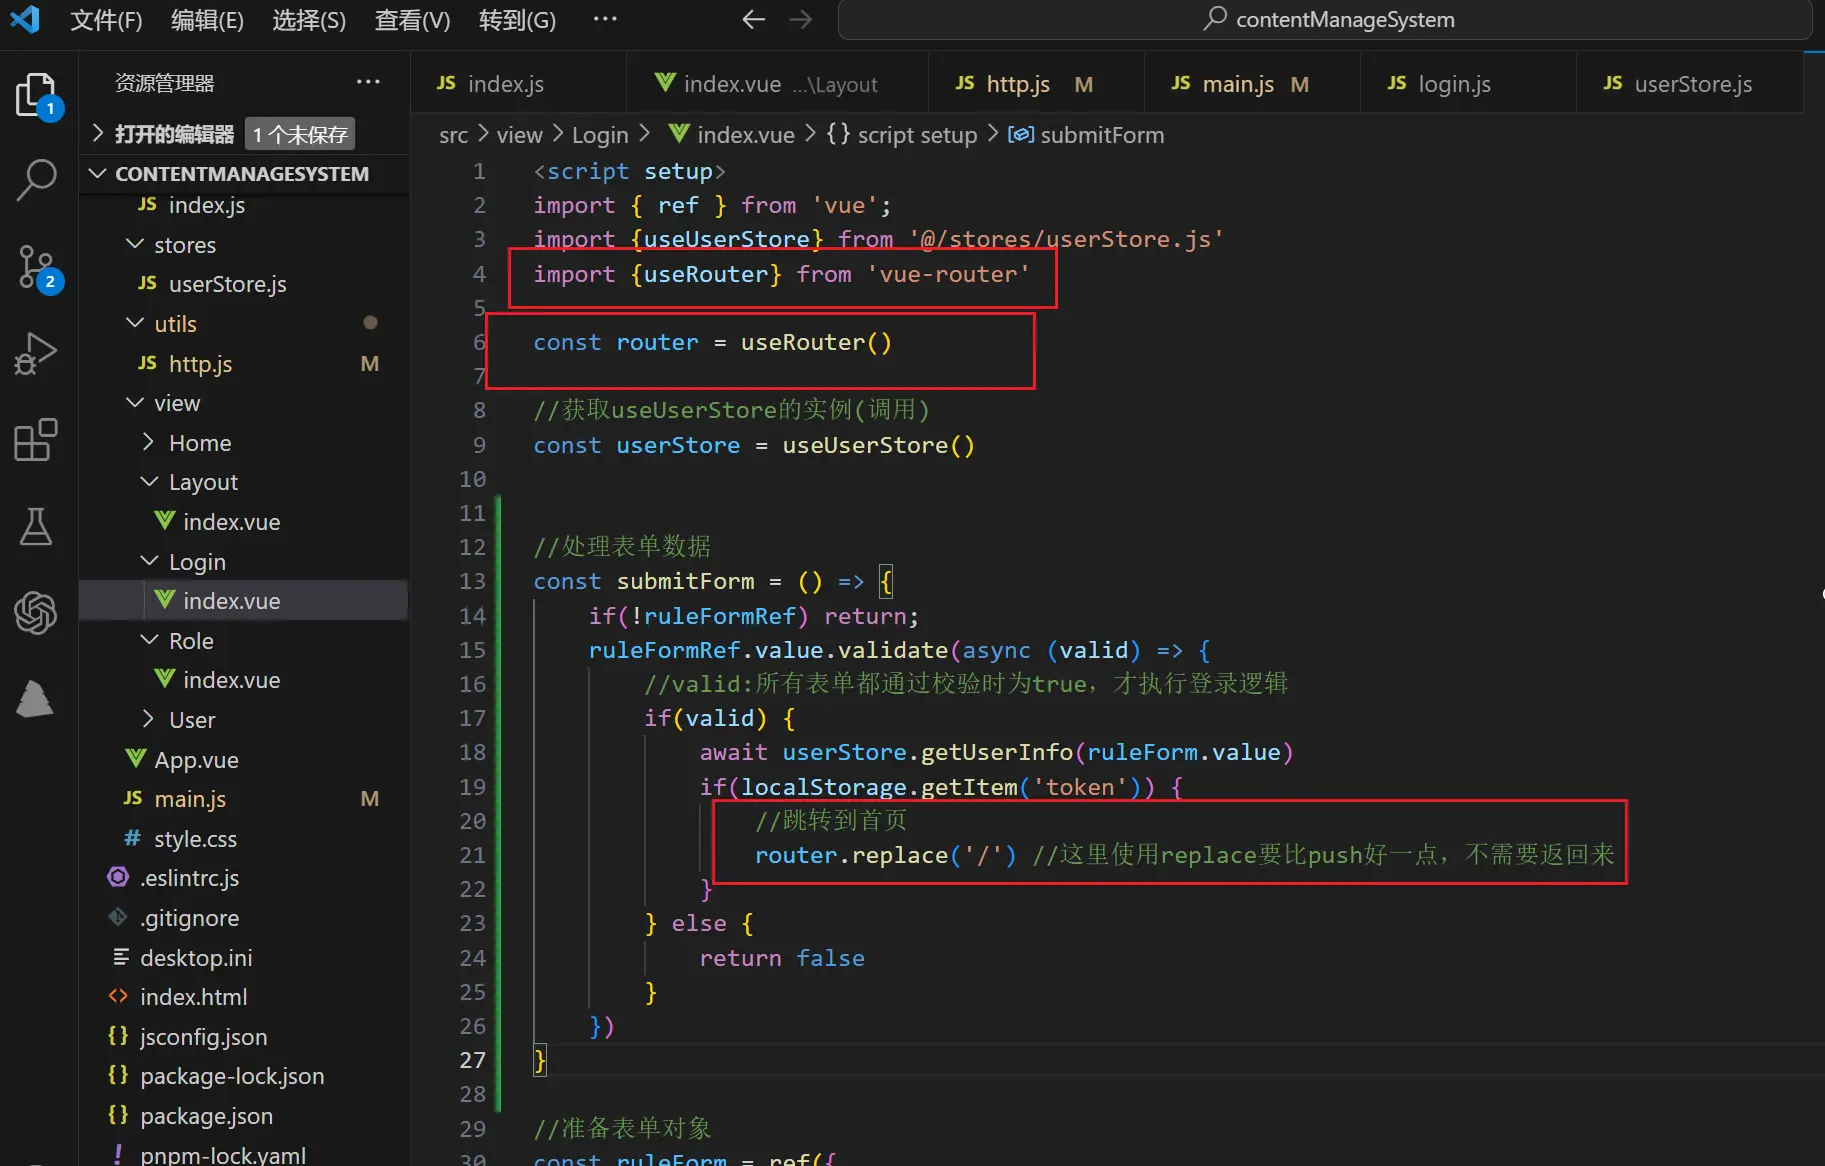
6.1.8.登录成功后的页面跳转(注意:在 vue3 中没有 this 变量了,所以页面跳转需要导入 router)
七.首页搭建
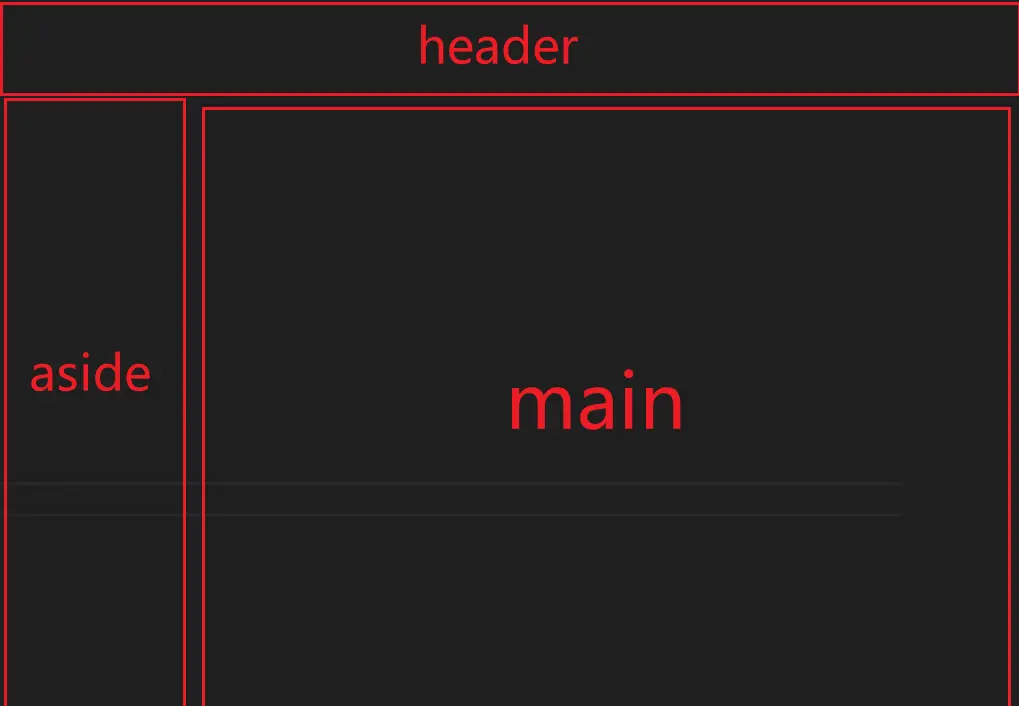
7.1.1. SPA的页面设计比较简单,在view下创建Layout和Home文件夹,里面又分别创建index.vue文件,我这里的思想就是Layout是这个页面的整体结构,home主页面放在了下图的mian区域。
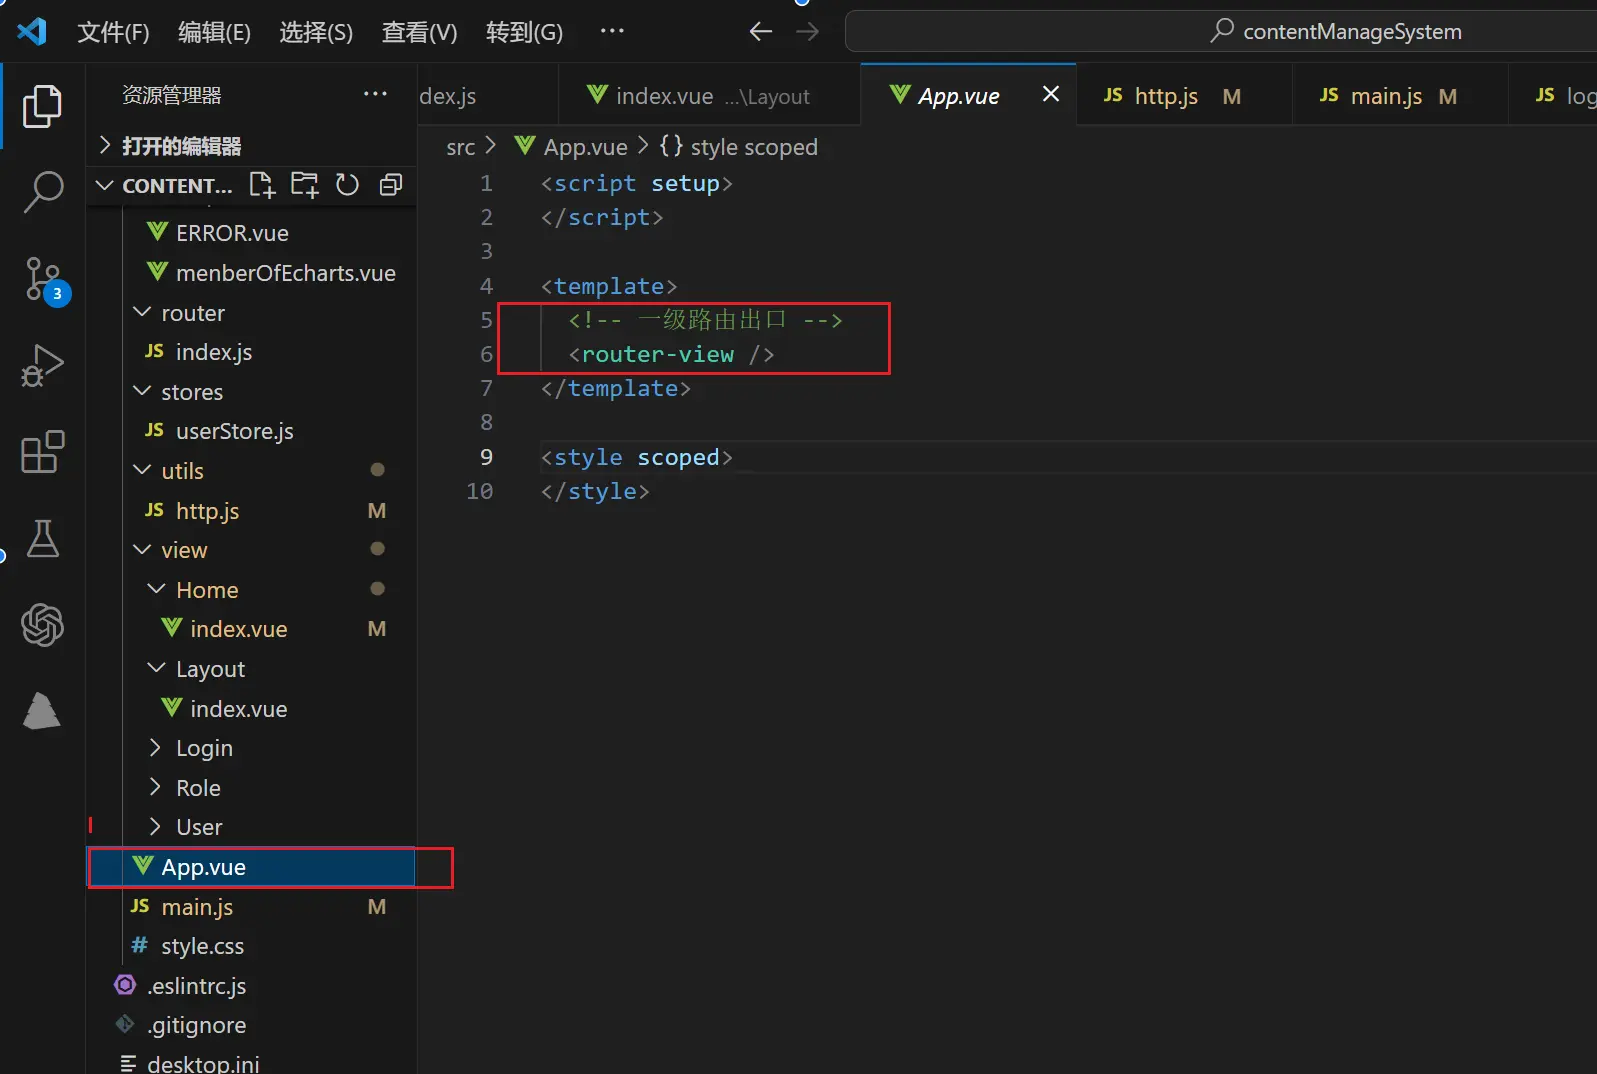
先在App.vue中配置好Layout的路由出口:
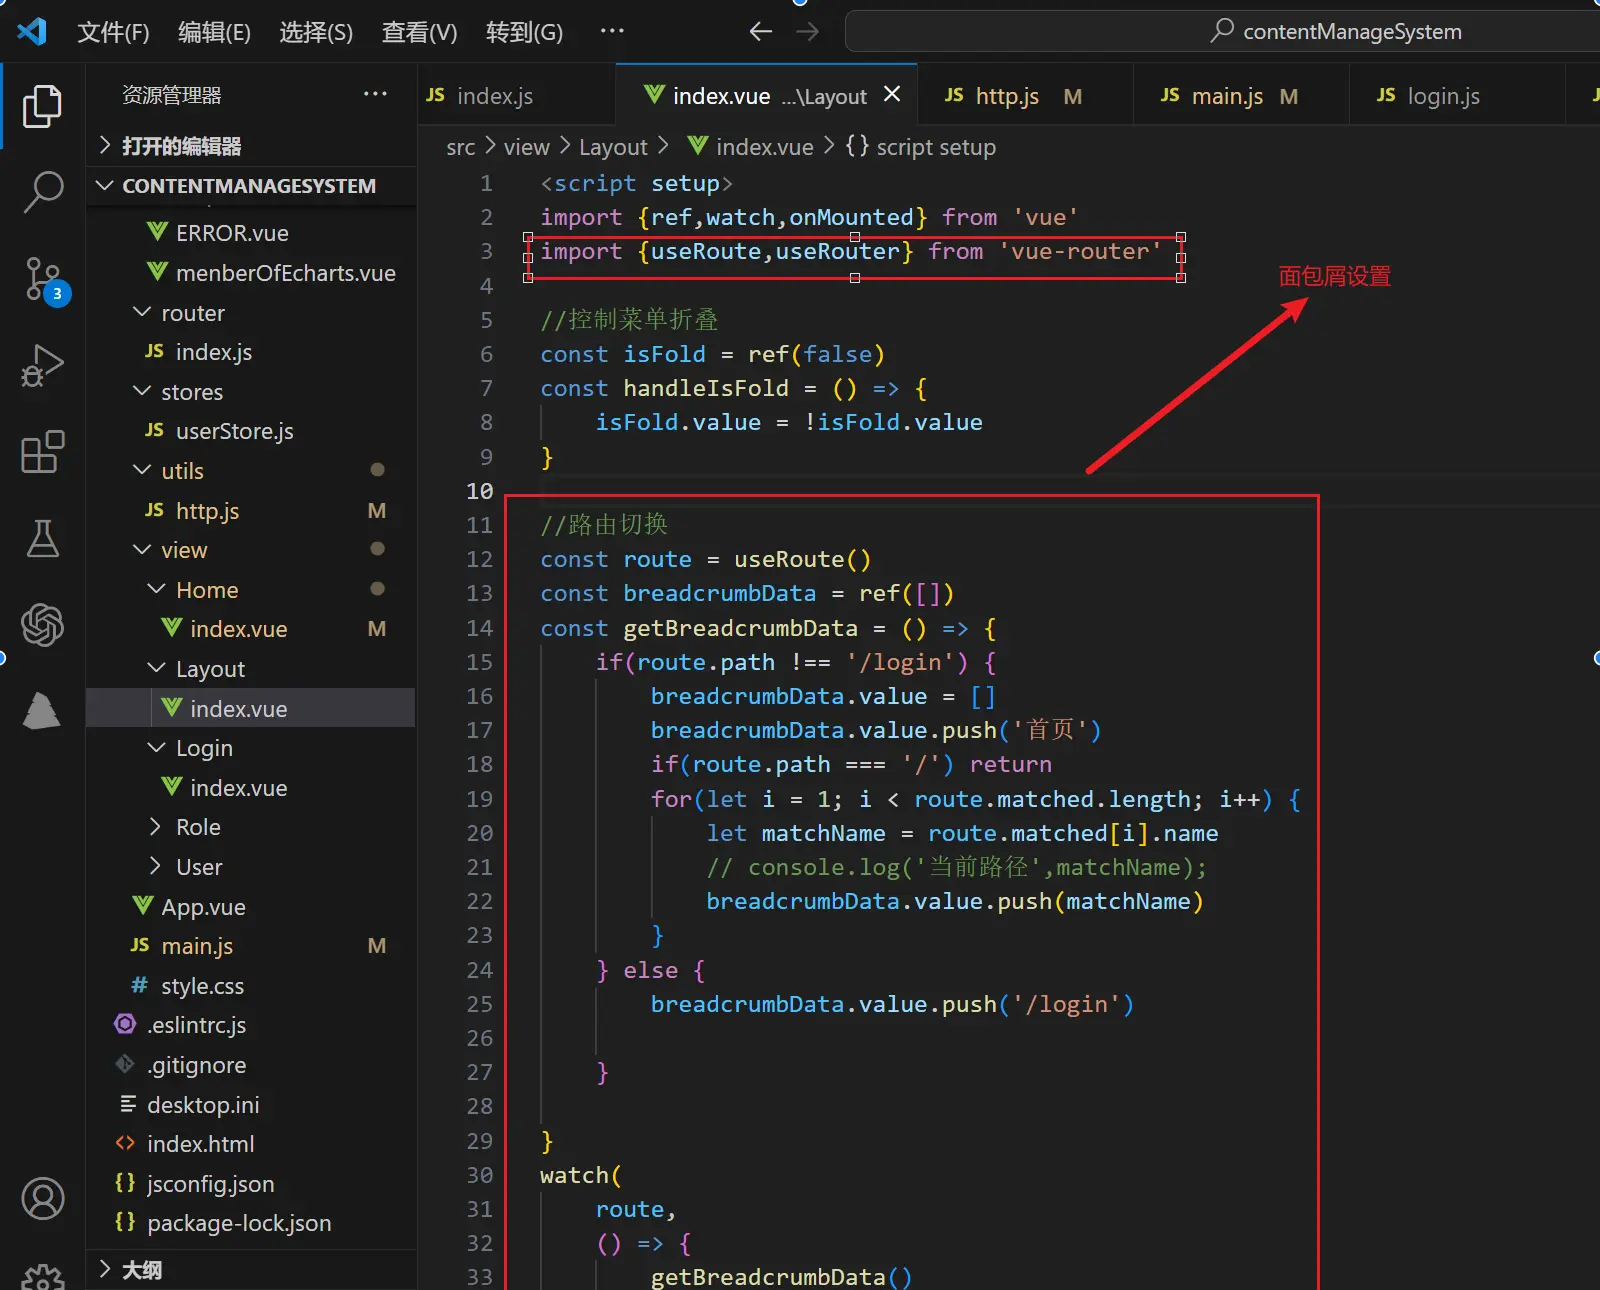
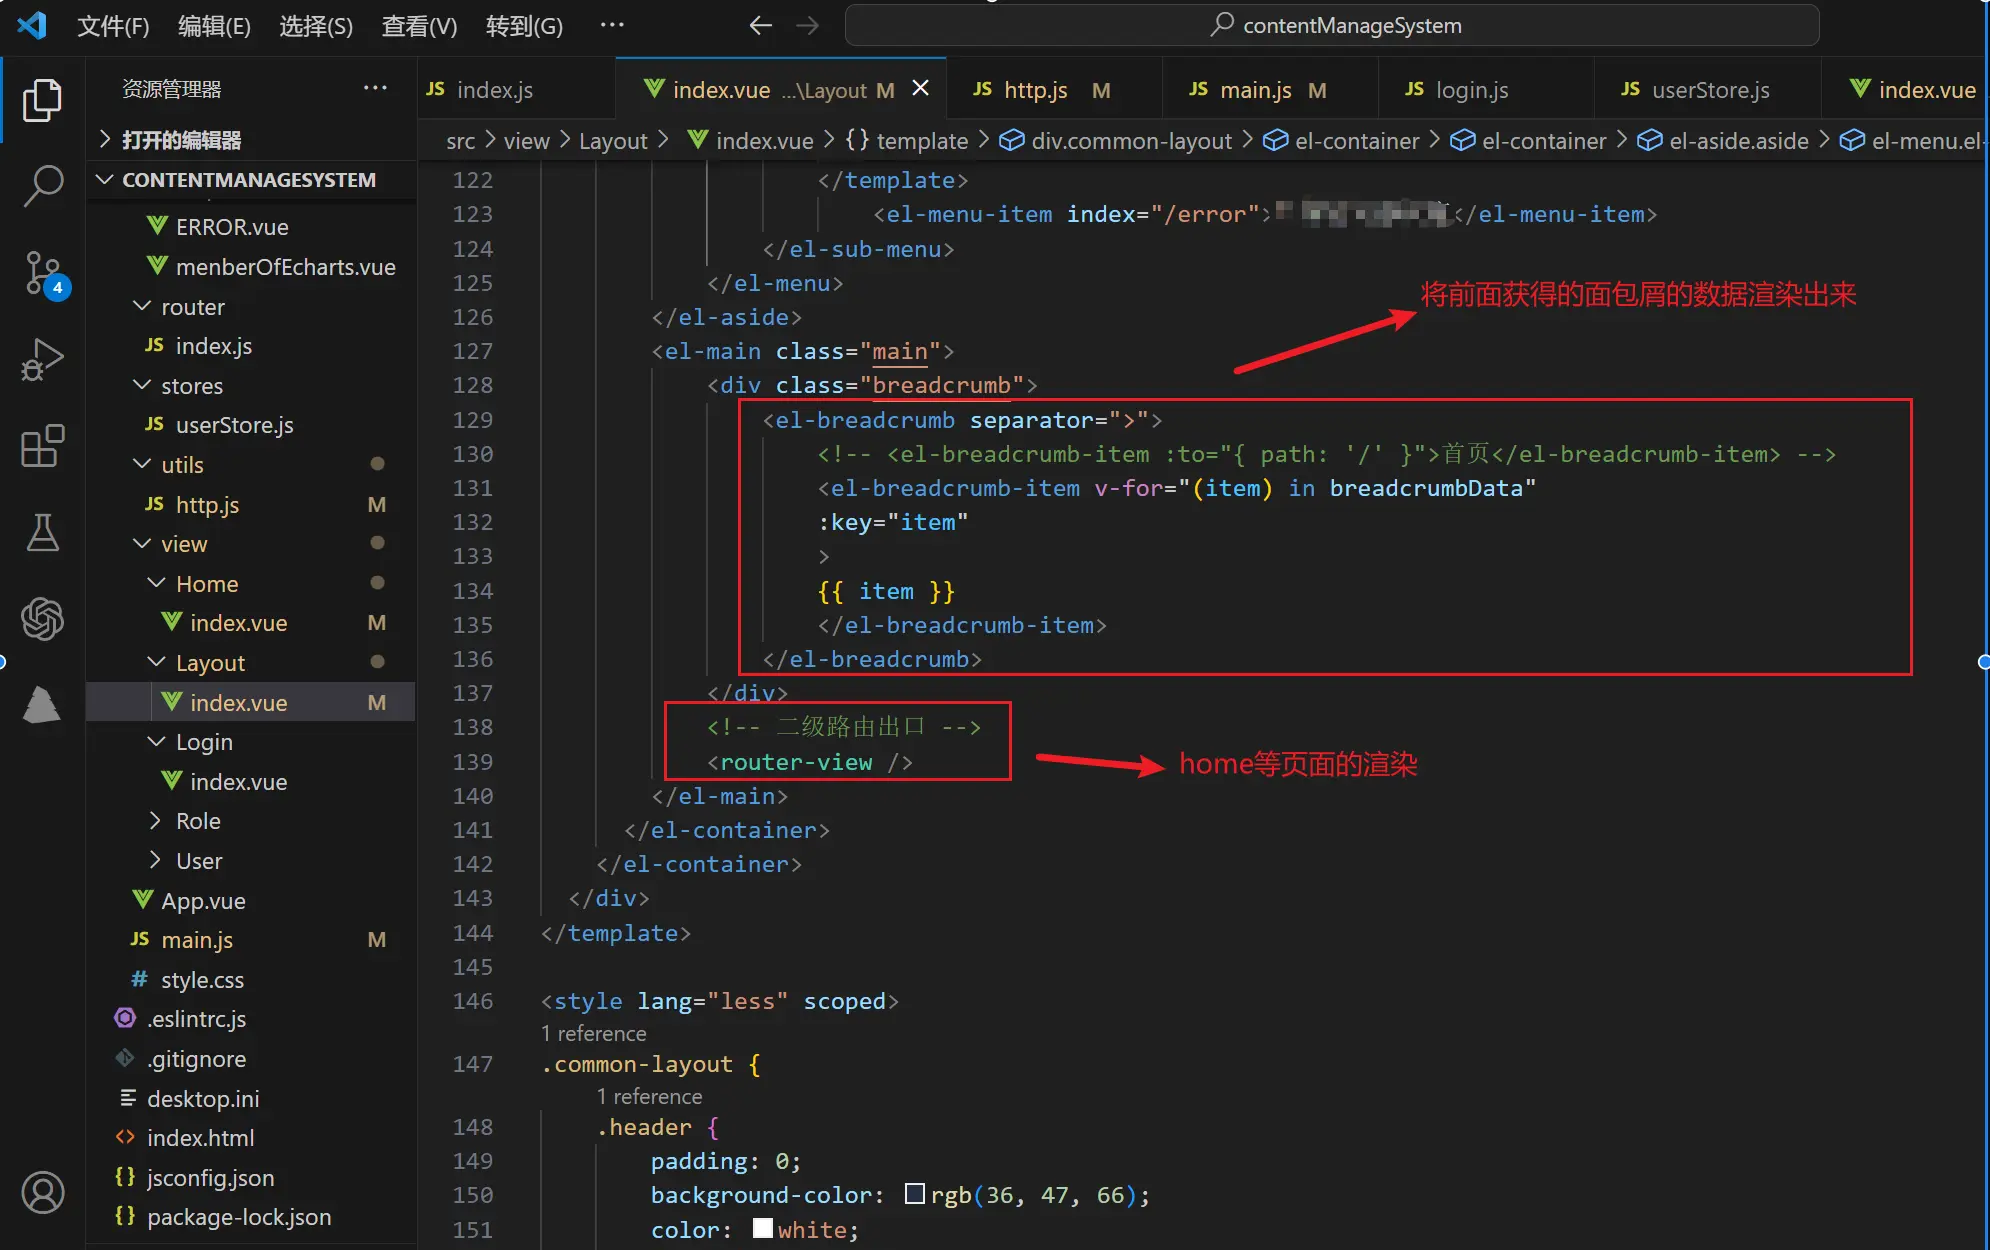
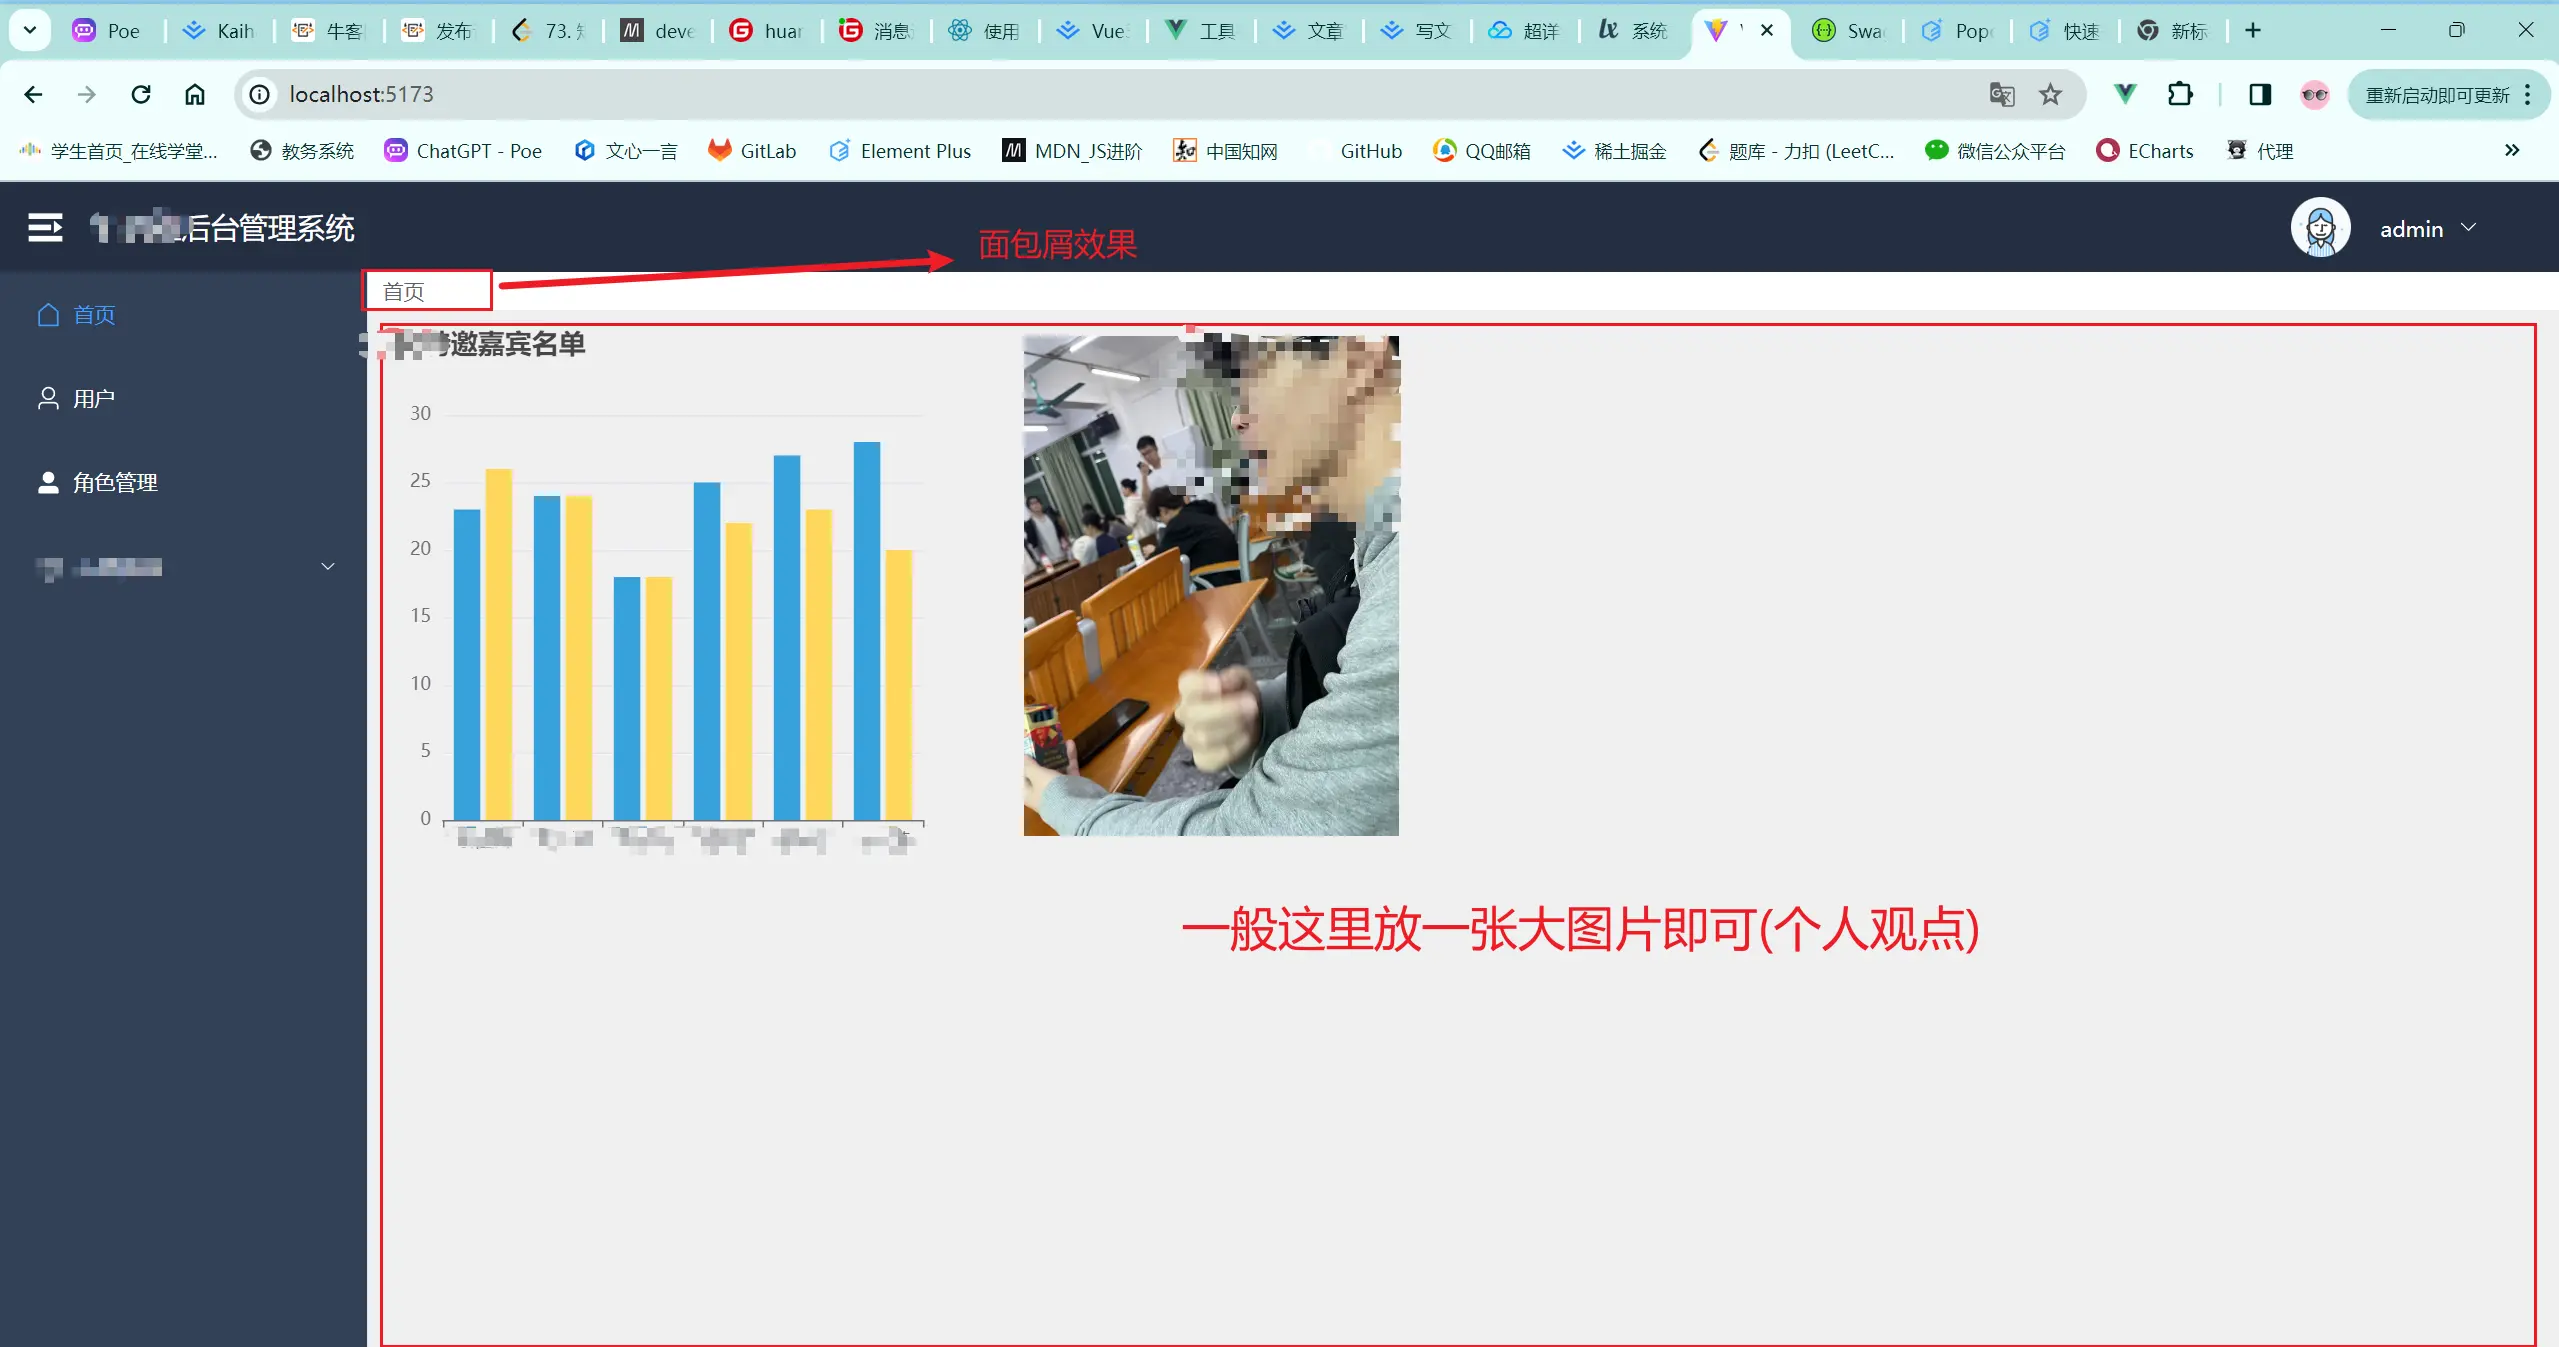
Layout页面布局 && 面包屑设置:


7.1.2.Home页面布局(小编这里就做的比较潦草了,只是引入echarts渲染了一点数据和放了一张图片,大家可以根据自己的需求设置页面排版,一般来说这种后台的Home首页就是放一张有意义的大图片(能说明我们后台管理系统的主题)铺满即可,简洁明了,言简意赅。)
7.1.2.1.Home路由配置
八.搭建用户页
8.1.1.在view中创建User文件夹,里面创建index.vue文件,编写该二级路由组件
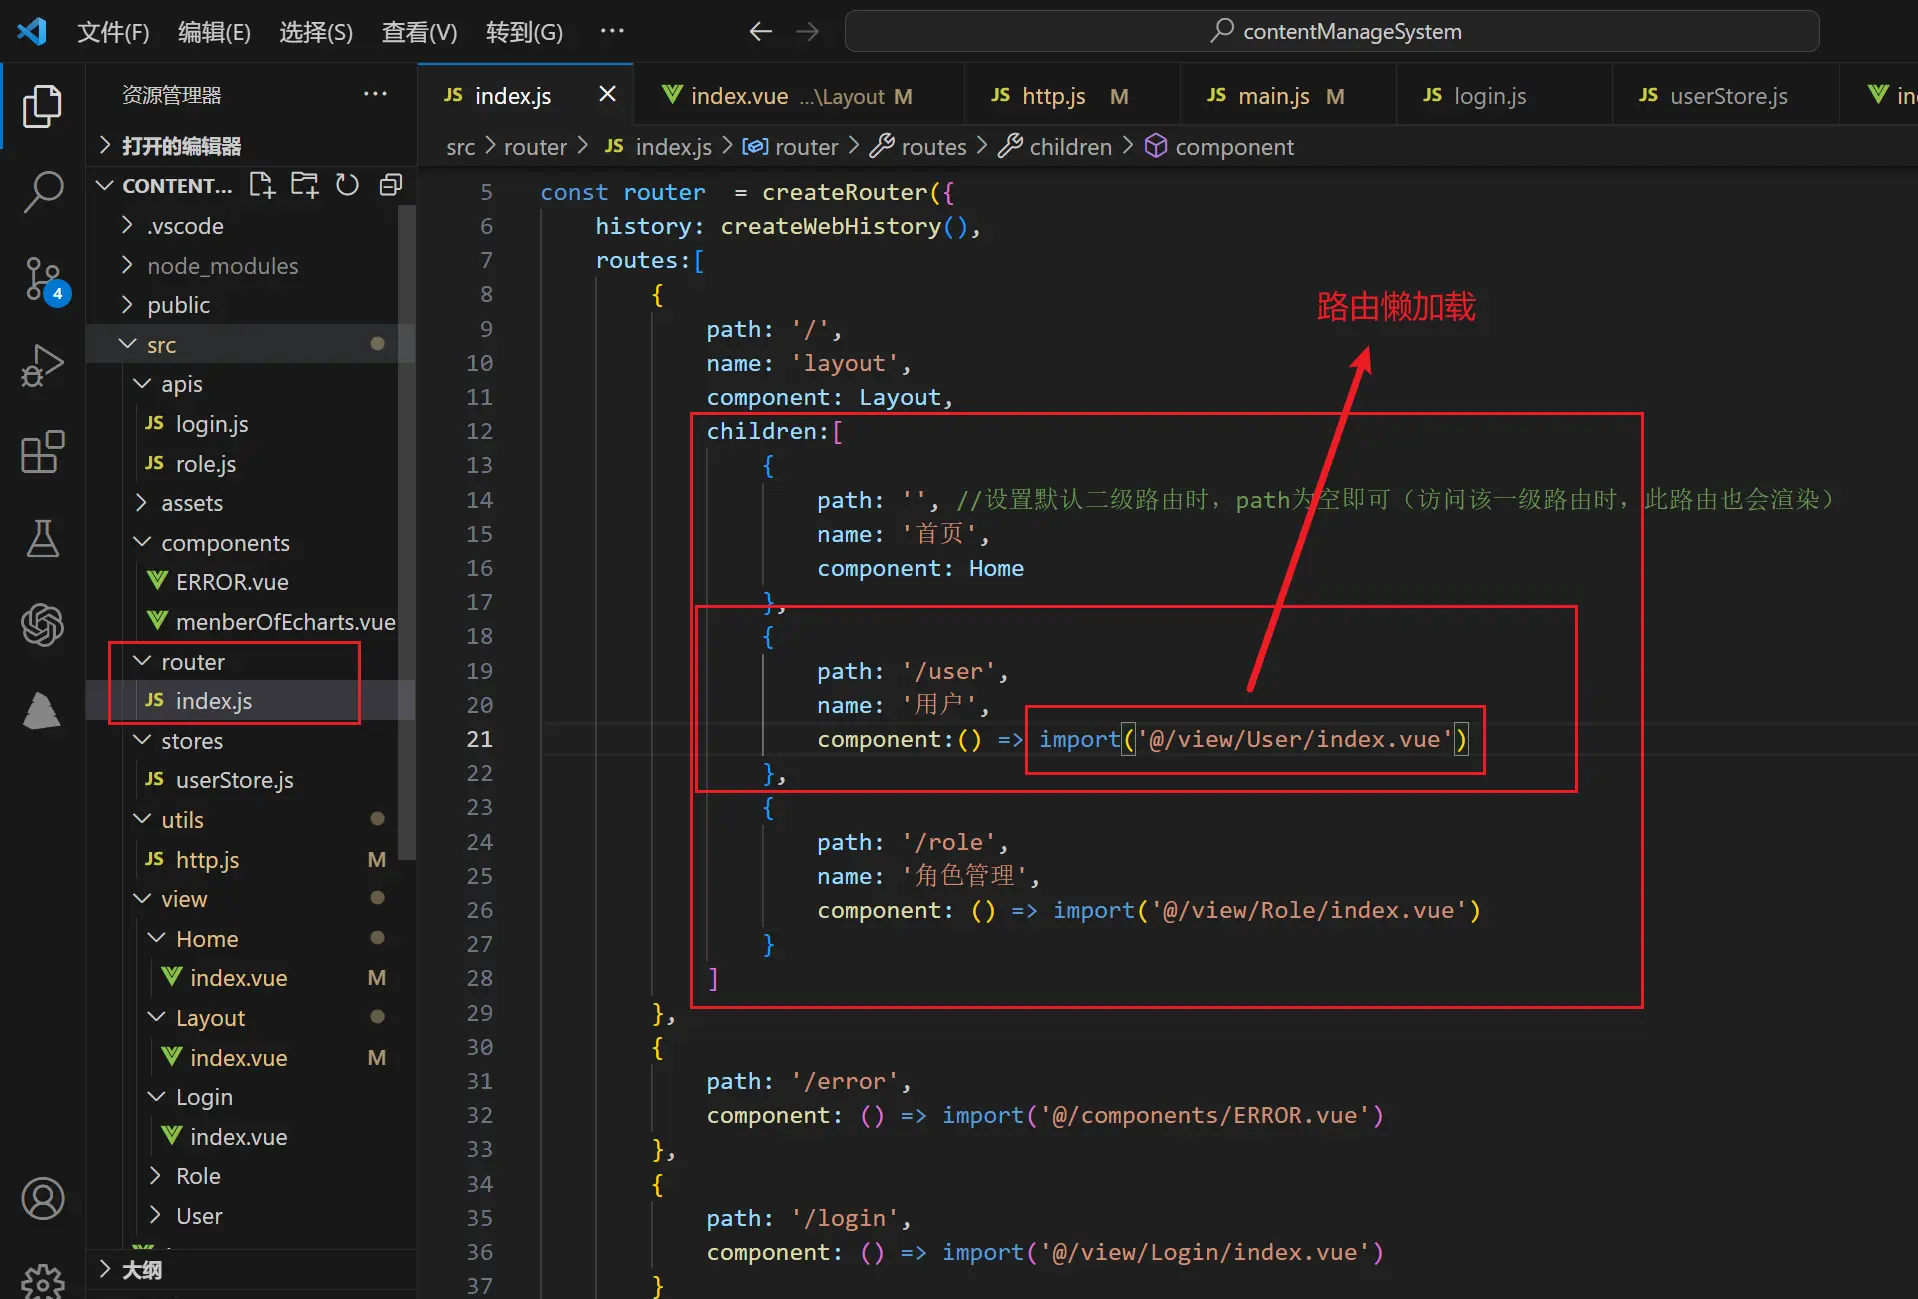
8.1.1.1.User路由配置
10.3.1.由于用户页代码较多,小编这里直接把用户页的代码原封不动地展示出来,并且代码里面写了较多的注释,相信小伙伴理解起来也不会太难,不过值得一提的是,这个后台是小编忙里偷闲赶出来的,所以里面的代码是比较臃肿的,小编下一期会出一篇关于组件封装的专题,就围绕这个用户页和下面的角色管理页展开,实现对于组件的封装,提高复用性。所以这篇文章的不足之处敬请谅解,仅为各位朋友搭建后台管理系统分享我的构建思路…
<!-- view/User/index.vue -->
<script setup>
import { getUserInfoAPI, addUserInfoAPI, delUserInfoAPI, DelUsersInfoAPI, searchUserInfoAPI, editUserInfoAPI } from '@/apis/user'
import { onMounted, ref } from 'vue'
import { useRoleStore } from '@/stores/roleStore.js'
import { ElMessage, ElMessageBox } from 'element-plus'
//准备好分页数据的对象
const searchForm = ref({
name: '',
current: 1,
size: 10
})
// 获取用户信息
const statusList = ref([])
const userMsg = ref({})
const currentPageUserMsg = ref([])
const total = ref(0)
const getUserMsg = async ({ pageNum, pageSize }) => {
const res = await getUserInfoAPI({ pageNum, pageSize })
userMsg.value = res.data
currentPageUserMsg.value = userMsg.value.records.slice(0, searchForm.value.size)
console.log('@@获取用户信息', userMsg.value)
total.value = res.data.total
console.log('curr', currentPageUserMsg.value)
statusList.value = []
userMsg.value.records.forEach((item) => {
statusList.value.push(item.status === 1 ? true : false)
})
console.log(statusList.value)
}
onMounted(() => {
getUserMsg({
pageNum: 0,
pageSize: 0
})
})
//多选
//保存要批量删除的用户ID
let IDs
const handleSelectionChange = (val) => {
IDs = ''
console.log(val)
val.forEach((item) => {
IDs += item.id + ','
})
IDs = IDs.slice(0, IDs.length - 1)
console.log(IDs)
}
//处理批量处理时的删除逻辑
const handleDelList = async () => {
if (!IDs) {
ElMessage.error('请先勾选您想要删除的数据')
return
} else {
ElMessageBox.confirm('确认删除选中的用户吗?', {
confirmButtonText: '是',
cancelButtonText: '否',
type: 'warning'
})
.then(async () => {
await DelUsersInfoAPI(IDs)
IDs = ''
//更新视图
const res1 = await getUserInfoAPI(0, 0)
userMsg.value = res1.data
currentPageUserMsg.value = userMsg.value.records.slice(0, searchForm.value.size)
total.value = userMsg.value.records.length
ElMessage({
type: 'success',
message: '删除成功'
})
})
.catch(() => {})
}
}
//删除单个用户的逻辑
let id = ref(-1)
const handleDel = async (index, rowData) => {
console.log('下标', index, '删除的数据', rowData.id)
id.value = rowData.id
console.log('删除的id', id.value)
ElMessageBox.confirm('确认删除该用户吗?', {
confirmButtonText: '是',
cancelButtonText: '否',
type: 'warning'
})
.then(async () => {
const res = await delUserInfoAPI(id.value)
id = -1
console.log(res)
//更新视图
const res1 = await getUserInfoAPI(0, 0)
userMsg.value = res1.data
currentPageUserMsg.value = userMsg.value.records.slice(0, searchForm.value.size)
total.value = userMsg.value.records.length
ElMessage({
type: 'success',
message: '删除成功'
})
})
.catch(() => {})
}
//处理用户状态
const handleStatus = (scope) => {
console.log('111', scope)
console.log('scope.row.status: ', scope.row.status)
const changeStatus = ref('')
const changedUserName = ref('')
changedUserName.value = scope.row.account
if (scope.row.status === 1) {
changeStatus.value = '停用'
} else {
changeStatus.value = '启用'
}
ElMessageBox.confirm(`确认${changeStatus.value}${changedUserName.value}吗?`, {
confirmButtonText: '是',
cancelButtonText: '否',
type: 'warning'
})
.then(() => {
statusList[scope.$index] = scope.row.status === 1 ? false : true
console.log('222', statusList[scope.$index])
//后续调用相关api,修改用户的status
})
.catch(() => {
statusList[scope.$index] = scope.row.status === 1 ? true : false
})
console.log(scope)
}
//查找用户
const searchData = ref({
pageNum: 0,
pageSize: 0,
account: ''
})
const searchUser = async (val) => {
console.log('search', val)
searchData.value.account = val
const res = await searchUserInfoAPI(searchData.value)
console.log(res)
//更新视图
// const res1 = await getUserInfoAPI(0, 0)
userMsg.value = res.data
currentPageUserMsg.value = userMsg.value.records.slice(0, searchForm.value.size)
total.value = userMsg.value.records.length
}
//页数变化
const handleSizeChange = (val) => {
//更新页面尺寸
searchForm.value.size = val
//尺寸变化更新页面首页表单内容
currentPageUserMsg.value = userMsg.value.records.slice(0, searchForm.value.size)
}
//当前页数变化
// const background = ref(false)
const handleCurrentChange = (val) => {
if (val !== 1) {
currentPageUserMsg.value = userMsg.value.records.slice((val - 1) * searchForm.value.size)
} else {
currentPageUserMsg.value = userMsg.value.records.slice(0, searchForm.value.size)
}
searchForm.current = val
// console.log('页数改变', val)
// console.log('page', searchForm.current)
}
//新增
//搜集新增用户的信息
const formInline = ref({
id: '',
account: '',
phone: '',
email: '',
password: '',
gender: 0,
age: '', //应为number
birth: '',
roleId: '',
status: 0,
createDate: ''
})
//角色信息
//调用useRoleStore中的action函数
const useRole = useRoleStore()
onMounted(() => {
useRole.getRoleInfo()
})
const addFormVisible = ref(false)
const roleOptions = ref([])
const handleAdd = () => {
formInline.value = {}
roleOptions.value = []
useRole.roleInfo.forEach((item) => {
roleOptions.value.push({
id: item.id,
description: item.description
})
})
// console.log('角色选项', roleOptions.value)
addFormVisible.value = true
}
//处理选择后的信息
const handleRoleOPtion = (val) => {
//与el-select中的v-model="roleOptions.value"一样,
// 可以通过 @change="handleRoleOPtion(roleOptions.value)" 获取当前用户选中的value值
roleOptions.value.forEach((item) => {
if (item.description === val) {
//更新角色id,赋予特定用户的角色类别
formInline.value.roleId = item.id
}
})
// console.log('update', formInline.value)
}
//提交新增用户的信息
const confirmAddUser = async () => {
formInline.value.gender = formInline.value.gender === '男' ? 1 : 0
formInline.value.status = formInline.value.status === '正常' ? 1 : 0
await addUserInfoAPI(formInline.value)
//清空表单填入的数据
formInline.value = {}
//隐藏表单
addFormVisible.value = false
//更新表格
const res1 = await getUserInfoAPI(0, 0)
userMsg.value = res1.data
currentPageUserMsg.value = userMsg.value.records.slice(0, searchForm.value.size)
total.value = userMsg.value.records.length
ElMessage({
type: 'success',
message: '新增用户成功'
})
}
// 编辑用户信息
const editFormVisible = ref(false)
const defaultRole = ref(null)
const handledetail = (row) => {
editFormVisible.value = true
formInline.value.account = row.account
formInline.value.phone = row.phone
formInline.value.email = row.email
formInline.value.password = row.password
formInline.value.gender = row.gender
formInline.value.age = row.age
formInline.value.id = row.id
formInline.value.birth = row.birth
formInline.value.roleId = row.roleId
formInline.value.status = row.status
currentPageUserMsg.value.forEach((item) => {
if (formInline.value.roleId === item.id) {
formInline.value.id = item.id
formInline.value.createDate = item.createDate
}
})
roleOptions.value = []
useRole.roleInfo.forEach((item) => {
roleOptions.value.push({
id: item.id,
description: item.description
})
})
roleOptions.value.forEach((item) => {
if (item.id == formInline.value.roleId) {
defaultRole.value = item.description
}
})
}
//确认修改用户信息
const confirmEdit = async () => {
console.log('表单信息', formInline.value)
formInline.value.gender = formInline.value.gender === '男' ? 1 : 0
formInline.value.status = formInline.value.status === '正常' ? 1 : 0
await editUserInfoAPI(formInline.value)
editFormVisible.value = false
//更新视图
const res1 = await getUserInfoAPI(0, 0)
userMsg.value = res1.data
currentPageUserMsg.value = userMsg.value.records.slice(0, searchForm.value.size)
console.log('editedData', res1)
ElMessage({
type: 'success',
message: '编辑用户信息成功'
})
}
//表单校验规则
const rules = ref({
account: [{ required: true, message: '用户名不能为空', trigger: 'blur' }],
password: [
{ required: true, message: '密码不能为空', trigger: 'blur' },
{ min: 6, max: 14, message: '密码长度为6-14个字符', trigger: 'blur' }
],
email: [
{ type: 'email', message: '请输入有效的邮箱地址', trigger: ['blur', 'change'] },
{ required: true, message: '请输入有效的邮箱地址', trigger: 'blur' }
]
})
</script>
<template>
<el-card style="margin-top: 20px">
<!-- 查找 -->
<el-input placeholder="请输入用户名称" clearable style="width: 450px; margin-bottom: 10px" v-model="searchForm.name">
<template #append>
<el-button icon="Search" @click="searchUser(searchForm.name)" />
</template>
</el-input>
<!-- 操作表格 -->
<el-row style="margin-bottom: 10px">
<el-button type="primary" @click="handleAdd" icon="Plus" plain>新增</el-button>
<el-button type="danger" icon="Delete" @click="handleDelList" plain>删除</el-button>
</el-row>
<!-- 表格结构 -->
<el-table
:data="currentPageUserMsg"
height="250"
border
style="width: 100%"
:header-cell-style="{ textAlign: 'center', color: '#515a6e', backgroundColor: '#f8f8f9' }"
:cell-style="{ textAlign: 'center' }"
@selection-change="handleSelectionChange"
table-layout="auto"
>
<el-table-column type="selection" width="55" />
<el-table-column prop="account" label="用户名称" width="180" />
<el-table-column label="性别" width="80">
<template #default="scope">{{ scope.row.gender === 0 ? '女' : '男' }}</template>
</el-table-column>
<el-table-column prop="email" label="邮箱" width="200" />
<el-table-column prop="phone" label="电话号码" width="180" />
<el-table-column prop="status" label="状态" width="160">
<template #default="scope">
<el-switch v-model="statusList[scope.$index]" @click="handleStatus(scope)" />
</template>
</el-table-column>
<el-table-column prop="createDate" label="创建时间" width="200" />
<el-table-column label="操作">
<template #default="scope">
<!-- <el-button type="primary" icon="Plus" @click="handleAdd" small plain>新增</el-button> -->
<el-button type="danger" icon="Delete" plain @click="handleDel(scope.$index, scope.row)">删除</el-button>
<el-button type="success" icon="Edit" plain @click="handledetail(scope.row)">编辑</el-button>
</template>
</el-table-column>
</el-table>
<!-- 分页 -->
<el-pagination
style="margin: 20px 0; display: flex; float: right"
v-model:current-page="searchForm.current"
background
v-model:page-size="searchForm.size"
:page-sizes="[10, 20, 30, 40]"
layout="total, sizes, prev, pager, next, jumper"
:total="total"
@size-change="handleSizeChange"
@current-change="handleCurrentChange"
small
/>
</el-card>
<!-- 新增用户的对话框 -->
<el-dialog v-model="addFormVisible" title="新增用户" width="41%" destroy-on-close center>
<el-form :inline="true" :rules="rules" ref="addFormRef" :model="formInline" class="demo-form-inline">
<el-form-item prop="account" label="用户名称:">
<el-input v-model="formInline.account" clearable />
</el-form-item>
<el-form-item label="电话:" style="margin-left: 10px">
<el-input v-model="formInline.phone" clearable />
</el-form-item>
<el-form-item prop="email" label="邮箱:" style="margin-left: 30px">
<el-input v-model="formInline.email" clearable />
</el-form-item>
<el-form-item prop="password" label="密码:">
<el-input type="password" v-model="formInline.password" clearable />
</el-form-item>
<el-form-item label="性别:" style="margin-left: 40px">
<div style="margin-left: 5px">男<input type="radio" name="sex" style="margin-left: 5px" value="男" v-model="formInline.gender" /></div>
<div style="margin-left: 15px">女<input type="radio" name="sex" style="margin-left: 5px" value="女" v-model="formInline.gender" /></div>
</el-form-item>
<el-form-item label="年龄:" style="margin-left: 148px">
<el-input v-model="formInline.age" clearable />
</el-form-item>
<el-form-item label="生日:" style="width: 250px; margin-left: 42px">
<el-date-picker v-model="formInline.birth" type="date" clearable />
</el-form-item>
<el-form-item label="角色:" style="margin-left: 23px">
<!-- <el-input v-model="formInline.roleId" placeholder="请选择角色" clearable /> -->
<el-select v-model="roleOptions.value" @change="handleRoleOPtion(roleOptions.value)">
<el-option v-for="item in roleOptions" :key="item.id" :label="item.description" :value="item.description" />
</el-select>
</el-form-item>
<el-form-item label="状态:" style="margin-left: 42px">
<div style="margin-left: 5px">正常<input type="radio" name="status" style="margin-left: 5px" value="正常" v-model="formInline.status" /></div>
<div style="margin-left: 15px">
停用<input type="radio" name="status" style="margin-left: 5px" value="停用" v-model="formInline.status" />
</div>
</el-form-item>
</el-form>
<template #footer>
<span class="dialog-footer">
<el-button @click="addFormVisible = false">取消</el-button>
<el-button type="primary" @click="confirmAddUser()"> 确认 </el-button>
</span>
</template>
</el-dialog>
<!-- 编辑用户的对话逻辑(到时候和新增封装为一个通用的组件) -->
<el-dialog v-model="editFormVisible" title="编辑用户信息" width="41%" destroy-on-close center>
<el-form :inline="true" :rules="rules" :model="formInline" class="demo-form-inline">
<el-form-item prop="account" label="用户名称:">
<el-input v-model="formInline.account" clearable />
</el-form-item>
<el-form-item label="电话:" style="margin-left: 10px">
<el-input v-model="formInline.phone" clearable />
</el-form-item>
<el-form-item prop="email" label="邮箱:" style="margin-left: 30px">
<el-input v-model="formInline.email" clearable />
</el-form-item>
<el-form-item prop="password" label="密码:">
<el-input type="password" disabled v-model="formInline.password" clearable />
</el-form-item>
<el-form-item label="性别:" style="margin-left: 40px">
<div style="margin-left: 5px">
男<input :checked="formInline.gender === 1" type="radio" name="sex" style="margin-left: 5px" value="男" v-model="formInline.gender" />
</div>
<div style="margin-left: 15px">
女<input :checked="formInline.gender === 0" type="radio" name="sex" style="margin-left: 5px" value="女" v-model="formInline.gender" />
</div>
</el-form-item>
<el-form-item label="年龄:" style="margin-left: 148px">
<el-input v-model="formInline.age" clearable />
</el-form-item>
<el-form-item label="生日:" style="width: 250px; margin-left: 42px">
<el-date-picker v-model="formInline.birth" type="date" clearable />
</el-form-item>
<el-form-item label="角色:" style="margin-left: 23px">
<el-select v-model="defaultRole" @change="handleRoleOPtion(roleOptions.value)">
<el-option v-for="item in roleOptions" :key="item.id" :label="item.description" :value="item.description" />
</el-select>
</el-form-item>
<el-form-item label="状态:" style="margin-left: 42px">
<div style="margin-left: 5px">
正常<input
type="radio"
:checked="formInline.status === 1"
name="status"
style="margin-left: 5px"
value="正常"
v-model="formInline.status"
/>
</div>
<div style="margin-left: 15px">
停用<input
type="radio"
:checked="formInline.status === 0"
name="status"
style="margin-left: 5px"
value="停用"
v-model="formInline.status"
/>
</div>
</el-form-item>
</el-form>
<template #footer>
<span class="dialog-footer">
<el-button @click="editFormVisible = false">取消</el-button>
<el-button type="primary" @click="confirmEdit"> 确认 </el-button>
</span>
</template>
</el-dialog>
</template>
<style scoped>
.dialog-footer button:first-child {
margin-right: 10px;
}
.demo-form-inline .el-input {
--el-input-width: 220px;
}
</style>
//  apis/user.js
//  用户相关接口
import httpInstance from '@/utils/http'
//获取用户信息
const getUserInfoAPI = ({ pageNum, pageSize }) => {
return httpInstance({
url: '/user',
params: {
pageNum,
pageSize
}
})
}
//新增用户
const addUserInfoAPI = (data) => {
return httpInstance({
url: '/user',
method: 'POST',
data
})
}
//删除单个用户
const delUserInfoAPI = (data) => {
return httpInstance({
url: `/user/${data}`,
method: 'DELETE'
})
}
//批量删除用户
const DelUsersInfoAPI = (data) => {
return httpInstance({
url: `/user/batch/${data}`,
method: 'DELETE'
})
}
//查找用户
const searchUserInfoAPI = ({ pageNum, pageSize, account }) => {
return httpInstance({
url: '/user/',
params: {
pageNum,
pageSize,
account
}
})
}
//编辑用户信息
const editUserInfoAPI = (data) => {
return httpInstance({
url: '/user',
method: 'PUT',
data
})
}
export { getUserInfoAPI, addUserInfoAPI, delUserInfoAPI, DelUsersInfoAPI, searchUserInfoAPI, editUserInfoAPI }
九.搭建角色管理页
9.1.1.在view中创建Role文件夹,里面创建index.vue文件,编写该二级路由组件
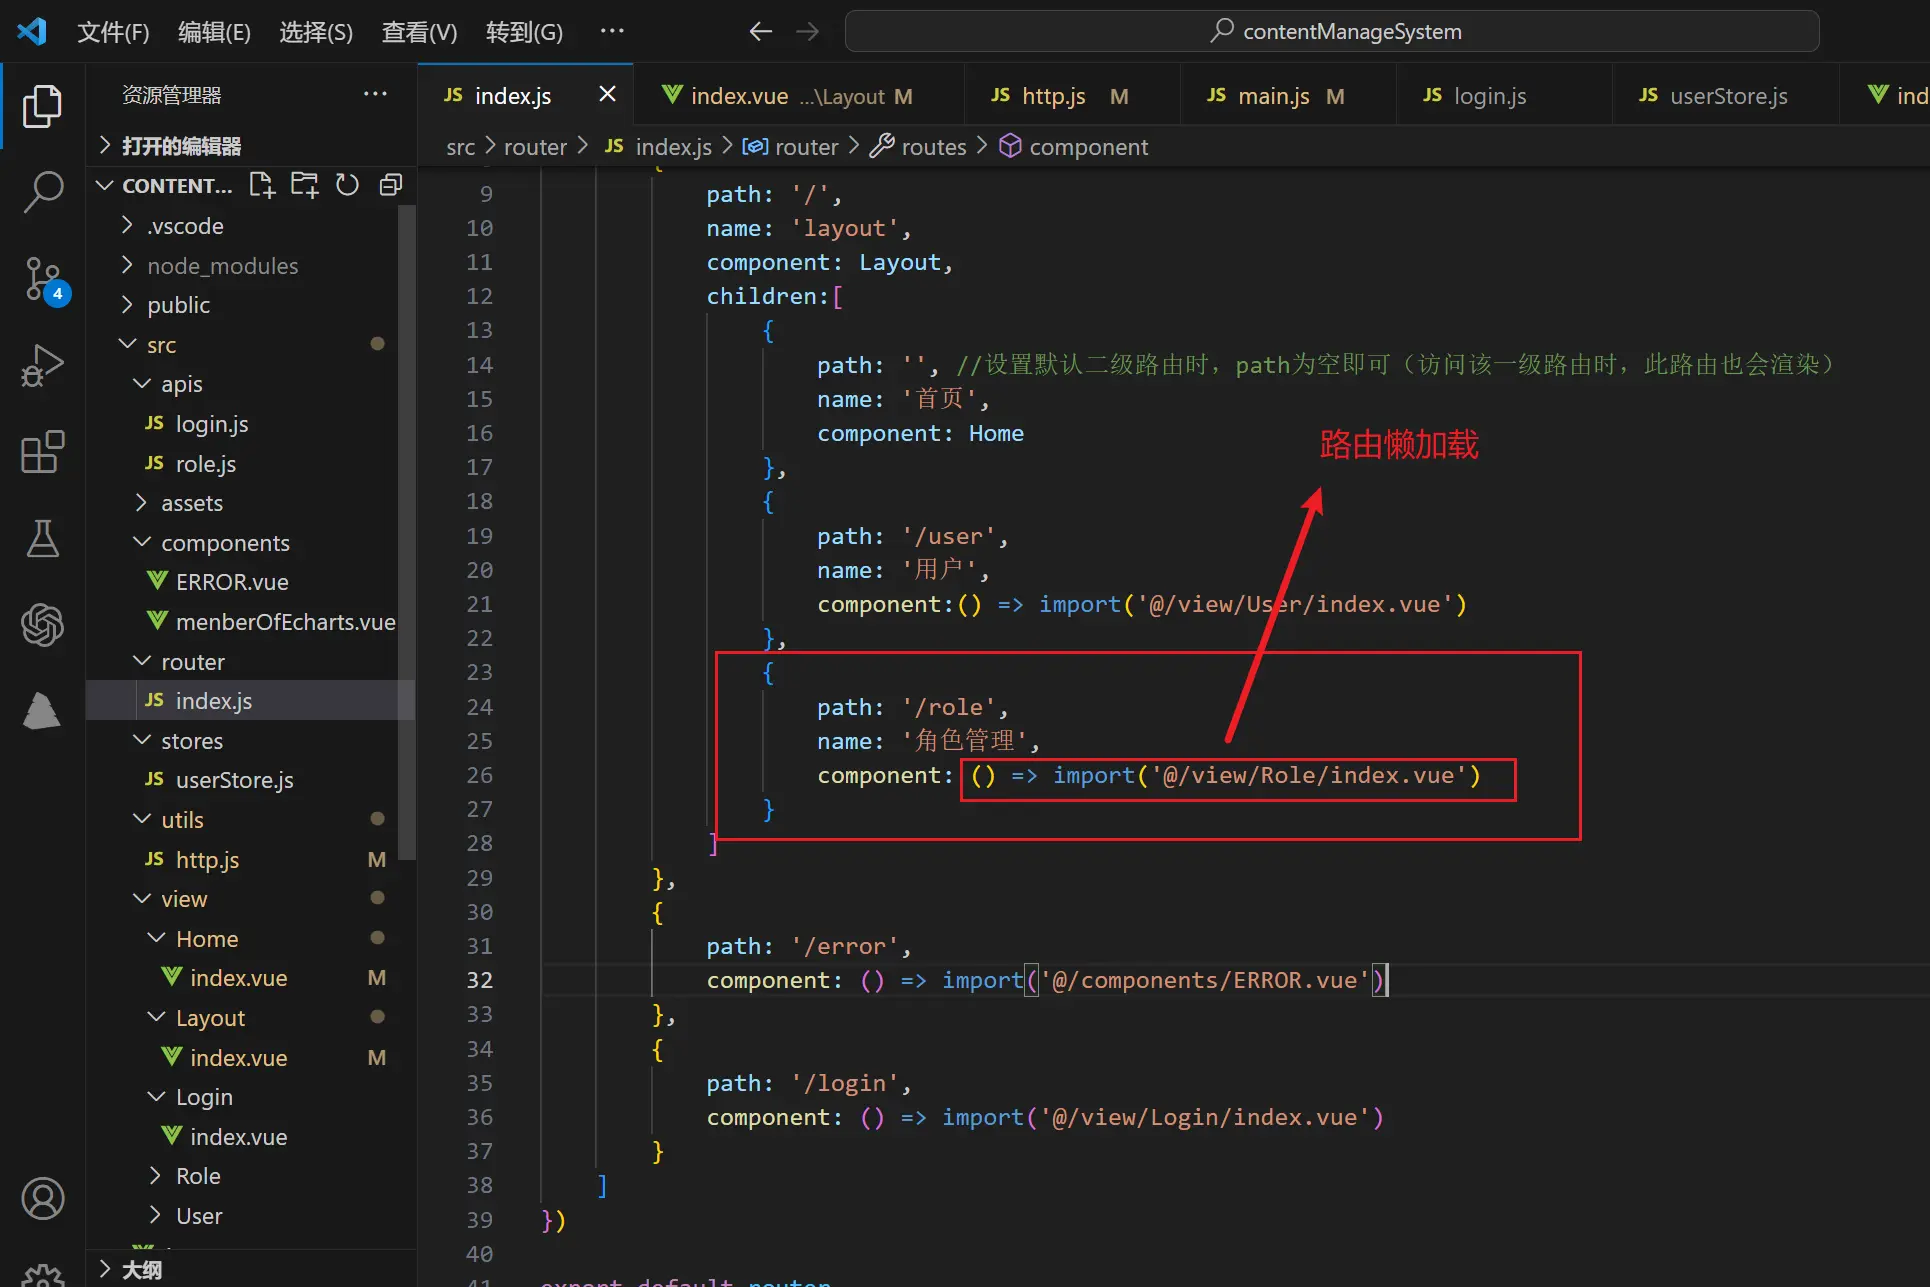
9.1.1.1.Role路由配置
9.1.1.2.角色管理页和用户管理页面的代码思想其实是差不多的,代码较多就不全部列出来啦,后面展示一下效果给大家看看就好…
十.整体效果及部分代码展示
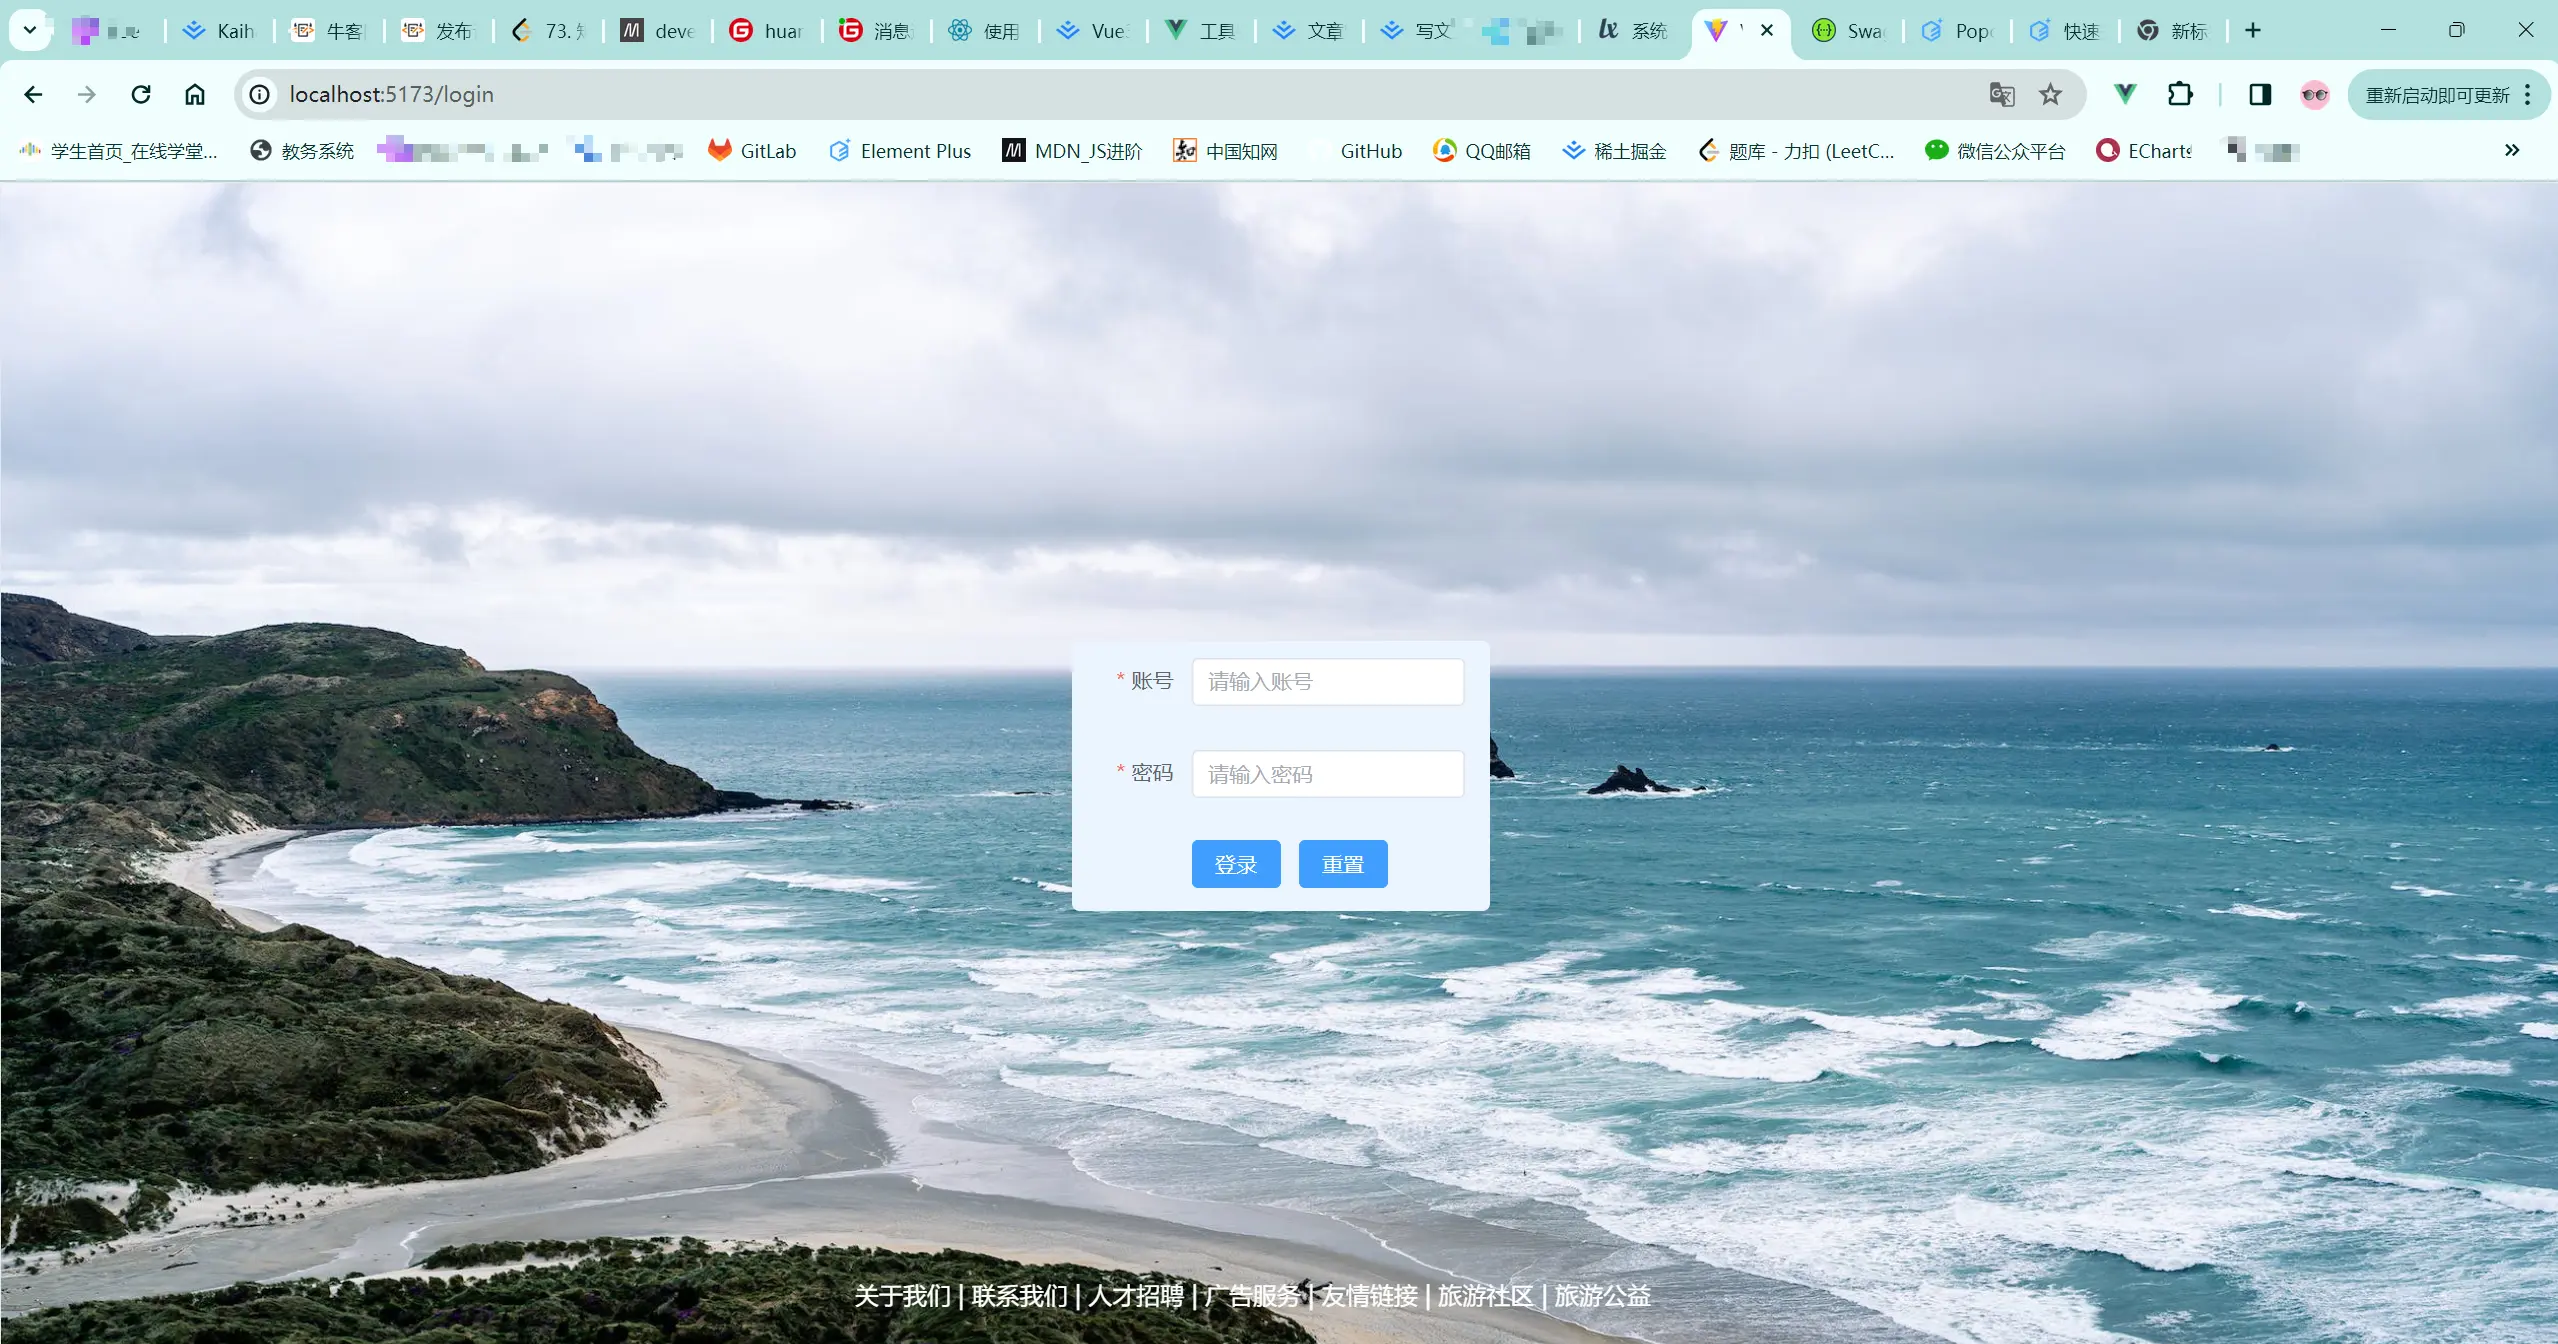
10.1.登录页
10.2.首页
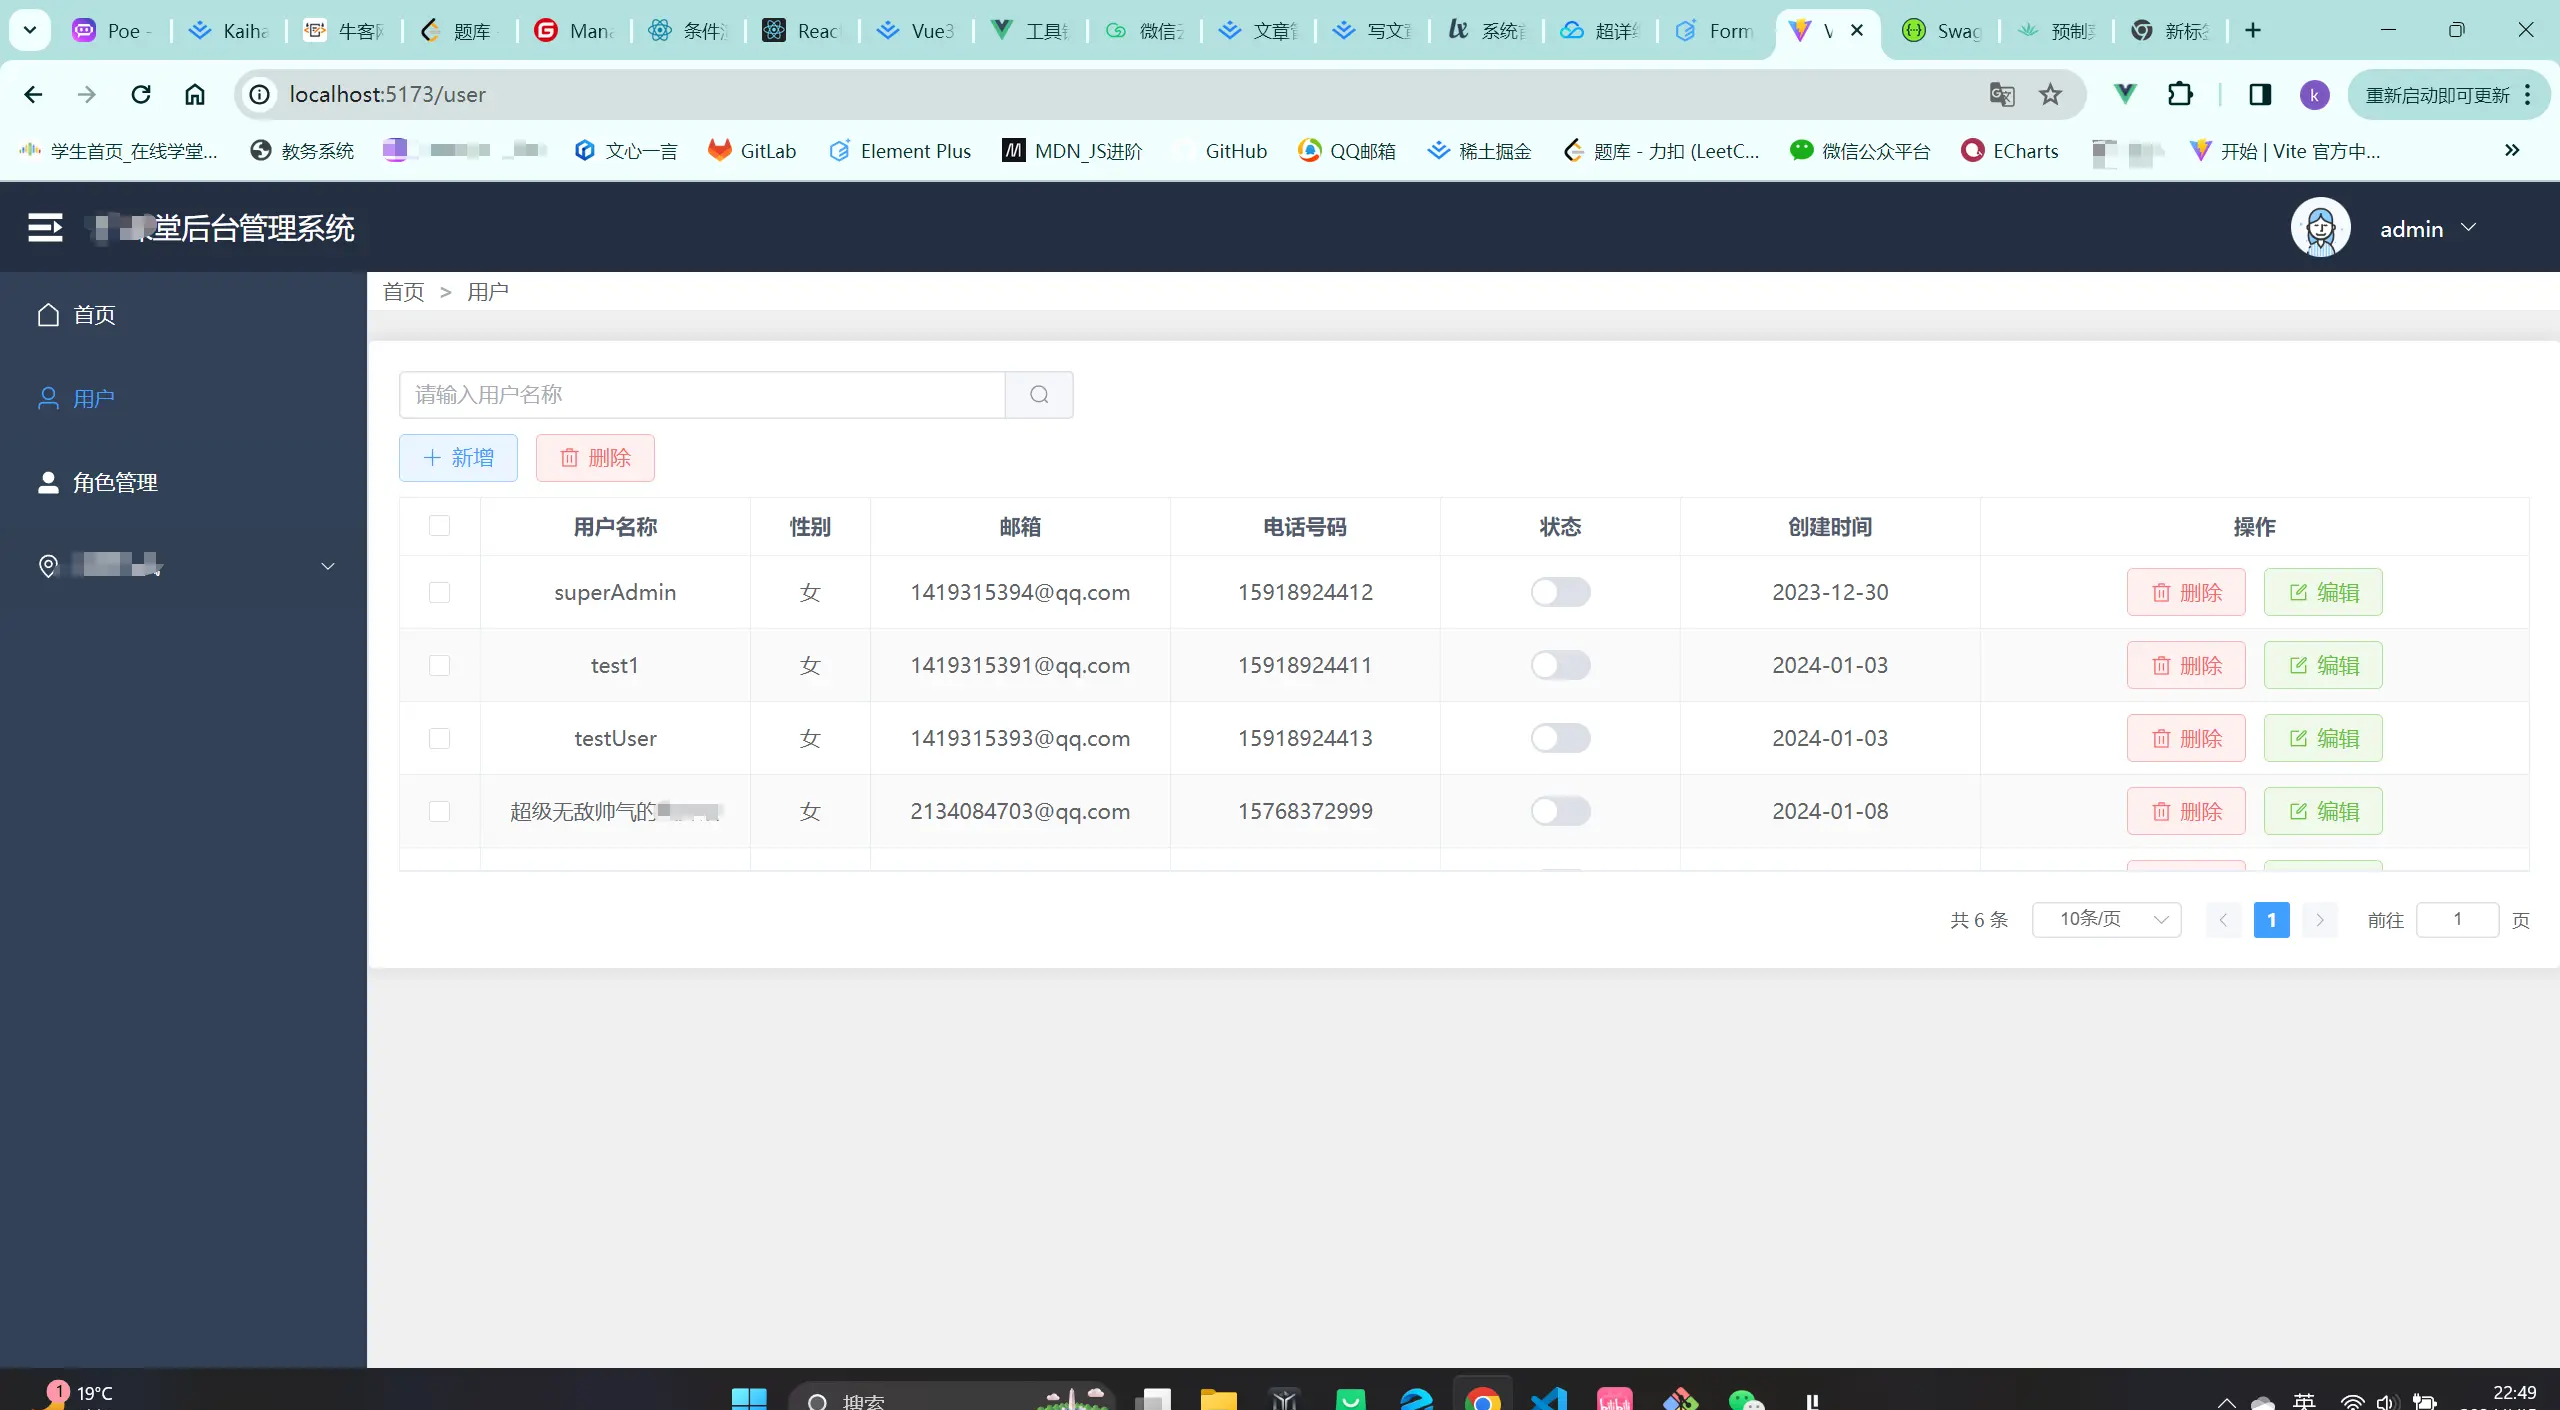
10.3.用户页
10.3.2.用户页效果图:
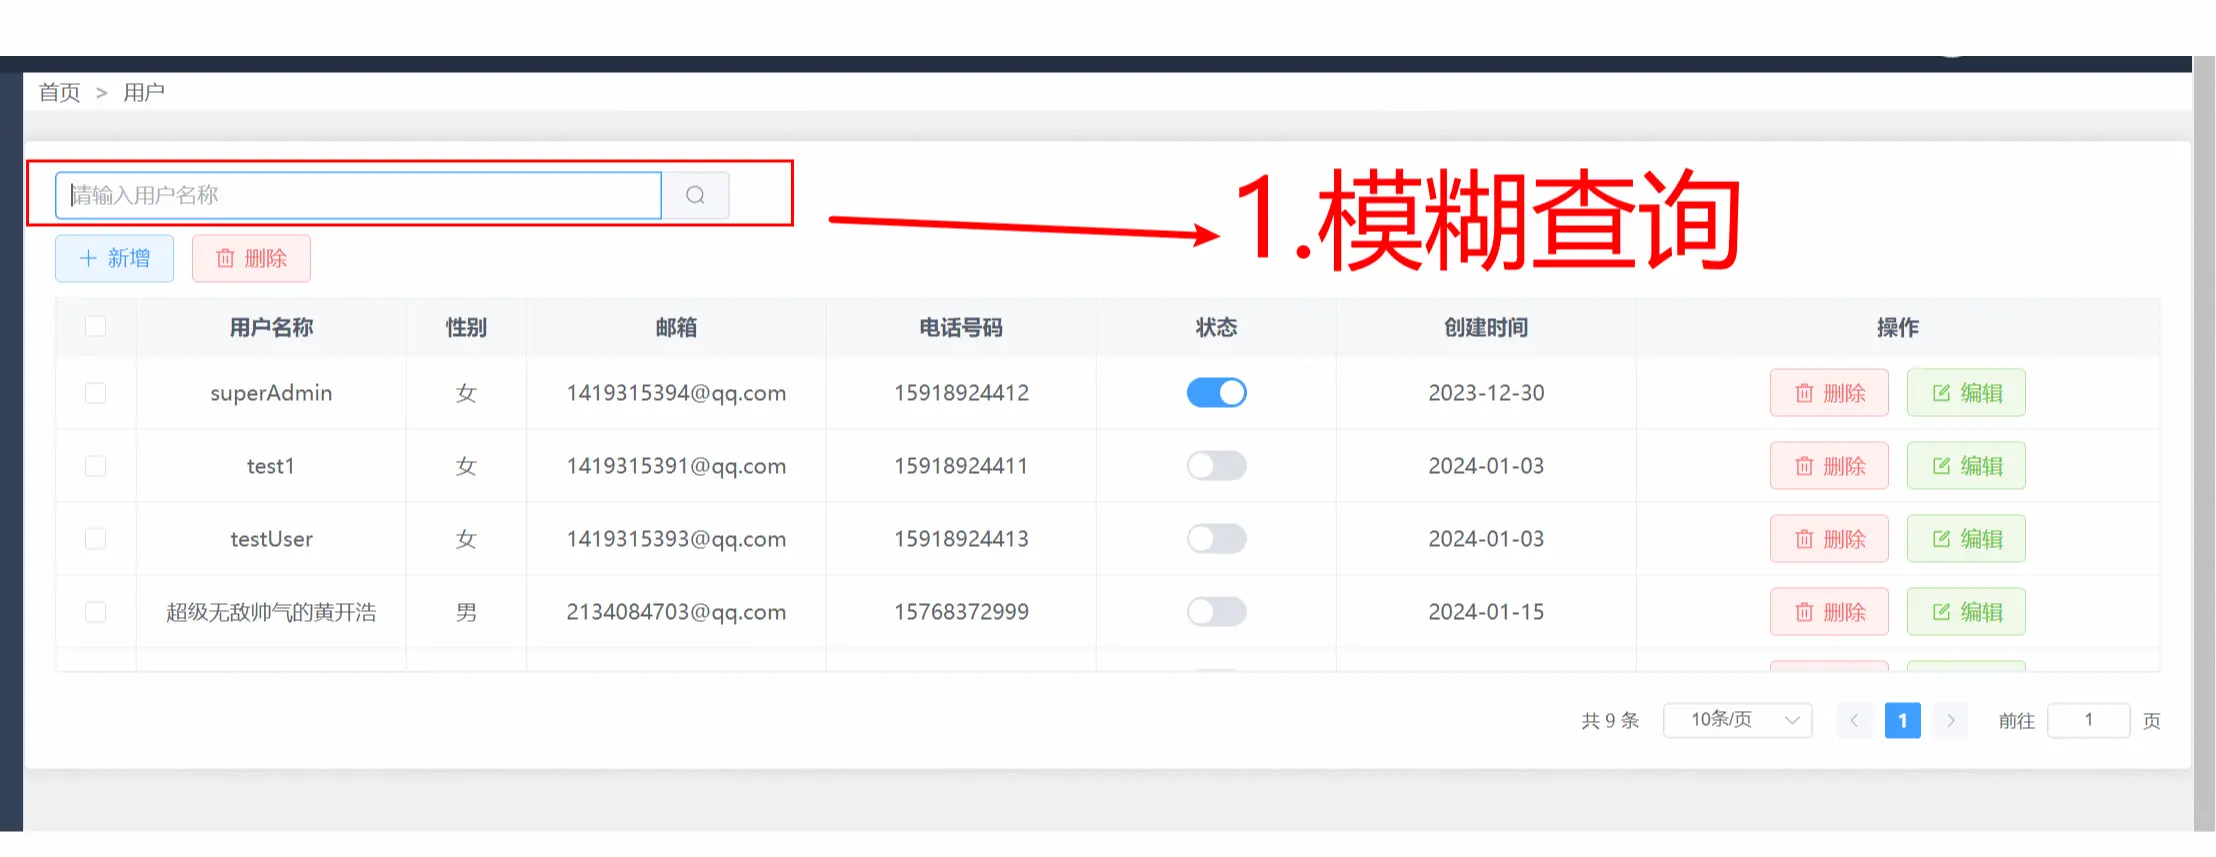
10.3.3.查询功能:
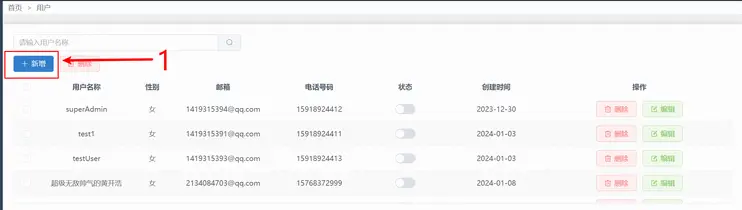
10.3.4.添加用户功能:
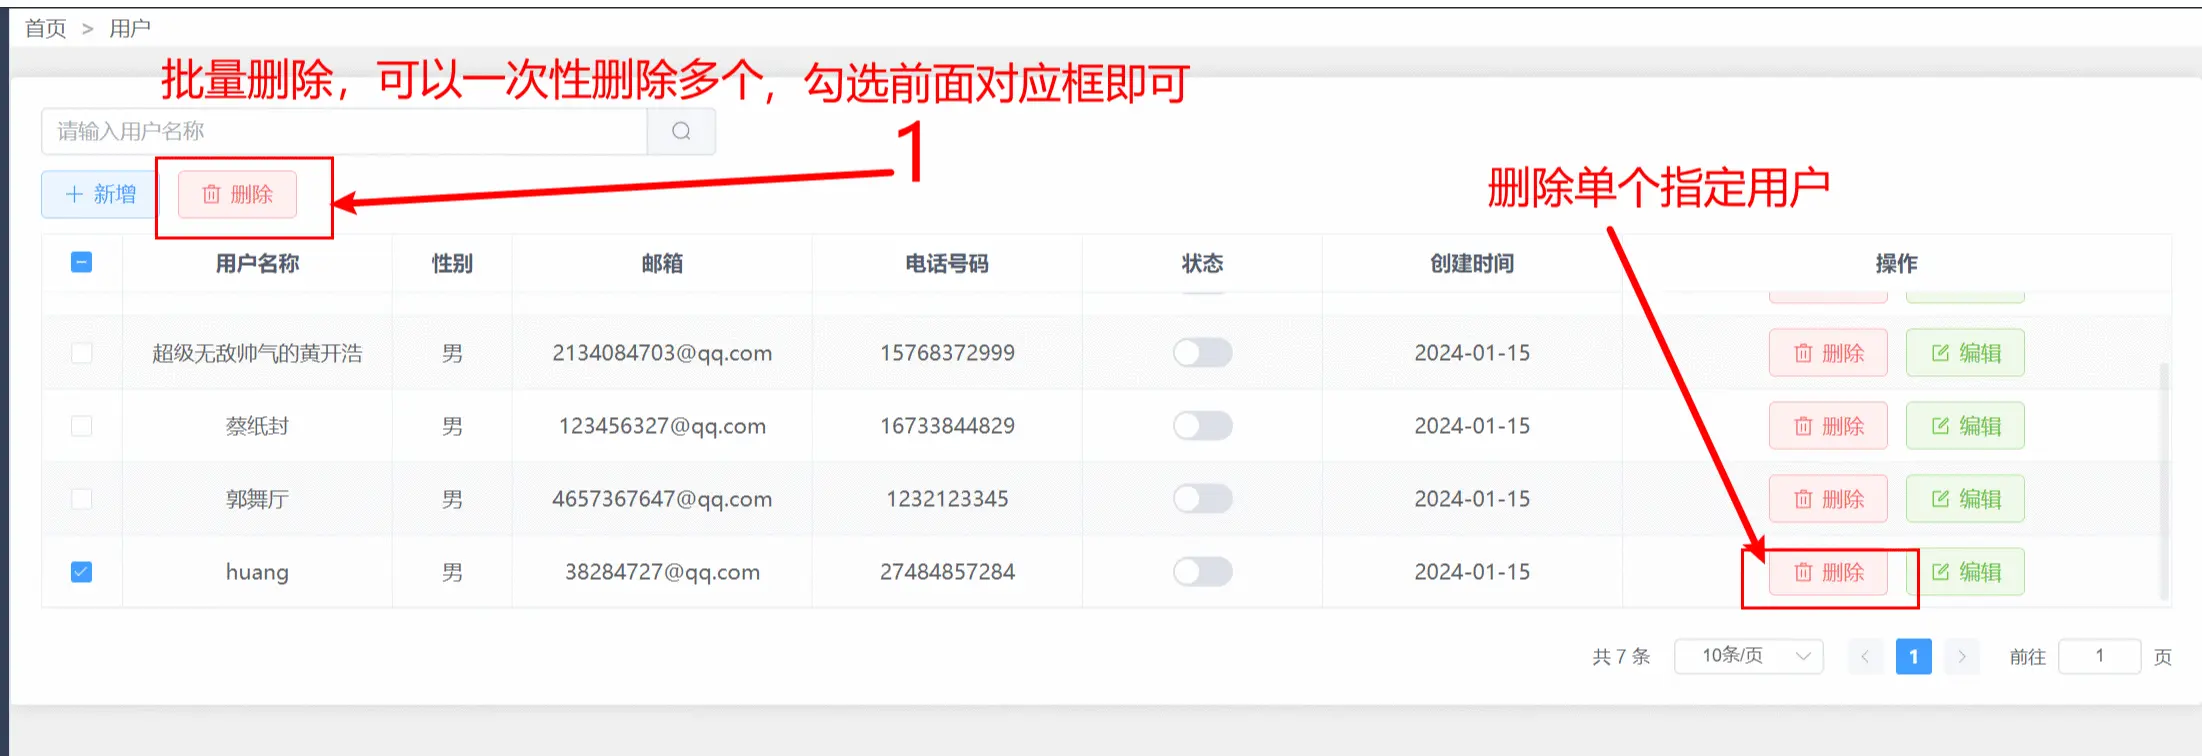
10.3.5.删除用户功能:
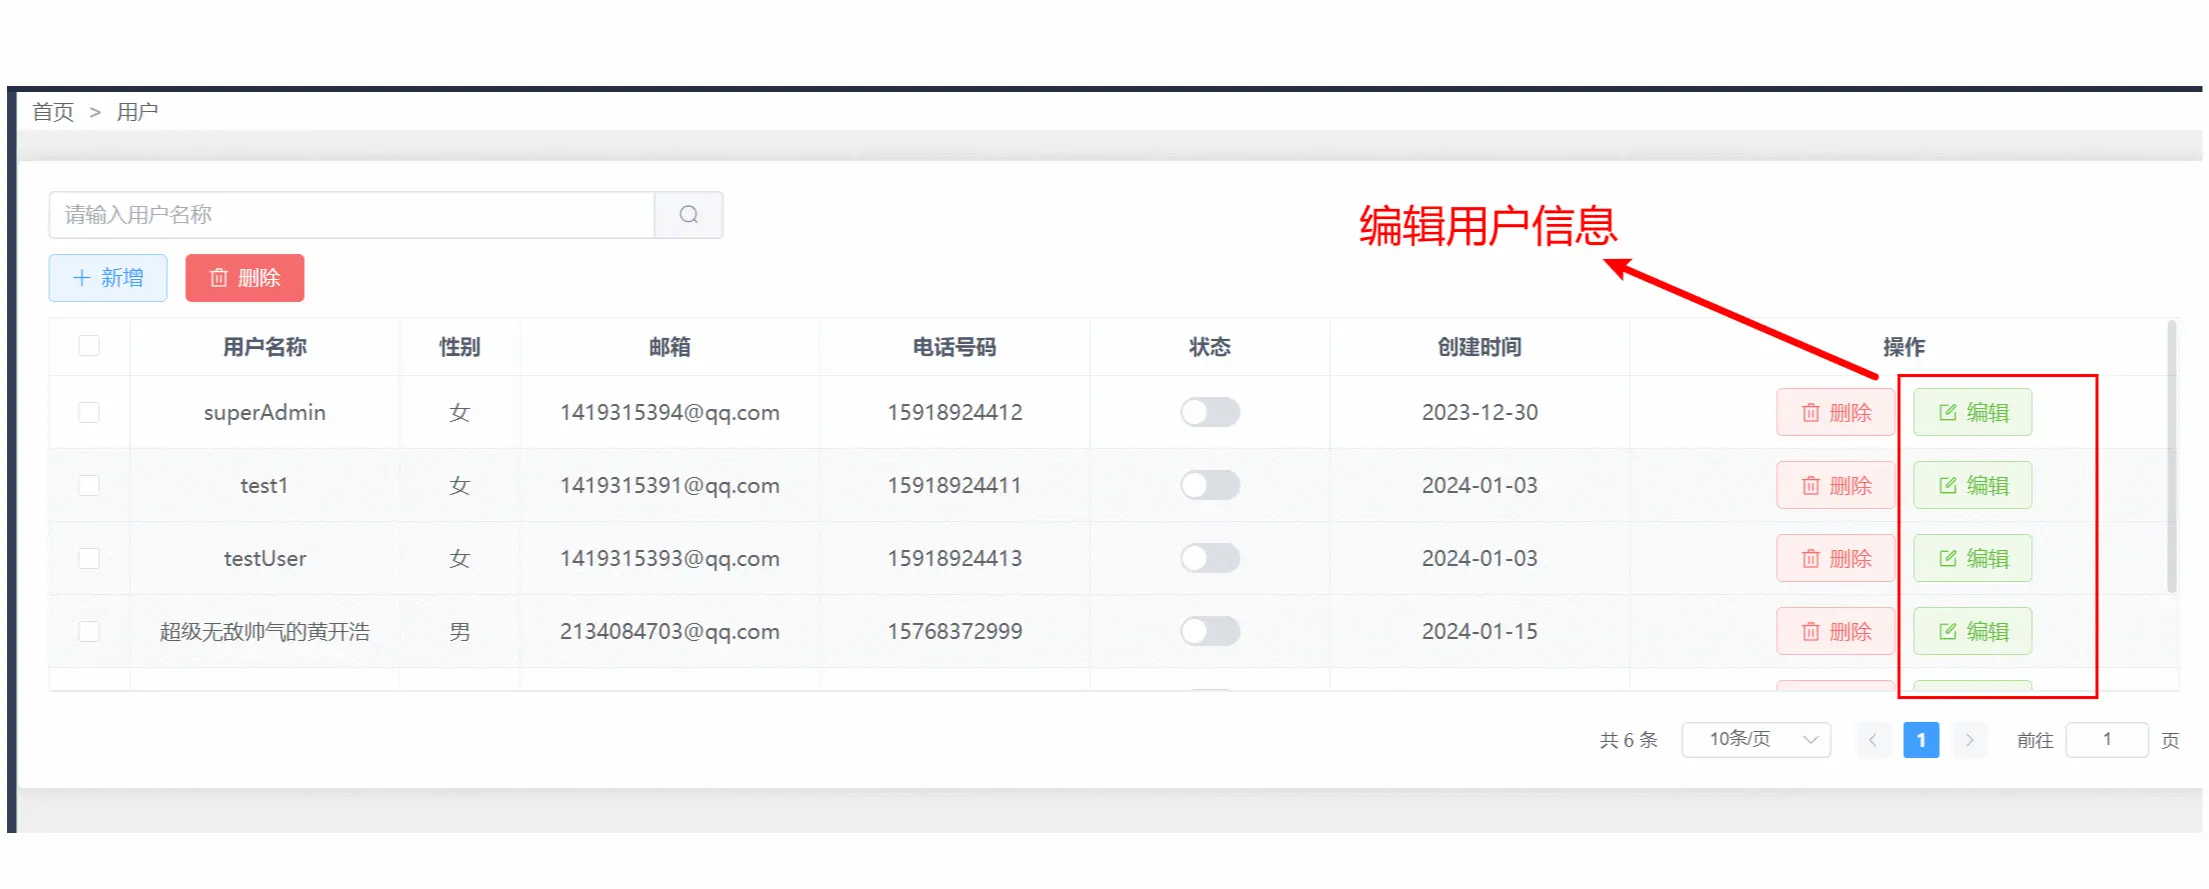
10.3.5.编辑用户功能:
10.4.角色管理页
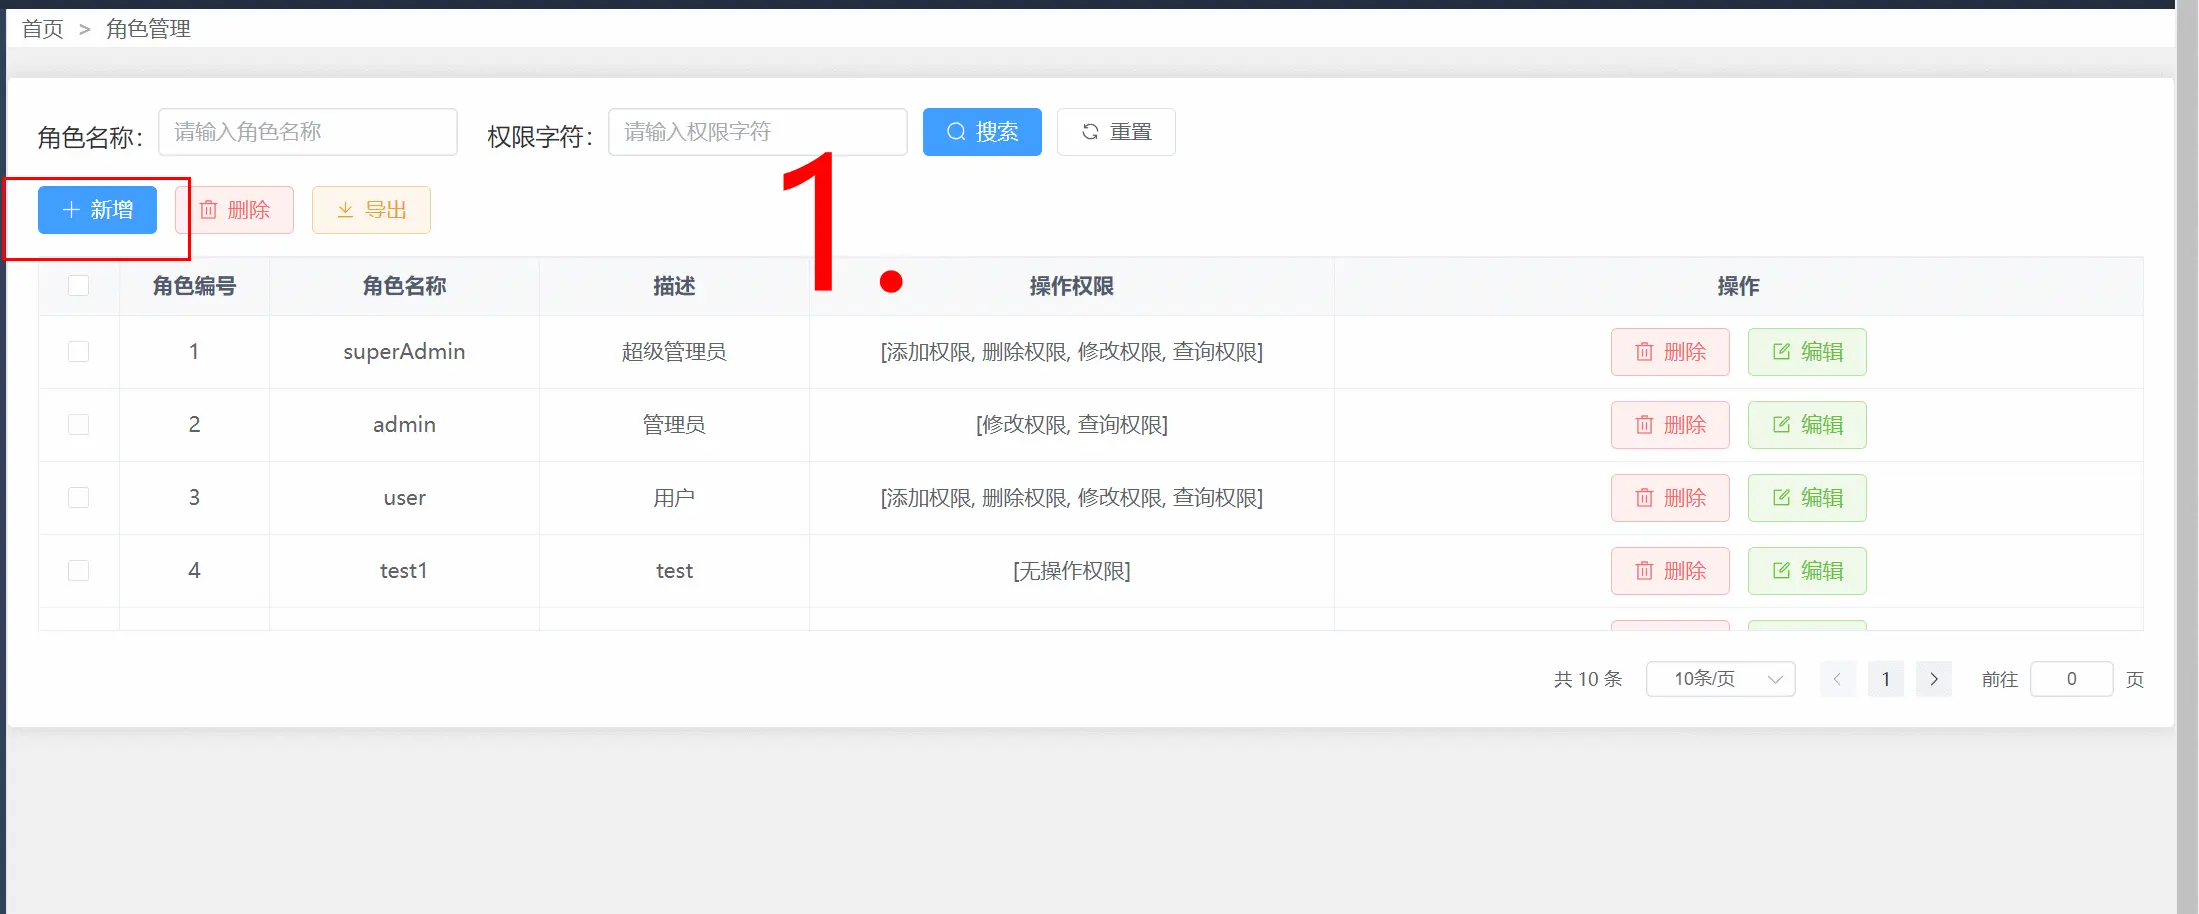
10.4.1.整体效果:

10.4.2.查询功能

10.4.2.新增角色功能
10.4.2.删除角色功能

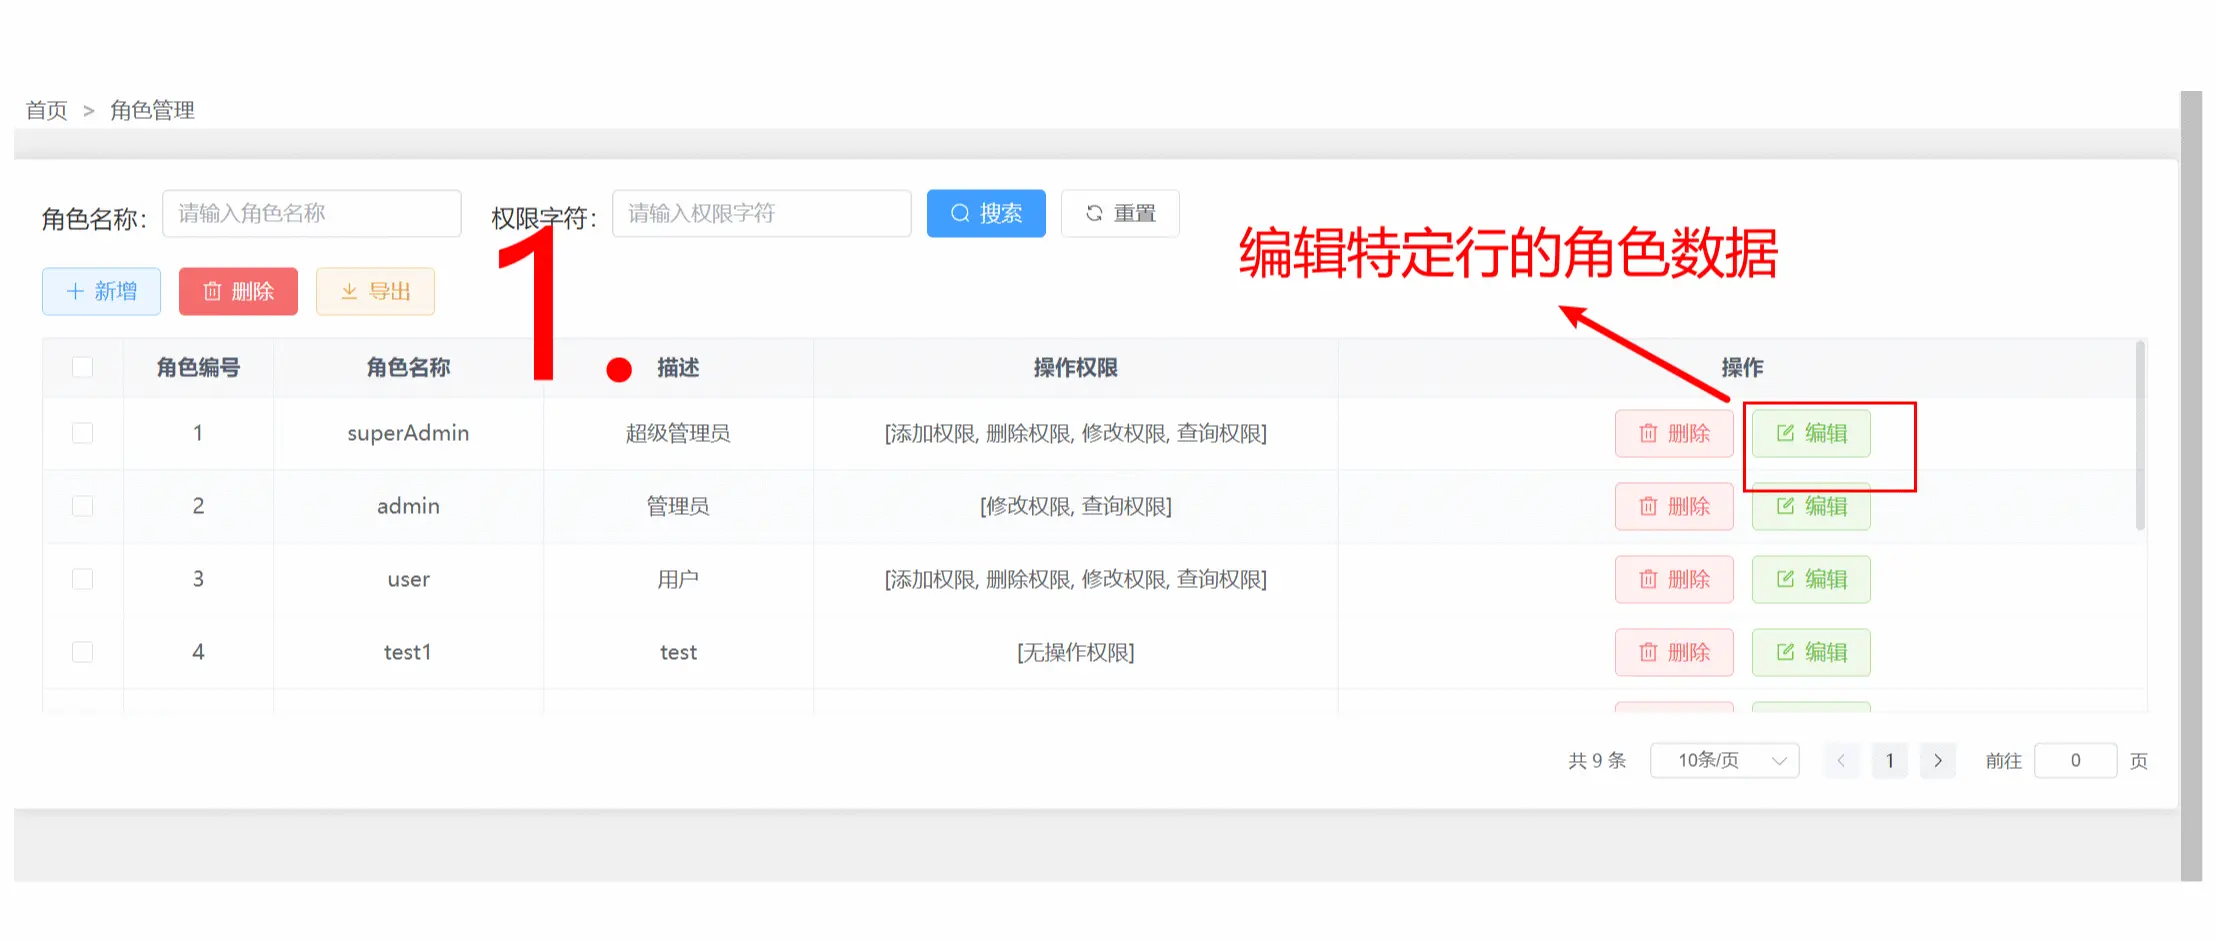
10.4.2.编辑角色功能
到这里内容就分享结束啦,总而言之,这只是一个小编为了复习知识点而写的推文,有挺多地方写的不够规范,(小编目前大二在读,技术不够成熟,有错误的地方非常欢迎各位大佬指正谢谢…), 感谢阅读!!!
原文链接:https://juejin.cn/post/7324599628463833140 作者:Kaihao_Huang