

前言
本篇文章我们继续探究axios源码实现原理,这一篇中会重点介绍拦截器的实现原理。
如果你没有看过第一篇: 新年假期弯道超车:每天都在使用的Axios源码竟然这么简单?—发送请求篇(一)
建议先阅读第一篇内容再进行本篇内容的学习~
一、回顾问题
在第一篇文章开头我们提出过一个问题:
❓如果多次使用请求拦截器和响应拦截器会是什么效果?后面的拦截器配置会覆盖前面的拦截器配置吗?如果不会覆盖,那拦截器的执行顺序是什么?
axios.interceptors.request.use(xxx)  // 第一次使用请求拦截器
axios.interceptors.request.use(yyy)  // 第二次使用请求拦截器
axios.interceptors.response.use(zzz) // 第一次使用响应拦截器
axios.interceptors.response.use(www) // 第二次使用响应拦截器
二、拦截器使用小案例
 <script src="https://cdn.bootcss.com/axios/0.19.0/axios.js"></script>
  <script>

  // 添加请求拦截器1
  axios.interceptors.request.use(
      config => {
        console.log('request interceptor1 onResolved()')
        return config
      },
      error => {
        console.log('request interceptor1 onRejected()')
        return Promise.reject(error);
      }
   )

  // 添加请求拦截器2
    axios.interceptors.request.use(
      config => {
        console.log('request interceptor2 onResolved()')
        return config
      },
      error => {
        console.log('request interceptor2 onRejected()')
        return Promise.reject(error);
      }
    )

   // 添加响应拦截器1
    axios.interceptors.response.use(
      response => {
        console.log('response interceptor1 onResolved()')
        return response
      },
      function (error) {
        console.log('response interceptor1 onRejected()')
        return Promise.reject(error);
      }
    )

    // 添加响应拦截器2
    axios.interceptors.response.use(
      response => {
        console.log('response interceptor2 onResolved()')
        return response
      },
      function (error) {
        console.log('response interceptor2 onRejected()')
        return Promise.reject(error);
      }
    )

    axios.get('http://localhost:3000/posts')
      .then(response => {
        console.log('data', response.data)
      })
      .catch(error => {
        console.log('error', error.message)
      })

  </script>
拦截器执行顺序结果
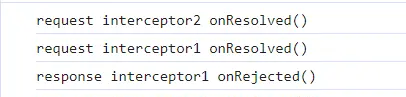

从打印结果可以看到,对于请求拦截器,后添加的拦截器会倒序先执行。对于响应拦截器,是按照添加的顺序正序执行。
三、 axios/lib/core/Axios.js
// axios/lib/core/Axios.js

function Axios(instanceConfig) {
  // 将指定的config, 保存为defaults属性
  this.defaults = instanceConfig;
  // 将包含请求/响应拦截器管理器的对象保存为interceptors属性
  this.interceptors = {
    request: new InterceptorManager(),
    response: new InterceptorManager()
  };
}
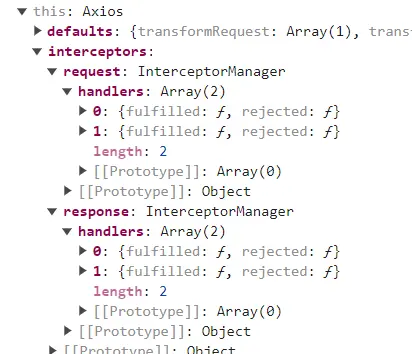
axios实例对象上有一个interceptors对象,对象里面有request属性和response属性。两个属性的值都是InterceptorManager 的实例对象,所以我们进入InterceptorManager方法里面去看看。
四、 axios/lib/core/InterceptorManager.js
// axios/lib/core/InterceptorManager.js

function InterceptorManager() {
  // 用来保存拦截器函数的数组, 数组中每个都是对象, 对象中包含fulfilled/rejected方法
  this.handlers = [];
}

InterceptorManager.prototype.use = function use(fulfilled, rejected) {
  // 添加成功和失败的拦截器函数
  this.handlers.push({
    fulfilled: fulfilled,
    rejected: rejected
  });
  // 返回拦截器对应的ID(也就是下标)
  return this.handlers.length - 1;
};


InterceptorManager.prototype.eject = function eject(id) {...};


InterceptorManager.prototype.forEach = function forEach(fn) {...};

module.exports = InterceptorManager;
-
Use函数是通过原型对象赋值的方式往InterceptorManager构造函数身上添加,
不管是request还是response,作为Interceptor构造函数实例对象,各自的自身会有一个handlers数组,在用户使用use方法时,会传入一个拦截器的成功回调函数和失败回调函数。 -
Use函数在接收到这两个回调函数时,会包装成对象的形式,往自身的handlers数组上push,最后返回该拦截器的下标。 -
除此之外呢,
Interceptor的原型对象上还增加了一个forEach函数,这个暂时先不看,后面会用上。 -
我们用上面的使用案例代码,来看看现在的数据长什么样子:
requestInterceptors: [{fulfilled1(){}, rejected1(){}}, {fulfilled2(){}, rejected2(){}}]

responseInterceptors: [{fulfilled11(){}, rejected11(){}}, {fulfilled22(){}, rejected22(){}}]
五、 axios/lib/core/Axios.js request()方法中处理请求拦截器
use方法将请求和响应的两种拦截器存储进handlers数组以后什么时候使用呢?
这就需要回到我们的request请求方法里面,我们回头看看request方法里面的逻辑:
// axios/lib/core/Axios.js

Axios.prototype.request = function request(config) {

  /*
  创建用于保存请求/响应拦截函数的数组
  数组的中间放发送请求的函数
  数组的左边放请求拦截器函数(成功/失败)
  数组的右边放响应拦截器函数
  */
  var chain = [dispatchRequest, undefined];
  var promise = Promise.resolve(config);

  // 后添加的请求拦截器保存在数组的前面
  this.interceptors.request.forEach(function unshiftRequestInterceptors(interceptor) {
    chain.unshift(interceptor.fulfilled, interceptor.rejected);
  });
  // 后添加的响应拦截器保存在数组的后面
  this.interceptors.response.forEach(function pushResponseInterceptors(interceptor) {
    chain.push(interceptor.fulfilled, interceptor.rejected);
  });

  // 通过promise的then()串连起所有的请求拦截器/请求方法/响应拦截器
  while (chain.length) {
    promise = promise.then(chain.shift(), chain.shift());
  }

  // 返回用来指定我们的onResolved和onRejected的promise
  return promise;
};
// axios./lib/core/InterceptorManager.js
InterceptorManager.prototype.forEach = function forEach(fn) {
  // 遍历处理所有保存的拦截器
  utils.forEach(this.handlers, function forEachHandler(h) {
    if (h !== null) {
      fn(h);
    }
  });
};
interceptors变量的request属性是一个Interceptor实例对象,在调用Interceptor原型对象上的forEach方法时传入unshiftRequestInterceptors这个回调函数,而forEach方法接收到这个回调函数后,会将 request(Interceptor实例对象)或者response(Interceptor实例对象)的handlers数组进行遍历,依次取出数组的元素,比如第一项是:[{fulfilled1(){}, rejected1(){}},然后丢给fn函数,执行fn函数。
fn函数就是:
function unshiftRequestInterceptors(interceptor) {
    chain.unshift(interceptor.fulfilled, interceptor.rejected);
}
request()方法中处理请求拦截器
unshiftRequestInterceptors回调函数得到这个对象后,会通过unshift方法往chain数组的头部,(注意:是数组的头部!!!) 添加请求拦截器的成功回调函数和失败回调函数。如下:
 chain: [
      fulfilled2, rejected2, fulfilled1, rejected1,
      dispatchReqeust, undefined,
    ]
request()方法中处理响应拦截器
同样的,在处理响应拦截器也是相同的逻辑,但是顺序上有细微的不同,我们看执行的以下代码:
  // 后添加的响应拦截器保存在数组的后面
  this.interceptors.response.forEach(function pushResponseInterceptors(interceptor) {
    chain.push(interceptor.fulfilled, interceptor.rejected);
  });
对于响应拦截器的回调函数pushResponseInterceptors,在获取到interceptor对象时,是通过push方法往chain数组的尾部 (注意:是数组的尾部) 添加响应拦截器的成功回调函数和失败回调函数。如下:
 chain: [
      fulfilled2, rejected2, fulfilled1, rejected1,
      dispatchReqeust, undefined,
      fulfilled11, rejected11, fulfilled22, rejected22
]
注意:dispatchReqeust前面的四个元素是请求拦截器的回调函数,undefined后面的四个元素是响应拦截器的回调函数
request方法执行请求逻辑
此时chain的数组长度为10,继续往下执行代码:
  while (chain.length) {
    promise = promise.then(chain.shift(), chain.shift());
  }

  // 返回用来指定我们的onResolved和onRejected的promise
  return promise;
-
chain的长度为10,进入while循环,通过shift方法将chain的
第一个元素取出来当成当前then方法的成功回调函数,将chain的第二个元素取出来当成then方法的失败回调函数,相当于是:promise.then(fulfilled2,rejected2)执行then方法以后,重新为promise赋值。
-
chain的长度为8,继续while循环,通过shift方法将chain的
第一个元素取出来当成当前then方法的成功回调函数,将chain的第二个元素取出来当成then方法的失败回调函数,相当于是:promise.then(fulfilled1,rejected1)执行then方法以后,重新为promise赋值。
正因为每次都是从chain数组头部添加拦截器和从头部取出拦截器,所以后添加的请求响应拦截器反而会先执行
-
chain的长度为6,继续while循环,通过shift方法将chain的
第一个元素取出来当成当前then方法的成功回调函数,将chain的第二个元素取出来当成then方法的失败回调函数,相当于是:promise.then(dispatchRequest,undefined)在请求拦截器的回调函数全部执行完以后,调用dispatchRequest函数进行发送请求
执行then方法以后,重新为promise赋值。
-
chain的长度为4,继续while循环,通过shift方法将chain的
第一个元素取出来当成当前then方法的成功回调函数,将chain的第二个元素取出来当成then方法的失败回调函数,相当于是:promise.then(fulfilled11,rejected11)执行then方法以后,重新为promise赋值。
-
chain的长度为2,继续while循环,通过shift方法将chain的
第一个元素取出来当成当前then方法的成功回调函数,将chain的第二个元素取出来当成then方法的失败回调函数,相当于是:promise.then(fulfilled22,rejected22)执行then方法以后,重新为promise赋值。
正因为每次都是从chain数组尾部加入拦截器,又从头部取出拦截器,所以先添加的响应拦截器会先执行
- chain的长度为0, 跳出while循环,将promise返回给用户
这个时候我们终于明白,在chain数组中为什么作者一开始会“多此一举”添加一个undefined。在处理拦截器逻辑时,axios都会每次从chain数组连续取出一对成功和失败的回调函数。加入了undefined以后,chain的数组长度为偶数,就不会破坏取出时回调函数的顺序。不得不说,这是我认为axios最巧妙的“神来之笔”!!!
最后小结
好了,本篇内容里我们探究了axios中拦截器处理逻辑的来龙去脉,相信大家现在对拦截器问题心中也有了答案吧~
下一篇: 我们将继续探究axios取消功能的实现原理:
新年假期弯道超车:每天都在使用的Axios源码竟然这么简单?—取消请求篇(三)
❓ 如果多次使用请求拦截器和响应拦截器会是什么效果?后面的拦截器配置会覆盖前面的拦截器配置吗?如果不会覆盖,那拦截器的执行顺序是什么?
axios.interceptors.request.use(xxx)  // 第一次使用请求拦截器
axios.interceptors.request.use(yyy)  // 第二次使用请求拦截器
axios.interceptors.response.use(zzz) // 第一次使用响应拦截器
axios.interceptors.response.use(www) // 第二次使用响应拦截器
👉:多次使用拦截器时,不管是请求拦截器还是响应拦截器,axios都会将多个拦截器的成功回调函数和失败回调函数以对象的形式{fulfilled,rejected} 存储进handlers数组里面.后面的拦截器配置不会覆盖前面的拦截器配置。
👉:在request方法执行时,axios会从请求拦截器的成功回调函数和失败回调函数放在chain数组的头部,将响应拦截器的成功回调函数和失败回调函数放在chain数组的尾部。
👉:在执行while循环中的then方法时,axios会从chain的头部开始,每次取出两个元素,第一个元素当作promise的成功回调函数,第二个元素当作promise的失败回调函数。
👉:当chain数组的长度为0时,跳出while循环,将promise返回给用户
👉:拦截器的执行顺序为:
原文链接:https://juejin.cn/post/7332387986535972879 作者:秋天的一阵风