
Electron桌面时钟小摆件

创建electron项目
这里使用electron-vite来构建electron项目(electron安装经常会报错,建议使用国内镜像):
npm create electron-vite
之后会提示命名和选择使用的框架。然后安装依赖:
npm i
绘制时钟
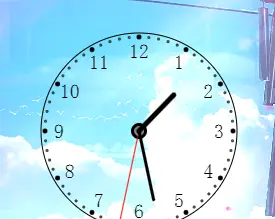
时钟使用canvas绘制。首先绘制表盘,然后绘制刻度、中心点、指针,最后让指针运动起来,指向当前时间。
绘制表盘
我们将画布移动到(100,100)处,取他为圆心绘制一个半径为98的圆,将他当作表盘。
const drawPanel = () => {
  ctx.translate(100, 100);
  ctx.beginPath();
  ctx.arc(0, 0, 98, 0, 2 * Math.PI);
  ctx.fillStyle = "rgba(255, 255, 255, 0)";
  ctx.fill();
  ctx.stroke();
  ctx.closePath();
};
绘制刻度
我们首先将1~12这12个数字按半径80,30弧度一个的距离绘制在表盘内,之后绘制刻度,若当前弧度绘制了数字,则刻度画的长一些,这样我们就在表盘上画好了小时数和60个刻度。
const hourNumbers = () => {
  const hourArr = [1, 2, 3, 4, 5, 6, 7, 8, 9, 10, 11, 12];
  ctx.beginPath();
  ctx.font = "20px fangsong";
  ctx.textAlign = "center";
  ctx.textBaseline = "middle";
  ctx.fillStyle = "#000";
  for (let i = 0; i < hourArr.length; i++) {
    ctx.fillText(
      hourArr[i].toString(),
      80 * Math.cos(((i * 30 - 60) * Math.PI) / 180),
      80 * Math.sin(((i * 30 - 60) * Math.PI) / 180)
    );
  }
  for (let i = 0; i < 60; i++) {
    if (i % 5 === 0) {
      ctx.beginPath();
      ctx.arc(
        94 * Math.cos(((i * 6 - 300) * Math.PI) / 180),
        94 * Math.sin(((i * 6 - 300) * Math.PI) / 180),
        2,
        0,
        2 * Math.PI,
        true
      );
      ctx.fillStyle = "#000";
      ctx.fill();
      ctx.stroke();
    } else {
      ctx.beginPath();
      ctx.arc(
        94 * Math.cos(((i * 6 - 300) * Math.PI) / 180),
        94 * Math.sin(((i * 6 - 300) * Math.PI) / 180),
        1,
        0,
        2 * Math.PI,
        true
      );
      ctx.fillStyle = "#ccc";
      ctx.fill();
      ctx.stroke();
    }
  }
};
绘制盘心
在圆心位置画两个小圆当作盘心,让指针在盘心上转动。
const centerDot = () => {
  ctx.beginPath();
  ctx.fillStyle = "#000";
  ctx.arc(0, 0, 8, 0, 2 * Math.PI);
  ctx.fill();
  ctx.beginPath();
  ctx.fillStyle = "gray";
  ctx.arc(0, 0, 5, 0, 2 * Math.PI);
  ctx.fill();
};
绘制时、分、秒针
- 时针当前所在的位置应该是:
(当前小时数 / 12)* 2Π +(当前分钟数 / 60)* 1/6Π - 分针当前所在的位置应该是:
(当前分钟数 / 60)* 2Π - 秒针当前所在的位置应该是:
(当前秒数 / 60)* 2Π
这里秒对时针、分针的影响较小,所以忽略不计。
const hourHand = (hours: number, minutes: number) => {
  const radius =
    ((2 * Math.PI) / 12) * hours + (((1 / 6) * Math.PI) / 60) * minutes;
  ctx.save();
  ctx.beginPath();
  ctx.lineWidth = 5;
  ctx.lineCap = "round";
  ctx.strokeStyle = "#000";
  ctx.rotate(radius);
  ctx.moveTo(0, 0);
  ctx.lineTo(0, -50);
  ctx.stroke();
  ctx.restore();
};
让时钟动起来
定时器获取当前的时间,然后重新绘制时钟即可。
const update = () => {
  const time = new Date();
  const hours = time.getHours();
  const minutes = time.getMinutes();
  const seconds = time.getSeconds();
  ctx.save();
  drawPanel();
  hourNumbers();
  centerDot();
  secondHand(seconds);
  minuteHand(minutes);
  hourHand(hours, minutes);
  ctx.restore();
};

const runFrame = () => {
  ctx.clearRect(0, 0, canvas.width, canvas.height);
  update();
  requestAnimationFrame(runFrame);
};
runFrame();
修改Electron窗口属性
现在我们已经绘制好了一个可以运动的时钟了,然后我们需要将他变成一个置顶在桌面上的可拖动时钟摆件。
 win = new BrowserWindow({
    width: 340,
    height: 340,
    // titleBarStyle: "hidden",
    transparent: true,  //透明
    frame: false,      //隐藏框架
    movable: true,
    icon: path.join(process.env.VITE_PUBLIC, "electron-vite.svg"),
    webPreferences: {
      preload: path.join(__dirname, "preload.js"),
      nodeIntegration: true,
    },
  });

  // 始终置顶
  win.setAlwaysOnTop(true);
  // 不显示在任务栏
  win.setSkipTaskbar(true);
这样设置之后我们就得到了一个透明的,始终置顶的时钟,但是可能会存在无法拖拽的问题,这时只需找到index.html文件,给里面的body标签添加样式即可解决:
style="-webkit-app-region: drag"
然后我们希望自定义一下任务托盘的图标和事件:
tray = new Tray(path.join(process.env.VITE_PUBLIC, "clock.jpg"));

// 给托盘图标添加右键菜单
const contextMenu = Menu.buildFromTemplate([
  { label: "显示", click: () => win.show() },
  { label: "隐藏", click: () => win.hide() },
  { label: "退出", click: () => app.quit() },
]);
tray.setToolTip("桌面时钟");
tray.setContextMenu(contextMenu);

// 当点击托盘图标时,显示/隐藏窗口
tray.on("click", () => {
  if (win.isVisible()) {
    win.hide();
  } else {
    win.show();
  }
});
现在桌面时钟摆件就已经基本完成了,但是还存在一个问题,那就是时钟会遮挡鼠标的事件,导致它下层的元素无法点击到,要解决这个问题,我们可以获取鼠标当前的像素块,看看他是否是透明的,如果鼠标处于透明像素块,则不捕获鼠标事件:
//实现透明区域忽略鼠标事件
setInterval(() => {
  const point = screen.getCursorScreenPoint();
  const [x, y] = win.getPosition();
  const [w, h] = win.getSize();

  if (point.x > x && point.x < x + w && point.y > y && point.y < y + h) {
    updateIgnoreMouseEvents(point.x - x, point.y - y);
  }
}, 300);

const updateIgnoreMouseEvents = async (x: number, y: number) => {
  // 捕获鼠标所在区域1*1的像素块.
  const image = await win.webContents.capturePage({
    x,
    y,
    width: 1,
    height: 1,
  });
  // 获取鼠标所在的像素块的alpha通道值
  var buffer = image.getBitmap();
  //若为透明,则buffer[3]为0,不捕获鼠标事件
  win!.setIgnoreMouseEvents(!buffer[3]);
};
至此Electron+Canvas实现桌面时钟小摆件已全部完成,可以执行打包命令:
npm run build
将Electron程序打包,生成安装包程序,就可以把安装包发给小伙伴试试啦。
原文链接:https://juejin.cn/post/7341288089494224923 作者:笨笨的地球人