

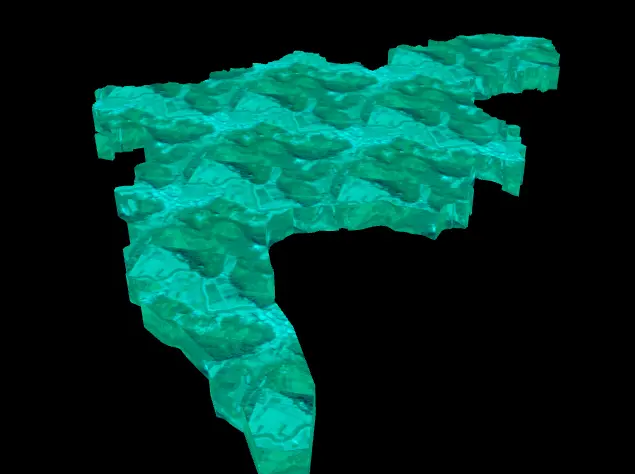
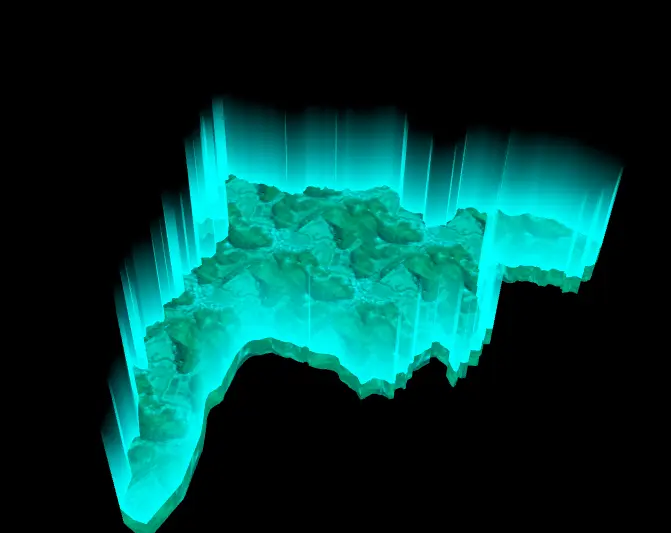
1.3D区块泛光轮廓
网上好多是LineMaterial画的轮廓,通过attributes的color来配置高亮部分颜色,我这里用的是TubeGeometry,就想有点线宽的样子。
1.画个3D区块
createRegion(points) {
          const extrudeSettings = {
            depth: 0.2,
            bevelEnabled: false
          };
          const shape = new THREE.Shape();

          shape.moveTo(points[0].x, points[0].z);

          for (let i = 1; i < points.length; i = i + 2) {
            shape.lineTo(points[i].x, points[i].z);
          }
          shape.lineTo(points[0].x, points[0].z);
          //添加区块形状
          const geometry = new THREE.ExtrudeGeometry(shape, extrudeSettings);
          //卫星贴图
          const tex = new THREE.TextureLoader().load('./assets/tex.png');
          tex.wrapS = THREE.RepeatWrapping;
          tex.wrapT = THREE.RepeatWrapping;
          const material = new THREE.MeshBasicMaterial({
            map: tex,
            color: new THREE.Color('#00FFFF')
          });
          const mesh = new THREE.Mesh(geometry, material);
          //将竖着的形状转个90度
          mesh.rotateX(Math.PI * 0.5);
          return mesh
        }

注意:
- points是区块外边界,这里用的是广州的。卫星贴图是随便截图的正方形图片,不是真实的,只是为了好看。
- 经纬度坐标记得用d3-geo转换成px
import d3geo from './d3-geo.min.js';

let geoFun;
export function initGeoFun(size) {
//放大倍数
  geoFun = d3geo.geoMercator().scale(size);

}

export const latlng2px = (pos) => {
  if (pos[0] >= -180 && pos[0] <= 180 && pos[1] >= -90 && pos[1] <= 90) {
    return geoFun(pos);
  }
  return pos;
};


initGeoFun(180);
          let points = await this.getData();
          //转换经纬度
          points = points.map((item) => {
            const p = latlng2px(item);
            return new THREE.Vector3(p[0], 0, p[1]);
          });
详细3D区块地图实现请参考:用Three.js搞个炫酷的3D区块地图
2.区块轮廓
createLine(points) {
          const curve = new THREE.CatmullRomCurve3(points, true, 'catmullrom', 0);

          const geometry = new THREE.TubeGeometry(
            curve,
            Math.round(points.length * 0.5),
            0.01,
            8,
            true
          );

          const material = new THREE.MeshBasicMaterial({ color: 'white' });
          const mesh = new THREE.Mesh(geometry, material);
          return mesh;
        }
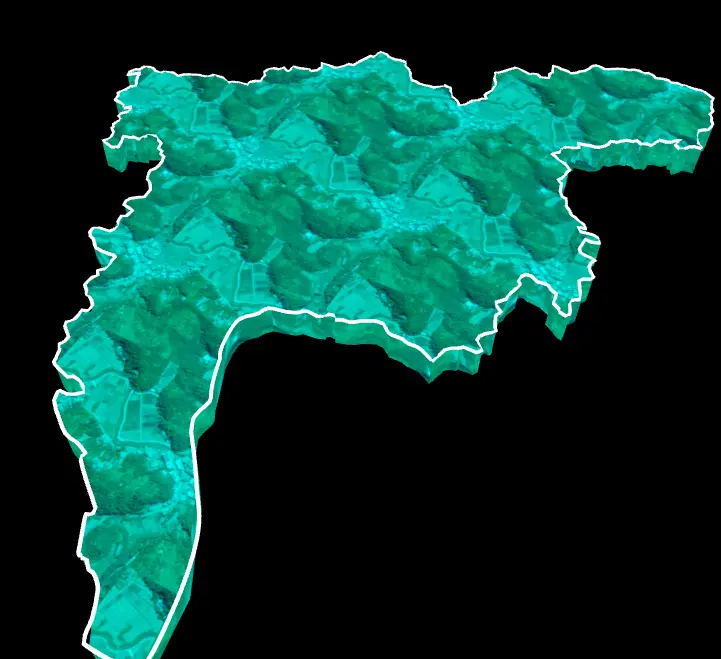
注意:
- CatmullRomCurve3传入的点经纬度是x位经度,z为纬度。
- 因为是基于CatmullRomCurve3计算的,可能轮廓有一小部分不重合,但是别纠结,看上去没问题就行。
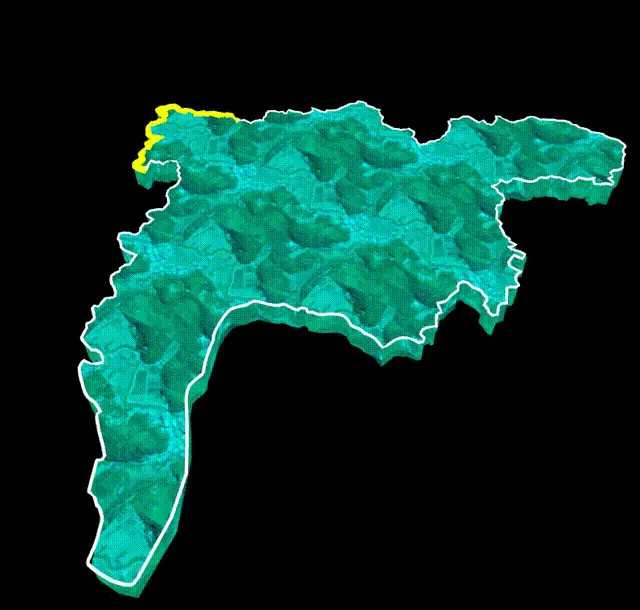
3.让轮廓动起来
顶点着色器
uniform float time;
uniform float size;
uniform float len;
uniform vec3 color1;
uniform vec3 color2;
varying vec3 vColor;
void main() {
    vColor =color1;
    vec3 newPosition = position;
    float d = uv.x - time;//当前运动点的距离
    if(abs(d) < len) {//如果在范围内,则管道宽度变大,颜色变成color2
        newPosition = newPosition + normal * size;
        vColor = color2;
    }
    gl_Position = projectionMatrix * modelViewMatrix * vec4(newPosition, 1.0);
}
片元着色器
varying vec3 vColor;
void main() {
  gl_FragColor =vec4(vColor, 1.0);
}
将材质换成ShaderMaterial
 const material = new THREE.ShaderMaterial({
            uniforms: {
              time: { value: 0.0 },//运动时间
              len: { value: 0.05 },//运动点距离范围
              size: { value: 0.02 },//管道增加宽度
              color1: { value: new THREE.Color('#FFFFFF') },
              color2: { value: new THREE.Color('yellow') }
            },
            vertexShader: ``,
            fragmentShader: ``
          });
          this.material = material;
动画修改time,让轮廓随着时间动起来
   animateAction() {
          if (this.material) {
            if (this.time >= 1.0) {
              this.time = 0.0;
            }
            this.time = this.time + 0.005;
            this.material.uniforms.time.value = this.time;
          }
        }
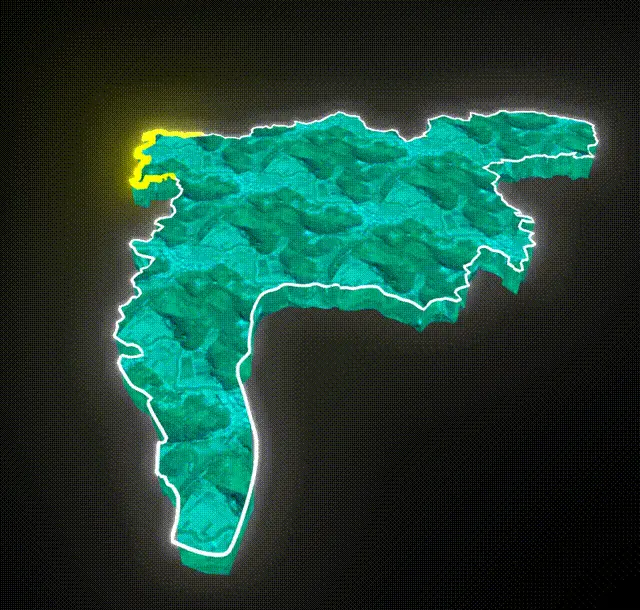
4.添加后期泛光效果
只有轮廓需要泛光,这里用了visible显隐来控制部分泛光
 initBloom(params) {
          const renderScene = new RenderPass(this.scene, this.camera);

          const bloomPass = new UnrealBloomPass(
            new THREE.Vector2(this.container.offsetWidth, this.container.offsetHeight),
            1.5,
            0.4,
            0.85
          );
          bloomPass.threshold = params.threshold;
          bloomPass.strength = params.strength;
          bloomPass.radius = params.radius;

          const composer = new EffectComposer(this.renderer);
          composer.addPass(renderScene);
          composer.addPass(bloomPass);
          const outputPass = new OutputPass();
          composer.addPass(outputPass);

          this.composer = composer;
        }
animate(){
 this.renderer.setViewport(
              0,
              0,
              this.container.offsetWidth,
              this.container.offsetHeight
            );
            //必须关闭autoClear,避免渲染效果被清除
            this.renderer.autoClear = false;
            this.renderer.clear();
            //不需要发光的物体在bloom后期前隐藏
            this.normalObj.visible = false;

            this.composer.render();
            this.renderer.clearDepth();
            //不需要发光的物体在bloom后期后显示
            this.normalObj.visible = true;
            this.renderer.render(this.scene, this.camera);
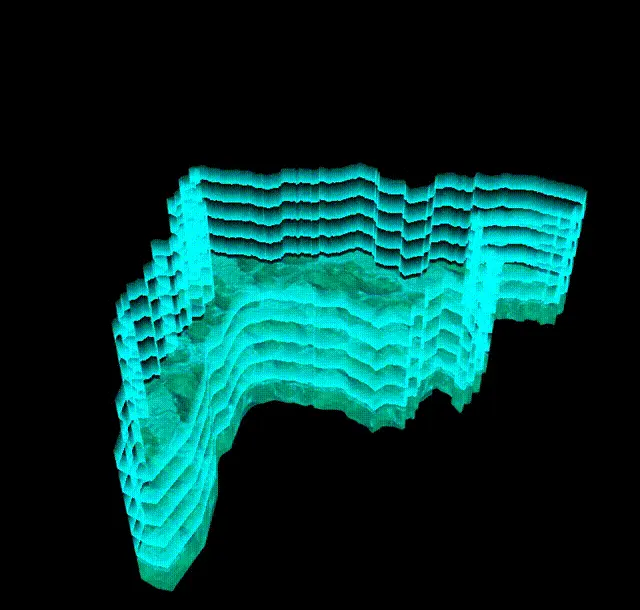
2.3D区块渐变围栏
- 先将区块形状画出来
  createShape(points) {
          const shape = new THREE.Shape();

          shape.moveTo(points[0].x, points[0].z);

          for (let i = 1; i < points.length; i = i + 2) {
            shape.lineTo(points[i].x, points[i].z);
          }
          shape.lineTo(points[0].x, points[0].z);
          return shape;
        }
- 围栏和区块都共用这个形状,分别创建两个ExtrudeGeometry,区块的厚度小点,围栏的厚度大点。
- 要实现渐变围栏则需要使用ShaderMaterial
顶点着色器
varying vec2 vUv;
varying vec3 vNormal;

void main() {
    vUv = uv;
    vNormal = normal;

    gl_Position = projectionMatrix * modelViewMatrix * vec4(position, 1.0);
}
片元着色器
uniform vec3 color1;
varying vec2 vUv;
varying vec3 vNormal;
void main() {
//顶面和底面都为透明
    if(vNormal.z == 1.0 || vNormal.z == -1.0 || vUv.y == 0.0) {
        discard;
    } else {
        gl_FragColor = vec4(color1, mix(1.0, 0.0, vUv.y));//透明度根据竖直方向渐变
    }
}
const material = new THREE.ShaderMaterial({
            side: THREE.DoubleSide,//双面可见
            transparent: true,//开启透明度
            depthTest: false,//关闭深度测试
            uniforms: {
              color1: { value: new THREE.Color('#00FFFF') }//围栏颜色
            },
            vertexShader: ``,
            fragmentShader: ``
          });
注意:
- 围栏记得开启透明度,否则没有渐变效果。
- 另外因为有透明的问题,会出现深度冲突,轮廓重叠的地方有点奇怪的黑边,所以关闭深度测试来纠正。
- 围栏和区块还要根据厚度调整一下位置才能呈现合适的效果。
3.3D区块多重渐变围栏
- 根据上面的围栏只需要稍微修改一下片元着色器
uniform vec3 color1;
uniform float time;
uniform float num;
varying vec2 vUv;
varying vec3 vNormal;
void main() {
    if(vNormal.z == 1.0 || vNormal.z == -1.0 || vUv.y == 0.0) {
        discard;
    } else {
    //随着时间移动的多重渐变
        gl_FragColor = vec4(color1, 1.0 - fract((vUv.y - time) * num));
    }
}
- 对应的ShaderMaterial也要添加参数
const material = new THREE.ShaderMaterial({
            side: THREE.DoubleSide,
            transparent: true,
            depthTest: false,
            uniforms: {
              time: { value: 0.0 },//时间变化
              num: { value: 5.0 },//几重渐变
              color1: { value: new THREE.Color('#00FFFF') }
            },
            vertexShader: ``,
            fragmentShader: ``
          });


            animateAction() {//改变时间动起来
          if (this.material) {
            if (this.time >= 1.0) {
              this.time = 0.0;
            }
            this.time = this.time + 0.005;
            this.material.uniforms.time.value = this.time;
          }
        }
Github地址
原文链接:https://juejin.cn/post/7343902899095306259 作者:敲敲敲敲暴你脑袋