

前言
这是vue3系列源码的第十章,使用的vue3版本是3.4.15。
背景
这篇文章来看一下vue3中生命周期的实现
前置
这里我们准备几个组件,能够更好的观察生命周期的作用实际。
// app.vue

<template>
  <div>
    <HelloWorld v-if="show"/>
    <textVue v-else/>
  </div>
  <div>
    <button @click="check">点击</button>
  </div>
 </template>
 <script setup>
 import { ref, onBeforeMount, onMounted, onBeforeUpdate, onUpdated } from 'vue'
 import HelloWorld from './HelloWorld.vue';
 import textVue from './text.vue';

 const show = ref(true)

 const check = () => {
  show.value = false
 }

 console.log('app setup')


 onBeforeMount(() => console.log('app beforeMount'))
 onMounted(() => console.log('app mounted'))
 onBeforeUpdate(() => console.log('app beforeUpdate'))
 onUpdated(() => console.log('app updated'))
 </script>
// hellowWorld.vue

<template>
  <div>hellow word</div>
</template>
<script setup>
 import { onBeforeUnmount, onUnmounted } from 'vue'

 console.log('hello setup')
 onBeforeUnmount(() => {
  console.log('hello beforeUnmount')
 })
 onUnmounted(() => console.log('hello unmounted'))

</script>
// test.vue
<template>
  <div>text</div>
</template>
这里面我们通过v-if的切换,来实现组件的卸载。
setup
首先遇到的是setup的执行。
在setupStatefulComponent函数中,执行了setup函数。
那么也就是在这里,执行了第一个console.log('app setup')
beforeMount
接下来,在setupRenderEffect函数中,定义了componentUpdateFn函数。也就是在这个函数中,执行了beforeMount的内容。
 const componentUpdateFn = () => {
      if (!instance.isMounted) {
        let vnodeHook: VNodeHook | null | undefined
        const { el, props } = initialVNode
        const { bm, m, parent } = instance
        const isAsyncWrapperVNode = isAsyncWrapper(initialVNode)

        toggleRecurse(instance, false)
        // beforeMount hook
        if (bm) {
          invokeArrayFns(bm)
        }
        // onVnodeBeforeMount
        if (
          !isAsyncWrapperVNode &&
          (vnodeHook = props && props.onVnodeBeforeMount)
        ) {
          invokeVNodeHook(vnodeHook, parent, initialVNode)
        }
        ...
   }
上面函数中的bm就是指的beforeMounte,我们定义了这个钩子之后,就会调用。
const invokeArrayFns = (fns: Function[], arg?: any) => {
  for (let i = 0; i < fns.length; i++) {
    fns[i](arg)
  }
}
function injectHook(
  type: LifecycleHooks,
  hook: Function & { __weh?: Function },
  target: ComponentInternalInstance | null = currentInstance,
  prepend: boolean = false,
): Function | undefined {
  if (target) {
    const hooks = target[type] || (target[type] = [])
    // cache the error handling wrapper for injected hooks so the same hook
    // can be properly deduped by the scheduler. "__weh" stands for "with error
    // handling".
    const wrappedHook =
      hook.__weh ||
      (hook.__weh = (...args: unknown[]) => {
        if (target.isUnmounted) {
          return
        }
        // disable tracking inside all lifecycle hooks
        // since they can potentially be called inside effects.
        pauseTracking()
        // Set currentInstance during hook invocation.
        // This assumes the hook does not synchronously trigger other hooks, which
        // can only be false when the user does something really funky.
        const reset = setCurrentInstance(target)
        const res = callWithAsyncErrorHandling(hook, target, type, args)
        reset()
        resetTracking()
        return res
      })
    if (prepend) {
      hooks.unshift(wrappedHook)
    } else {
      hooks.push(wrappedHook)
    }
    return wrappedHook
  } else if (__DEV__) {
   ...
  }
}
最终就是在injectHook函数中最终执行了我们传入的回调函数。
也就是第二个console.log('app beforeMount')。
子组件的setup
接着,还是在componentUpdateFn函数中,进行了对subTree的patch
patch(
            null,
            subTree,
            container,
            anchor,
            instance,
            parentSuspense,
            namespace,
          )
那么也就是重复了父组件的上面的过程,也就是执行setup和beforeMount和mount。
这里打印了console.log('hello setup')。
beforeCreate created
那么这里其实还有两个钩子,我们并没有用到。就是beforeCeate和created钩子。
因为在setup的写法里,并不支持这两个钩子,因为他们和setup的执行时机非常接近。
但是在选项式的写法里,还是可以定义这两个钩子,那么他们到底是在什么时候执行。
我们都知道setup是在所有的生命周期之前执行的,那么其实,setup执行完毕后,就会去执行这两个钩子。
handleSetupResult(instance, setupResult, isSSR)
我们在setupStatefulComponent函数中执行了setup函数后,会进入handleSetupResult函数中。
function handleSetupResult(
  instance: ComponentInternalInstance,
  setupResult: unknown,
  isSSR: boolean,
) {
finishComponentSetup(instance, isSSR)
}
最终会进入到finishComponentSetup函数中。
function finishComponentSetup(
  instance: ComponentInternalInstance,
  isSSR: boolean,
  skipOptions?: boolean,
) {
 // support for 2.x options
  if (__FEATURE_OPTIONS_API__ && !(__COMPAT__ && skipOptions)) {
    const reset = setCurrentInstance(instance)
    pauseTracking()
    try {
      applyOptions(instance)
    } finally {
    ...
    }
  }
}
这里对选项式API的写法做了支持。
function applyOptions(instance: ComponentInternalInstance) {
   if (options.beforeCreate) {
    callHook(options.beforeCreate, instance, LifecycleHooks.BEFORE_CREATE)
  }
  ...
   if (created) {
    callHook(created, instance, LifecycleHooks.CREATED)
  }
}
就是在applyOptions函数中,先后执行了beforeCreate和created
mounted
接下来,还是在componentUpdateFn函数中,执行了mounted钩子中的回调函数。
// mounted hook
        if (m) {
          queuePostRenderEffect(m, parentSuspense)
        }
这里的m,代表的就是mounted。
function queueEffectWithSuspense(
  fn: Function | Function[],
  suspense: SuspenseBoundary | null,
): void {
  if (suspense && suspense.pendingBranch) {
    if (isArray(fn)) {
      suspense.effects.push(...fn)
    } else {
      suspense.effects.push(fn)
    }
  } else {
    queuePostFlushCb(fn)
  }
}
这里的mounted中的回调函数会加入到post异步队列中。
  const render: RootRenderFunction = (vnode, container, namespace) => {
    if (vnode == null) {
      if (container._vnode) {
        unmount(container._vnode, null, null, true)
      }
    } else {
      patch(
        container._vnode || null,
        vnode,
        container,
        null,
        null,
        null,
        namespace,
      )
    }
    if (!isFlushing) {
      isFlushing = true
      flushPreFlushCbs()
      flushPostFlushCbs()
      isFlushing = false
    }
    container._vnode = vnode
  }
当组件patch的流程走完了,也就是挂载完毕后,会在flushPostFlushCbs函数中执行post异步队列中的所有函数,也就是在这里,会执行console.log('app mounted')。
所以这里也很容易想到一个面试题,那就是父子组件的这些钩子函数的执行顺序:
答案很明显了:
- 父组件会先执行了setup beforeCreate created beforeMount
- 然后进入
subTree的patch,然后去执行子组件的setup beforeCreate created beforeMount - 子组件的
patch过程结束后,会执行子组件的mounted - 最后才会执行父组件的mounted。
那么渲染阶段的生命周期就是这么回事了,下面我们点击一下页面上的按钮,进入到组件的更新,和子组件的销毁过程。
beforeUpdate
再次进入app.vue的setupRenderEffect函数中的componentUpdateFn函数中,只不过这次走的更新阶段的代码。
 const componentUpdateFn = () => {
   if (!instance.isMounted) {
      ...
   else {
        let { next, bu, u, parent, vnode } = instance
        if (bu) {
          invokeArrayFns(bu)
        }
        ...
         if (u) {
          queuePostRenderEffect(u, parentSuspense)
        }
   }
这里的bu就是beforeUpdate
就是在这里执行了console.log('app beforeUpdate')
beforeUnmount
接着就进入到了新旧元素的patch阶段。
 patch(
         prevTree,
         nextTree,
         // parent may have changed if it's in a teleport
         hostParentNode(prevTree.el!)!,
         // anchor may have changed if it's in a fragment
         getNextHostNode(prevTree),
         instance,
         parentSuspense,
         namespace,
       )
 const patch: PatchFn = (
   n1,
   n2,
   container,
   anchor = null,
   parentComponent = null,
   parentSuspense = null,
   namespace = undefined,
   slotScopeIds = null,
   optimized = __DEV__ && isHmrUpdating ? false : !!n2.dynamicChildren,
 ) => {
   if (n1 === n2) {
     return
   }

   // patching & not same type, unmount old tree
   if (n1 && !isSameVNodeType(n1, n2)) {
     anchor = getNextHostNode(n1)
     unmount(n1, parentComponent, parentSuspense, true)
     n1 = null
   }
   ...
 }
在patch里面,先执行了n1也就是旧组件的unmount。
 const unmount: UnmountFn = (
   vnode,
   parentComponent,
   parentSuspense,
   doRemove = false,
   optimized = false,
 ) => {
  if (shapeFlag & ShapeFlags.COMPONENT) {
     unmountComponent(vnode.component!, parentSuspense, doRemove)
   }
 }
这里是对组件的卸载,调用了unmountComponent
 const unmountComponent = (
   instance: ComponentInternalInstance,
   parentSuspense: SuspenseBoundary | null,
   doRemove?: boolean,
 ) => {
     const { bum, scope, update, subTree, um } = instance
     // beforeUnmount hook
    if (bum) {
     invokeArrayFns(bum)
   }
   ...
    // unmounted hook
   if (um) {
     queuePostRenderEffect(um, parentSuspense)
   }
 }
这里的bum就是beforeUnmount,也就是在这里执行了console.log('hello beforeUnmount')
unmounted
在上面的bum执行后,就执行了queuePostRenderEffect, 这里的um就是unmounted,和mounted一样,这里也是加入到post异步队列中,不是立即执行。
updated
那么当patch过程结束了后,此时的页面上的元素已经发生了变化,我们再回到componentUpdateFn函数中看,最后执行了
  // updated hook
        if (u) {
          queuePostRenderEffect(u, parentSuspense)
        }
这里还是一样,u就是updated,并且加入到post异步队列中。
最后,来到flushPostFlushCbs函数中,开始执行异步队列中的任务。
先执行了console.log('hello unmounted')
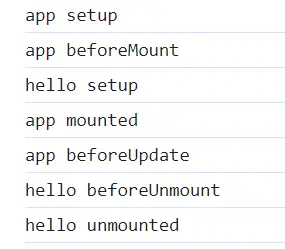
然后执行了console.log('app updated')
下面是实际跑出来的验证结果。

keepAlive
那么其实在生命周期里,有两个特殊一点的,activated 和deactivated。
这里我们需要把之前的组件稍微改造一下:
// app.vue
<template>
  <div>
    <KeepAlive>
      <HelloWorld v-if="show"/>
      <textVue v-else/>
    </KeepAlive>
  </div>
  <div>
    <button @click="check">点击</button>
  </div>
 </template>
app.vue中把两字子组件用keepAlive包裹一下
// helloWorld.vue

<template>
  <div>hellow word</div>
</template>
<script setup>
 import { onBeforeMount, onMounted,onBeforeUnmount, onUnmounted, onActivated, onDeactivated } from 'vue'

 console.log('hello setup')
 onBeforeMount(() => console.log('hello beforeMount'))
 onMounted(() => console.log('hello mount'))
 onBeforeUnmount(() => {
  console.log('hello beforeUnmount')
 })
 onUnmounted(() => console.log('hello unmounted'))
 onActivated(() => console.log('hello actived'))
 onDeactivated(() => console.log('hello deactivated'))
</script>
helloWorld.vue组件中添加几个生命周期钩子,这里除了添加了onActivated 和 onDeactivated,还添加了onBeforeMount onMounted,是为了体现他们之间的调用顺序。
activated
在componentUpdateFn函数中,在子组件的mounted钩子被添加到异步队列中之后,这里就把actived钩子的内容也添加到了异步队列中了。
// activated hook for keep-alive roots.
// #1742 activated hook must be accessed after first render
// since the hook may be injected by a child keep-alive
if (initialVNode.shapeFlag & ShapeFlags.COMPONENT_SHOULD_KEEP_ALIVE ||
          (parent &&
            isAsyncWrapper(parent.vnode) &&
            parent.vnode.shapeFlag & ShapeFlags.COMPONENT_SHOULD_KEEP_ALIVE)
        ) {
          instance.a && queuePostRenderEffect(instance.a, parentSuspense)
 }
所以从执行顺序上看,actived钩子应该是在子组件的mounted之后,父组件的mounted之前。
deactivated
当我们点击了按钮,更新了组件之后,
在卸载helloWorld组件的时候:
const unmount: UnmountFn = (
    vnode,
    parentComponent,
    parentSuspense,
    doRemove = false,
    optimized = false,
  ) => {
    const {
      type,
      props,
      ref,
      children,
      dynamicChildren,
      shapeFlag,
      patchFlag,
      dirs,
    } = vnode
    // unset ref
    if (ref != null) {
      setRef(ref, null, parentSuspense, vnode, true)
    }

    if (shapeFlag & ShapeFlags.COMPONENT_SHOULD_KEEP_ALIVE) {
      ;(parentComponent!.ctx as KeepAliveContext).deactivate(vnode)
      return
    }
   }
会执行deactivate函数
这个函数是定义在KeepAliveImpl类中的,
 sharedContext.deactivate = (vnode: VNode) => {
      const instance = vnode.component!
      move(vnode, storageContainer, null, MoveType.LEAVE, parentSuspense)
      queuePostRenderEffect(() => {
        if (instance.da) {
          invokeArrayFns(instance.da)
        }
        const vnodeHook = vnode.props && vnode.props.onVnodeUnmounted
        if (vnodeHook) {
          invokeVNodeHook(vnodeHook, instance.parent, vnode)
        }
        instance.isDeactivated = true
      }, parentSuspense)

      if (__DEV__ || __FEATURE_PROD_DEVTOOLS__) {
        // Update components tree
        devtoolsComponentAdded(instance)
      }
    }
这里会先执行move函数,把旧组件挂载到别的地方,然后把deactivated钩子的回调函数添加到异步队列中,这里的da就是deactivated。
当组件的更新完成后,再把app.vue的update钩子添加到异步队列中。
所以deactivated的执行时机应该是在父组件beforeUpdate之后,父组件deactivated之前。
同时,这里还要注意到,被keepAlive包裹之后,子组件并没有被销毁,所有没有调用beforeUnmounte和unMounted钩子。
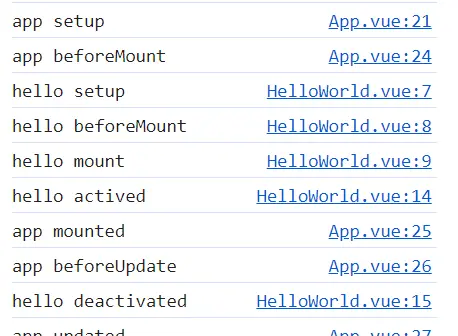
下面是实际结果:
总结
以上就是生命周期相关的内容了,
我们分析了八个生命周期钩子,setup,和keepAlive涉及到的两个钩子activated deactivated的执行时机,更加系统深入的了解了生命周期在源码中的作用方式和时机,以后在项目中也能更好的使用它们。
原文链接:https://juejin.cn/post/7343921947871051827 作者:小识谭记