
原文链接:Build your first Angular app,by Angular Team。翻译时有删改。
Angular 和 React、Vue 是目前全世界最流行的三大框架之一。本文将带你手动创建一个 Anuglar App,领略 Angular 的编码方式。
环境准备
首先,确保你的电脑中安装了 LTS 版本的 Node.js,目前 Node.js 的 LTS 版本 是 v20.11.1(npm 10.2.4),推荐安装。
PS D:\learning> node -v
v20.11.1
PS D:\learning> npm -v
10.2.4
然后,全局安装 Angular CLI 程序,这是一个 npm 包。
PS D:\learning> npm install -g @angular/cli
PS D:\learning> npm list -g
C:\Users\张宝\AppData\Roaming\npm
├── @angular/cli@17.3.0
安装成功后,就有一个全局 ng 指令可以使用了。
最后就是代码编辑器了,推荐 VS Code,同时安装插件 Angular Language Service,它会提供代码自动提示支持。
这样,就完成了 Angular 项目的环境准备。
创建项目
首先,使用 ng new 命令创建一个全新的项目 my-first-angular-app。
PS D:\learning> ng new my-first-angular-app
一路 Enter,采用默认选项就好。
进入项目,使用 VS Code 打开。
PS D:\learning> cd .\my-first-angular-app\
PS D:\learning\my-first-angular-app> code .
安装依赖,启动并在浏览器中打开项目。
PS D:\learning\my-first-angular-app> npm install
PS D:\learning\my-first-angular-app> ng serve --open
Initial chunk files | Names         |  Raw size
polyfills.js        | polyfills     |  83.60 kB |
main.js             | main          |  22.09 kB |
styles.css          | styles        |  95 bytes |

                    | Initial total | 105.78 kB

Application bundle generation complete. [1.361 seconds]

Watch mode enabled. Watching for file changes...
  ➜  Local:   http://localhost:4200/
  ➜  press h + enter to show help
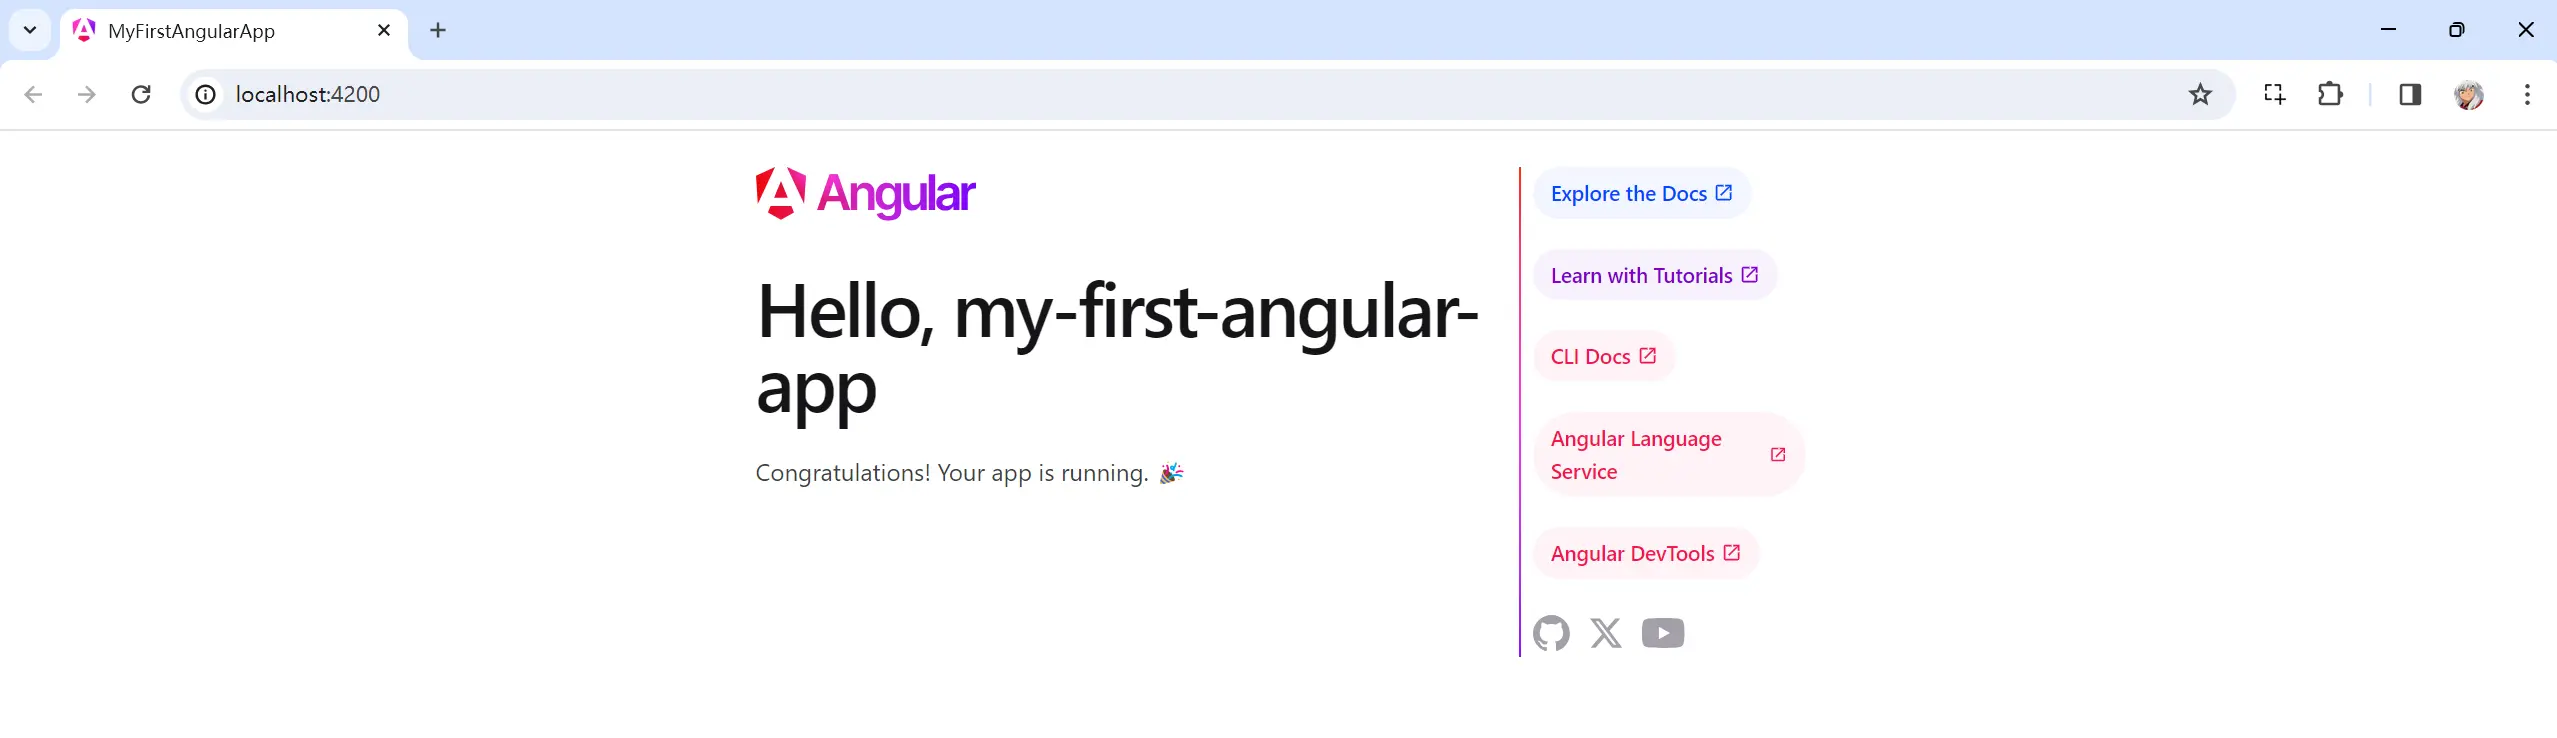
当你看到类似下面的页面被打开时,说明项目启动成功。

写一个“Hello World”
现在我们对项目中的文件做一些修改,更新页面。
- 首先,打开
my-first-angular-app/src/index.html。 - 将 HTML 的
<title>元素内容修改如下
<title>Homes</title>
-
接下里,打开
my-first-angular-app/src/app/app.component.ts文件,这是项目的根组件 -
app.component.ts 文件里,在
@Component定义中,修改 template 部分
- templateUrl: './app.component.html',
+ template: `<h1>Hello world!</h1>`,
- 同样在 app.component.ts 文件的 AppComponent 类定义中,更新 title 变量赋值部分
- title = 'my-first-angular-app';
+ title = 'homes';
-
终端终止
ng serve执行,重新再执行一遍。 -
浏览器打开 localhost:4200 地址查看
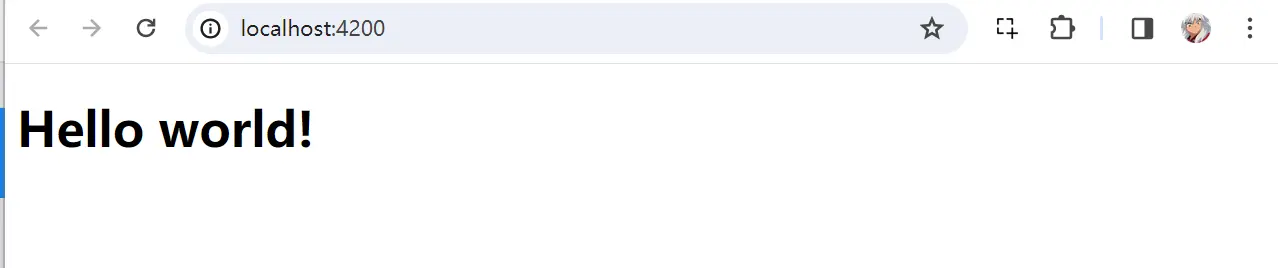
修改成功,这就是 Angular 的“Hello World”程序啦。
创建 Home 组件
Angular 也是将页面看成是一个个组件(Component)构成的。
Angular 中,创建组件使用的是 ng generate component 命令,下面就来带大家手动创建一个 Home 组件感受一下。
- 进入
my-first-angular-app目录 - 终端执行如下指令,创建一个新的
HomeComponent组件
PS D:\learning\my-first-angular-app> ng generate component home --inline-template --skip-tests
CREATE src/app/home/home.component.ts (256 bytes)
CREATE src/app/home/home.component.css (0 bytes)
发现,在 src/app/ 下创建了一个 home 目录,包含 Home 组件内容。
--inline-template、--skip-tests 是命令参数:表示使用的模板是内嵌的,还有忽略测试文件的创建。
- 进入 app.component.ts 文件。将 HomeComponent 组件引入进来
import { HomeComponent } from './home/home.component'
- 更新
@Component中的 imports
imports: [
  HomeComponent,
],
- 更新
@Component中的 template
template: `
  <main>
    <section class="content">
      <app-home></app-home>
    </section>
  </main>
`,
- 终端 ng serve 启动项目查看

看到这个效果,就说明组件添加成功了。
为 Home 组件添加功能
现在,我们为 Home 组件增加一个功能。
- 进入到 home.component.ts 文件
- 更新
@Component的 template
template: `
  <section>
    <form>
      <input type="text" placeholder="Filter by city">
      <button class="primary" type="button">Search</button>
    </form>
  </section>
`,
- 接下来,打开 home.component.css 文件,为 Home 组件增加一些样式
input[type="text"] {
  margin-right: 4px;
  width: 30%;
}

button {
  font: inherit;
}

.results {
  display: grid;
  gap: 14px;
  grid-template-columns: repeat(auto-fill, minmax(400px, 400px));
  margin-top: 50px;
  justify-content: space-around;
}
我们为 <input>、<button> 元素简单设置了一些样式。.results 是查找结果的包装元素,先写上。
- 打开地址 http://localhost:4200/ 查看效果

创建 HousingLocation 组件
- 同样,进入
my-first-angular-app目录 - 终端执行如下指令,创建一个新的
HousingLocationComponent组件
PS D:\learning\my-first-angular-app> ng generate component housingLocation --inline-template --skip-tests
CREATE src/app/housing-location/housing-location.component.ts (303 bytes)
CREATE src/app/housing-location/housing-location.component.css (0 bytes)
发现,在 src/app/ 下创建了一个 housing-location 目录,包含 HousingLocation 组件内容。
- 进入 home.component.ts 文件。将 HousingLocation 组件引入进来
import { HousingLocationComponent } from '../housing-location/housing-location.component'
- 更新
@Component中的 imports
imports: [
  HousingLocationComponent,
],
- 更新
@Component中的 template,引入<app-housing-location>
template: `
  <section>
    <form>
      <input type="text" placeholder="Filter by city">
      <button class="primary" type="button">Search</button>
    </form>
  </section>
  <section class="results">
    <app-housing-location></app-housing-location>
  </section>
  `,
- 打开 housing-location.component.css 文件,添加以下样式
.listing {
  padding-bottom: 30px;
}

.listing-photo {
  height: 250px;
  width: 100%;
  object-fit: cover;
}
这块样式后面在实现时会用到。
- 终端 ng serve 启动项目查看
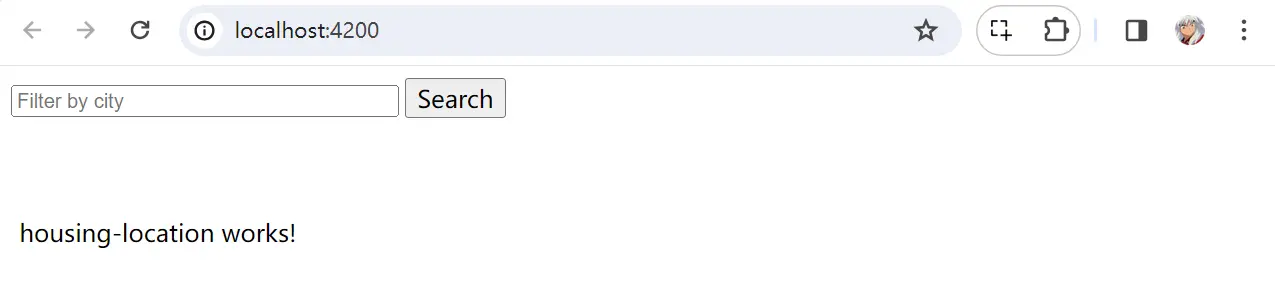
看到这个效果,就说明组件添加成功了。
创建接口类型
ng 还提供了 ng generate interface 命令支持,用于创建 TS 接口类型。
接下来,我们将为上一部创建的 HousingLocation 组件增加接口声明支持。
- 创建接口文件
ng generate interface housingLocation
这会创建 src/app/housing-location.ts 文件。
- housing-location.ts 文件中,添加如下的类型声明
export interface HousingLocation {
  id: number;
  name: string;
  city: string;
  state: string;
  photo: string;
  availableUnits: number;
  wifi: boolean;
  laundry: boolean;
}
- 进入 home.component.ts 文件,引入 HousingLocation 类型
import type { HousingLocation } from '../housing-location'
- 补充
export class HomeComponent {}里的内容
export class HomeComponent {
  readonly baseUrl = 'https://angular.io/assets/images/tutorials/faa';

  housingLocation: HousingLocation = {
    id: 9999,
    name: 'Test Home',
    city: 'Test city',
    state: 'ST',
    photo: `${this.baseUrl}/example-house.jpg`,
    availableUnits: 99,
    wifi: true,
    laundry: false,
  };
}
housingLocation 变量使用了 HousingLocation 指定数据结构。
- 执行 ng serve,项目成功启动,没有报错。
为组件增加输入参数
在之前的章节里,我们使用了 @Component 修饰器来为组件定义一些元数据信息(metadata),而涉及到父子组件的数据共享时,就要用到 @Input 修饰器。
用 HousingLocationComponent 举例。
- 打开
src/app/housing-location/housing-location.component.ts文件 - 增加 Input 修饰器以及 HousingLocation 类型的引入
import { Component, Input } from '@angular/core';
import { HousingLocation } from '../housing-location'
- 为 HousingLocationComponent 类增加 housingLocation 属性支持,并使用
@Input修饰器修饰
export class HousingLocationComponent {
  @Input() housingLocation!: HousingLocation;
}
这一步表示 HousingLocationComponent 必须接收一个名为 housingLocation 的输入属性,这个属性是通过父组件传入的。
-
接下来进入
src/app/home/home.component.ts文件 -
更新
@Component修饰器 template 中引入<app-housing-location>的部分
<app-housing-location [housingLocation]="housingLocation"></app-housing-location>
[housingLocation]="housingLocation" 遵循 [attribute] = "value" 语法规则。
表示将 HousingLocation 组件的 housingLocation 属性与当前 Home 组件声明的属性 housingLocation 进行绑定。housingLocation 是在前一节中就初始化了。
在组件模板中使用输入参数
前一步我们在 HousingLocation 组件中声明的 housingLocation 属性可以直接在 template 中使用插入语法 {{}} 使用。
- 进入 src/app/housing-location/housing-location.component.ts 文件
- 更新
@Component修饰器下的 template 内容
template: `
  <section class="listing">
    <img class="listing-photo" [src]="housingLocation.photo" alt="Exterior photo of {{housingLocation.name}}">
    <h2 class="listing-heading">{{ housingLocation.name }}</h2>
    <p class="listing-location">{{ housingLocation.city}}, {{housingLocation.state }}</p>
  </section>
  `,
这里,我们为 <img> 的 src 绑定了 housingLocation.photo 这个值,并使用插值语法分别将其他内容也提供出去。
- 执行 ng serve 启动项目,查看效果
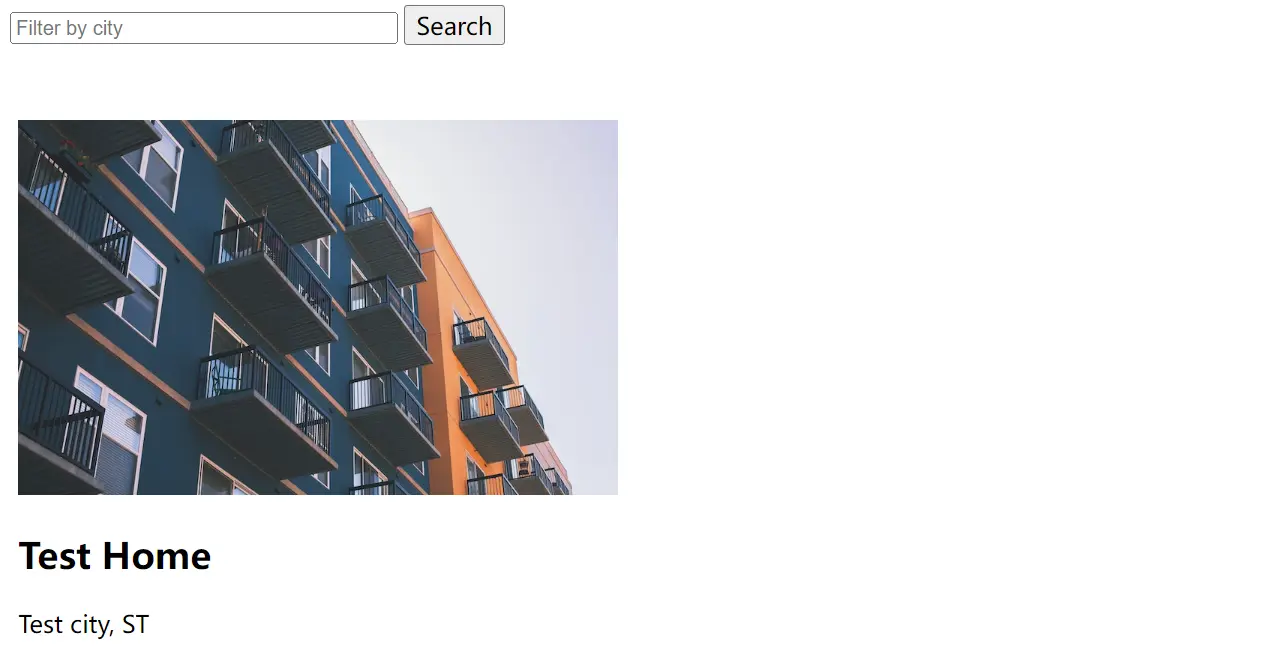
成功!数据被正确渲染了。
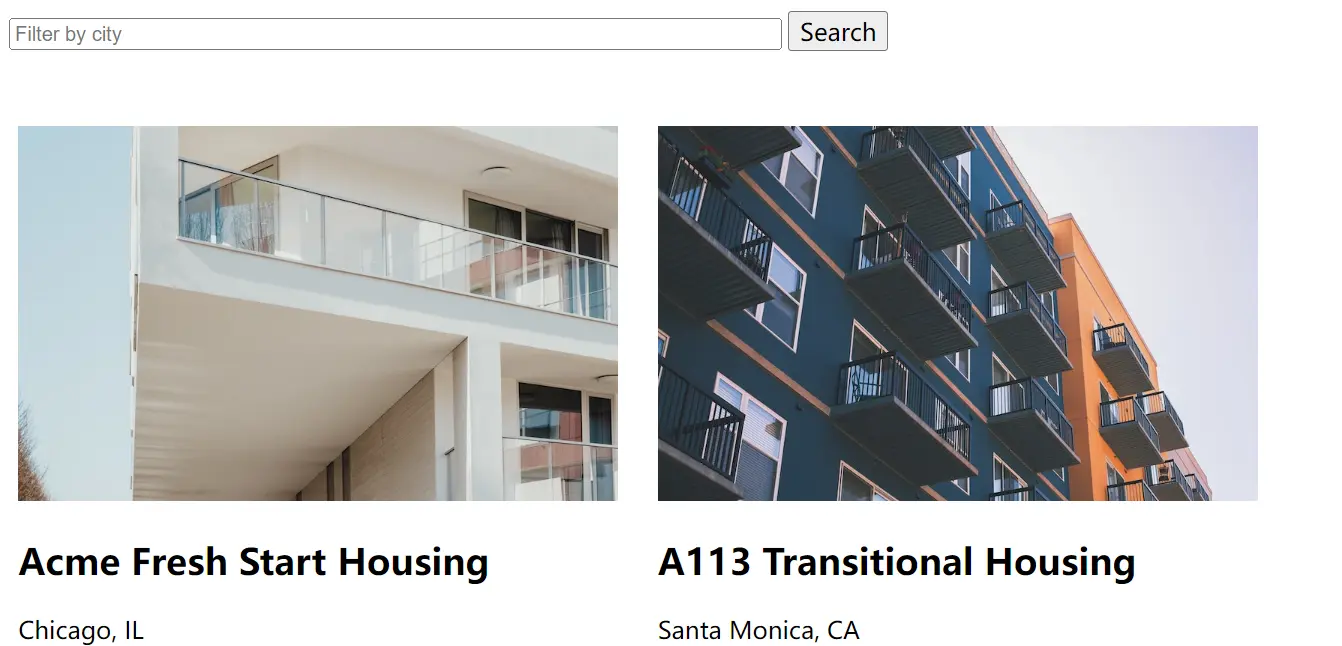
使用 *ngFor 遍历列表数据
Angular 提供了一个 ngFor 指令用来遍历列表数据,其功能类似 JS 语言中的 for 循环。
- 为了展示列表功能,我们先修改
home.component.ts文件,增加 housingLocationList 属性,承载列表数据。
export class HomeComponent {
  readonly baseUrl = 'https://angular.io/assets/images/tutorials/faa';

  housingLocationList: HousingLocation[] = [
    {
      id: 0,
      name: 'Acme Fresh Start Housing',
      city: 'Chicago',
      state: 'IL',
      photo: `${this.baseUrl}/bernard-hermant-CLKGGwIBTaY-unsplash.jpg`,
      availableUnits: 4,
      wifi: true,
      laundry: true
    },
    {
      id: 1,
      name: 'A113 Transitional Housing',
      city: 'Santa Monica',
      state: 'CA',
      photo: `${this.baseUrl}/brandon-griggs-wR11KBaB86U-unsplash.jpg`,
      availableUnits: 0,
      wifi: false,
      laundry: true
    },
  ]
}
- 接着在 home.component.ts 中使用
<app-housing-location>的地方使用 ngFor 指令遍历 housingLocationList 这个列表
<app-housing-location
  *ngFor="let housingLocation of housingLocationList"
  [housingLocation]="housingLocation"
></app-housing-location>
不过会看到报错。
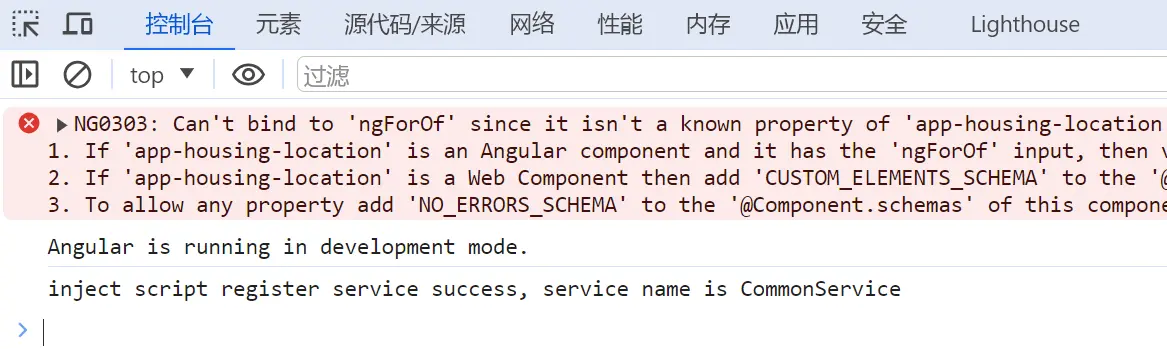
这是因为 ngFor 指令是在 Angular 提供的 CommonModule 里的。需要额外引入。
- 在 home.component.ts 中引入 CommonModule 模块
import { CommonModule } from '@angular/common';
imports: [
  CommonModule,
  HousingLocationComponent
],
- 保存修改,打开 http://localhost:4200/ 查看效果

发现数据成功被遍历出来了。
Angular Service 与依赖注入
Angular Service 是一种将应用数据与业务逻辑分离的一种技术,方便在多个组件重用,是作为组件依赖存在的。
依赖注入(Dependency injection)则是一种管理组件依赖的算法,能限制其他组件可以访问到的服务。
创建 Angular Serivice
接下来,我们来学习创建 Angular Serivice。
- 首先,打开 my-first-angular-app 目录
- 接下来使用 ng generate service 命令来创建服务
PS D:\learning\my-first-angular-app> ng generate service housing --skip-tests
CREATE src/app/housing.service.ts (145 bytes)
创建了一个 src/app/housing.service.ts 文件。
- 接下来,复制下 home.component.ts 文件中的 housingLocationList 数据到 housing.service.ts 文件的 HousingService 类中
import { Injectable } from '@angular/core';
import { HousingLocation } from './housing-location';

@Injectable({
  providedIn: 'root'
})
export class HousingService {

  readonly baseUrl = 'https://angular.io/assets/images/tutorials/faa';

  housingLocationList: HousingLocation[] = [
    {
      id: 0,
      name: 'Acme Fresh Start Housing',
      city: 'Chicago',
      state: 'IL',
      photo: `${this.baseUrl}/bernard-hermant-CLKGGwIBTaY-unsplash.jpg`,
      availableUnits: 4,
      wifi: true,
      laundry: true
    },
    {
      id: 1,
      name: 'A113 Transitional Housing',
      city: 'Santa Monica',
      state: 'CA',
      photo: `${this.baseUrl}/brandon-griggs-wR11KBaB86U-unsplash.jpg`,
      availableUnits: 0,
      wifi: false,
      laundry: true
    }
  ];

  constructor() { }
}
注意,你会发现 HousingService 有一个
@Injectable修饰器修饰。其实,每个服务都有,因为 Angular 中定义所有的服务都是可注入的(injectable)。
再添加 2 个获取数据的方法。
getAllHousingLocations(): HousingLocation[] {
  return this.housingLocationList;
}

getHousingLocationById(id: number): HousingLocation | undefined {
  return this.housingLocationList.find(housingLocation => housingLocation.id === id);
}
服务创建之后,就可以在组件中注入服务并使用了。
应用依赖注入
打开 home.component.ts 文件,我们将为其注入 HousingService 服务
- 从 @angular/core 中多引入一个 inject 方法
import { Component, inject } from '@angular/core';
- 再导入 housing.service。
import { HousingService } from '../housing.service';
-
将 HomeComponent 类下的 housingLocationList 置空(
[]) -
为 HomeComponent 增加 housingService 属性(对应 Housing 服务),通过
inject(HousingService)方式实例化,再在 constructor 中调用服务上的方法初始化 housingLocationList 变量
housingLocationList: HousingLocation[] = [];
housingService: HousingService = inject(HousingService);

constructor() {
  this.housingLocationList = this.housingService.getAllHousingLocations();
}
这样做完后,查看效果。
发现跟之前的一样的效果。不同点在于,现在列表数据是通过服务的方式来获取的。
添加路由
路由是 SPA 项目页面中从一个组件导航到另一个组件的技术,能在不刷新整个页面的情况下,替换部分页面内容。
默认路由设置
通过 ng new 命令创建的项目,默认已经部署了路由支持,我们来看下。
- 打开 app.config.ts,这个文件对外导出了 appConfig 配置。
- appConfig 配置中,通过 @angular/router 中暴露的 provideRouter() 方法对 app.routes.ts 文件进行处理,作为 providers 对外提供。这里的 app.routes.ts 就是我们定义路由的地方
import type { Routes } from '@angular/router';

export const routes: Routes = [];
- appConfig 则在项目的入口文件 main.ts 中被使用
import { bootstrapApplication } from '@angular/platform-browser';
import { appConfig } from './app/app.config';
import { AppComponent } from './app/app.component';

bootstrapApplication(AppComponent, appConfig)
  .catch((err) => console.error(err));
设置 AppComponent,使用路由配置
以上的配置,只是说明项目已经做了路由功能的部署,而具体页面内那块部分使用路由功能,还需要额外配置。因此,接下来我们将修改 app.component.ts,指定路由跳转的区域。
- 进入 src/app/app.component.ts,为其引入 RoutingModule,增加路由组件支持
import { RouterModule } from '@angular/router';

imports: [
  HomeComponent,
  RouterModule,
],
- 修改 template 属性,将
<app-home></app-home>的地方替换成<router-outlet>,这是切换路由时承载具体组件的占位组件
template: `
  <main>
    <a [routerLink]="['/']">
      <header class="brand-name">
        Home
      </header>
    </a>
    <section class="content">
      <router-outlet></router-outlet>
    </section>
  </main>
`,
查看效果。

因为我们还没有在 app.routes.ts 文件中定义路由,因此 <router-outlet> 并没有实际的组件与其对应,所以现在页面还是空白的。
定义跳转路由
接下来开始跳转路由的定义。
- 为了查看路由切换效果,我们还要再创建一个详情页组件
PS D:\learning\my-first-angular-app> ng generate component details --inline-template --skip-tests
CREATE src/app/details/details.component.ts (268 bytes)
CREATE src/app/details/details.component.css (0 bytes)
- 接下来进入 app.routes.ts,引入 HomeComponent 和 DetailsComponent,并设置到 routes 变量中
import { Routes } from '@angular/router';
import { HomeComponent } from './home/home.component';
import { DetailsComponent } from './details/details.component';

export const routes: Routes = [
  {
    path: '',
    component: HomeComponent,
    title: 'Home Page'
  },
  {
    path: 'details/:id',
    component: DetailsComponent,
    title: 'Details Page'
  }
];
path: '' 表示设置站点根路由,'details/:id' 则表示匹配类似 /details/xx 这种形式的路由。
- 执行
ng serve启动项目
访问 http://localhost:4200/,看到的是 HomeComponent 渲染的效果。
访问 http://localhost:4200/details/1 看到的就是 DetailsComponent 渲染的效果。

进一步整合详情页
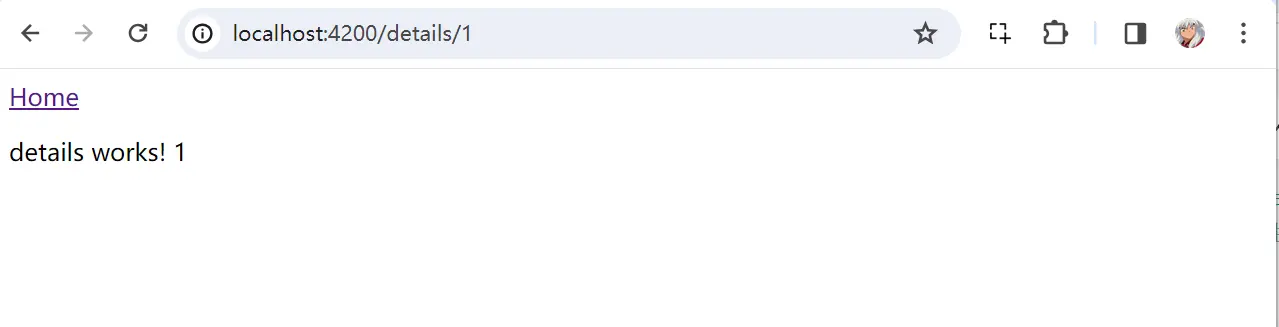
在定义详情页路由的时候,我们使用的是“details/:id”,这里的 :id 是指路由参数 id,它的值是根据具体访问时的不同而不同。
当请求路由是“/details/1”时,id 值就是 1,当请求路由是“/details/2”时,id 值就是 2。
接下来,修改 details.component.ts 来获取路由参数 id。
获取路由参数 id
- 引入 ActivatedRoute 服务和注入服务所需的 inject() 方法
import { Component, inject } from '@angular/core';
import { ActivatedRoute } from '@angular/router';
- 注入 ActivatedRoute 服务,创建 route 实例。然后通过
this.route.snapshot.params['id']获得地址栏中的 id 参数值,并赋值给 housingLocationId 属性
export class DetailsComponent {
    route: ActivatedRoute = inject(ActivatedRoute);
    housingLocationId = -1;
    constructor() {
        this.housingLocationId = Number(this.route.snapshot.params['id']);
    }
}
- 接下里,修改 template,展示 housingLocationId 属性值
template: `<p>details works! {{ housingLocationId }}</p>`,
- 访问地址 http://localhost:4200/details/1,发现 id 参数成功获取到了
获取详情页内容
有了详情页的 id,就能从 HousingService 中获得某个 id 对应的详情信息了。我们来看看。
- detail.component.ts 中引入 HousingService 并注入,并根据 id 从 housingService 获取对应详情信息
import { HousingService } from '../housing.service';
import { HousingLocation } from '../housing-location';

export class DetailsComponent {

  route: ActivatedRoute = inject(ActivatedRoute);
  housingService = inject(HousingService);
  housingLocation: HousingLocation | undefined;

  constructor() {
    const housingLocationId = Number(this.route.snapshot.params['id']);
    this.housingLocation = this.housingService.getHousingLocationById(housingLocationId);
  }

}
housingLocation 就对应某个 id 详情信息。
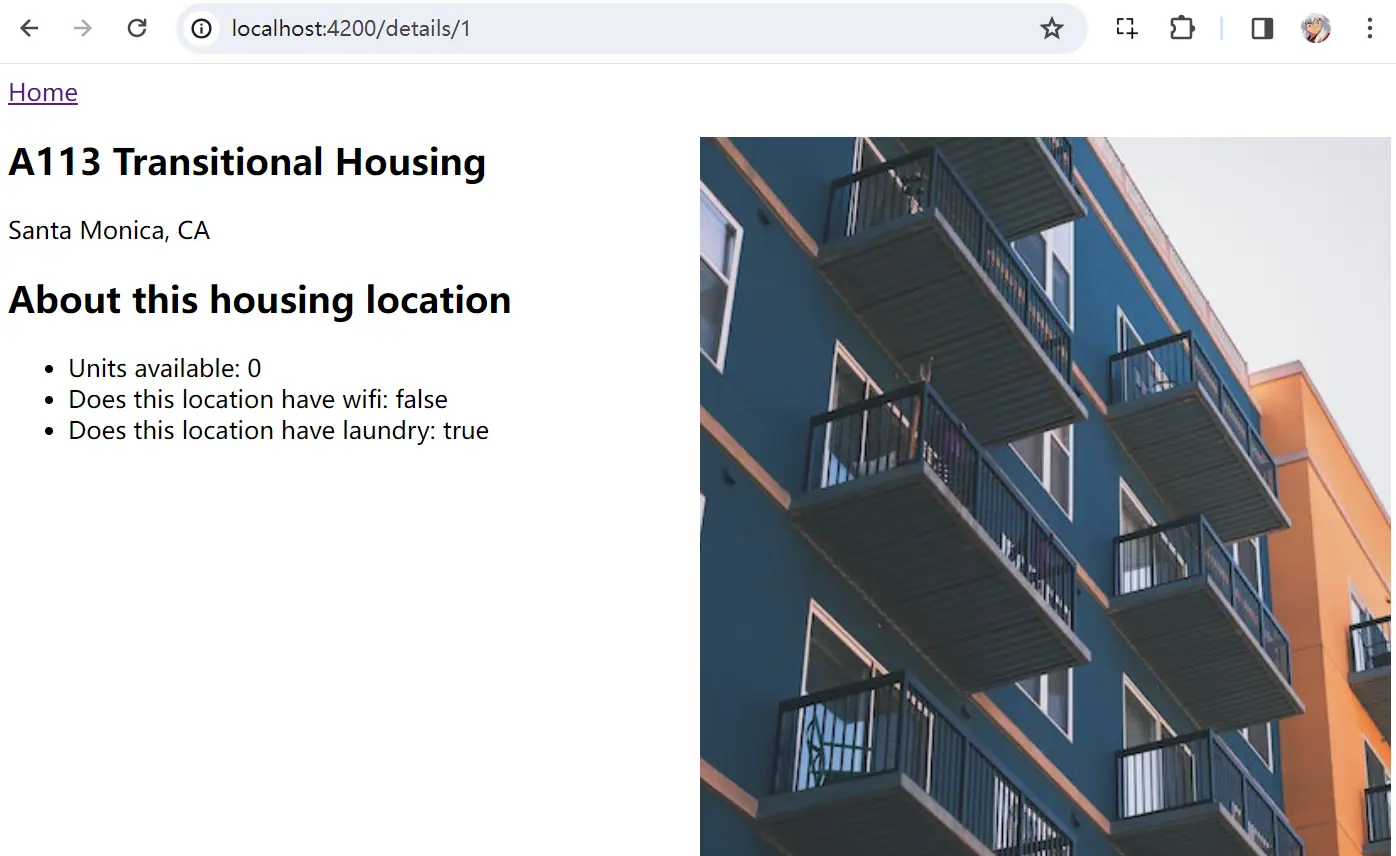
- 修改 template,增加详情信息渲染
template: `
  <article>
    <img class="listing-photo" [src]="housingLocation?.photo"
      alt="Exterior photo of {{housingLocation?.name}}"/>
    <section class="listing-description">
      <h2 class="listing-heading">{{housingLocation?.name}}</h2>
      <p class="listing-location">{{housingLocation?.city}}, {{housingLocation?.state}}</p>
    </section>
    <section class="listing-features">
      <h2 class="section-heading">About this housing location</h2>
      <ul>
        <li>Units available: {{housingLocation?.availableUnits}}</li>
        <li>Does this location have wifi: {{housingLocation?.wifi}}</li>
        <li>Does this location have laundry: {{housingLocation?.laundry}}</li>
      </ul>
    </section>
  </article>
`,
- 向
detail.component.css增加一些样式
.listing-photo {
  height: 600px;
  width: 50%;
  object-fit: cover;
  float: right;
}
- 查看效果。
- 点击左上角的“Home”会返回首页

这是通过 app.component.ts 的 routerLink 定义的: <a [routerLink]="['/']">。routerLink 的值是一个数组,定义路由 segment 信息,所有 segment 合在一起就是最终的跳转地址了。
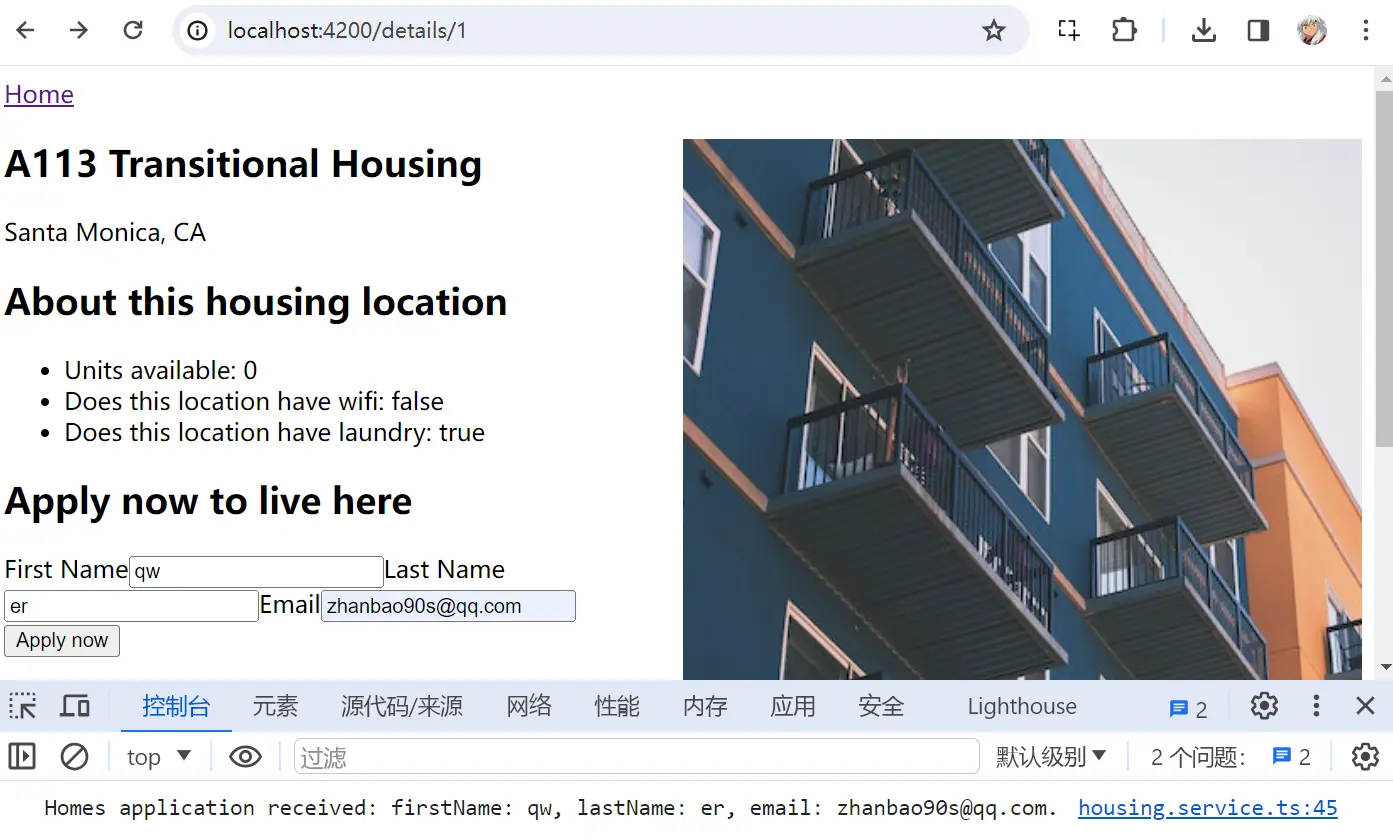
表单提交
本节我们将增加表单提交功能。
- 进入 src/app/housing.service.ts 文件,为 HousingService 类增加 submitApplication() 方法
submitApplication(firstName: string, lastName: string, email: string) {
  console.log(`Homes application received: firstName: ${firstName}, lastName: ${lastName}, email: ${email}.`);
}
- 接下来进入 src/app/details/details.component.ts,引入 Angular Form 相关的类
import { FormControl, FormGroup, ReactiveFormsModule } from '@angular/forms';

imports: [
  ReactiveFormsModule
],
- 接着在 DetailsComponent 类中在 constructor() 之前增加一个 applyForm 属性
applyForm = new FormGroup({
  firstName: new FormControl(''),
  lastName: new FormControl(''),
  email: new FormControl('')
});
- 然后在 DetailsComponent 类中在 constructor() 之后增加一个 submitApplication() 方法
submitApplication() {
  this.housingService.submitApplication(
    this.applyForm.value.firstName ?? '',
    this.applyForm.value.lastName ?? '',
    this.applyForm.value.email ?? ''
  );
}
- 接下来,我们将修改 details.component.ts 的 template,增加
<Form>表单标签
template: `
  <article>
    <!-- ... -->
    <section class="listing-apply">
      <h2 class="section-heading">Apply now to live here</h2>
      <form [formGroup]="applyForm" (submit)="submitApplication()">
        <label for="first-name">First Name</label>
        <input id="first-name" type="text" formControlName="firstName">

        <label for="last-name">Last Name</label>
        <input id="last-name" type="text" formControlName="lastName">

        <label for="email">Email</label>
        <input id="email" type="email" formControlName="email">
        <button type="submit" class="primary">Apply now</button>
      </form>
    </section>
  </article>
`,
我们将 applyForm 绑定到 <form> 的 formGroup 属性,每个 <input> 通过 formControlName 为 applyForm 收集数据。再使用 (submit)="submitApplication()" 指定提交表单时的处理函数。
- 查看效果,发现调用成功
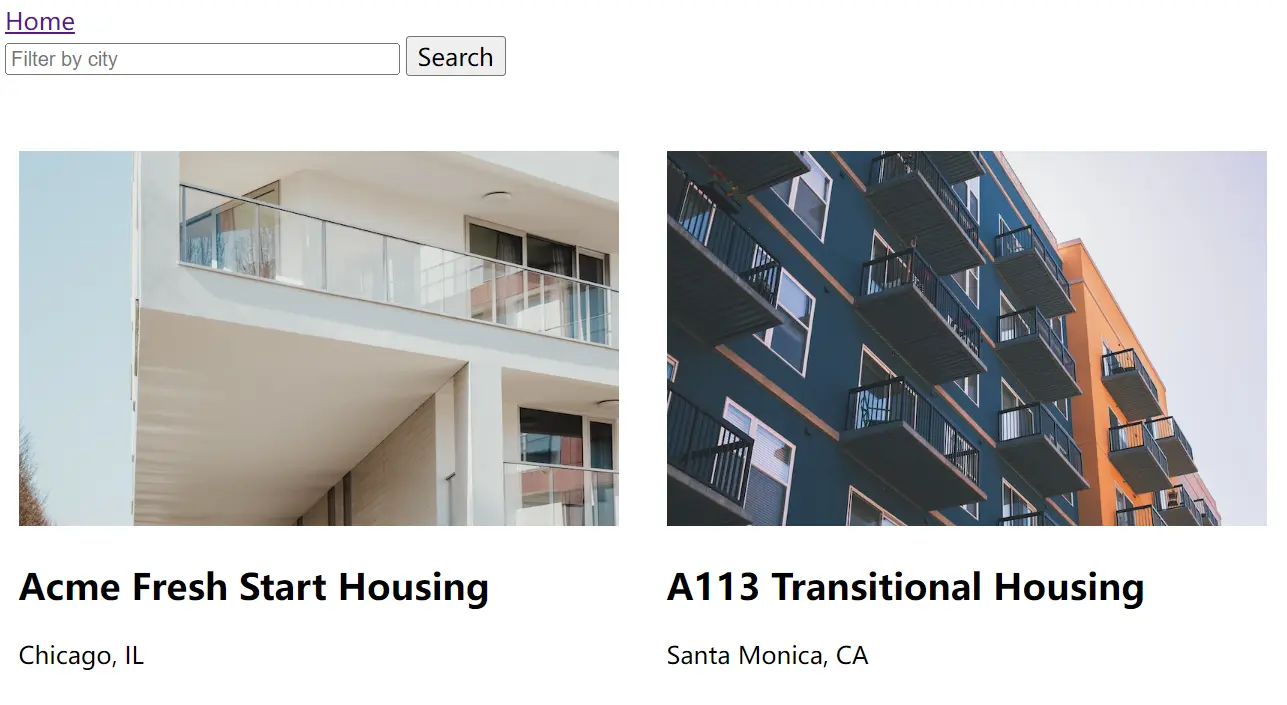
增加搜索功能
我们再为首页增加搜索功能。
- 进入 src/app/home/home.component.ts,为 HomeComponent 类增加 filteredLocationList 属性
filteredLocationList: HousingLocation[] = [];
- 然后在 constructor() 中,先讲 housingLocationList 设置给 filteredLocationList
constructor() {
  this.housingLocationList = this.housingService.getAllHousingLocations();
  this.filteredLocationList = this.housingLocationList;
}
- 再更新 template,为
<input>增加模板变量#filter
<input type="text" placeholder="Filter by city" #filter>
- 接着为“Search”按钮增加事件处理函数
<button class="primary" type="button" (click)="filterResults(filter.value)">Search</button>
- ngFor 指令遍历的对象也改成 filteredLocationList
<app-housing-location *ngFor="let housingLocation of filteredLocationList" [housingLocation]="housingLocation"></app-housing-location>
- 在 HomeComponent 类实现 filterResults() 方法
filterResults(text: string) {
  if (!text) {
    this.filteredLocationList = this.housingLocationList;
    return;
  }

  this.filteredLocationList = this.housingLocationList.filter(
    housingLocation => housingLocation?.city.toLowerCase().includes(text.toLowerCase())
  );
}
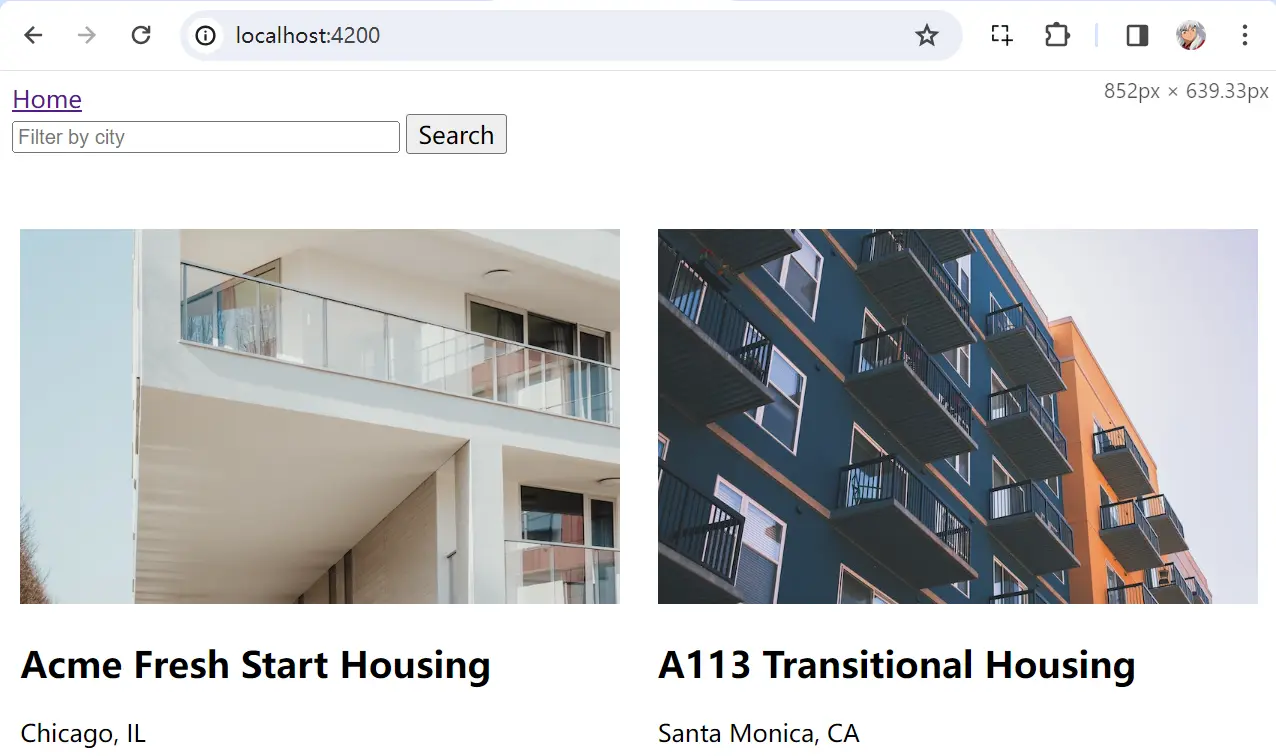
- 查看效果。输入框输入“chi”,点击按钮,正确输出了结果

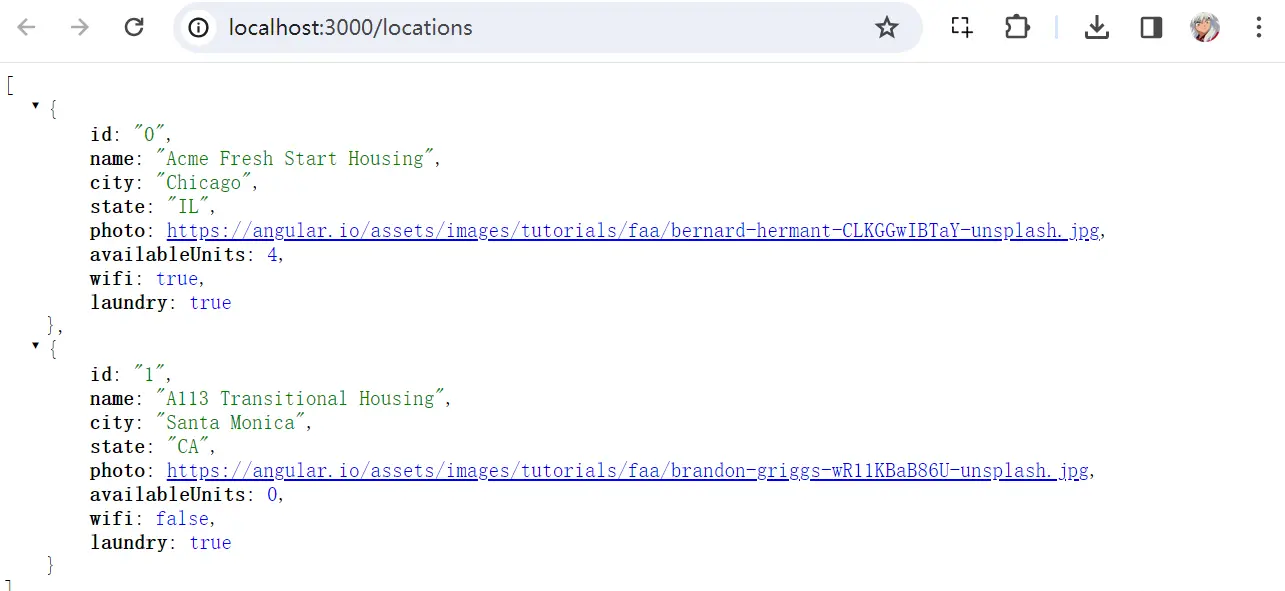
增加 HTTP 请求
最后,我们将启动一个 JSON 服务,提供数据列表的请求支持,在 housing-service.ts 使用。
启动 JSON 服务
- 首先安装 json-server
npm install -g json-server
- 再在项目根目录下创建一个 db.json 文件
{
  "locations": [
    {
    "id": 0,
    "name": "Acme Fresh Start Housing",
    "city": "Chicago",
    "state": "IL",
    "photo": "https://angular.io/assets/images/tutorials/faa/bernard-hermant-CLKGGwIBTaY-unsplash.jpg",
    "availableUnits": 4,
    "wifi": true,
    "laundry": true
    },
    {
    "id": 1,
    "name": "A113 Transitional Housing",
    "city": "Santa Monica",
    "state": "CA",
    "photo": "https://angular.io/assets/images/tutorials/faa/brandon-griggs-wR11KBaB86U-unsplash.jpg",
    "availableUnits": 0,
    "wifi": false,
    "laundry": true
    }
  ]
}
- 命令行执行下面指令,启动服务
json-server --watch db.json

更新 Service 接入 web server
- 进入 src/app/housing.service.ts 文件,移除 housingLocationList 属性
- 增加 url 属性
url = 'http://localhost:3000/locations';
- 更新 getAllHousingLocations() 方法实现
async getAllHousingLocations(): Promise<HousingLocation[]> {
  const data = await fetch(this.url);
  return await data.json() ?? [];
}
- 更新 getHousingLocationsById() 方法实现
async getHousingLocationById(id: number): Promise<HousingLocation | undefined> {
  const data = await fetch(`${this.url}/${id}`);
  return await data.json() ?? {};
}
- 进入 src/app/home/home.component.ts 文件,更新 constructor(),使用异步版本的 getAllHousingLocations()
constructor() {
  this.housingService.getAllHousingLocations().then((housingLocationList: HousingLocation[]) => {
    this.housingLocationList = housingLocationList;
    this.filteredLocationList = housingLocationList;
  });
}
- 进入 src/app/details/details.component.ts 文件,更新 constructor(),使用异步版本的 getHousingLocationById()
constructor() {
  const housingLocationId = Number(this.route.snapshot.params['id']);
  this.housingService.getHousingLocationById(housingLocationId).then(housingLocation => {
    this.housingLocation = housingLocation;
  });
}
- 保存后,浏览器查看结果
数据仍旧能够正常展示。
至此,我们就完成了一个简单的 Angular 程序。
总结
本文我们实现了一个具备建议搜索和列表展示功能的应用,从中学习了 Angular CLI 工具的使用以及一些概念,比如组件、接口、属性绑定、ngFor 指令、服务(涉及依赖注入)、路由、HTTP 请求等。
当然,以上只是带大家进行一次快速上手。如果你想要真正理解 Angular 的涉及理念和几大概念,就需要阅读官方文档的《理解 Angular》部分的内容了。
在理解了 Angular 设计思想之后,继续阅读《开发者指南》 详细了解 Angular 中每个技术点的使用。期间,还有 2 个教程: Tour of Heroes 和 template-driven form,可以穿插学习,加深对 Angular 的理解。
总之,Angular 拥有一个很庞大的生态,所以完全掌握是需要一些时间的,切勿急躁。
好了。本文内容就先介绍到这里了,感谢你的阅读,再见。
原文链接:https://juejin.cn/post/7348105395163643915 作者:zhangbao90s