
基础回顾
1、创建应用
import ReactDOM from 'react-dom/client';
const root = ReactDOM.createRoot(document.getElementById('root'));
const element = <div>hello</div>;
root.render(element);
至此,我们的第一个简单的应用就渲染到页面中了。
2、方法
(1)createRoot
createRoot方法用于创建根节点,并将组件渲染到页面中;
【语法】createRoot(domNode, options?)
该函数接受两个参数:
- 第一个domNode,表示一个DOM节点;
- 第二个参数options,是可选的,用于配置React根节点的对象;
【返回值】返回一个根root实例对象,包含两个方法:render和unmount;
(2)render
render用于将传入的reactNode渲染到页面中;render接受一个参数reactNode,reactNode是一段JSX;该方法没有返回值。
前置知识
在根据源码了解React的工作过程前,我们需要先了解一下fiberRoot和rootFiber;
1、fiberRoot
fiberRoot:表示数据结构中的最外层对象,是Fiber数据结构中的根节点;
该对象包含应用中的所有组件和状态,并且能够记录应用的更新信息;在React Fiber中,fiberRoot是唯一的,用于表示整个应用的状态和挂载点。
【fiberRoot的结构如下】
function FiberRootNode(
    containerInfo,
    tag,
    hydrate,
    identifierPrefix,
    onRecoverableError,
) {
    // 表示React的工作模式:取值有ConcurrentRoot - 并发模式、LegacyRoot - 同步模式
    this.tag = tag;
    this.containerInfo = containerInfo; // 表示root节点信息
    this.pendingChildren = null;
    this.current = null;
    this.pingCache = null;
    this.finishedWork = null;
    this.timeoutHandle = noTimeout;
    this.context = null;
    this.pendingContext = null;
    this.callbackNode = null;
    this.callbackPriority = NoLane;
    this.eventTimes = createLaneMap(NoLanes);
    this.expirationTimes = createLaneMap(NoTimestamp);
    this.pendingLanes = NoLanes;
    this.suspendedLanes = NoLanes;
    this.pingedLanes = NoLanes;
    this.expiredLanes = NoLanes;
    this.mutableReadLanes = NoLanes;
    this.finishedLanes = NoLanes;
    this.entangledLanes = NoLanes;
    this.entanglements = createLaneMap(NoLanes);
    this.identifierPrefix = identifierPrefix;
    this.onRecoverableError = onRecoverableError;
}
2、rootFiber
rootFiber表示组件挂载点对应的Fiber对象,如:示例中对应的就是id为root的div标签。
rootFiber指向fiberRoot,并在其对象中有一个stateNode属性,指向fiberRoot。在React Fiber中,rootFiber可以有多个,因为render方法是可以调用多次的。
【fiberNode的结构如下】
function FiberNode(
    tag: WorkTag,
    pendingProps: mixed,
    key: null | string,
    mode: TypeOfMode,
) {
    // Instance
    this.tag = tag;
    this.key = key;
    this.elementType = null;
    this.type = null;
    this.stateNode = null;
    // Fiber
    this.return = null;
    this.child = null;
    this.sibling = null;
    this.index = 0;
    this.ref = null;

    this.pendingProps = pendingProps;
    this.memoizedProps = null;
    this.updateQueue = null;
    this.memoizedState = null;
    this.dependencies = null;
    this.mode = mode;
    // Effects
    this.flags = NoFlags;
    this.subtreeFlags = NoFlags;
    this.deletions = null;
    this.lanes = NoLanes;
    this.childLanes = NoLanes;
    this.alternate = null;
}
深入源码
1、createRoot函数
// createRoot函数位置:react-dom/src/client/ReactDOM.js
function createRoot(
    // container就是我们在示例中传入的document.getElementById('root')
    container: Element | Document | DocumentFragment,
    options?: CreateRootOptions
): RootType {
    return createRootImpl(container, options);
}
// createRootImpl:react-dom/src/client/ReactDOMRoot.js
export function createRoot(
    container: Element | Document | DocumentFragment,
    options?: CreateRootOptions
): RootType {
    // 验证传入的container是否是一个合理的DOM元素
    if (!isValidContainer(container)) {
        throw new Error('createRoot(...): Target container is not a DOM element.');
    }
    // 创建fiberRoot对象:fiber数据结构中的最外层对象
    // ConcurrentRoot:表示创建模式是并发模式
    const root = createContainer(container, ConcurrentRoot, ...);

    const rootContainerElement: Document | Element | DocumentFragment =
        container.nodeType === COMMENT_NODE
            ? (container.parentNode: any)
            : container;
    // 监听所有事件
    listenToAllSupportedEvents(rootContainerElement);
    // 创建一个ReactDOMRoot实例:该实例包含两个方法render和unmount
    return new ReactDOMRoot(root);
}

function ReactDOMRoot(internalRoot: FiberRoot) {
    // internalRoot就是createContainer函数调用返回的fiberRoot对象
    this._internalRoot = internalRoot;
}
那么,调用createContainer函数到底做了一些什么工作呢?
// createContainer函数位置:react-reconciler/src/ReactFiberReconciler.js
export function createContainer(
    containerInfo: Container,
    tag: RootTag,
    ...
): OpaqueRoot {
    return createFiberRoot(containerInfo, tag, ...);
}
fiberRoot对象的创建
// createFiberRoot函数位置:react-reconciler/src/ReactFiberRoot.js
export function createFiberRoot(containerInfo: any, tag: RootTag, ...): FiberRoot {
    const root: FiberRoot = (new FiberRootNode(containerInfo, tag, ...): any);
    // 创建rootFiber对象
    const uninitializedFiber = createHostRootFiber(tag, ...);
    root.current = uninitializedFiber;
    // 可以看到:fiber对象的stateNode指向了我们创建的FiberRoot对象
    uninitializedFiber.stateNode = root;
    const initialState: RootState = {
        element: initialChildren,
        isDehydrated: hydrate,
        cache: (null: any), // not enabled yet
        transitions: null,
        pendingSuspenseBoundaries: null,
    };
    uninitializedFiber.memoizedState = initialState;
    // 用于初始化一个更新队列updateQueue:记住,这里只是初始化更新队列哦~
    initializeUpdateQueue(uninitializedFiber);

    return root;
}
rootFiber对象的创建
export const HostRoot = 3;
// createHostRootFiber函数位置:react-reconciler/src/ReactFiber.js
export function createHostRootFiber(tag: RootTag): Fiber {
    return createFiber(HostRoot, null, null, mode);
}
const createFiber = function(
    tag: WorkTag,
    pendingProps: mixed,
    key: null | string,
    mode: TypeOfMode,
): Fiber {
    // 用于实例化一个fiber对象
    return new FiberNode(tag, pendingProps, key, mode);
}
【总结】
综上所述,createRoot函数主要完成以下准备工作:
- 根据传入的DOM节点创建一个fiberRoot对象;
- 实例化root对应的rootFiber对象,该对象包含stateNode(节点实例)、memoizedState(初始状态值)、updateQueue(初始化的更新队列);
- 监听所有事件:
isListenToAllSupportedEvents(rootContainerElement);
root.render(element)
该render方法是挂载在由createRoot创建的root实例对象上的;代码实现如下:
ReactDOMRoot.prototype.render = function (children: ReactNodeList): void {
    const root = this._internalRoot;
    if (root === null) {
        throw new Error('cannot update an unmounted root.');
    }
    updateContainer(children, root, null, null);
}
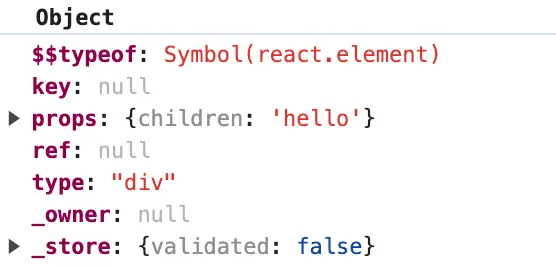
可以看到,render函数接受一个参数children也就是我们示例中的element,它是一个虚拟DOM节点,它的结构如下图所示:

从上述代码中,我们可以看到,render函数实际上是调用了一个updateContainer函数去实现的;
export function updateContainer(
    element: ReactNodeList,
    container: OpaqueRoot, // root
    parentComponent: ?React$Component<any, any>,
    callback: ?Function, // 首次调用时,传入的callback参数值为null
): Lane {
    const current = container.current; // root的current属性指向的是rootFiber,由createHostRootFiber创建
    const eventTime = requestEventTime(); // 请求事件
    const lane = requestUpdateLane(current); // 请求更新优先级
    const context = getContextForSubtree(parentComponent);
    if (container.context === null) {
        container.context = context;
    } else {
        container.pendingContext = context;
    }
    const update = createUpdate(eventTime, lane); // 创建一个更新对象
    // Caution: React DevTools currently depends on this property being called "element".
    update.payload = {element}; // 这个element对象就是我们给render方法传入的JSX
    callback = callback === undefined ? null : callback; // callback的值为null
    if (callback !== null) {
        // 跳过该判断 update.callback = callback;
    }
    const root = enqueueUpdate(current, update, lane); // 开始执行该函数
    if (root !== null) {
        scheduleUpdateOnFiber(root, current, lane, eventTime);
        entangleTransitions(root, current, lane);
    }
    return lane;
}
createUpdate函数:用于创建一个更新对象;enqueueUpdate函数:将更新对象添加到更新队列中;scheduleUpdateOnFiber函数:进入调度阶段;
原文链接:https://juejin.cn/post/7354656406160588815 作者:wangwangwang