

前言
K线图是股票分析中非常常见的一种图表形式,它能够直观地反映股票的价格变化趋势。而在实现K线图的过程中,左右拖动是一个非常重要的功能,可以让用户在不同的时间段内查看股票价格的变化。本文将介绍如何利用canvas实现K线图的左右拖动以及十字光标功能思路。
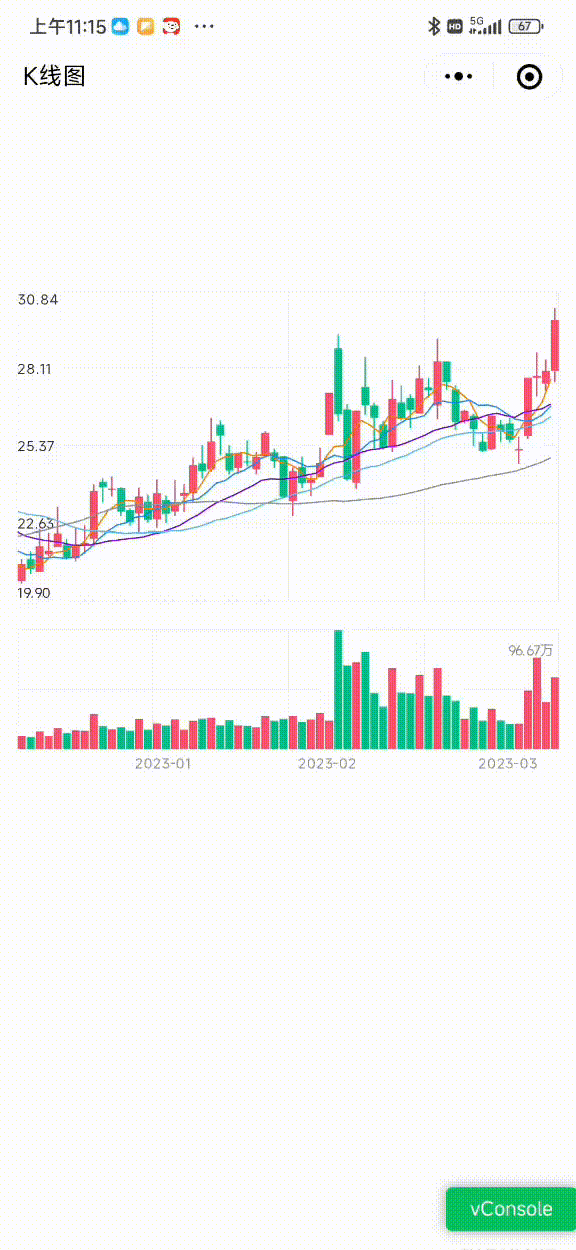
效果

实现思路及问题
- 实现Canvas左右拖动主要利用区间渲染类似虚拟列表的技术。在滚动时,需要先清空画布,然后切割数据进行渲染。具体而言,可以通过确定可视范围内的数据区间,并渲染这个区间的数据来实现左右拖动。
- 在实现左右拖动的过程中,我们需要处理一些问题,包括以下几个方面:
- 拖动灵敏度:为了避免拖动过于灵敏,我们需要对拖动事件进行处理,在计算滑动距离时,乘以一个小于 1 的系数,这样可以减缓滑动速度,从而增加滑动阻力,从而降低了灵敏度。
- 拖动和十字架冲突:在实现拖动功能时,我们需要注意避免与十字架交互功能发生冲突,这可以通过对拖动和十字架事件进行区分来实现。
- 边界限制:左右拖动功能需要在数据范围内进行,因此需要对拖动的边界进行限制,确保数据不会超出可视范围。
左右拖动
首先在上canvas上绑定移动事件。
<canvas
    id="canvas"
    type="2d"
    bindtouchstart="canvasStartEvent"
    bindtouchend="canvasEndEvent"
    bindtouchmove="canvasMoveEvent"
/>
定义一个起始索引值startIndex,以及可视区间内的条目数visibleNum,二者组合起来构成了一个区间。在touchMove事件中,增加了一个延迟时间,只有在按住一定毫秒数后才开始响应拖动操作。这样做的目的是为了避免手指轻触即触发拖动操作。
Page({
onLoad(){
this.startIndex = 0;
this.visibleNum = 60;
this.touchstartX = 0;
this.moveLastTime = 0;
this.width = 400;
this.height = 400;
this.xScale = 3;
},
canvasStartEvent(e) {
let { x } = e.touches[0];
this.touchstartX = x;
},
canvasEndEvent(e) {
// 拖动大于17毫秒才生效
let nowTime = new Date().getTime();
if (nowTime - this.moveLastTime < 17) {
return;
}
this.moveLastTime = new Date().getTime();
let x = e.changedTouches[0].x;
const { width, height } = this;
let move = 0;
ctx.clearRect(0, 0, width, height);
// 左边
if (x > this.touchstartX) {
moveX = x - touchstartX
// (xScale - 0.8)是柱子宽度
let moveNum = (moveX / xScale / (xScale - 0.8)).toFixed(0);
moveNum = Number(moveNum)
this.startIndex -= moveNum;
}
// 右边
else {
moveX = touchstartX - x;
let moveNum = (moveX / xScale / (xScale - 0.8)).toFixed(0);
moveNum = Number(moveNum)
this.startIndex += moveNum;
}
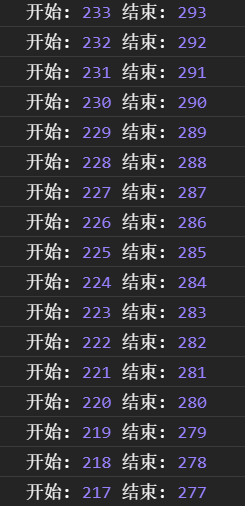
console.log('开始:', this.startIndex , '结束:', this.startIndex + this.visibleNum)
// 调用绘制方法
this.openDraw();
}
})
例如,假设日K总数为300个,保存在一个名为list的列表中。通过上面的计算startIndex是不断变化的,因此这个区间也会不断变化。为了只渲染当前可视区间的60个日K,我们可以使用list.slice(startIndex, startIndex + visibleNum)对列表进行切割。在拖动时,可以通过不断地切割和重绘,实现视觉上的拖动效果。
灵敏度调整
上面的代码中如果手指微微一拖就会快速拖动导致很难控制到我们想拖到的区间,现在来开始改造降低拖动灵敏度。
// 左边
- moveX = x - touchstartX;
+ moveX = (x - touchstartX) * 0.4;
// 右边
- moveX = touchstartX - x;
+ moveX = (touchstartX - x) * 0.4;
在计算滑动距离时,乘以一个小于 1 的系数,这样可以减缓滑动速度,从而增加滑动阻力,从而降低了灵敏度。
边界限制
如果拖到头了或者拖到尾了就得保留当前位置,不能继续拖动。
canvasEndEvent(e) {
+len = this.list.length - visibleNum;
+ this.startIndex = this.startIndex <= 1 ? 1 : this.startIndex;
+ this.startIndex = this.startIndex >= len ? len : this.startIndex;
console.log('开始:', this.startIndex , '结束:', this.startIndex + this.visibleNum)
// 调用绘制方法
this.openDraw();
}
区分拖动与十字架
由于拖动和十字架的处理都在touchMove事件中,需要进行区分,以避免两者同时触发。我的处理思路是,如果用户长按住不动,则显示十字架;如果用户按住并拖动,则执行拖动操作。当显示十字架时,当用户松开手指后,会进行画布的清空操作。
canvasStartEvent(e) {
let { x } = e.touches[0];
this.touchstartX = x;
+ this.moveX = x;
+ clearTimeout(this.longtapTimer);
+ this.longtapTimer = setTimeout(() => {
+ if (this.touchstartX == this.moveX) {
+    this.isDragging = false;
+    this.crossGrid(e);
+ } else {
+    this.isDragging = true;
+ }
+ }, 500);
},
canvasEndEvent(e) {
    // 拖动大于17毫秒才生效
    let nowTime = new Date().getTime();
    if (nowTime - this.moveLastTime < 17) {
        return;
    }
    this.moveLastTime = new Date().getTime();
    let x = e.changedTouches[0].x;
    const { width, height } = this;
    let move = 0;
    ctx.clearRect(0, 0, width, height);
+if (this.isDragging) {
    // 左边
    if (x > this.touchstartX) {
        moveX = x - touchstartX
        // (xScale - 0.8)是柱子宽度
        let moveNum = (moveX / xScale / (xScale - 0.8)).toFixed(0);
        moveNum = Number(moveNum)
        this.startIndex -= moveNum;
    }
    // 右边
    else {
        moveX = touchstartX - x;
        let moveNum = (moveX / xScale / (xScale - 0.8)).toFixed(0);
        moveNum = Number(moveNum)
        this.startIndex += moveNum;
    }
+} else {
+    this.crossGrid(e);
+}
}
十字架绘制
crossGrid(e) {
    const { list, ctx2, width, height, startIndex, visibleNum } = this;
    let { x, y } = e.touches[0];
    list = list.slice(startIndex, startIndex + visibleNum);
    this.isDragging = false;
    // 边界处理 超出边界就等于边界
    if (x <= 0) x = 0;
    if (x > width) x = width;
    if (y <= 0) y = mt;
    if (y >= height) y = height;
    let index = Math.floor(x / xScale);
    if (!list[index]) return false;
    // 清空画布
    ctx2.clearRect(0, 0, width, height);
    // 十字架
    ctx2.save();
    ctx2.strokeStyle = crossColor;
    this.drawBrokenLine(ctx2, 0, y, width, y);
    this.drawBrokenLine(ctx2, x, 0, x, height);
    ctx2.restore();
    // 选中的数据
    console.log(list[index])
},
drawBrokenLine(ctx, startX, startY, endX, endY) {
    ctx.save();
    ctx.lineWidth = 1;
    ctx.beginPath();
    ctx.moveTo(startX, startY);
    ctx.lineTo(endX, endY);
    ctx.stroke();
    ctx.restore();
},
优化
绘制十字架时,需要频繁清空画布以实现十字架随手指移动的效果。但频繁的清空重绘会导致移动时出现卡顿。实际上,在绘制十字架时,日K、成交量、均线等是不会发生变化的,因此不需要清空重绘它们,只需要清空十字架即可。这样就能减少无意义的清空重绘,提高移动时的流畅性。
为了将变与不变的情况分离,我们可以使用两个canvas进行叠加。日K、成交量、均线等绘制在canvas1上,而十字架则绘制在canvas2上。当触发十字架时,只需要清空重绘canvas2即可,而拖动k线时也不需要处理十字架的画布。这种方式能够有效减少不必要的操作,提高移动的性能。
原文链接:https://juejin.cn/post/7214004641897267237 作者:刘煎蛋