
Vue3工程化项目搭建
一、何为工程化
前端工程化大致可以分为模块化、组件化、规范化和自动化。
规范化
- 项目目录结构
- 语法提示
- 编码风格规范
- 联调规范
- 文件命名规范
- 代码样式规范
- git flow
模块化
模块化是指将一个文件拆分成多个相互依赖的文件,最后进行统一的打包和加载,这样能够很好的保证高效的多人协作。
例如:ES6 Module、CommonJS、AMD、CMD
组件化
组件化则是对UI层面的拆分,将页面拆分成多个组件,每个组件包含自己的样式、逻辑和模板,最后组合成完整的页面。
例如:vue组件
自动化
- 自动化构建
- 自动化测试
- 自动化部署
- 自动化文档生成
::: 工程化的优势 一个字,降本增效
:::
接下来,一起搭建一个Vue3工程化项目
二、项目搭建
:::tip 提示 Node版本:16.0.0+
建议使用 pnpm
:::
可以使用官方脚手架vue-cli或者vite选择vue模板来创建一个 Vue 应用
vue-cli 搭建
pnpm create vue@latest
vite 搭建
pnpm create vite
这里选择使用vue-cli来创建项目,选项都可以选择Yes,
帮你完成Ts,Jsx,Vue Router,Pinia,Cypress,Eslint,Prettier的配置
Vue.js - The Progressive JavaScript Framework

✔ Project name: … vue3-quick-start
✔ Add TypeScript? … No / Yes
✔ Add JSX Support? … No / Yes
✔ Add Vue Router for Single Page Application development? … No / Yes
✔ Add Pinia for state management? … No / Yes
✔ Add Vitest for Unit Testing? … No / Yes
✔ Add an End-to-End Testing Solution? › Cypress
✔ Add ESLint for code quality? … No / Yes
✔ Add Prettier for code formatting? … No / Yes

Scaffolding project in ./<your-project-name>...

Done.
下载完成之后,执行如下启动项目
cd vue3-quick-start
pnpm install
pnpm format
pnpm dev
如下:项目成功启动
  VITE v4.4.2  ready in 1064 ms

  ➜  Local:   http://127.0.0.1:5173/
  ➜  Network: use --host to expose
  ➜  press h to show help
点击http://127.0.0.1:5173/即可访问


至此,全都使用脚手架生成代码
完整目录如下,可以看到Eslint和Prettier也已填加
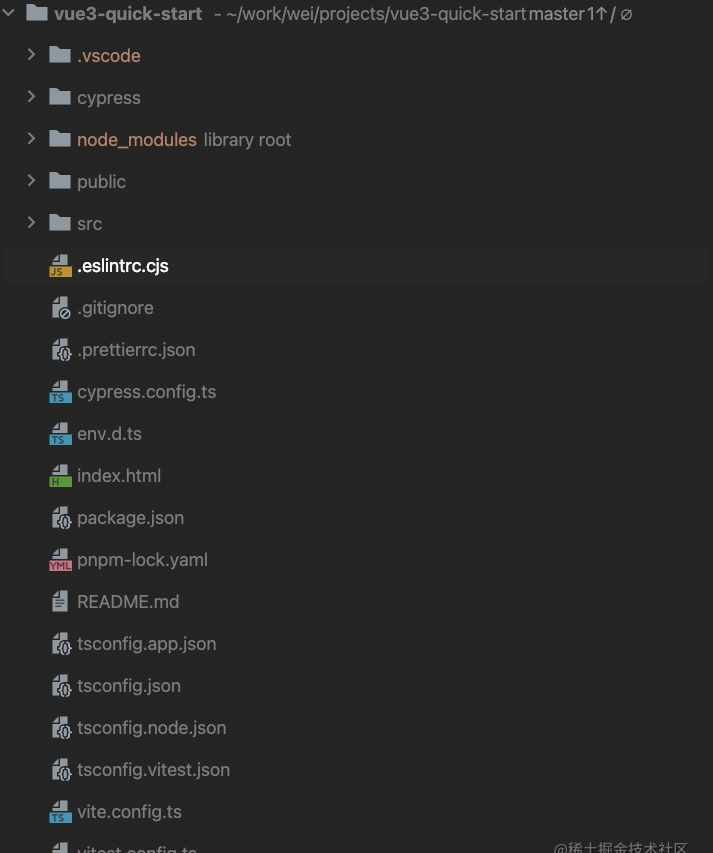
三、规范化
目录规范
├── src/
    ├── api/                       // 接口请求目录
    ├── assets/                    // 静态资源目录
        ├── logo.png
    ├── common/                    // 通用类库目录
    ├── components/                // 公共组件目录
    ├── router/                    // 路由配置目录
    ├── store/                     // 状态管理目录
    ├── style/                     // 通用样式目录
    ├── utils/                     // 工具函数目录
    ├── views/                     // 页面组件目录
        ├── Home                   // 页面组件目录
            ├── index.vue          // 页面组件
            ├── type.ts            // 页面组件类型定义
            ├── index.ts           // 页面组件逻辑
            ├── index.scss         // 页面组件样式
            ├── __tests__	       // 页面组件测试
    ├── App.vue
    ├── main.js
├── tests/                         // 单元测试目录
├── tsconfig.json                  // JavaScript 配置文件
├── vite.config.js                 // Vite 配置文件
└── package.json                   // 项目配置文件
├── .env                           // 公共配置文件
├── .env.development               // 开发环境配置文件
├── .env.production                // 生产环境配置文件
├── .eslintrc.js                   // eslint 配置文件
├── .gitignore                     // git 忽略文件
├── .prettierrc.js                 // prettier 配置文件
代码规范
这里通过 EditorConfig + ESLint + Prettier来实现代码规范
Eslint和Prettier默认已配置集成,这里需要做下修改并添加webstorm自动修复
1、修改.eslintrc.js
eslint Find and fix problems in your JavaScript code
将@vue/eslint-config-prettier/skip-formatting中skip-formatting去掉,
修改为@vue/eslint-config-prettier,这样就可以使用自动修复功能了
添加.eslintignore文件,忽略不需要检查的文件
.DS_Store
.idea
.editorconfig
pnpm-lock.yaml
.npmrc

.tmp
.cache/
coverage/
.nyc_output/
**/.yarn/**
**/.pnp.*
/dist*/
node_modules/
**/node_modules/

## Local
.husky
.local

!.prettierrc.js
components.d.ts
auto-imports.d.ts
2、修改.prettierrc.json为.prettierrc.js
prettier An opinionated code formatter
修改为.js,主要是方便我们去查看配置了哪些规范
配置项根据需要自行修改
::: tip
脚手架已经帮我们配置了将 Prettier 的规则设置到 ESLint 的规则中,
所以我们只需要关注.prettierrc.js中的配置即可
:::
module.exports = {
    "$schema": "https://json.schemastore.org/prettierrc",
    printWidth: 120, // 单行输出(不折行)的(最大)长度
    semi: false, // 结尾使用分号, 默认true
    useTabs: false, // 使用tab缩进,默认false
    tabWidth: 4, // tab缩进大小,默认为2
    singleQuote: true, // 使用单引号, 默认false(在jsx中配置无效, 默认都是双引号)
    jsxSingleQuote: true, // jsx 不使用单引号,而使用双引号
    trailingComma: 'none', // 行尾逗号,默认none,可选 none|es5|all es5 包括es5中的数组、对象,all 包括函数对象等所有可选
    bracketSpacing: true, // 对象中的空格 默认true,true: { foo: bar },false: {foo: bar}
    htmlWhitespaceSensitivity: 'ignore', // 指定 HTML 文件的全局空白区域敏感度, "ignore" - 空格被认为是不敏感的
    jsxBracketSameLine: false,
    arrowParens: 'avoid', // 箭头函数参数括号 默认avoid 可选 avoid| always, avoid 能省略括号的时候就省略 例如x => x,always 总是有括号
    proseWrap: 'always', // 当超出print width(上面有这个参数)时就折行
}
同样,添加.prettierignore文件,忽略不需要检查的文件
.DS_Store
.idea
.editorconfig
pnpm-lock.yaml
.npmrc

.tmp
.cache/
coverage/
.nyc_output/
**/.yarn/**
**/.pnp.*
/dist*/
node_modules/
**/node_modules/

## Local
.husky
.local

**/*.svg
**/*.sh
components.d.ts
auto-imports.d.ts
3、添加.editorconfig
配置编辑器代码风格,保持统一
# http://editorconfig.org
root = true

[*]
indent_style = space
indent_size = 4
charset = utf-8
trim_trailing_whitespace = true
insert_final_newline = true

[*.md]
trim_trailing_whitespace = false
4、自动格式化代码
- webstorm
开启eslint,并选择自动修复

- vscode
安装 eslint, volar
settings.json 设置文件中,增加以下代码:
"editor.codeActionsOnSave": {
    "source.fixAll": true,
},
"eslint.validate": [
    "javascript",
    "javascriptreact",
    "typescript"
],
"eslint.alwaysShowStatus": true
修改之后再次执行 yarn run format,对代码进行格式化
::: tip
代码规范配置已完成,具体配置根据团队规范进行修改
:::
husky和lint-staged集成
1、添加husky配置
通过特定的 git hook 来检查git提交信息,代码lint等功能
- 安装
pnpm dlx husky-init && pnpm install
执行完成之后自动添加以下配置
1、在package.json中添加
"script": {
    "prepare": "husky install"
}
2、创建了一个 pre-commit 钩子的示列
如何添加新的钩子
npx husky add .husky/commit-msg "npm test"
2、添加lint-staged配置
lint-staged只作用于git暂存区的文件,
可以对暂存区的文件进行lint检查,格式化等操作
这里结合husky/pre-commit钩子,对暂存区的文件进行检查
- 安装
pnpm install -D lint-staged
- 配置
package.json添加如下配置
"lint-staged": {
    "*.{js,jsx,ts,tsx,vue}": [
        "eslint --fix",
        "git add ."
    ]
},
修改 .husky/pre-commit 触发命令为:
npx lint-staged
这样就可以在提交代码之前,对暂存区的文件进行检查,并尝试修复
比如当你尝试提交如下代码,根据规范,会自动将”转为’,并完成提交
const a = "string"
Git提交规范
这里我们只讲怎么操作,Commit规范讲解参考下文
1、Git Commit 格式规范
这是 angular 的commit记录,属于是业界的标杆了
2、commitizen 规范集成
- a、安装
本地或者全局安装
这里推荐团队成员去全局安装,这样项目中只需要配置即可使用
pnpm install -g commitizen cz-conventional-changelog
commitizen:Commitizen CLI 工具
cz-conventional-changelog:适配器
- b、配置
package.json添加如下配置
"config": {
    "commitizen": {
      "path": "cz-conventional-changelog"
    }
}
- c、使用
git add .
git cz
或者package.json添加scripts
"scripts": {
    "commit": "cz"
}
pnpm run commit
此时会出现这样的交互式命令行,根据提示完成提交
? Select the type of change that you're committing: (Use arrow keys)
❯ feat:        A new feature
  fix:         A bug fix
  improvement: An improvement to a current feature
  docs:        Documentation only changes
  style:       Changes that do not affect the meaning of the code (white-space, formatting, missing semi-colons, etc)
  refactor:    A code change that neither fixes a bug nor adds a feature
  perf:        A code change that improves performance
(Move up and down to reveal more choices)
3、commitlint 规范校验
- 安装
pnpm install -D @commitlint/cli @commitlint/config-conventional
- 配置
package.json添加如下配置
"commitlint": {
    "extends": [
        "@commitlint/config-conventional"
    ]
}
使用 husky 命令在,创建 commit-msg 钩子,并执行验证命令:
npx husky add .husky/commit-msg "npx --no-install commitlint --edit $1"
这样就可以在commit-msg,对提交信息进行检查
比如当你去尝试提交一个不规范的message,会阻止提交并报错
subject may not be empty
type may not be empty
➜  vue3-quick-start git:(master) ✗ git commit -m 这是一个错误的提交信息
→ No staged files match any configured task.
⧗   input: 这是一个错误的提交信息
✖   subject may not be empty [subject-empty]
✖   type may not be empty [type-empty]

✖   found 2 problems, 0 warnings
ⓘ   Get help: https://github.com/conventional-changelog/commitlint/#what-is-commitlint

husky - commit-msg hook exited with code 1 (error)
4、版本管理及CHANGELOG
推荐使用 release-it
集成以下功能:
- Bump version (in e.g. package.json)
- Git commit, tag, push
- Execute any (test or build) commands using hooks
- Create release at GitHub or GitLab
- Generate changelog
- Publish to npm
- Manage pre-releases
- Extend with plugins
- Release from any CI/CD environment
规范化的提交信息除了能很好描述项目的修改,还有一个很好的作用就是能根据提交记录来生成CHANGELOG.MD和自动生成版本号等功能。
# Changelog

All notable changes to this project will be documented in this file. See [standard-version](https://github.com/conventional-changelog/standard-version) for commit guidelines.

### 1.0.0 (2022-08-27)

### Features

* init By Vue 3 + TypeScript + Vite ([9487a8b](https://github.com/wei-design/web-vue/commit/9487a8be27d396f6ea96b0ff3b57473325d7f54b))
* 添加github ci ([44d63e2](https://github.com/wei-design/web-vue/commit/44d63e2cb714669945a3d27f99f3148915c904c4))
* 添加husky ([d1150f4](https://github.com/wei-design/web-vue/commit/d1150f47e84dc4ddc0fda5d16bc1ab837b551b05))

### Bug Fixes

* update ci ([278fb38](https://github.com/wei-design/web-vue/commit/278fb3860f460bbbdb045fd2bbe96c9994505d6e))
四、基础配置
1、scss集成
pnpm install -D sass
2、Vite配置
针对打包路径、打包配置、环境变量常量、本地服务做了配置,具体如下:
3、环境变量与模式
Vite 在一个特殊的 import.meta.env 对象上暴露环境变
默认变量
-
import.meta.env.MODE: {string} 应用运行的模式。
-
import.meta.env.BASE_URL: {string} 部署应用时的基本 URL。他由base 配置项决定。
-
import.meta.env.PROD: {boolean} 应用是否运行在生产环境。
-
import.meta.env.DEV: {boolean} 应用是否运行在开发环境 (永远与 import.meta.env.PROD相反)。
-
import.meta.env.SSR: {boolean} 应用是否运行在 server 上。
.env 文件
Vite 使用 dotenv 从你的 环境目录 中的下列文件加载额外的环境变量:
- 规则如下
- 配置
添加env.development文件,用于开发环境的配置
添加env.production文件,用于生产环境的配置
- TypeScript 的智能提示
在env.d.ts文件中添加
4、路由自动加载
主要用到了 import.meta.glob
核心代码如下:
5、auto-import 使用
先看下使用效果
这里使用了 onMounted,无需导入,直接使用,对应 element-plus 的 message 组件也是
安装
配置
- 在
vite.config.ts中plugins添加
这里只配置了vue和vue-router的auto-import
此时会生成 auto-imports.d.ts 和 .eslintrc-auto-import.json
- 在
tsconfig.json中include添加
为了代ts提示
- 在
.eslintrc.cjs中extends添加
为了eslint不报错
添加 element-plus 的按需引入
element-plus 导入具体查看官网,这里主要说下 auto-import
这里使用到了 unplugin-auto-import 的 Custom resolvers, unplugin-vue-components
- 首先,安装
- 配置
在 vite.config.ts 中 plugins 添加
:::warning WARNING
如果使用 unplugin-element-plus 并且只使用组件 API,你需要手动导入样式。
Example:
:::
到此,自动导入的配置完成
遇到的问题
在打包时候报错,相关issue
Module ‘”element-plus”‘ has no exported member ‘ElMessage’. Did you mean to use ‘import ElMessage from “element-plus”‘ instead?ts`
解决办法:
在 tsconfig.json 中 compilerOptions 添加
…
axios封装
tools封装
…
五、自动化
通过 github actions + github pages,实现项目的自动化构建和部署
源码:github
原文链接:https://juejin.cn/post/7256161389021265978 作者:forguo