
出场就要帅气!
1.画出模型的点
  this.loadModel('apple.glb').then((model) => {
            let obj = model.children[0].children[0];
 let geometry = obj.geometry;
 //放大两倍
            geometry.scale(2, 2, 2);
            //形状点整体居中
            geometry.center();
      //渲染方式为画点
 let material = new THREE.PointsMaterial({
              size: 1,//点大小
              color: new THREE.Color(that.color), //颜色
              transparent: true, //开启透明
   });

 this.mesh = new THREE.Points(geometry, material);
  this.scene.add(this.mesh);
  //设置视角
 this.setView(that.cameraPos, that.controlsPos);
 })
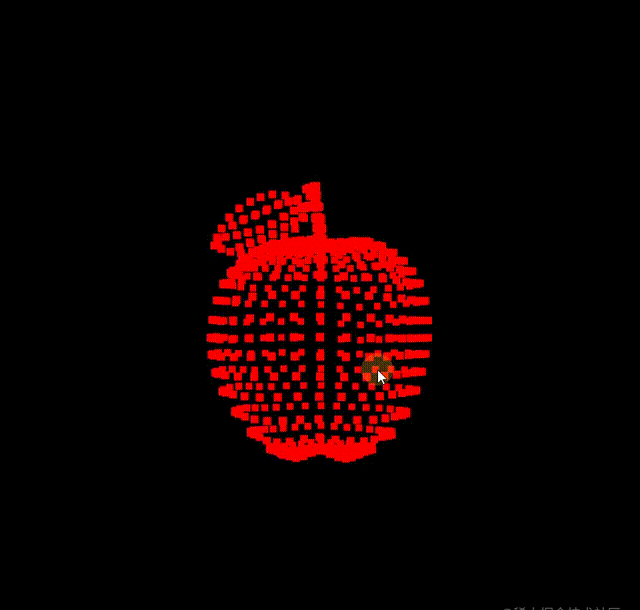

- 为了操作点方便,所以这里使用的是
BufferGeometry,以上是苹果模型的BufferGeometry,如果是一些像球体等封装好的图元,可以采用以下方式转换成对应的缓存图元
 //转为缓存图元
            geometry = new THREE.BufferGeometry().fromGeometry(geometry);
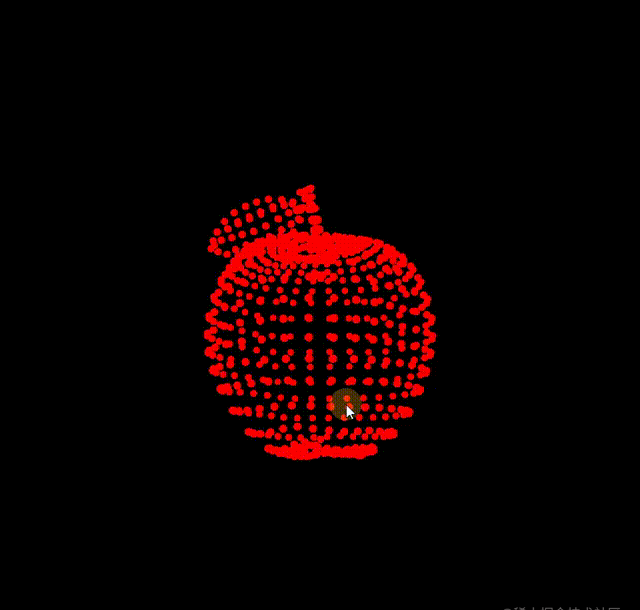
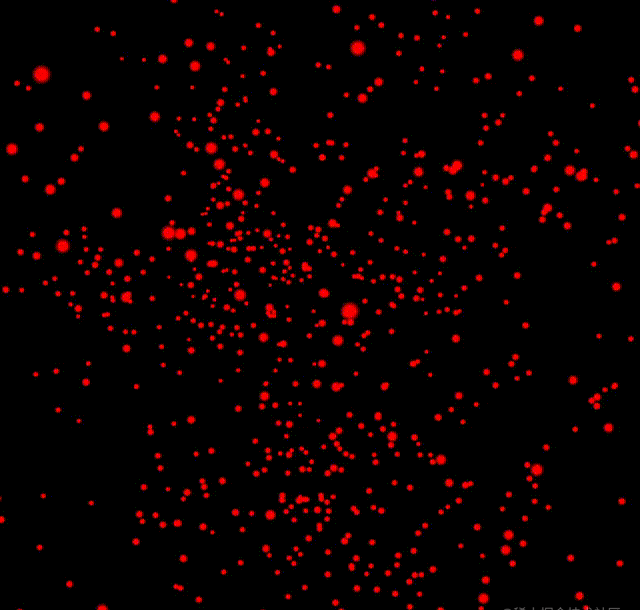
2.画圆点
- 可以看到原始的点是正方形的,为了好看,我们需要将点变成圆形,那么我们需要在编译前修改片元着色器
  material.onBeforeCompile = (shader) => {
  console.log(shader)
  })
- 打印
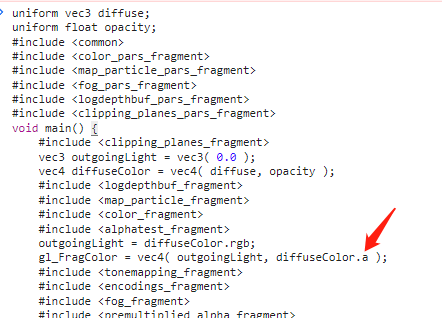
shader.fragmentShader可以看到编译前的代码,有点多和复杂,不用读懂,我们只需要替换其中要用的一句代码,变成我们需要的结果。
  material.onBeforeCompile = (shader) => {
//修改片元着色器
shader.fragmentShader = shader.fragmentShader.replace(
 `gl_FragColor = vec4( outgoingLight, diffuseColor.a );`,
                `  //需要替换的代码……`
              );
- 以下是画圆点的着色器,实现逻辑:计算每个片元离中心点的距离,远离中心点的片元没有过颜色
//计算离中心点距离
float d=distance(gl_PointCoord, vec2(0.5, 0.5));
//离中心点0.5以外没有颜色
  if(d>0.5) discard;
  //复用替换前的代码
 gl_FragColor = vec4(outgoingLight , diffuseColor.a );
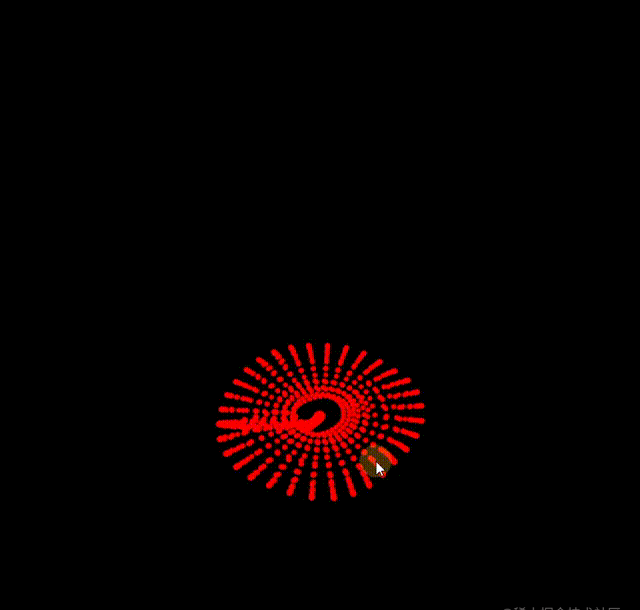
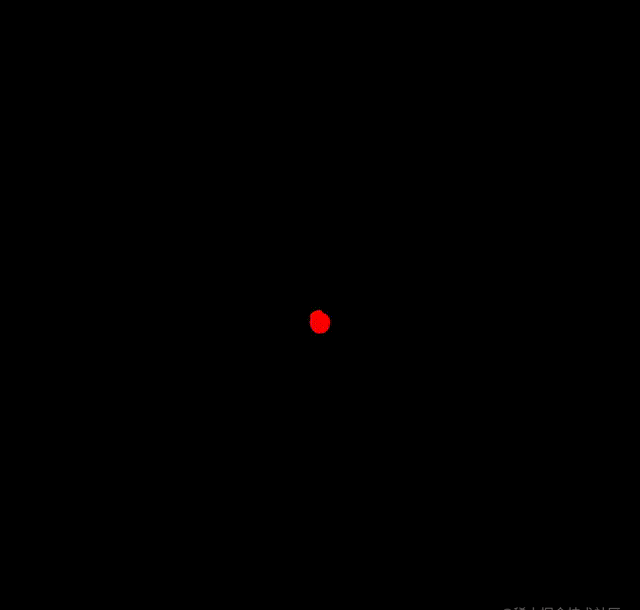
3.圆点变光点
- 一个个圆点貌似有点丑,巴啦啦小魔仙仙,呜呼啦呼,变!
float d=distance(gl_PointCoord, vec2(0.5, 0.5));
if(d < 0.3){//保持原色
  gl_FragColor = diffuseColor;
}else{
//透明渐变
  gl_FragColor.rgb = diffuseColor.rgb;
float cd =(1.0-d*2.0);
gl_FragColor.a=diffuseColor.a*cd*0.5;
}
- 离中心点0.3以内的保持原来颜色
- 其他部分根据离中心点距离透明渐变

- 但是你会发现当点出现叠加时,有个黑框正方形,那是因为深度冲突的问题,这时候就需要关闭材质的深度测试
  let material = new THREE.PointsMaterial({
              size: 1,
              color: new THREE.Color(that.color),
              transparent: true,
              depthTest: false//关闭深度测试
            });

- 可以看到黑框不见了,发光点正常了!
4.出场方式1:让点从底部逐渐上升
获取顶点位置,然后复制存一份作为原始值,另一份设置成全部点落在底
geometry.boundingBox:形状的包围框,可以获取底部的位置和顶部的位置
const positions = geometry.attributes.position;

            const pos = positions.clone();
            //底部位置
            const bottom = geometry.boundingBox.min.y;
            this.distance = bottom;
            //顶部位置
            this.max = geometry.boundingBox.max.y;
            const count = pos.count;

            for (let i = 0; i < count; i++) {
            //将y轴坐标全部置底
              pos.setXYZ(i, pos.getX(i), bottom, pos.getZ(i));
            }
            pos.needsUpdate = true;

            geometry.setAttribute('position', pos);

            geometry.setAttribute('initialPosition', positions.clone());

            geometry.attributes.position.setUsage(THREE.DynamicDrawUsage);
- 可以看到3D形状像是变成扁平二维了
动起来,让世界变得精彩
this.speed:运动速度this.speed1:运动加速度this.distance:上升的距离
动画逻辑:
- 当初始点小于上升距离时,则点回到原来的位置
- 当点大于上升距离时,点维持上升距离的位置
- 上升距离随着时间增大,这样就可以呈现沿着一个平面,点逐步复原的出场效果!
- 当上升距离大于最高点则结束动画,出场完成!
animateAction() {
          if (this.mesh && this.distance <= this.max) {
            this.speed += this.speed1;
            this.distance += this.speed;
            let dist = this.distance;
            const positions = this.mesh.geometry.attributes.position;
            const initialPositions = this.mesh.geometry.attributes.initialPosition;
            const count = positions.count;
            let t = this.max - this.distance;
            for (let i = 0; i < count; i++) {
              const iy = initialPositions.getY(i);
              positions.setXYZ(i, positions.getX(i), iy <= dist ? iy : dist, positions.getZ(i));
            }
            //通知材质的着色器,点要更新
            positions.needsUpdate = true;
          }
        }
注意:赋值改变点位置后,一定要
positions.needsUpdate = true;通知点位置属性要更新
5.出场方式2:让凌乱的点汇聚
- 逻辑跟第一种出场方式类似,不过这里需要存储一份随机偏移值,用来生成凌乱的点
const positions = geometry.attributes.position;
            geometry.setAttribute('initialPosition', positions.clone());
            const pos = positions.clone();
            const count = pos.count;
            const displacement = new Float32Array(count);

            for (let i = 0; i < count; i++) {
            //随机偏移值
              displacement[i] = that.minDistance + that.distance * Math.random();
            }
            pos.needsUpdate = true;


            geometry.setAttribute('position', pos);
//偏移值赋值
   geometry.setAttribute('displacement', new THREE.BufferAttribute(displacement, 1));
            geometry.attributes.position.setUsage(THREE.DynamicDrawUsage);
*动画逻辑:*
-
初始点根据时间变换,逐渐减少偏移,最终回调原始的点,形成3D形状
-
当偏移距离减少至零,全部点恢复位置,动画结束,出场完成!
this.time时间增长值
注意:偏移距离要乘以法向量,这样才能让点四面八方地分布
  animateAction() {
          if (this.mesh && this.time >= 0) {
            this.speed += this.speed1;
            this.time += this.speed;
            const positions = this.mesh.geometry.attributes.position;
            const normal = this.mesh.geometry.attributes.normal;
            const initialPositions = this.mesh.geometry.attributes.initialPosition;
            const displacement = this.mesh.geometry.attributes.displacement;
            const count = positions.count;
            let t = 2.0 - this.time;
            for (let i = 0; i < count; i++) {
            //计算该时间的偏移距离
              const d = displacement.getX(i) * t;
              const ix = initialPositions.getX(i);
              const iy = initialPositions.getY(i);
              const iz = initialPositions.getZ(i);
              const nx = normal.getX(i);
              const ny = normal.getY(i);
              const nz = normal.getZ(i);
              //初始点减去偏移距离
              positions.setXYZ(i, ix - nx * d, iy - ny * d, iz - nz * d);
            }
            positions.needsUpdate = true;
            if (this.time >= 2) {//结束动画
              this.time = -1;
            }
          }
        }
6.出场方式3:中心爆炸点
- 这个与上面的出场方式类似,不过是全部点从一个点出发,然后回到原来的位置,于是就要设置初始点为同一个位置
const positions = geometry.attributes.position;
 const b = geometry.boundingBox;
            this.max = Math.max(
              Math.abs(b.min.x),
              Math.abs(b.min.y),
              Math.abs(b.min.z),
              Math.abs(b.max.x),
              Math.abs(b.max.y),
              Math.abs(b.max.z)
            );
            geometry.setAttribute('initialPosition', positions.clone());
            const pos = positions.clone();
            const count = pos.count;

            for (let i = 0; i < count; i++) {
            //全部点设置为原点
              pos.setXYZ(i, 0, 0, 0);
            }
            pos.needsUpdate = true;
是是
            geometry.setAttribute('position', pos);

            geometry.attributes.position.setUsage(THREE.DynamicDrawUsage);
*动画逻辑:*
-
半径随着时间增大,当点原始位置与原点的距离小于半径则回归原位,否则跟着扩张半径运动,直至全部点回到原始位置,形成最终的3D形状!
-
半径扩展与时间是比例相乘关系,当时间为1时,则恢复原状,动画结束,出场完成!
注意:每个点与原点的距离有正负值之分,对比时要用绝对值!
 animateAction() {
          if (this.mesh && this.time >= 0) {
            this.speed += this.speed1;
            this.time += this.speed;

            const positions = this.mesh.geometry.attributes.position;

            const normal = this.mesh.geometry.attributes.normal;

            const initialPositions = this.mesh.geometry.attributes.initialPosition;

            const count = positions.count;
            const radius = this.time * this.max;

            for (let i = 0; i < count; i++) {
              const nx = normal.getX(i);
              const ny = normal.getY(i);
              const nz = normal.getZ(i);

              const ix = initialPositions.getX(i);
              const iy = initialPositions.getY(i);
              const iz = initialPositions.getZ(i);

              positions.setXYZ(
                i,
                radius >= Math.abs(ix) ? ix : radius * nx,
                radius >= Math.abs(iy) ? iy : radius * ny,
                radius >= Math.abs(iz) ? iz : radius * nz
              );
            }
            positions.needsUpdate = true;

            if (this.time >= 1) {
              this.time = -1;
            }
          }
        }
7.给光点开启布灵布灵的效果
- 传入每个点的颜色值,这里采用的是随机颜色,范围是[0,1]
            let colors = [];

            for (let i = 0; i < positions.count; i++) {
              colors.push(Math.random(), Math.random(), Math.random());
            }
            geometry.setAttribute('color', new THREE.Float32BufferAttribute(colors, 3));
- 开启材质的顶点颜色
let material = new THREE.PointsMaterial({
              size: 1,
              color: new THREE.Color(that.color),
              vertexColors: true,//顶点颜色
              transparent: true,
              depthTest: false
            });
- 完成出场后,动画帧中添加给每个点不停赋值随机色,就能形成一闪一闪的效果。
 const colors = this.mesh.geometry.attributes.color;
              const count = colors.count;
              for (let i = 0; i < count; i++) {
                colors.setXYZ(i, Math.random(), Math.random(), Math.random());
              }
              colors.needsUpdate = true;
注意:点颜色值改变要通知颜色属性要更新
为什么开启点颜色后可以有不同颜色深度的效果呢?
- 我们可以改一下编译前的片元着色器,去掉一个分号,让它报错,打印一下编译后的着色器结果
material.onBeforeCompile = (shader) => {

              //修改片元着色器,使其变成发光圆点
              shader.fragmentShader = shader.fragmentShader.replace(
                `gl_FragColor = vec4( outgoingLight, diffuseColor.a );`,
                `gl_FragColor = vec4( outgoingLight, diffuseColor.a )`

              );
            };
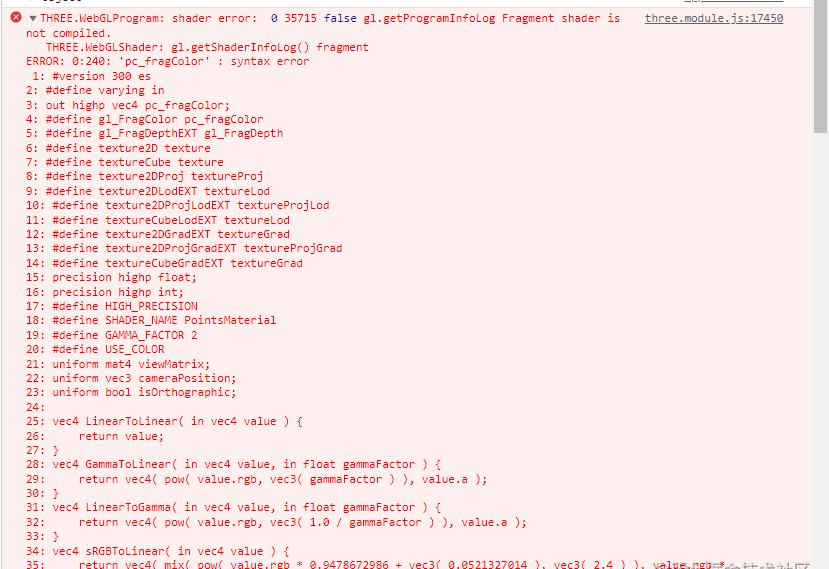
- 代码真的好多,看得好头大!是时候展现你的着色器常识了!这个点颜色值肯定是从顶点着色器那边穿过来的,搜一下
varying全局变量,果不其然,可以发现一下代码!
173: #ifdef USE_COLOR
174: 	varying vec3 vColor;
175: #endif


229: #ifdef USE_COLOR
230: 	diffuseColor.rgb *= vColor;
231: #endif
- 破案!
diffuseColor是点显示的颜色,默认的时候是材质的color属性值,如果开启vertexColors后,vColor传过来,会执行颜色值相乘,即颜色值叠加,就会出现这样不同的深度的颜色。

总结
以上点的运动都是通过计算传入最终位置结果,但其实可以通过修改顶点着色器也能实现同样的效果。
three.js真的封装很全,大家可以弄点报错,看看人家的着色器代码,学习一下,也方便以后修改着色器代码,自定义效果!
GitHub地址
https://github.com/xiaolidan00/my-three
原文链接:https://juejin.cn/post/7260140816576167973 作者:敲敲敲敲暴你脑袋