

前期准备
1. 准备 threejs 的渲染操作
2. 准备 shader 雷达效果需要的 相关函数 解析
rotate
- (vec2 uv,float rotation , vec2 mid) rotation 旋转角度 、 mid 旋转中心坐标;
旋转函数 (该函数为自定义函数 , 固定写法)可供后续开发使用;
vec2 rotate(vec2 uv,float rotation , vec2 mid){
    return vec2(
       cos(rotation) * (uv.x - mid.x) + sin(rotation) * (uv.y - mid.y) + mid.x ,
       cos(rotation) * (uv.y - mid.y) - sin(rotation) * (uv.x - mid.x) + mid.y
    );
}
step
- ( float number , float value) 内置函数 理解为:value > number ? 1 : 0;
mix
- (vec3 color1, vec3 color2 , float value) 内置函数 ;
distance
- ( vec2 uv , vec2 vec2(0.5) ) 内置函数 理解为:a、b两点之间距离; distance 函数一般用来绘制一个圆环
float strength = step(0.5,distance(vUv,vec2(0.5)) + 0.35);
strength *= step(0.5,distance(vUv,vec2(0.5)) + 0.25);
gl_FragColor = vec4(strength,strength,strength,1);

atan
- (falot number , float number) 内置函数 切片函数 (雷达效果主要函数);
float strength = atan(vUv.x,vUv.y);
gl_FragColor = vec4(strength,strength,strength,1);
3. 片元着色器代码解析
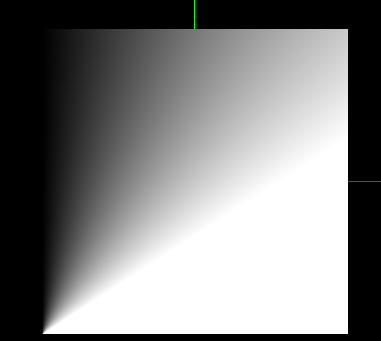
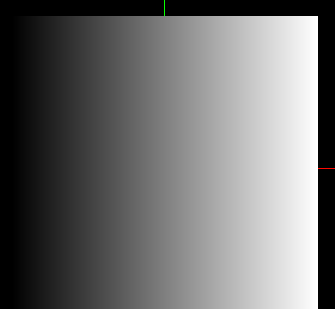
3.1 通过 vUv 绘制一个基础的渐变颜色
void main(){
   vec2 rotateUv = rotate(vUv , -uTime * 5.0,vec2(0.5));
   gl_FragColor = vec4(vUv.x,vUv.x,vUv.x,1);
}
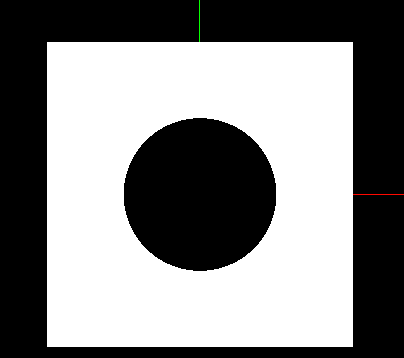
3.2 绘制圆 透明值 = alpha 这里有一个点是需要在 着色器材质中添加一个属性 transparent:true
void main(){
    vec2 rotateUv = rotate(vUv , -uTime * 5.0,vec2(0.5));
    float alpha = 1.0 - step(0.5,distance(vUv,vec2(0.5)) +0.15); // 圆
    gl_FragColor = vec4(vUv.x,vUv.x,vUv.x,alpha);
}
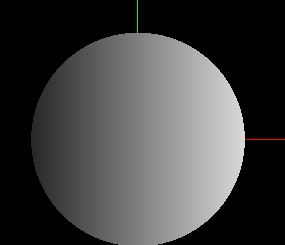
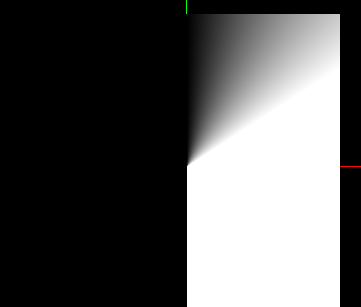
3.3 绘制完圆 我们开始绘制雷达效果 并设置 x y 中心坐标
void main(){
     float strength = atan(vUv.x - 0.5,vUv.y - 0.5);
     gl_FragColor = vec4(strength,strength,strength,1);
}
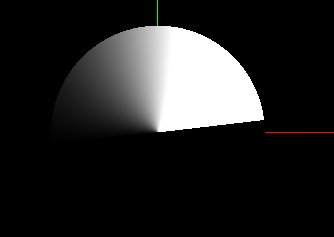
3.4 圆 结合 雷达切片效果 行成了一张 扇行的效果
void main() {
    vec2 rotateUv = rotate(vUv , -uTime * 5.0,vec2(0.5));
    float alpha = 1.0 - step(0.5,distance(vUv,vec2(0.5)) +0.15); // 圆
    float angle = atan(rotateUv.x -0.5,rotateUv.y - 0.5);
    gl_FragColor = vec4(vUv.x * angle,vUv.x * angle,vUv.x * angle, alpha );
}
3.5 接下来我们可以 改变 黑色和白色的颜色
void main() {
    vec2 rotateUv = rotate(vUv , -uTime * 5.0,vec2(0.5));
    float alpha = 1.0 - step(0.5,distance(vUv,vec2(0.5)) +0.15); // 圆
    float angle = atan(rotateUv.x -0.5,rotateUv.y - 0.5);
    float color = mix(vec3(1.0,1.0,1.0),vec3(1.0,1.0,0),angle);
    gl_FragColor = vec4(color, alpha );
}

3.6 现在我们到这里 也就差不多完成了 , 那么我们可以 修改一下白色区域的大小
void main() {
    vec2 rotateUv = rotate(vUv , -uTime * 5.0,vec2(0.5));
    float alpha = 1.0 - step(0.5,distance(vUv,vec2(0.5)) +0.15); // 圆
    float angle = atan(rotateUv.x -0.5,rotateUv.y - 0.5);
    float strength = (angle + 3.14) / 6.28;
    float color = mix(vec3(1.0,1.0,1.0),vec3(1.0,1.0,0),strength);
    gl_FragColor = vec4(color, alpha );
}
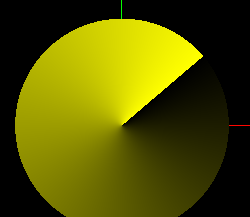
3.7 现在是不是更 符合审美了点呢!
3.7.1 那么我们再加一个动画效果吧.. 加一个动画效果 我们只需要把 vUv 修改为 我们的旋转 rotateUv 就可以了。。。 再加一个 传递 的 uTime 时间;
uniform float uTime;
// 旋转函数
vec2 rotate(vec2 uv,float rotation , vec2 mid){
    return vec2(
       cos(rotation) * (uv.x - mid.x) + sin(rotation) * (uv.y - mid.y) + mid.x ,
       cos(rotation) * (uv.y - mid.y) - sin(rotation) * (uv.x - mid.x) + mid.y
    );
}
void main() {
    vec2 rotateUv = rotate(vUv , -uTime * 5.0,vec2(0.5));
    float alpha = 1.0 - step(0.5,distance(vUv,vec2(0.5)) +0.15); // 圆
    float angle = atan(rotateUv.x -0.5,rotateUv.y - 0.5);
    float strength = (angle + 3.14) / 6.28;
    float color = mix(vec3(1.0,1.0,1.0),vec3(1.0,1.0,0),strength);
    gl_FragColor = vec4(color, alpha );
}
原文链接:https://juejin.cn/post/7265891101894410259 作者:抱着女鬼在坟头_