
本文将介绍如何在网页应用程序中处理用户认证的逻辑,并区分开发环境和生产环境。文章内容将涵盖如何为测试目的模拟用户登录及如何在真实登录情况下分别拿到用户信息。
开发环境的模拟登录:
在开发环境中,可能不总是有后端服务可用。使用模拟数据来模拟登录过程。使用 isUseFront 或 URL参数来控制:
if (isUseFront || getUrlParams(window.top.location.href).mockLogin === "true") {
  // 在此处模拟登录逻辑
}
缓存登录数据:
每次请求都检索登录信息的做法是低效的。因此,需要存储这些数据。如果已经可用,就可以直接使用:
if (window.loginInfo) {
  callback(window.loginInfo);
  return;
}
这些缓存的信息可以减少网络流量并加快应用程序的速度。
动态函数调用:
不同类型的登录,如设施或用户登录,可能需要不同的处理。使用动态函数调用模式:
const loginFunc = { facility: facilityLoginIn, user: loginIn };
loginFunc[type](data => {
  // 模拟登录实现
});
这种模式让切换不同登录过程变得方便,无需为每种场景硬编码。
轮询认证:
在实际登录时,可能需要等待外部脚本加载。使用轮询机制来检查 getUserInfo 函数:
const timer = setInterval(() => {
  if (window.locationjs && window.locationjs.getUserInfo) {
    getUserInfo(callback);
    clearInterval(timer);
  }
}, 100);
轮询定期检查所需函数是否可用,并相应地进行处理。
解析URL参数:
经常需要从URL中提取参数以提供动态内容:
export const getUrlParams = (url = window.location.href) => {
  // 解析逻辑在这里
};
这个实用函数对于应用程序响应URL中的变化至关重要。
检索用户信息:
一旦 getUserInfo 函数可用,就使用它来设置 window.loginInfo 对象:
const getUserInfo = callback => {
  window.locationjs.getUserInfo(data => {
    const loginInfo = JSON.parse(data);
    // 设置登录信息
    callback(window.loginInfo);
  });
};
这个函数是一个处理JavaScript中异步操作的例子,通过回调函数来处理。
总结:
通过应用上面这些JavaScript技术,创建了一个既适应性强又以用户为中心的代码库。需要注意的是,比起具体的代码,本文中介绍的这些概念才是构建既响应迅速又高效的网页应用程序的基础。
附录:
完整代码
// 获取登陆信息
export const getLoginInfo = (callback, type = "user") => {
  if (
    isUseFront ||
    getUrlParams(window.top.location.href).mockLogin === "true"
  ) {
    if (window.loginInfo) {
      callback(window.loginInfo);
      return;
    }
    // 模拟登陆
    const loginFunc = { facility: facilityLoginIn, user: loginIn };
    loginFunc[type](data => {
      const res = data && data !== null ? data : {};
      window.loginInfo = res;
      callback(res);
    });
  } else {
    const timer = setInterval(() => {
      if (window.locationjs && window.locationjs.getUserInfo) {
        getUserInfo(callback);
        clearInterval(timer);
      }
    }, 100);
  }
};

// 获取登陆信息
const getUserInfo = callback => {
  window.locationjs.getUserInfo(data => {
    const loginInfo = JSON.parse(data);
    window.loginInfo = {
      token: loginInfo.token,
      userInfo: loginInfo,
    };
    callback(window.loginInfo);
  });
};

export const getUrlParams = (url = window.location.href) => {
  console.log('url:', url)
    let curl = url;
    curl = decodeURI(curl); // 符后的字串
    const theRequest = {};
    if (curl.indexOf("?") !== -1) {
      const str = curl.split("?");
      const strs = str[1].split("&");
      for (let i = 0; i < strs.length; i += 1) {
        // eslint-disable-next-line prefer-destructuring
        strs[i] = strs[i].split("#")[0];
        theRequest[strs[i].split("=")[0]] = unescape(strs[i].split("=")[1]);
      }
      return theRequest;
    }
    return "";
  };

// 模拟登陆(用户版)
export const loginIn = cb => {
  const { keyword: psw, userName: uname } = userInfo;
  const { password = psw, userName = uname } = getUrlParams();
  const param = {
    userName,
    password,
  };
  publicGetAxios("post", interfaceApi.authorize, param, cb);
};

// 模拟登陆(商家版)
export const facilityLoginIn = cb => {
  const { keyword: psw, nationalId: id } = facility;
  const { password = psw, nationalId = id } = getUrlParams();
  const param = {
    nationalId,
    password,
  };
  publicGetAxios("post", facilityApi.authorize, param, data => {
    cb(data);
  });
};
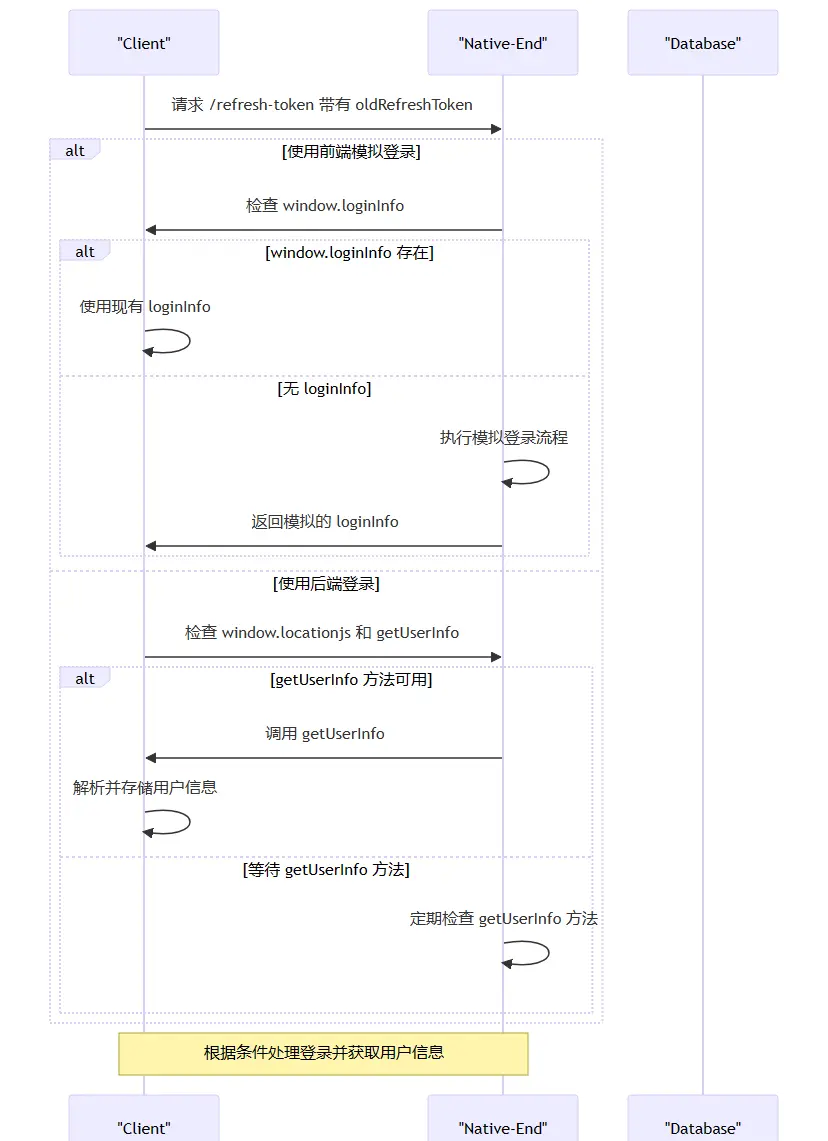
流程图

English version: How Can H5-end Get User Information From Native-end
Today, I’m going to walk you through the logic of handling user authentication in a web application, which can vary between a development and a production environment. This tutorial will cover how to simulate user login for testing purposes and how to implement a real login flow.
Mock Login for Development:
In a development setting, we might not always have the backend services available. We simulate the login process using mock data. This is where variables like isUseFront or URL parameters such as mockLogin come into play. Here’s how we check for them in our code:
if (isUseFront || getUrlParams(window.top.location.href).mockLogin === "true") {
  // Mock login logic goes here
}
We use this conditional to decide if we should proceed with a mock login or connect to actual backend services.
Caching Login Data:
It’s inefficient to retrieve login information with every request. Hence, we use window.loginInfo to store this data. If it’s already available, we use it directly:
if (window.loginInfo) {
  callback(window.loginInfo);
  return;
}
This cached information allows us to reduce network traffic and speed up our application.
Dynamic Function Invocation:
Different types of logins, such as for facilities or users, may require different handling. We use a dynamic function invocation pattern:
const loginFunc = { facility: facilityLoginIn, user: loginIn };
loginFunc[type](data => {
  // Mock login implementation
});
This pattern lets us conveniently switch between different login processes without hardcoding each scenario.
Polling for Authentication:
When it comes to actual login, we may need to wait for an external script to load. We use a polling mechanism to check for the getUserInfo function:
const timer = setInterval(() => {
  if (window.locationjs && window.locationjs.getUserInfo) {
    getUserInfo(callback);
    clearInterval(timer);
  }
}, 100);
Polling periodically checks whether the necessary function is available and proceeds accordingly.
Parsing URL Parameters:
We often need to extract parameters from the URL for dynamic content delivery:
export const getUrlParams = (url = window.location.href) => {
  // Parsing logic here
};
This utility function is essential for applications to react to changes in the URL.
Retrieving User Information:
Once we have the getUserInfo function available, we use it to set the window.loginInfo object:
const getUserInfo = callback => {
  window.locationjs.getUserInfo(data => {
    const loginInfo = JSON.parse(data);
    // Set login info
    callback(window.loginInfo);
  });
};
This function is an example of asynchronous operations in JavaScript, handled via callbacks.
In Summary:
This code exemplifies a structured approach to managing user authentication with flexibility for both development and live environments. By applying these JavaScript techniques, we create a codebase that is both adaptable and user-centric. Remember, these concepts are fundamental in building web applications that are both responsive and efficient.
Appendix:
Whole Code
// 获取登陆信息
export const getLoginInfo = (callback, type = "user") => {
  if (
    isUseFront ||
    getUrlParams(window.top.location.href).mockLogin === "true"
  ) {
    if (window.loginInfo) {
      callback(window.loginInfo);
      return;
    }
    // 模拟登陆
    const loginFunc = { facility: facilityLoginIn, user: loginIn };
    loginFunc[type](data => {
      const res = data && data !== null ? data : {};
      window.loginInfo = res;
      callback(res);
    });
  } else {
    const timer = setInterval(() => {
      if (window.locationjs && window.locationjs.getUserInfo) {
        getUserInfo(callback);
        clearInterval(timer);
      }
    }, 100);
  }
};

// 获取登陆信息
const getUserInfo = callback => {
  window.locationjs.getUserInfo(data => {
    const loginInfo = JSON.parse(data);
    window.loginInfo = {
      token: loginInfo.token,
      userInfo: loginInfo,
    };
    callback(window.loginInfo);
  });
};

export const getUrlParams = (url = window.location.href) => {
  console.log('url:', url)
    let curl = url;
    curl = decodeURI(curl); // 符后的字串
    const theRequest = {};
    if (curl.indexOf("?") !== -1) {
      const str = curl.split("?");
      const strs = str[1].split("&");
      for (let i = 0; i < strs.length; i += 1) {
        // eslint-disable-next-line prefer-destructuring
        strs[i] = strs[i].split("#")[0];
        theRequest[strs[i].split("=")[0]] = unescape(strs[i].split("=")[1]);
      }
      return theRequest;
    }
    return "";
  };

// 模拟登陆(用户版)
export const loginIn = cb => {
  const { keyword: psw, userName: uname } = userInfo;
  const { password = psw, userName = uname } = getUrlParams();
  const param = {
    userName,
    password,
  };
  publicGetAxios("post", interfaceApi.authorize, param, cb);
};

// 模拟登陆(商家版)
export const facilityLoginIn = cb => {
  const { keyword: psw, nationalId: id } = facility;
  const { password = psw, nationalId = id } = getUrlParams();
  const param = {
    nationalId,
    password,
  };
  publicGetAxios("post", facilityApi.authorize, param, data => {
    cb(data);
  });
};
Diagram

原文链接:https://juejin.cn/post/7327479764678475827 作者:慕仲卿