

wujie源码目录是怎样的?
wujie是如何实现js、css沙箱的?
wujie子应用是如何被加载到主应用中的?
wujie是如何实现路由同步的?
wujie可以实现应用保活吗?
让我们带着疑问,一探究竟
1、无界源码目录
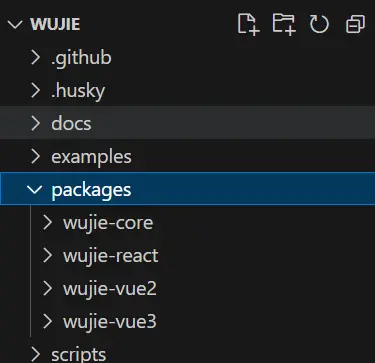

wujie-core是无界的核心源码部分
wujie-vue、wujie-react都是在wujie-core的基础上做了一层封装,代码很简单,主要看core里面内容
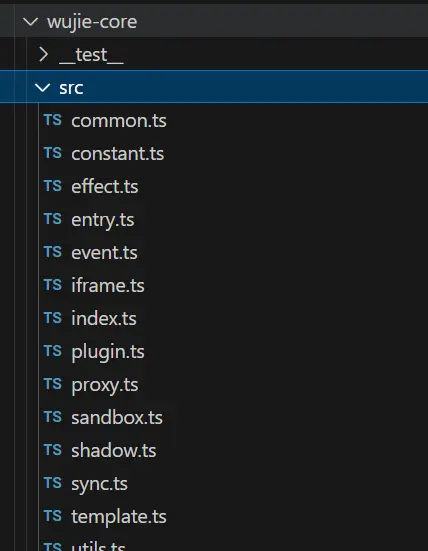
core包中
index.js—导出 startApp setupApp preloadApp destroyApp
iframe.js—iframeGenerator,js沙箱负责创建和主应用同源的iframe
sanbox.js—Wujie类,基于 Proxy和iframe 实现的沙箱
shadow.js—处理wujie webComponent相关内容
proxy.js—代理window、document、location
event.js—eventBus 事件中心
sync.js—路由同步相关
2、无界微前端解决方案
微前端关注点主要是看
1、js、css沙箱
2、各个应用通信问题
3、路由切换各个应用如何切换
4、子应用激活卸载能力
js沙箱:无界js沙箱采用创建iframe的方式,iframe天然具有js沙箱的优势,而且带有location以及history,路由也彻底和主应用解耦
css沙箱:web component天然具有样式隔离的特性,对web component不熟悉的话,建议先看完mdn上的介绍,理解了之后再看wujie源码!
应用通信:
props通信: 加载无界的子应用相当于加载一个组件,所以可以传props给子应用
window通信:由于子应用运行的iframe的src和主应用是同域的,所以相互可以直接通信
eventBus通信: 无界提供的通信方式
3、无界 startApp流程
在index.js中会定义webComponent容器,就是自定义一个元素标签wujie-app,然后创建shadow dom,并且把shadow dom赋值给sandbox.shadowRoot,源码如下所示:
// index.js中
// 定义webComponent容器
defineWujieWebComponent();
--------------------------------------------------------------------------------------
// shadow.js中
/**
 * 定义 wujie webComponent,将shadow包裹并获得dom装载和卸载的生命周期
 */
export function defineWujieWebComponent() {
  const customElements = window.customElements;
  if (customElements && !customElements?.get("wujie-app")) {
    class WujieApp extends HTMLElement {
      connectedCallback(): void {
        if (this.shadowRoot) return;
        const shadowRoot = this.attachShadow({ mode: "open" });
        const sandbox = getWujieById(this.getAttribute(WUJIE_APP_ID));
        patchElementEffect(shadowRoot, sandbox.iframe.contentWindow);
        sandbox.shadowRoot = shadowRoot;
      }

      disconnectedCallback(): void {
        const sandbox = getWujieById(this.getAttribute(WUJIE_APP_ID));
        sandbox?.unmount();
      }
    }
    customElements?.define("wujie-app", WujieApp);
  }
}

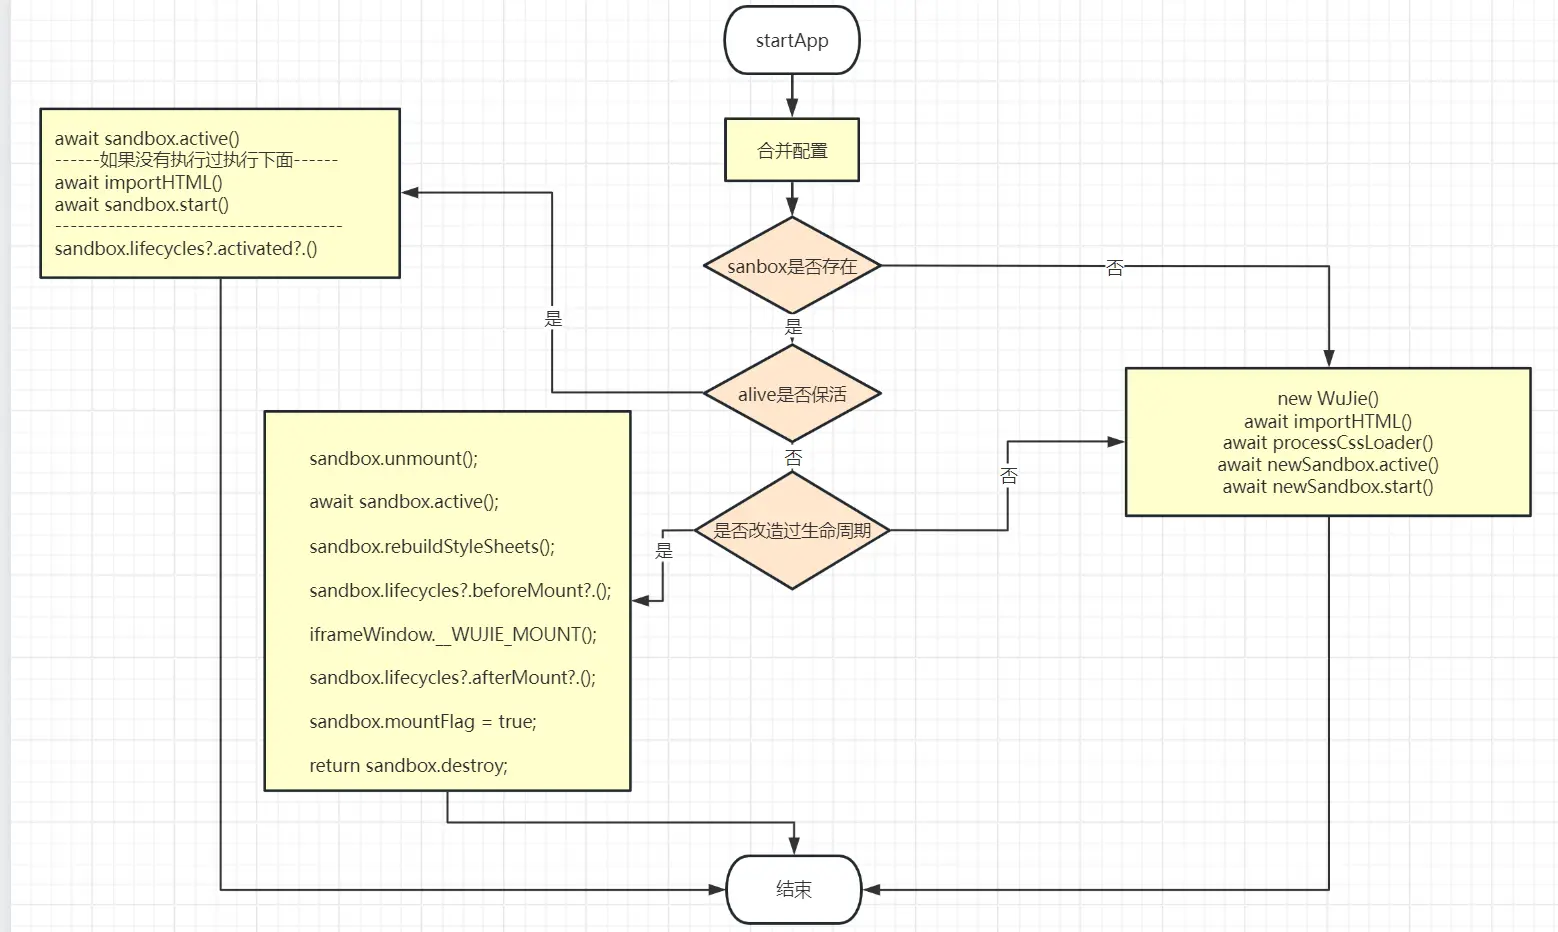
无界有三种模式,流程如上图所示,这个流程在startApp中可以看出来。
- 如果存在sandbox证明已经运行过应用,如果保活模式开启,进行应用激活等操作,然后结束。
- 如果改造过生命周期执行sandbox.unmount(),然后进行应用激活,执行生命周期函数,然后return结束。
- 如果没有保活,没有改造生命周期,则进行sandbox.destroy();销毁实例,然后重新生成newSandbox。
startApp流程图如下:
startApp源码如下:
/**
 * 运行无界app
 */
export async function startApp(startOptions: startOptions): Promise<Function | void> {
   。。。。省略一些合并配置代码。。。。。。。。
  // 已经初始化过的应用,快速渲染
  if (sandbox) {
    sandbox.plugins = getPlugins(plugins);
    sandbox.lifecycles = lifecycles;
    const iframeWindow = sandbox.iframe.contentWindow;
    if (sandbox.preload) {
      await sandbox.preload;
    }
    if (alive) {
      // 保活
      await sandbox.active({ url, sync, prefix, el, props, alive, fetch, replace });
      // 预加载但是没有执行的情况
      if (!sandbox.execFlag) {
        sandbox.lifecycles?.beforeLoad?.(sandbox.iframe.contentWindow);
        const { getExternalScripts } = await importHTML({
          url,
          html,
          opts: {
            fetch: fetch || window.fetch,
            plugins: sandbox.plugins,
            loadError: sandbox.lifecycles.loadError,
            fiber,
          },
        });
        await sandbox.start(getExternalScripts);
      }
      sandbox.lifecycles?.activated?.(sandbox.iframe.contentWindow);
      return sandbox.destroy;
    } else if (isFunction(iframeWindow.__WUJIE_MOUNT)) {
      /**
       * 子应用切换会触发webcomponent的disconnectedCallback调用sandbox.unmount进行实例销毁
       * 此处是防止没有销毁webcomponent时调用startApp的情况,需要手动调用unmount
       */
      sandbox.unmount();
      await sandbox.active({ url, sync, prefix, el, props, alive, fetch, replace });
      // 正常加载的情况,先注入css,最后才mount。重新激活也保持同样的时序
      sandbox.rebuildStyleSheets();
      // 有渲染函数
      sandbox.lifecycles?.beforeMount?.(sandbox.iframe.contentWindow);
      iframeWindow.__WUJIE_MOUNT();
      sandbox.lifecycles?.afterMount?.(sandbox.iframe.contentWindow);
      sandbox.mountFlag = true;
      return sandbox.destroy;
    } else {
      // 没有渲染函数
      sandbox.destroy();
    }
  }

  // 设置loading
  addLoading(el, loading);
  const newSandbox = new WuJie({ name, url, attrs, degradeAttrs, fiber, degrade, plugins, lifecycles });
  newSandbox.lifecycles?.beforeLoad?.(newSandbox.iframe.contentWindow);
  const { template, getExternalScripts, getExternalStyleSheets } = await importHTML({
    url,
    html,
    opts: {
      fetch: fetch || window.fetch,
      plugins: newSandbox.plugins,
      loadError: newSandbox.lifecycles.loadError,
      fiber,
    },
  });

  const processedHtml = await processCssLoader(newSandbox, template, getExternalStyleSheets);
  await newSandbox.active({ url, sync, prefix, template: processedHtml, el, props, alive, fetch, replace });
  await newSandbox.start(getExternalScripts);
  return newSandbox.destroy;
}
接下来主要围绕startApp流程所执行的每一步展开,顺着阅读就能get到wujie的js沙箱以及css沙箱是如何生成的。
4、new WuJie(基于iframe的js沙箱初始化)
从startApp中可以看到 new WuJie创建子应用实例
new Wujie()负责创建基于iframe的js沙箱,然后产生proxyWindow、proxyDocument、proxyLocation
degrade—兼容低版本浏览器(不支持Proxy) 如果浏览器不支持Proxy就采用Object.defineProperties,支持就采用Proxy
  constructor(options) {
     。。。。省略一些赋值无关紧要。。。。。。。
    // 创建iframe
    this.iframe = iframeGenerator(this, attrs, mainHostPath, appHostPath, appRoutePath);

    if (this.degrade) {
      const { proxyDocument, proxyLocation } = localGenerator(this.iframe, urlElement, mainHostPath, appHostPath);
      this.proxyDocument = proxyDocument;
      this.proxyLocation = proxyLocation;
    } else {
      const { proxyWindow, proxyDocument, proxyLocation } = proxyGenerator(
        this.iframe,
        urlElement,
        mainHostPath,
        appHostPath
      );
      this.proxy = proxyWindow;
      this.proxyDocument = proxyDocument;
      this.proxyLocation = proxyLocation;
    }
    this.provide.location = this.proxyLocation;
    addSandboxCacheWithWujie(this.id, this);
  }
4-1、iframeGenerator
1、patchIframeVariable注入wujie相关的全局变量到iframeWindow
2、initIframeDom 初始化iframe的dom结构
export function iframeGenerator(
  sandbox: WuJie,
  attrs: { [key: string]: any },
  mainHostPath: string,
  appHostPath: string,
  appRoutePath: string
): HTMLIFrameElement {
  const iframe = window.document.createElement("iframe");
  const attrsMerge = { src: mainHostPath, style: "display: none", ...attrs, name: sandbox.id, [WUJIE_DATA_FLAG]: "" };
  setAttrsToElement(iframe, attrsMerge);
  window.document.body.appendChild(iframe);

  const iframeWindow = iframe.contentWindow;
  // 变量需要提前注入,在入口函数通过变量防止死循环
  patchIframeVariable(iframeWindow, sandbox, appHostPath);
  sandbox.iframeReady = stopIframeLoading(iframeWindow).then(() => {
    if (!iframeWindow.__WUJIE) {
      patchIframeVariable(iframeWindow, sandbox, appHostPath);
    }
    initIframeDom(iframeWindow, sandbox, mainHostPath, appHostPath);
    /**
     * 如果有同步优先同步,非同步从url读取
     */
    if (!isMatchSyncQueryById(iframeWindow.__WUJIE.id)) {
      iframeWindow.history.replaceState(null, "", mainHostPath + appRoutePath);
    }
  });
  return iframe;
}
4-2、initIframeDom
主要负责了路由同步操作
子应用js执行在iframeWindow中执行,拦截路由pushState和replaceState,进行子应用—>主应用的路由同步操作TODO:这里一些拦截操作有待细看。。。
function initIframeDom(iframeWindow, wujie, mainHostPath, appHostPath) {
  const iframeDocument = iframeWindow.document;
  const newDoc = window.document.implementation.createHTMLDocument("");
  const newDocumentElement = iframeDocument.importNode(newDoc.documentElement, true);
  iframeDocument.documentElement
    ? iframeDocument.replaceChild(newDocumentElement, iframeDocument.documentElement)
    : iframeDocument.appendChild(newDocumentElement);
  iframeWindow.__WUJIE_RAW_DOCUMENT_HEAD__ = iframeDocument.head;
  iframeWindow.__WUJIE_RAW_DOCUMENT_QUERY_SELECTOR__ = iframeWindow.Document.prototype.querySelector;
  iframeWindow.__WUJIE_RAW_DOCUMENT_QUERY_SELECTOR_ALL__ = iframeWindow.Document.prototype.querySelectorAll;
  iframeWindow.__WUJIE_RAW_DOCUMENT_CREATE_ELEMENT__ = iframeWindow.Document.prototype.createElement;
  iframeWindow.__WUJIE_RAW_DOCUMENT_CREATE_TEXT_NODE__ = iframeWindow.Document.prototype.createTextNode;
  // -------------初始化base标签-----------------
  initBase(iframeWindow, wujie.url);

  // 对iframe的history的pushState和replaceState进行拦截、同步路由到主应用
  // 同步子应用路由到主应用
  // 子应用调用history.pushState()后,会同步作用到主应用url上,并且更新base标签的herf
  patchIframeHistory(iframeWindow, appHostPath, mainHostPath);

  // 对iframe的事件进行拦截
  // 运行插件钩子函数
  // 子应用window监听需要挂载到iframe沙箱上的事件,子应用以下事件会被代理到iframeWindow上
// export const appWindowAddEventListenerEvents = [
//   "hashchange",
//   "popstate",
//   "DOMContentLoaded",
//   "load",
//   "beforeunload",
//   "unload",
//   "message",
//   "error",
//   "unhandledrejection",
// ];
  patchIframeEvents(iframeWindow);

  // 降级情况下 Node记录节点的监听事件
  if (wujie.degrade) recordEventListeners(iframeWindow);

  // 监听子应用事件hashchange、popstate,子应用前进后退,同步路由到主应用
  syncIframeUrlToWindow(iframeWindow);

  // 下面几个是代理Window、Node、Document的
  patchWindowEffect(iframeWindow);
  patchDocumentEffect(iframeWindow);
  patchNodeEffect(iframeWindow);
  patchRelativeUrlEffect(iframeWindow);
}
5、importHTML && processCssLoader
5-1、importHTML
这个importHTML非常类似qiankun中的import-html-entry
这个推荐看大佬写的文章乾坤的资源加载机制(import-html-entry的内部实现)wujie的importHTML与qiankun的类似。
流程大致是通过fetch请求,加载html,然后解析html中的srcipt标签与style、link标签,拿到如下返回值TODO 这里有待细看。。。
      return {
        template: template, // html
        assetPublicPath, // 资源地址
        getExternalScripts: () =>  // 拿到scripts的函数
          getExternalScripts(
            scripts
              .filter((script) => !script.src || !isMatchUrl(script.src, jsExcludes))
              .map((script) => ({ ...script, ignore: script.src && isMatchUrl(script.src, jsIgnores) })),
            fetch,
            loadError,
            fiber
          ),
        getExternalStyleSheets: () => // 拿到styles的函数
          getExternalStyleSheets(
            styles
              .filter((style) => !style.src || !isMatchUrl(style.src, cssExcludes))
              .map((style) => ({ ...style, ignore: style.src && isMatchUrl(style.src, cssIgnores) })),
            fetch,
            loadError
          ),
      };
5-2、processCssLoader
通过processCssLoader,处理cssloader相关内容,然后把加载到的css资源内联进入html中
export async function processCssLoader(
  sandbox: Wujie,
  template: string,
  getExternalStyleSheets: () => StyleResultList
): Promise<string> {
  const curUrl = getCurUrl(sandbox.proxyLocation);
  /** css-loader */
  const composeCssLoader = compose(sandbox.plugins.map((plugin) => plugin.cssLoader));
  const processedCssList: StyleResultList = getExternalStyleSheets().map(({ src, ignore, contentPromise }) => ({
    src,
    ignore,
    contentPromise: contentPromise.then((content) => composeCssLoader(content, src, curUrl)),
  }));
  const embedHTML = await getEmbedHTML(template, processedCssList);
  return sandbox.replace ? sandbox.replace(embedHTML) : embedHTML;
}

---------------------------------------------------------------------------
async function getEmbedHTML(template, styleResultList: StyleResultList): Promise<string> {
  let embedHTML = template;

  return Promise.all(
    styleResultList.map((styleResult, index) =>
      styleResult.contentPromise.then((content) => {
        if (styleResult.src) {
          embedHTML = embedHTML.replace(
            genLinkReplaceSymbol(styleResult.src),
            styleResult.ignore
              ? `<link href="${styleResult.src}" rel="stylesheet" type="text/css">`
              : `<style>/* ${styleResult.src} */${content}</style>`
          );
        } else if (content) {
          embedHTML = embedHTML.replace(
            getInlineStyleReplaceSymbol(index),
            `<style>/* inline-style-${index} */${content}</style>`
          );
        }
      })
    )
  ).then(() => embedHTML);
}
回顾一下!!!!!!!!
回顾一下,到现在为止,下图中步骤
1、new WuJie()
2、importHTML()
3、processCssLoader()
都进行完毕了!!!!!!!!!!!!!!!
剩余
newSanbox.active()
newSanbox.start()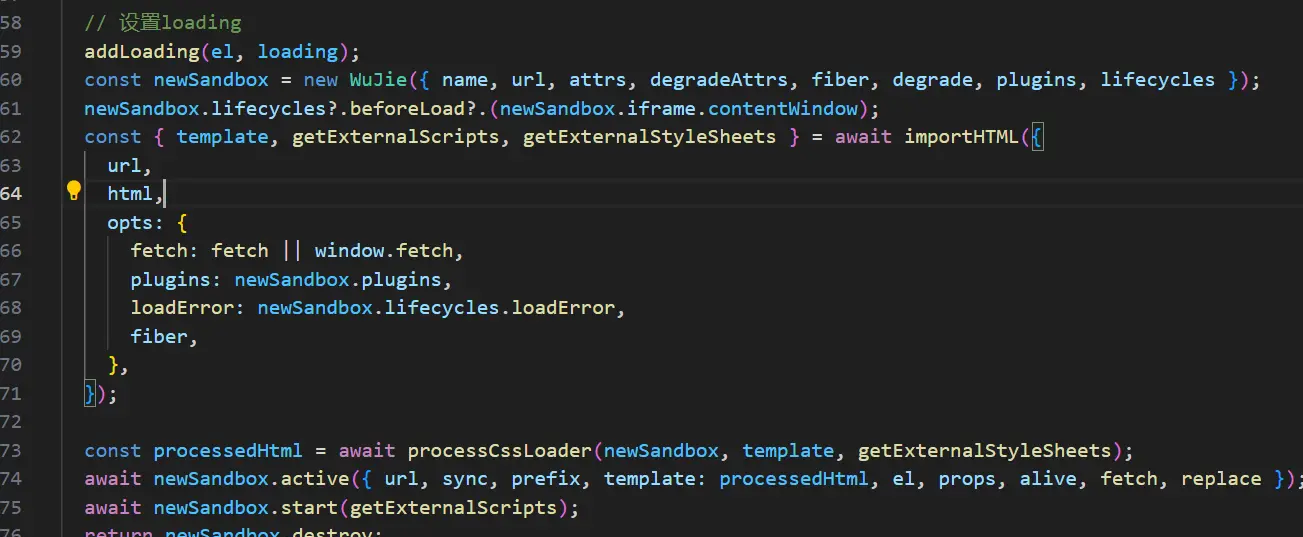
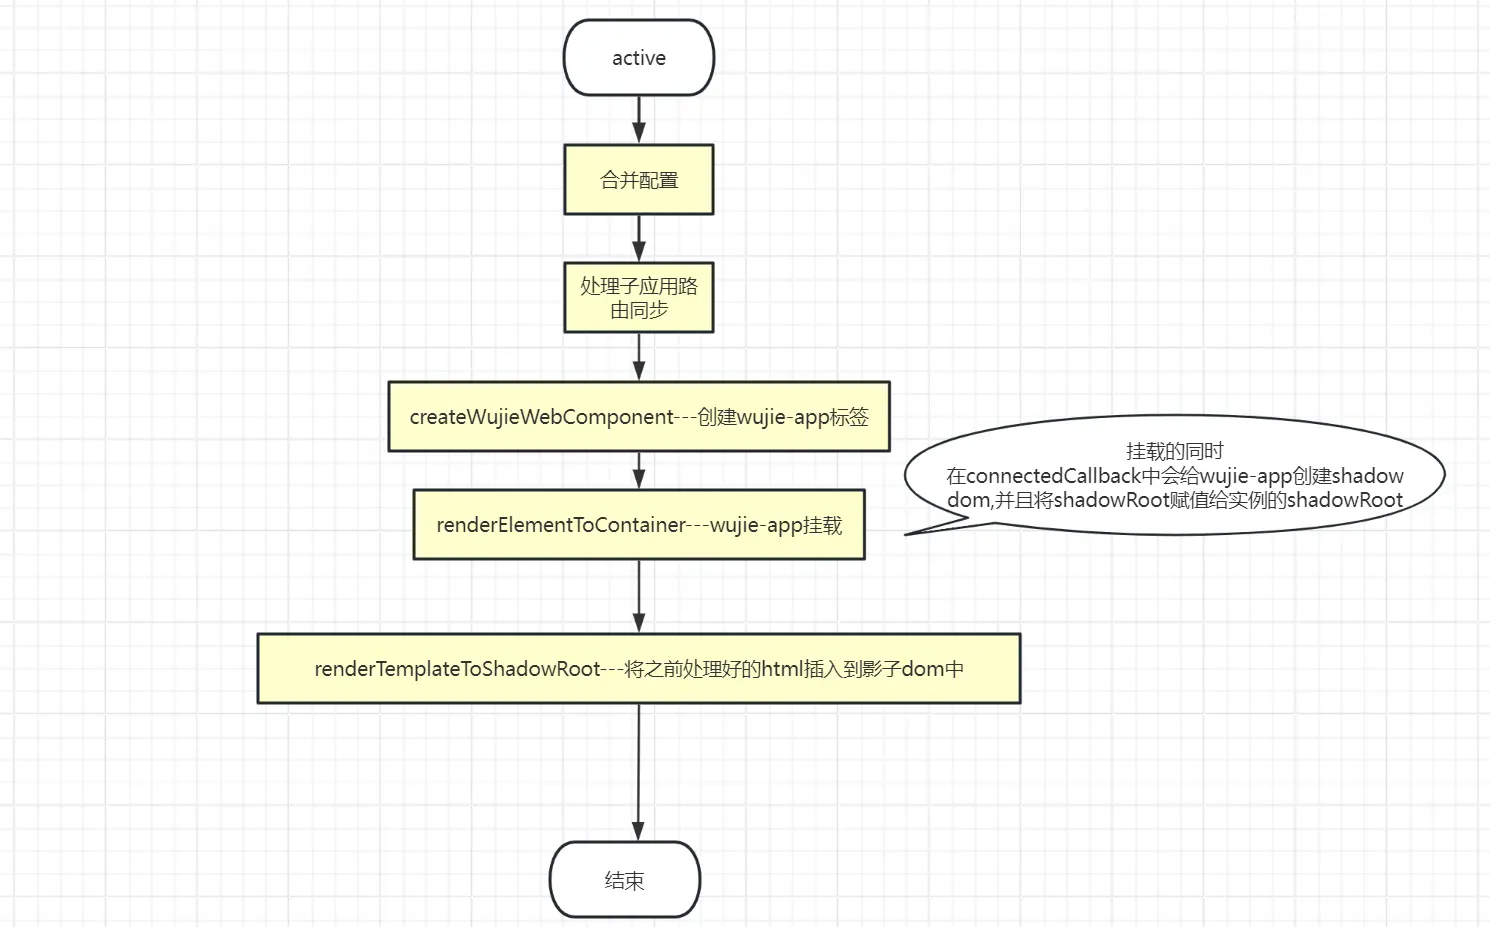
6、Sanbox.active(子应用激活—也是创建dom的过程)
acticve中主要做了以下几件事情
1、处理子应用路由同步
2、降级处理
3、createWujieWebComponent—之前定义过的wujie-app元素,在这里被创建
4、renderElementToContainer—创建好的wujie-app标签,在被插入指定位置,这里会首次执行没有容器可以挂载,会暂时插入到iframeBody中,触发Web Component的connect,在connectedCallback中会给wujie-app创建shadow dom,并且将shadowRoot赋值给实例的shadowRoot
connectedCallback源码如下:
      connectedCallback(): void {
        if (this.shadowRoot) return;
        const shadowRoot = this.attachShadow({ mode: "open" });
        const sandbox = getWujieById(this.getAttribute(WUJIE_APP_ID));
        patchElementEffect(shadowRoot, sandbox.iframe.contentWindow);
        sandbox.shadowRoot = shadowRoot;
      }
5、renderTemplateToShadowRoot—之前通过processCssLoader获取到的html将在renderTemplateToShadowRoot中渲染到shadowRoot
这里就是html的插入shadow dom的过程,这里也是wujie css沙箱的原理
可以在wujie官网的demo中看到确实是这样的shadow dom 点击链接查看官网demo

子应用激活active的大致的流程图如下:
子应用激活active源码如下:
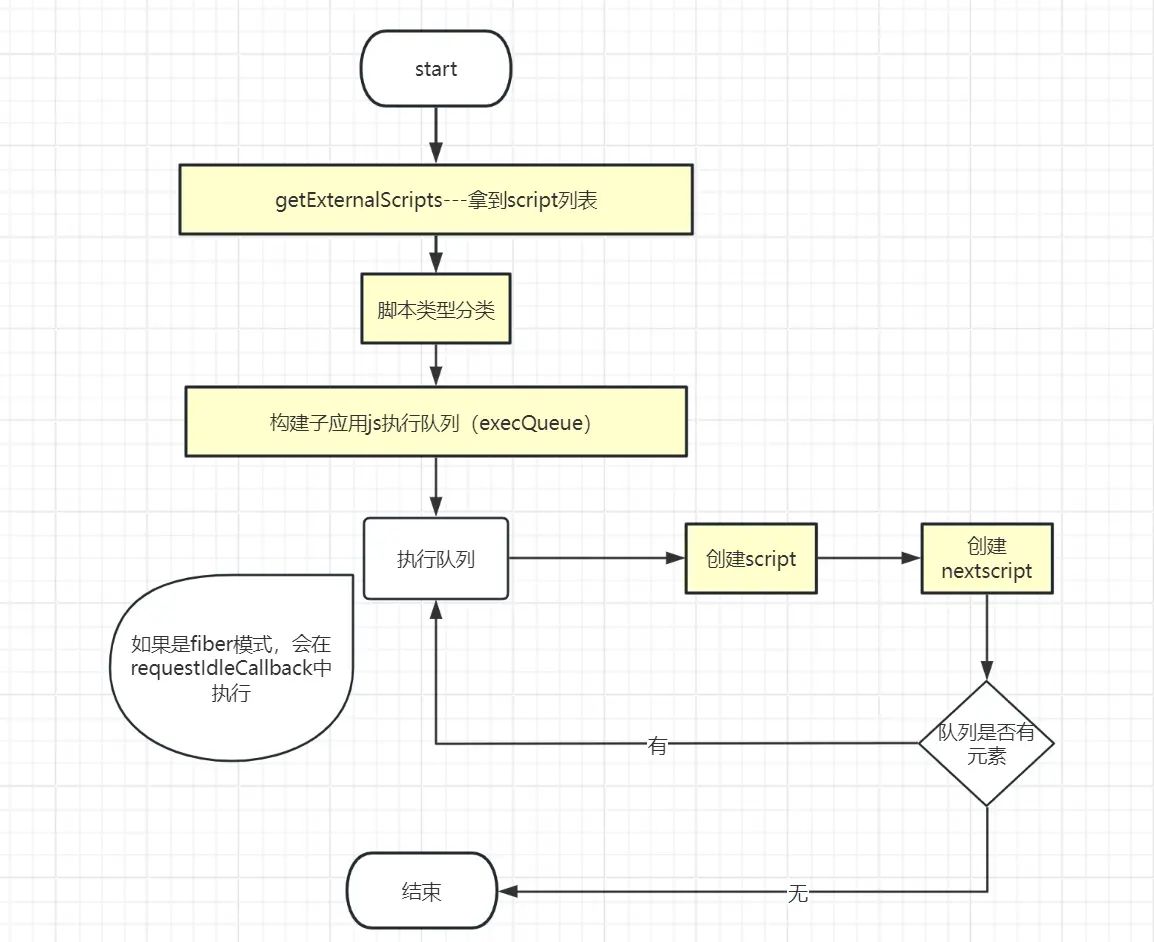
7、Sanbox.start(子应用运行—js执行)
万事俱备,开始执行start,也就是运行子应用js代码
1、const scriptResultList = await getExternalScripts() — 拿到script列表
2、按照脚本类型分类(defer、async、同步script)push入不同数组
3、按照以下顺序构建子应用js执行队列(execQueue)sanbox.execQueue = beforeScriptResultList-->syncScriptResultList-->deferScriptResultList-->mount-->domContentLoadedTrigger-->afterScriptResultList-->domLoadedTrigger
4、execQueue中每一项都是一个函数如下:
insertScriptToIframe—执行后会在iframe插入脚本,创建当前的执行脚本script以及下一个执行脚本script
nextScriptElement的作用就是取出队列的下一个元素执行,这样直到队列所有元素出队后执行完毕
start流程图如下:
start源码如下:
  public async start(getExternalScripts: () => ScriptResultList): Promise<void> {
this.execFlag = true;
// 执行脚本
const scriptResultList = await getExternalScripts();
// 假如已经被销毁了
if (!this.iframe) return;
const iframeWindow = this.iframe.contentWindow;
// 标志位,执行代码前设置
iframeWindow.__POWERED_BY_WUJIE__ = true;
// 用户自定义代码前
const beforeScriptResultList: ScriptObjectLoader[] = getPresetLoaders("jsBeforeLoaders", this.plugins);
// 用户自定义代码后
const afterScriptResultList: ScriptObjectLoader[] = getPresetLoaders("jsAfterLoaders", this.plugins);
// 同步代码
const syncScriptResultList: ScriptResultList = [];
// async代码无需保证顺序,所以不用放入执行队列
const asyncScriptResultList: ScriptResultList = [];
// defer代码需要保证顺序并且DOMContentLoaded前完成,这里统一放置同步脚本后执行
const deferScriptResultList: ScriptResultList = [];
scriptResultList.forEach((scriptResult) => {
if (scriptResult.defer) deferScriptResultList.push(scriptResult);
else if (scriptResult.async) asyncScriptResultList.push(scriptResult);
else syncScriptResultList.push(scriptResult);
});
// 插入代码前
beforeScriptResultList.forEach((beforeScriptResult) => {
this.execQueue.push(() =>
this.fiber
? this.requestIdleCallback(() => insertScriptToIframe(beforeScriptResult, iframeWindow))
: insertScriptToIframe(beforeScriptResult, iframeWindow)
);
});
// 同步代码
syncScriptResultList.concat(deferScriptResultList).forEach((scriptResult) => {
this.execQueue.push(() =>
scriptResult.contentPromise.then((content) =>
this.fiber
? this.requestIdleCallback(() => insertScriptToIframe({ ...scriptResult, content }, iframeWindow))
: insertScriptToIframe({ ...scriptResult, content }, iframeWindow)
)
);
});
// 异步代码
asyncScriptResultList.forEach((scriptResult) => {
scriptResult.contentPromise.then((content) => {
this.fiber
? this.requestIdleCallback(() => insertScriptToIframe({ ...scriptResult, content }, iframeWindow))
: insertScriptToIframe({ ...scriptResult, content }, iframeWindow);
});
});
//框架主动调用mount方法
this.execQueue.push(this.fiber ? () => this.requestIdleCallback(() => this.mount()) : () => this.mount());
//触发 DOMContentLoaded 事件
const domContentLoadedTrigger = () => {
eventTrigger(iframeWindow.document, "DOMContentLoaded");
eventTrigger(iframeWindow, "DOMContentLoaded");
this.execQueue.shift()?.();
};
this.execQueue.push(this.fiber ? () => this.requestIdleCallback(domContentLoadedTrigger) : domContentLoadedTrigger);
// 插入代码后
afterScriptResultList.forEach((afterScriptResult) => {
this.execQueue.push(() =>
this.fiber
? this.requestIdleCallback(() => insertScriptToIframe(afterScriptResult, iframeWindow))
: insertScriptToIframe(afterScriptResult, iframeWindow)
);
});
//触发 loaded 事件
const domLoadedTrigger = () => {
eventTrigger(iframeWindow.document, "readystatechange");
eventTrigger(iframeWindow, "load");
this.execQueue.shift()?.();
};
this.execQueue.push(this.fiber ? () => this.requestIdleCallback(domLoadedTrigger) : domLoadedTrigger);
// 由于没有办法准确定位是哪个代码做了mount,保活、重建模式提前关闭loading
if (this.alive || !isFunction(this.iframe.contentWindow.__WUJIE_UNMOUNT)) removeLoading(this.el);
this.execQueue.shift()();
// 所有的execQueue队列执行完毕,start才算结束,保证串行的执行子应用
return new Promise((resolve) => {
this.execQueue.push(() => {
resolve();
this.execQueue.shift()?.();
});
});
}
大致我们了解了wujie的子应用加载与js、css沙箱
回头一望直呼nb看完之后才发现,其实整个框架真的不是很难,但是自己肯定写不出来,为什么? 基本功不够扎实!!!中间许多dom、bom、js的操作很骚气,但是不能一眼看出来用意,所以阅读起来造成一些困扰,但是遇到不懂的就去弄明白这操作,逐渐发现,阅读源码的过程其实也是基础夯实的过程!wujie还有许多细节值得深入研究,比如应用之间如何通信、如何执行预加载、importHTML详细步骤、无界的插件机制、降级处理是如何操作的等等
如有不对,欢迎斧正
原文链接:https://juejin.cn/post/7355723324969402405 作者:吃饺子不吃馅