
说到文本溢出,大家应该都不陌生,中文网络上的文章翻来覆去就是下面3种方法:
单行文本溢出
这是日常开发中用的最多的,核心代码如下:
p {
  width: 300px;
  overflow: hidden;
  white-space: nowrap; /*文本不会换行*/
  text-overflow: ellipsis;  /*当文本溢出包含元素时,以省略号表示超出的文本*/
}
但这个方法只对单行文本生效,如果我们想要对多行文本实现溢出控制,那要如何做呢?
多行文本溢出
总的来说,有2种思路,一种是基于 CSS 里的 box-orient(已废弃),另一种是基于伪元素。
基于 box-orient
p {
  width: 300px;
  overflow: hidden; /*将对象作为弹性伸缩盒子模型显示*/
  display: -webkit-box; /*设置子元素排列方式*/
  -webkit-box-orient: vertical; /*设置显示的行数,多出的部分会显示为...*/
  -webkit-line-clamp: 3;
}
这里用到了box-orient这个属性以及webkit-line-clamp,但是这个方法其实是不推荐在生产环境使用的,因为box-orient这个属性现在已经不推荐使用了,详见 box-orient的官方描述
基于伪元素
p {
  position: relative;
  line-height: 1.2em;
  max-height: 3.6em;
  width: 300px;
  text-align: justify; /*设置文本为两端对齐*/
  overflow: hidden;
}

p ::after {
  content: '...';
  position: absolute;
  bottom: 0;
  right: 0;
  width: 1em; /*将省略号的大小设置为1个字体大小*/
  background: #fff; /*设置背景,将最后一个字覆盖掉*/
}
可以看到这种方法主要是通过在段落的末尾添加1个伪元素,来覆盖最后的文字,但是这种方法无法动态地依据文本的长度来展示溢出元素,所以我们可以在这里做一些 hack。
效果图如下:


动态适应
因为掘金无法展示视频,所以视频大家可以到知乎上看
所以如果我们想要实现动态适应,要怎么做呢?这里给出 mxclsh 大佬的一种基于float属性的方法(细节见文末的“参考资料”),基本原理:
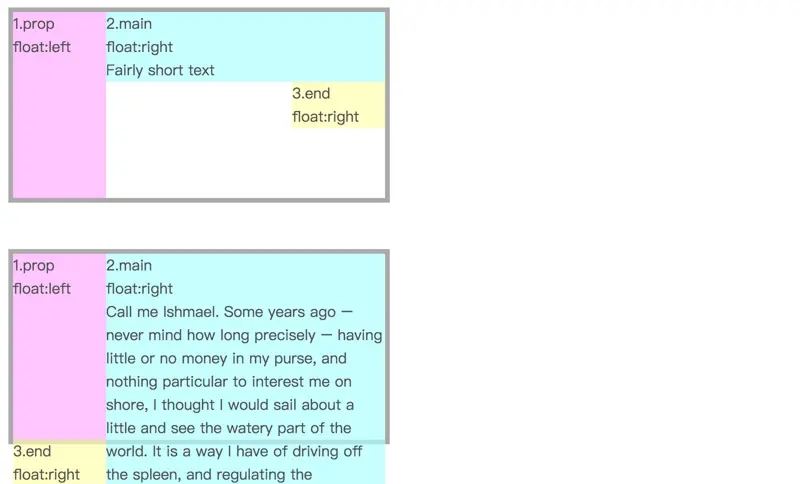
有个三个盒子 div,粉色盒子左浮动,浅蓝色盒子和黄色盒子右浮动,
- 当浅蓝色盒子的高度低于粉色盒子,黄色盒子仍会处于浅蓝色盒子右下方。
- 如果浅蓝色盒子文本过多,高度超过了粉色盒子,则黄色盒子不会停留在右下方,而是掉到了粉色盒子下。
那么我们可以将黄色盒子进行相对定位,将内容溢出的黄色盒子移动到文本内容右下角,而未溢出的则会被移到外太空去了。代码如下:
HTML
 <div class="wrap">
    <div class="text">这是一段文字。这是一段文字。这是一段文字。这是一段文字。这是一段文字。这是一段文字。这是一段文字。这是一段文字。这是一段文字。这是一段文字。Lorem ipsum dolor sit
        amet,
        consectetur adipisicing elit. Dignissimos labore sit vel itaque
        delectus atque quos magnam assumenda quod architecto perspiciatis animi.</div>
</div>
CSS
.wrap {
  height: 40px;
  line-height: 20px;
  overflow: hidden;
}

.wrap .text {
  float: right;
  margin-left: -5px;
  width: 100%;
  background-color: rgb(30, 195, 232);
  word-break: break-all;
}

.wrap::before {
  float: left;
  width: 5px;
  content: '';
  height: 40px;
}

.wrap::after {
  float: right;
  content: '...';
  height: 20px;
  line-height: 20px;
  /* 为三个省略号的宽度 */
  width: 3em;
  /* 使盒子不占位置 */
  margin-left: -3em;
  /* 移动省略号位置 */
  position: relative;
  left: 100%;
  top: -20px;
  padding-right: 5px;
  /* White background */
  background-color: rgb(202, 225, 24);
  /* Blur effect */
  backdrop-filter: blur(10px);
}
但是如果我们不仅想要多行文本不仅能做到动态适应,且能做到自定义溢出元素(例如插入1个 emoij 或图片),那该怎么办呢?这个时候我们就要祭出 Canvas 这个大杀器。
基于 Canvas 来实现多行文本溢出
这里我们需要跳出已有的思维禁锢,考虑用新的思路来做文本截断。
核心:用 canvas 的 measureText 来计算文本的理论最大长度,然后结合指定的最大行数和单行文本的宽度,通过二分算法来找到真正截断应该发生的地方,并展示自定义溢出元素
具体用法大概是这样:
<MagicText elementId="magic-123" text-maxline={2} className="multiple-text-line">
    这是一段很长的文本。这是一段很长的文本。这是一段很长的文本。这是一段很长的文本。这是一段很长的文本。这是一段很长的文本。这是一段很长的文本。这是一段很长的文本。这是一段很长的文本。这是一段很长的文本。这是一段很长的文本。这是一段很长的文本。这是一段很长的文本。这是一段很长的文本。这是一段很长的文本。这是一段很长的文本。这是一段很长的文本。这是一段很长的文本。
    <MagicInlineTruncation>
        <Img src={picSrc} className="truncation-image">
        <span>文本已经溢出啦</span>
    </MagicInlineTruncation>
</MagicText>
下面给出伪代码,具体的实现大家可以尽情发挥,这里是有很多可以优化的空间的(づ ̄3 ̄)づ╭❤~
const MagicText = (props: MagicTextProps) => {
useEffect(() => {
handleTruncation(textMaxLine, props.elementId!);
}, [props.style, props.children]);
return (
<span data-tag="magic-text" data-element-id={props.elementId} style={props.style}>
<span style={{ width: '100%' }}>{props.children}</span>
</span>
);
};
function handleTruncation(textMaxLine: number, elementId: string) {
const ele = document.querySelector(`span[data-element-id='${elementId}']`);
if (!ele) {
return;
}
// check whether "magic-inline-truncation" exists in children. If it does, then we should do truncation
const nestedChild = ele.children[0].childNodes;
let inlineTruncationElement;
Array.from(nestedChild).some((item: any) => {
if (item.attributes?.['data-tag'].value === 'magic-inline-truncation') {
inlineTruncationElement = item;
return true;
}
});
const truncationWidth =
inlineTruncationElement?.getBoundingClientRect().width ?? 0;
// if truncationWidth <= 0, then we should not do truncation
if (truncationWidth <= 0) {
return;
}
//! try to calculate the max width with "magic-inline-truncation"
// principle:
//  1. get the width of magic-text
//  2. if width is not set, get width from its parent
const widthFromStyle = window.getComputedStyle(ele).width;
// it can be optimized later
const lineWidth: number =
widthFromStyle === ''
? Math.floor(ele.getBoundingClientRect().width)
: Number(widthFromStyle.slice(0, -2));
const maxLine = textMaxLine == 0 ? 1 : textMaxLine;
const maxTotalWidth = Math.floor(lineWidth * maxLine); // get the maximum width
const content = String(ele.children[0].childNodes[0].textContent); // read the text content
const textStyle = getCanvasFont(ele);
const totalTextWidth = getTextWidth(content, textStyle); // calculate the text width with canvas
const targetTotalWidth = maxTotalWidth - truncationWidth; // the expected width
if (totalTextWidth >= maxTotalWidth) {
// try to do binary search to find the right text
const newContent = binarySearch(
content.split(''),
targetTotalWidth,
textStyle
);
nestedChild[0].nodeValue = newContent;
} else {
// hide the truncation
inlineTruncationElement.style.display = 'none';
}
}
// Try to find the exact position in the text where the truncation should start
function binarySearch(
text: string[],
targetWidth: number,
textStyle: string
): string {
let left = 0;
let right = text.length - 1;
const DELTA_WIDTH = 5; // It represents the width of single character and it use to judge critical conditions
while (left <= right) {
const mid = Math.floor(left + (right - left) / 2);
const searchWidthText = text.slice(0, mid + 1).join('');
const textWidth = getTextWidth(searchWidthText, textStyle);
if (isHitTarget(targetWidth, textWidth, DELTA_WIDTH)) {
return searchWidthText;
} else if (textWidth < targetWidth) {
left = mid + 1;
} else if (textWidth > targetWidth) {
right = mid - 1;
}
}
return text.join('');
}
function isHitTarget(target: number, source: number, delta: number) {
return Math.abs(target - source) <= delta;
}
interface MagicTextProps {
/**
* maximum number of lines for text
*/
'text-maxline'?: string;
/**
* The logic of text truncation when text overflows
* clip: directly truncate
* tail: add ellipsis to the end
*/
'ellipsize-mode'?: 'clip' | 'tail';
}
计算文本具体有多宽的核心代码如下:
 /**
* Uses canvas.measureText to compute and return the width of the given text of given font in pixels.
*
* @param { String } text The text to be rendered.
* @param { String } font The css font descriptor that text is to be rendered with (e.g. "bold 14px verdana").
*
*/
function getTextWidth(text: string, font: string): number {
// re-use canvas object for better performance
let canvas;
if (getTextWidth.prototype.canvas) {
canvas = getTextWidth.prototype.canvas;
} else {
canvas = document.createElement('canvas');
}
const context = canvas.getContext('2d');
context.font = font;
const metrics = context.measureText(text);
return metrics.width;
}
function getCssStyle(element: Element, prop: string) {
return window.getComputedStyle(element, null).getPropertyValue(prop);
}
// currently, we calculate text width using only "font-size", "font-family", and "font-weight", but
// we can consider more styles that impact text width later on
function getCanvasFont(el: Element = document.body): string {
const fontWeight =
getCssStyle(el, 'font-weight') || getCssStyle(document.body, 'normal');
const fontSize =
getCssStyle(el, 'font-size') || getCssStyle(document.body, 'font-size');
const fontFamily =
getCssStyle(el, 'font-family') || getCssStyle(document.body, 'font-family');
return `${fontWeight} ${fontSize} ${fontFamily}`;
}
总结
几种方式的优缺点和特点如下:
| text-overflow | 伪元素 | 伪元素+float | 基于Canvas | |
|---|---|---|---|---|
| 支持单行文本溢出 | ✅ | ✅ | ✅ | ✅ |
| 支持多行文本溢出 | ❌ | ✅ | ✅ | ✅ |
| 支持自适应 | ❌ | ❌ | ✅ | ✅ |
| 支持自定义溢出的元素 | ❌ | ❌ | ❌ | ✅ |
| 支持自定义最大行数 | ❌ | ❌ | ❌ | ✅ |
| 性能 | 好 | 好 | 好 | 一般 |
参考资料
stackoverflow.com/questions/1…
原文链接:https://juejin.cn/post/7322096880426254375 作者:王和阳